A Free Project Sheet From - Henry Glass & Co
A Free Project Sheet From - Henry Glass & Co
A Free Project Sheet From - Henry Glass & Co

Create successful ePaper yourself
Turn your PDF publications into a flip-book with our unique Google optimized e-Paper software.
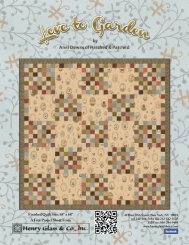
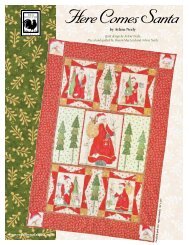
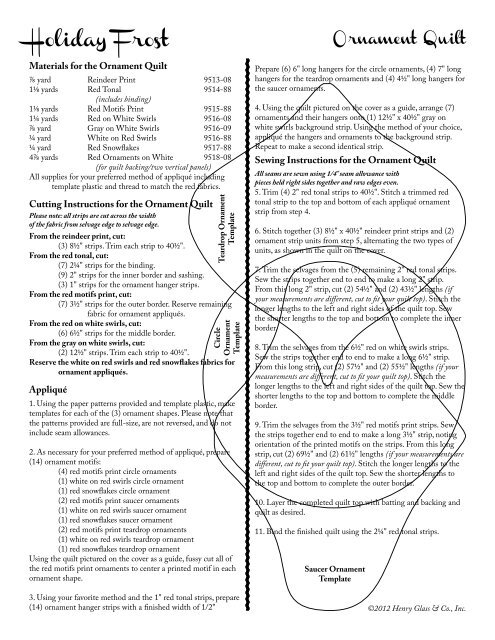
Holiday Frost<br />
Materials for the Ornament Quilt<br />
⅞ yard Reindeer Print 9513-08<br />
1⅛ yards Red Tonal 9514-88<br />
1⅛ yards<br />
(includes binding)<br />
Red Motifs Print 9515-88<br />
1¼ yards Red on White Swirls 9516-08<br />
⅞ yard Gray on White Swirls 9516-09<br />
¼ yard White on Red Swirls 9516-88<br />
¼ yard Red Snowflakes 9517-88<br />
4⅞ yards Red Ornaments on White 9518-08<br />
(for quilt backing/two vertical panels)<br />
All supplies for your preferred method of appliqué including<br />
template plastic and thread to match the red fabrics.<br />
Cutting Instructions for the Ornament Quilt<br />
Please note: all strips are cut across the width<br />
of the fabric from selvage edge to selvage edge.<br />
<strong>From</strong> the reindeer print, cut:<br />
(3) 8½" strips. Trim each strip to 40½".<br />
<strong>From</strong> the red tonal, cut:<br />
(7) 2¼" strips for the binding.<br />
(9) 2" strips for the inner border and sashing.<br />
(3) 1" strips for the ornament hanger strips.<br />
<strong>From</strong> the red motifs print, cut:<br />
(7) 3½" strips for the outer border. Reserve remaining<br />
fabric for ornament appliqués.<br />
<strong>From</strong> the red on white swirls, cut:<br />
(6) 6½" strips for the middle border.<br />
<strong>From</strong> the gray on white swirls, cut:<br />
(2) 12½" strips. Trim each strip to 40½".<br />
Teardrop Ornament<br />
Template<br />
Circle<br />
Ornament<br />
Template<br />
Reserve the white on red swirls and red snowflakes fabrics for<br />
ornament appliqués.<br />
Appliqué<br />
1. Using the paper patterns provided and template plastic, make<br />
templates for each of the (3) ornament shapes. Please note that<br />
the patterns provided are full-size, are not reversed, and do not<br />
include seam allowances.<br />
2. As necessary for your preferred method of appliqué, prepare<br />
(14) ornament motifs:<br />
(4) red motifs print circle ornaments<br />
(1) white on red swirls circle ornament<br />
(1) red snowflakes circle ornament<br />
(2) red motifs print saucer ornaments<br />
(1) white on red swirls saucer ornament<br />
(1) red snowflakes saucer ornament<br />
(2) red motifs print teardrop ornaments<br />
(1) white on red swirls teardrop ornament<br />
(1) red snowflakes teardrop ornament<br />
Using the quilt pictured on the cover as a guide, fussy cut all of<br />
the red motifs print ornaments to center a printed motif in each<br />
ornament shape.<br />
3. Using your favorite method and the 1" red tonal strips, prepare<br />
(14) ornament hanger strips with a finished width of 1/2"<br />
Ornament Quilt<br />
Prepare (6) 6" long hangers for the circle ornaments, (4) 7" long<br />
hangers for the teardrop ornaments and (4) 4½" long hangers for<br />
the saucer ornaments.<br />
4. Using the quilt pictured on the cover as a guide, arrange (7)<br />
ornaments and their hangers onto (1) 12½" x 40½" gray on<br />
white swirls background strip. Using the method of your choice,<br />
appliqué the hangers and ornaments to the background strip.<br />
Repeat to make a second identical strip.<br />
Sewing Instructions for the Ornament Quilt<br />
All seams are sewn using 1/4" seam allowance with<br />
pieces held right sides together and raw edges even.<br />
5. Trim (4) 2" red tonal strips to 40½". Stitch a trimmed red<br />
tonal strip to the top and bottom of each appliqué ornament<br />
strip from step 4.<br />
6. Stitch together (3) 8½" x 40½" reindeer print strips and (2)<br />
ornament strip units from step 5, alternating the two types of<br />
units, as shown in the quilt on the cover.<br />
7. Trim the selvages from the (5) remaining 2" red tonal strips.<br />
Sew the strips together end to end to make a long 2" strip.<br />
<strong>From</strong> this long 2" strip, cut (2) 54½" and (2) 43½" lengths (if<br />
your measurements are different, cut to fit your quilt top). Stitch the<br />
longer lengths to the left and right sides of the quilt top. Sew<br />
the shorter lengths to the top and bottom to complete the inner<br />
border.<br />
8. Trim the selvages from the 6½" red on white swirls strips.<br />
Sew the strips together end to end to make a long 6½" strip.<br />
<strong>From</strong> this long strip, cut (2) 57½" and (2) 55½" lengths (if your<br />
measurements are different, cut to fit your quilt top). Stitch the<br />
longer lengths to the left and right sides of the quilt top. Sew the<br />
shorter lengths to the top and bottom to complete the middle<br />
border.<br />
9. Trim the selvages from the 3½" red motifs print strips. Sew<br />
the strips together end to end to make a long 3½" strip, noting<br />
orientation of the printed motifs on the strips. <strong>From</strong> this long<br />
strip, cut (2) 69½" and (2) 61½" lengths (if your measurements are<br />
different, cut to fit your quilt top). Stitch the longer lengths to the<br />
left and right sides of the quilt top. Sew the shorter lengths to<br />
the top and bottom to complete the outer border.<br />
10. Layer the completed quilt top with batting and backing and<br />
quilt as desired.<br />
11. Bind the finished quilt using the 2¼" red tonal strips.<br />
Saucer Ornament<br />
Template<br />
©2012 <strong>Henry</strong> <strong>Glass</strong> & <strong>Co</strong>., Inc.