NavNet TZtouch Installation Checklist - Furuno USA
NavNet TZtouch Installation Checklist - Furuno USA
NavNet TZtouch Installation Checklist - Furuno USA

Create successful ePaper yourself
Turn your PDF publications into a flip-book with our unique Google optimized e-Paper software.
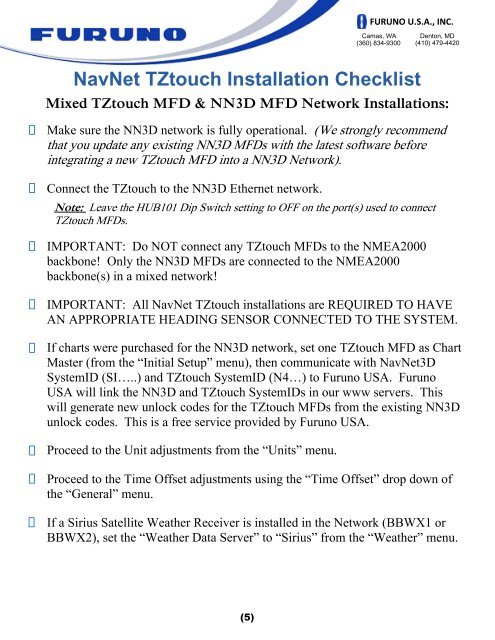
Mixed <strong>TZtouch</strong> MFD & NN3D MFD Network <strong>Installation</strong>s:<br />
(5)<br />
FURUNO U.S.A., INC.<br />
Camas, WA<br />
(360) 834-9300<br />
<strong>NavNet</strong> <strong>TZtouch</strong> <strong>Installation</strong> <strong>Checklist</strong><br />
Denton, MD<br />
(410) 479-4420<br />
Make sure the NN3D network is fully operational. (We strongly recommend<br />
that you update any existing NN3D MFDs with the latest software before<br />
integrating a new <strong>TZtouch</strong> MFD into a NN3D Network).<br />
Connect the <strong>TZtouch</strong> to the NN3D Ethernet network.<br />
Note: Leave the HUB101 Dip Switch setting to OFF on the port(s) used to connect<br />
<strong>TZtouch</strong> MFDs.<br />
IMPORTANT: Do NOT connect any <strong>TZtouch</strong> MFDs to the NMEA2000<br />
backbone! Only the NN3D MFDs are connected to the NMEA2000<br />
backbone(s) in a mixed network!<br />
IMPORTANT: All <strong>NavNet</strong> <strong>TZtouch</strong> installations are REQUIRED TO HAVE<br />
AN APPROPRIATE HEADING SENSOR CONNECTED TO THE SYSTEM.<br />
If charts were purchased for the NN3D network, set one <strong>TZtouch</strong> MFD as Chart<br />
Master (from the “Initial Setup” menu), then communicate with <strong>NavNet</strong>3D<br />
SystemID (SI…..) and <strong>TZtouch</strong> SystemID (N4…) to <strong>Furuno</strong> <strong>USA</strong>. <strong>Furuno</strong><br />
<strong>USA</strong> will link the NN3D and <strong>TZtouch</strong> SystemIDs in our www servers. This<br />
will generate new unlock codes for the <strong>TZtouch</strong> MFDs from the existing NN3D<br />
unlock codes. This is a free service provided by <strong>Furuno</strong> <strong>USA</strong>.<br />
Proceed to the Unit adjustments from the “Units” menu.<br />
Proceed to the Time Offset adjustments using the “Time Offset” drop down of<br />
the “General” menu.<br />
If a Sirius Satellite Weather Receiver is installed in the Network (BBWX1 or<br />
BBWX2), set the “Weather Data Server” to “Sirius” from the “Weather” menu.