User Manual
User Manual
User Manual

Create successful ePaper yourself
Turn your PDF publications into a flip-book with our unique Google optimized e-Paper software.
4) INSTALLATION Reposition INSTALLATION the anti-grease INSTRUCTIONS INSTRUCTIONS metallic – filter Electrical grilles. - Electrical Connection.<br />
Before installation and usage, read all the instructions and make sure that the<br />
voltage (V) and the frequency (Hz) indicated on the identification plate (found<br />
inside your Cooker Hood) and all the data inside the appliance are exactly the<br />
same as the voltage and frequency in your home.<br />
NOTE: The manufacturer declines all responsibility in the event of failure to observe all the<br />
accident-prevention regulations in force which are necessary for normal use and regular<br />
operation of the electric system.<br />
______________________________________________<br />
ELECTRICAL CONNECTION<br />
Your cooker hood is intended for fitted and permanent installation.<br />
installation<br />
o The power cable must be<br />
connected to the terminals<br />
marked L (live) and N (neutral)<br />
in the hood and fixed with a<br />
cable clamp.<br />
o The cooker hood’s power cable<br />
must be fitted upstream from the<br />
electrical connection using an<br />
omni-polar switch with a contact<br />
distance of at least 3mm.<br />
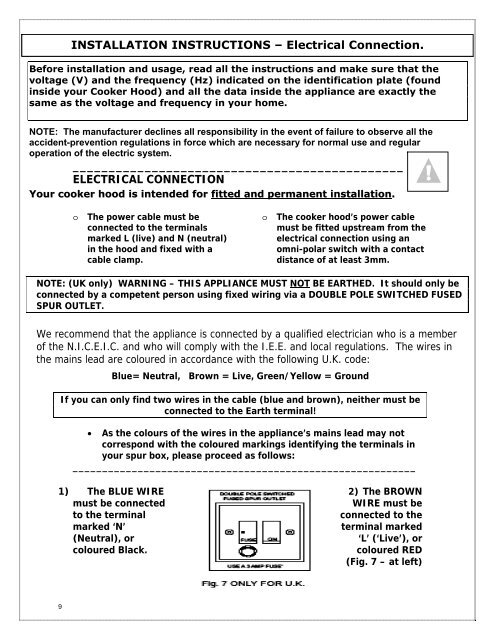
NOTE: (UK only) WARNING – THIS APPLIANCE MUST NOT BE EARTHED. It should only be<br />
connected by a competent person using fixed wiring via a DOUBLE POLE SWITCHED FUSED<br />
SPUR OUTLET.<br />
We recommend that the appliance is connected by a qualified electrician who is a member<br />
of the N.I.C.E.I.C. and who will comply with the I.E.E. and local regulations. The wires in<br />
the mains lead are coloured in accordance with the following U.K. code:<br />
Blue= Neutral, Brown = Live, Green/Yellow = Ground<br />
If you can only find two wires in the cable (blue and brown), neither must be<br />
connected to the Earth terminal!<br />
• As the colours of the wires in the appliance’s mains lead may not<br />
correspond with the coloured markings identifying the terminals in<br />
your spur box, please proceed as follows:<br />
__________________________________________________________<br />
1) The BLUE WIRE<br />
must be connected<br />
to the terminal<br />
marked ‘N’<br />
(Neutral), or<br />
coloured Black.<br />
9<br />
2) The BROWN<br />
WIRE must be<br />
connected to the<br />
terminal marked<br />
‘L’ (‘Live’), or<br />
coloured RED<br />
(Fig. 7 – at left)