Instruction Manual - Evolution Power Tools Ltd.
Instruction Manual - Evolution Power Tools Ltd.
Instruction Manual - Evolution Power Tools Ltd.

You also want an ePaper? Increase the reach of your titles
YUMPU automatically turns print PDFs into web optimized ePapers that Google loves.
of use (taking account of all parts of the operating cycle,<br />
such as the times the tool is switched off, when it is<br />
running idle, in addition to trigger time).<br />
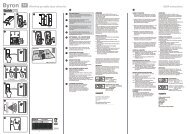
ASSEMBLY ASSEMBLY GB<br />
Your <strong>Evolution</strong> <strong>Power</strong> <strong>Tools</strong> saw is shipped complete.<br />
Remove all contents from the box and inspect to ensure no<br />
damage was incurred during shipping, and that the items<br />
listed below are included.<br />
Description Quantity<br />
<strong>Instruction</strong> <strong>Manual</strong> 1<br />
Side Handle 1<br />
Depth Gauge 1<br />
SDS Drills 1 x 6mm x 160mm<br />
1 x 8mm x 160mm<br />
1 x 10mm x 160mm<br />
SDS Chisels 1 x 25mm x 250mm<br />
1 x Point x 250mm<br />
Carry Case 1<br />
GETTING STARTED<br />
GETTING STARTED GB<br />
CAUTION! ALWAYS DISCONNECT THE DRILL FROM<br />
POWER SOURCE BEFORE MAKING ADJUSTMENTS.<br />
Refer to the “Service Parts List Drawing”.<br />
FUNCTIONAL<br />
FUNCTIONAL<br />
DESCRIPTION<br />
DESCRIPTION GB<br />
CAUTION! Always be sure that the tool is switched off and<br />
unplugged before adjusting or checking a function on the tool.<br />
Switch action (see FIG 1)<br />
CAUTION!<br />
• Before plugging in the tool, always check to see that the<br />
switch trigger actuates properly and returns to the ‘OFF’<br />
position when released.<br />
• The switch can be locked in the ‘ON’ position for ease of<br />
operator comfort during extended use. Apply caution when<br />
locking the tool in the ‘ON’ position and maintain a firm grip<br />
on the tool.<br />
To start the tool, simply pull the switch trigger. Tool speed<br />
is increased by increasing pressure on the switch trigger.<br />
Release the switch trigger to stop the drill.<br />
For continuous operation, pull the switch trigger and then<br />
push in the lock button.<br />
To stop the tool from the locked position, pull the switch<br />
trigger fully, then release it.<br />
A speed control screw is provided so that the maximum<br />
tool speed can be limited (variable). Turn the speed control<br />
screw clockwise for higher speed, and counterclockwise<br />
for lower speed.<br />
6<br />
®<br />
www.evolutionbuild.com<br />
Reversing switch action (see FIG 1)<br />
This drill has a reversing switch to change the direction of<br />
rotation. Move the reversing switch lever to the required<br />
position (clockwise or counterclockwise rotation) as<br />
indicated by the arrows on the drill body.<br />
CAUTION!<br />
• Always check the direction of rotation before operation.<br />
• Use the reversing switch only after the tool comes to a<br />
complete stop. Changing the direction of rotation before the<br />
tool stops may damage the tool.<br />
Selecting the action mode (see FIG 2)<br />
This tool has a 4 position action mode selecting switch.<br />
Push in the locking button on the switch lever and rotate<br />
the switch to the desired position. Release the locking<br />
button and ensure that the button has locked the switch in<br />
the required position.<br />
The 4 positions are:<br />
• Drill<br />
• Hammer Drill<br />
• Chisel (unlocked)<br />
• Chisel (locked)<br />
Installing the side handle (see FIG 3)<br />
CAUTION! Always be sure that the tool is switched off and<br />
unplugged before carrying out any work on the tool.<br />
Always use the side grip handle to ensure operating safety.<br />
Install the side grip handle onto the drill collar and secure in<br />
place by tightening the handle. Note that the handle may be<br />
swung through 360 o . Ensure that the side handle is pushed<br />
fully home against the drill body before tightening.<br />
Depth Gauge (see FIG 3)<br />
The depth gauge is convenient for drilling holes of uniform<br />
depth. To install, loosen the side grip handle and insert the<br />
depth gauge into the hexagonal hole. Adjust to suit and<br />
tighten the side grip handle to lock both the handle and<br />
depth gauge into the desired position.<br />
Installing or removing a drill bit or chisel (see FIG 4)<br />
CAUTION! Always be sure that the tool is switched of and<br />
unplugged before carrying out any work on the tool.<br />
Carefully insert the SDS chisel or bit into the SDS chuck.<br />
Gently pull the bit into the chuck whilst rotating the bit<br />
slowly. Pull back on the chuck collar and continue pulling<br />
the bit gently until positive location is felt and the bit slides<br />
fully home into the chuck.<br />
Only remove the bit when operations have finished and the<br />
bit has completely cooled down.<br />
To remove the bit, slide the chuck collar rearward and<br />
carefully pull the bit out of the chuck<br />
OPERATION<br />
OPERATION GB<br />
Standard Drilling Operation<br />
Ensure that the action mode selecting switch is set on the<br />
standard drill mode. See FIG 2<br />
CAUTION!<br />
• Using excessive force on the tool will not speed up the<br />
drilling. Excessive pressure will only serve to damage the<br />
tip of the bit, decrease the tool performance and shorten<br />
the service life of the tool.<br />
• There is tremendous force exerted on the tool / bit at the<br />
time of hole break-through. Hold the tool firmly and take<br />
care when the bit begins to break through the workpiece.<br />
• Always secure small workpieces in a vice or other hold<br />
down device.<br />
Drilling Wood<br />
When drilling wood the best results will be obtained by<br />
using dedicated wood bits equipped with a guide screw.<br />
The guide screw makes drilling easier by pulling the bit into<br />
the workpiece.<br />
Drilling Metal<br />
When drilling metal the best results will be obtained by using<br />
a dedicated twist drill designed for metal drilling. To prevent<br />
the bit from slipping when starting a hole, make an indentation<br />
with a centre-punch and hammer at the point to be drilled.<br />
Place the point of the bit into the indentation and begin drilling.<br />
Use an appropriate lubricant for the material being drilled with<br />
the exception of iron and brass which should be drilled dry.<br />
Hammer Drilling Operation<br />
Select the hammer drill function on the mode selection<br />
switch. See FIG 2<br />
CAUTION! There is a sudden twisting force exerted on<br />
the tool / bit at the time of hole break-through, when the<br />
hole becomes clogged with chips and particles, or when<br />
striking reinforcing rods embedded in concrete. Always use<br />
the side grip handle and firmly hold the tool by both the<br />
side handle and the switch handle during hammer drilling<br />
operations. Failure to do so could result in loss of control of<br />
the tool and potential injury to the operator.<br />
Be sure to use a dedicated tungsten-carbide tipped drill bit.<br />
Position the bit at the desired location for the hole, then pull<br />
the switch trigger. Do not force the tool. Consistent light<br />
pressure gives the best results. Keep the tool in position<br />
and prevent it from slipping away from the hole.<br />
Do not apply extra pressure if the hole becomes clogged<br />
with chips or particles. Instead allow the tool to run at<br />
idle and then partially remove the bit from the hole. By<br />
repeating this several times the hole will be cleaned out and<br />
normal drilling may be resumed.<br />
SDS4-800 HAMMER DRILL<br />
Chiselling Operations<br />
Set the mode selection switch to the preferred operator<br />
position, either chisel (locked) or chisel (unlocked). See FIG 2<br />
CAUTION! When using the tool for chiselling operations it<br />
is very important that the operator wears all the appropriate<br />
safety equipment. Safety glasses and dust masks are<br />
essential and other apparel such as gloves, safety shoes,<br />
ear protectors etc should be worn as necessary.<br />
Ensure that all marking out is completed before any<br />
chiselling is attempted.<br />
Insert the required chisel into the SDS chuck and ensure<br />
positive location. Offer the chisel up to the worksurface and<br />
holding the tool firmly with both hands begin the chiselling<br />
operation. Switch on the tool and begin to cut.<br />
Do not force the tool. Gentle consistent pressure works best.<br />
Do not try to remove too much material in one pass. Several<br />
repeat passes may be needed to achieve the required results.<br />
MAINTENANCE<br />
MAINTENANCE GB<br />
Note: Any maintenance must be carried out with the<br />
machine switched off and disconnected from the mains/<br />
battery power supply.<br />
Check that all safety features and guards are operating<br />
correctly on a regular basis. Only use this machine if all<br />
guards/safety features are fully operational.<br />
All motor bearings in this machine are lubricated for life.<br />
No further lubrication is required.<br />
Use a clean, slightly damp cloth to clean the plastic parts of<br />
the machine. Do not use solvents or similar products which<br />
could damage the plastic parts.<br />
WARNING! Do not attempt to clean by inserting pointed<br />
objects through openings in the machines casings etc.<br />
The machines air vents should be cleaned using<br />
compressed dry air.<br />
Excessive sparking may indicate the presence of dirt in<br />
the motor or worn out carbon brushes. If this is suspected<br />
have the machine serviced and the brushes replaced at an<br />
authorized service centre.<br />
ENVIRONMENTAL PROTECTION GB<br />
Waste electrical products should not be disposed of with<br />
household waste. Please recycle where facilities exist.<br />
Check with your Local Authority or retailer for<br />
recycling advice.<br />
www.evolutionbuild.com 7