ERF298MSW - Free-Instruction-Manuals.com
ERF298MSW - Free-Instruction-Manuals.com
ERF298MSW - Free-Instruction-Manuals.com

Create successful ePaper yourself
Turn your PDF publications into a flip-book with our unique Google optimized e-Paper software.
Original <strong>Instruction</strong>s<br />
Read instructions fully before operating this tool<br />
<strong>ERF298MSW</strong><br />
ERBAUER 24V 165MM SINGLE BEVEL MITRE SAW
Erbauer 24V 165mm Sliding Bevel Mitre Saw<br />
TABLE OF CONTENTS<br />
24 Month Limited Warranty<br />
General Safety Rules<br />
Additional Specific Safety Rules<br />
Safety Rules For Charger<br />
Battery Pack Care<br />
Labels and Symbols<br />
Mitre Saw Overview<br />
Specification<br />
Functional Description<br />
Operation<br />
Maintenance<br />
Environmental Protection<br />
ERBAUER 24V 165MM SINGLE SINGLE BEVEL BEVEL SLIDING MITRE SAW
Congratulations on your purchase of a quality power tool from Erbauer Ltd.<br />
This product should give you reliable service for your peace of mind this power<br />
tool does carry a 24-month guarantee, the terms of which are detailed below.<br />
If this product develops a fault within the guarantee period contact your retailer.<br />
Please retain this handbook in case you need to refer to safety, care or guarantee<br />
information in the future.<br />
GUARANTEE<br />
This product carries an Erbauer Ltd guarantee of 24 months. If your product<br />
develops a fault within this period, you should, in the first instance contact your retailer.<br />
If the fault occurs within the first 24 months, you may return the goods for a full refund or<br />
we will repair or replace the goods if you prefer. When repair is not practical or identical<br />
goods are not available, alternative goods of similar specification and quality will usually<br />
be provided but, failing this, you will be offered a partial or full refund depending on the<br />
time period since purchase.<br />
This guarantee specifically excludes losses caused due to:<br />
-Fair wear and tear<br />
-Misuse or abuse<br />
-Lack of routine maintenance<br />
-Failure of consumable items (such as batteries)<br />
-Accidental damage<br />
-Cosmetic damage<br />
-Failure to follow manufacturer’s guidelines<br />
-Loss of use of the goods<br />
-Repairs attempted by anyone, unless authorised by Erbauer Ltd.<br />
This guarantee does not affect your statutory rights. This guarantee is only valid in the UK.<br />
For further technical advice and spare parts, please contact your retailer quoting your<br />
Erbauer model number.<br />
ERBAUER 24V 165MM SINGLE BEVEL MITRE SAW
SAFETY INSTRUCTIONS<br />
WARNING! When using electric tools basic safety precautions should always<br />
be followed to reduce the risk of fire, electric shock and personal injury<br />
including the following.<br />
Read all these instructions before attempting to operate this product and save these<br />
instructions.<br />
SAVE THESE INSTRUCTIONS<br />
The term “power tool” in the warning refers to your mains-operated (corded) power tool<br />
or battery-operated (cordless) power tool.<br />
1 Keep work area clear<br />
- Cluttered areas and benches invite injuries.<br />
2 Consider work area environment<br />
- Do not expose tools to rain.<br />
- Do not use tools in damp or wet locations.<br />
- Keep work area well lit.<br />
- Do not use tools in the presence of flammable liquids or gases.<br />
3 Guard against electric shock<br />
- Avoid body contact with earthed or grounded surfaces (e.g. pipes, radiators, ranges,<br />
refrigerators).<br />
4 Keep other persons away<br />
- Do not let persons, especially children, not involved in the work touch the tool or the<br />
extension cord and keep them away from the work area.<br />
5 Store idle tools<br />
- When not in use, tools should be stored in a dry locked-up place, out of reach of<br />
children.<br />
6 Do not force the tool<br />
- It will do the job better and safer at the rate for which it was intended.<br />
7 Use the right tool<br />
- Do not force small tools to do the job of a heavy duty tool.<br />
- Do not use tools for purposes not intended; for example do not use circular saws to cut<br />
tree limbs or logs.<br />
8 Dress properly<br />
- Do not wear loose clothing or jewellery, they can be caught in moving parts.<br />
- Non-skid footwear is re<strong>com</strong>mended when working outdoors.<br />
- Wear protective hair covering to contain long hair.<br />
9 Use protective equipment<br />
- Use safety glasses.<br />
- Use face or dust mask if working operations create dust.<br />
10 Connect dust extraction equipment<br />
- If the tool is provided for the connection of dust extraction and collecting equipment,<br />
ensure these are connected and properly used.<br />
11 Do not abuse the cord<br />
- Never yank the cord to disconnect it from the socket. Keep the cord away from heat,<br />
oil and sharp edges.<br />
ERBAUER 24V 165MM SINGLE BEVEL MITRE SAW
12 Secure work<br />
- Where possible use clamps or a vice to hold the work. It is safer than using your hand.<br />
13 Do not overreach<br />
- Keep proper footing and balance at all times.<br />
14 Maintain tools with care<br />
- Keep cutting tools sharp and clean for better and safer performance.<br />
- Follow instruction for lubricating and changing accessories.<br />
- Inspect tool cords periodically and if damaged have them repaired by an authorised<br />
service facility.<br />
- Inspect extension cords periodically and replace if damaged.<br />
- Keep handles dry, clean and free from oil and grease.<br />
15 Disconnect tools<br />
- When not in use, before servicing and when changing accessories such as blades, bits<br />
and cutters, disconnect tools from the power supply.<br />
16 Remove adjusting keys and wrenches<br />
- Form the habit of checking to see that keys and adjusting wrenches are removed from<br />
the tool before turning it on.<br />
17 Avoid unintentional starting<br />
- Ensure switch is in “off” position when plugging in.<br />
18 Use outdoor extension leads<br />
- When the tool is used outdoors, use only extension cords intended for outdoor use and<br />
so marked.<br />
19 Stay alert<br />
- Watch what you are doing, use <strong>com</strong>mon sense and do not operate the tool when you<br />
are tired.<br />
20 Check damaged parts<br />
- Before further use of tool, it should be carefully checked to determine that it will<br />
operate properly and perform its intended function.<br />
- Check for alignment of moving parts, binding of moving parts, breakage of parts,<br />
mounting and any other conditions that may affect its operation.<br />
- A guard or other part that is damaged should be properly repaired or replaced by an<br />
authorised service centre unless otherwise indicated in this instruction manual.<br />
- Have defective switches replaced by an authorised service centre.<br />
- Do not use the tool if the switch does not turn it on and off.<br />
21 Warning<br />
- The use of any accessory or attachment other than one re<strong>com</strong>mended in this<br />
instruction manual may present a risk of personal injury.<br />
22 Have your tool repaired by a qualified person<br />
- This electric tool <strong>com</strong>plies with the relevant safety rules. Repairs should only be<br />
carried out by qualified persons using original spare parts, otherwise this may result in<br />
considerable danger to the user.<br />
ERBAUER 24V 165MM SINGLE BEVEL MITRE SAW
HEALTH ADVICE<br />
Warning! When drilling, sanding, sawing or grinding, dust particles will be<br />
produced. In some instances, depending on the materials you are working<br />
with, this dust can be particularly harmful to you (e.g. lead from old gloss paint).You are<br />
advised to consider the risks associated with the materials you are working with and to<br />
reduce the risk of exposure.You should:<br />
-Work in a well-ventilated area.<br />
-Work with approved safety equipment, such as dust masks that are specially designed<br />
to filter microscopic particles.<br />
SAFETY INSTRUCTIONS FOR ALL SAWS<br />
a. DANGER: Keep hands away from cutting area and the blade. Keep your second<br />
hand on the handle, or motor housing. If both hands are holding the saw, they cannot<br />
be cut by the blade.<br />
b. Do not reach underneath the workpiece. The guard cannot protect you from the<br />
blade below the workpiece.<br />
c. Adjust the cutting depth to the thickness of the workpiece. Less than a full tooth<br />
of the blade teeth should be visible below the workpiece.<br />
d. Never hold piece being cut in your hands or across your leg. Secure the workpiece to a<br />
stable platform. It is important to support the work properly to minimise body exposure,<br />
blade binding, or loss of control.<br />
e. Hold power tool by insulated gripping surfaces when performing an operation<br />
where the cutting tool may contact hidden wiring or its own cord. Contact with<br />
a “live” wire will also make exposed metal parts of the power tool “live” and shock the<br />
operator.<br />
f. When ripping always use a rip fence or straight edge guide. This improves the<br />
accuracy of cut and reduces the chance of blade binding.<br />
g. Always use blades with correct size and shape (diamond versus round) of arbor<br />
holes. Blades that do not match the mounting hardware of the saw will run eccentrically,<br />
causing loss of control.<br />
h. Never use damaged or incorrect blade washers or bolt. The blade washers and bolt<br />
were specially designed for your saw, for optimum performance and safety of operation.<br />
Further safety instructions for all saws<br />
Causes and operator prevention of kickback:<br />
− kickback is a sudden reaction to a pinched, bound or misaligned saw blade, causing an<br />
uncontrolled saw to lift up and out of the workpiece toward the operator;<br />
− when the blade is pinched or bound tightly by the kerf closing down, the blade stalls and<br />
the motor reaction drives the unit rapidly back toward the operator;<br />
− if the blade be<strong>com</strong>es twisted or misaligned in the cut, the teeth at the back edge of the<br />
blade can dig into the top surface of the wood causing the blade to climb out of the kerf<br />
and jump back toward the operator.<br />
Kickback is the result of saw misuse and/or incorrect operating procedures or<br />
conditions and can be avoided by taking proper precautions as given below.<br />
ERBAUER 24V 165MM SINGLE BEVEL MITRE SAW
a. Maintain a firm grip with both hands on the saw and position your arms to resist<br />
kickback forces. Position your body to either side of the blade, but not in line with the blade.<br />
Kickback could cause the saw to jump backwards, but kickback forces can be controlled by<br />
the operator, if proper precautions are taken.<br />
b. When blade is binding, or when interrupting a cut for any reason, release the trigger<br />
and hold the saw motionless in the material until the blade <strong>com</strong>es to a <strong>com</strong>plete stop.<br />
Never attempt to remove the saw from the work or pull the saw backward while the blade is in<br />
motion or kickback may occur. Investigate and take corrective actions to eliminate the cause of<br />
blade binding.<br />
c. When restarting a saw in the workpiece, centre the saw blade in the kerf and check<br />
that saw teeth are not engaged into the material. If saw blade is binding, it may walk up or<br />
kickback from the workpiece as the saw is restarted.<br />
d. Support large panels to minimise the risk of blade pinching and kickback. Large<br />
panels tend to sag under their own weight. Supports must be placed under the panel on<br />
both sides, near the line of cut and near the edge of the panel.<br />
e. Do not use dull or damaged blades. Unsharpened or improperly set blades produce<br />
narrow kerf causing excessive friction, blade binding and kickback.<br />
f. Blade depth and bevel adjusting locking levers must be tight and secure before<br />
making cut. If blade adjustment shifts while cutting, it may cause binding and kickback.<br />
g) Use extra caution when making a “plunge cut” into existing walls or other blind<br />
areas. The protruding blade may cut objects that can cause kickback.<br />
Safety instructions for saws<br />
a) Check lower guard for proper closing before each use. Do not operate the saw if<br />
lower guard does not move freely and close instantly. Never clamp or tie the lower guard<br />
into the open position. If saw is accidentally dropped, lower guard may be bent. Raise<br />
the lower guard with the retracting handle and make sure it moves freely and does not<br />
touch the blade or any other part, in all angles and depths of cut.<br />
b) Check the operation of the lower guard spring. If the guard and the spring are<br />
not operating properly, they must be serviced before use. Lower guard may operate<br />
sluggishly due to damaged parts, gummy deposits, or a build-up of debris.<br />
c) Lower guard may be retracted manually only for special cuts such as “plunge<br />
cuts” and “<strong>com</strong>pound cuts.” Raise lower guard by retracting handle and as soon as<br />
blade enters the material, the lower guard must be released. For all other sawing, the<br />
lower guard should operate automatically.<br />
d) Always observe that the lower guard is covering the blade before placing saw<br />
down on bench or floor. An unprotected, coasting blade will cause the saw to walk<br />
backwards, cutting whatever is in its path. Be aware of the time it takes for the blade to<br />
stop after switch is released.<br />
ERBAUER 24V 165MM SINGLE BEVEL MITRE SAW
ADDITIONAL SAFETY INSTRUCTIONS FOR YOUR MITRE SAW<br />
Warning: Be sure to read and understand all instructions. Failure to<br />
follow all instructions listed below may result in electric shock, fire and/or<br />
serious personal injury.<br />
1. Know your power tool. Read operator’s manual carefully. Learn the applications and<br />
limitations, as well as the specific potential hazards related to this tool.<br />
2. Always wear safety glasses or eye shields when using this mitre saw. Everyday<br />
eyeglasses have only impact-resistant lenses; they are not safety glasses.<br />
3. Always protect your lungs. Wear a face mask or dust mask if the operation is dusty.<br />
Always use dust extraction equipment to minimise dust.<br />
4. Always protect your hearing. Wear hearing protection during extended periods of<br />
operation.<br />
5. Always inspect the tool cords periodically and if damaged have them repaired.<br />
Always be aware of the cord location.<br />
6. Always check for damaged parts. Before further use of the tool, a guard or other<br />
part that is damaged should be carefully checked to determine if it will operate properly<br />
and perform its intended function. Check for misalignment or binding of moving parts,<br />
breakage of parts, and any other condition that may affect the tool’s operation. A guard<br />
or other part that is damaged should be properly repaired or replaced at a qualified<br />
service centre.<br />
7. Do not abuse the cord. Never use the cord to carry the tools or pull the plug from the<br />
socket. Keep cord away from heat, oil, sharp edges or moving parts. Replace damaged<br />
cords immediately. Damaged cords increase the risk of electric shock.<br />
8. Always make sure that your extension cord is in good condition. When using an<br />
extension cord be sure to use one that is heavy enough to carry the current that your<br />
tool will draw. An undersized cord will cause a drop in line voltage, resulting in loss of<br />
power and overheating.<br />
9. Always inspect and remove all nails from lumber before sawing.<br />
10. Do not use the tool while tired or under the influence of drugs, alcohol or any<br />
medication. Following this rule will reduce the risk of electric shock, fire or serious<br />
personal injury.<br />
11. Save these instructions. Refer to them frequently and use them to instruct others<br />
who may use this tool. If someone borrows this tool, make sure they have these<br />
instructions also.<br />
12. When the correct blade to cut the material has been fitted, this saw is<br />
re<strong>com</strong>mended for cutting wood and plastic only.<br />
13. Do not use saw blades with High Speed Steel (HSS) or damaged or deformed<br />
blades.<br />
14. Replace the table insert when worn.<br />
15. Use only saw blades re<strong>com</strong>mended by the manufacturer and which have the<br />
exact bore and diameter required for this machine.<br />
16. Connect your mitre saw to a dust collecting device (I. D.Ø32mm) when sawing.<br />
17. Select saw blades in relation to the material to be cut.<br />
18. Check the maximum depth of cut.<br />
19. When sawing long work pieces, always use extra support to provide better<br />
support, and use clamps or other clamping device<br />
ERBAUER 24V 165MM SINGLE BEVEL MITRE SAW
20. The operator is adequately trained in the use, adjustment and operation and<br />
operation of the machine.<br />
21. Provide for adequate room lighting at your workplace or for adequate lighting<br />
of the immediate work area.<br />
22. When fitted with laser no exchange with different type of laser is permitted.<br />
Repairs shall only be carried out by the laser manufacturer or an authorised agent.<br />
23. Refrain from removing any cut-offs or other parts of the workpiece from<br />
the cutting area whilst the machine is running and the saw head is not the rest<br />
position.<br />
24. Never stand on this tool. Serious injuries could occur when this tool tips over<br />
or when <strong>com</strong>ing in contact with the saw blade.<br />
25. Only use the saw with guards in good working order and properly maintained,<br />
and in position.<br />
26. Keep the floor area free of loose material e.g. chips and cut-offs.<br />
27. Ensure the speed marked on the saw blade is at least equal to the speed<br />
marked on the saw.<br />
28. Warning. Not replace the laser with a different type. <strong>Instruction</strong> that repairs shall<br />
only be carried out by the laser manufacturer or an authorised agent.<br />
WARNING: the operation of any mitre saw can result in foreign objects being<br />
thrown into your eyes, which can result in severe eye damage. Before beginning<br />
power tool operation, always wear safety goggles or safety glasses with side shield and a<br />
full face shield when needed.<br />
WARNING: If any parts are missing, do not operate your mitre saw until the<br />
missing parts are replaced. Failure to follow this rule could result in serious<br />
personal injury.<br />
CARRYING YOUR MITRE SAW<br />
Safety Advice<br />
1. Although <strong>com</strong>pact, this saw is heavy. To reduce the risk of back injury, get <strong>com</strong>petent<br />
help whenever you have to lift the saw.<br />
2. To reduce the risk of back injury, hold the tool close to your body when lifting.<br />
Bending your knees so you can lift with your legs, not your back. Lift by using the handhold<br />
areas at each side of the bottom of the base.<br />
3. Never carry the mitre saw with the battery pack attached to the machine. Be careful<br />
to avoid touching the on/off trigger switch in the handle. Carrying the machine by the cutting<br />
handle with the battery back attached risks accidental starting of the machine.<br />
4. Before moving the saw tighten the slide lock knob, mitre handle and bevel lock<br />
knob to guard against sudden movement.<br />
ERBAUER 24V 165MM SINGLE BEVEL MITRE SAW
WARNING!<br />
Do not use the blade guard as a ‘lifting point’.<br />
The battery pack should be removed from the mitre saw before attempting to<br />
move the machine.<br />
• Lock down the head using the head locking pin.<br />
• Move the cutting head to its outermost position and lock in place by tightening<br />
the slide lock knob.<br />
• Loosen the mitre angle lock knob. Pull up the mitre angle lever and rotate the<br />
table to either of its maximum settings.<br />
• Lock the table in position using the locking knob.<br />
• Use the two carry handle cut-outs machined into either end of the machine<br />
base, to transport the machine.<br />
Place the saw on a secure stationary work surface and check the saw over carefully.<br />
Check particularly the operation of all the machines safety features before<br />
<strong>com</strong>missioning or operating the machine.<br />
SAFETY RULES FOR YOR ERBAUER BATTERY CHARGER<br />
WARNING! READ AND UNDERSTAND ALL OF THESE INSTRUCTIONS.<br />
SAVE THESE INSTRUCTIONS FOR FUTURE OPERATOR USE.<br />
1. Read all instructions and cautionary labels on the charger and the battery pack before use.<br />
2. Do not insert a damaged battery pack into the charger. There is a danger of electric shock.<br />
3. Do not use an extension cord unless absolutely necessary. Use of an improper<br />
extension cord could cause the risk of fire, electric shock or electrocution.<br />
4. The charger is designed to be used from a standard domestic supply.<br />
Do not attempt to connect the charger to a supply with a different voltage.<br />
5. Do not use the charger outdoors or expose to wet or damp conditions.<br />
Water entering the charger will increase the risk of electric shock.<br />
6. Use this charger only with the designated rechargeable battery packs.<br />
Other types of battery may overheat and burst causing personal injury or damage.<br />
7. Do not abuse the charger cord. Never use the cord to carry the charger. Do not<br />
pull the cord rather than the plug when disconnecting from the power supply. Replace<br />
damaged cords immediately.<br />
8. Ensure that the power cord is routed so that it does not pose a trip hazard.<br />
Also ensure that it cannot <strong>com</strong>e into contact with sharp edges or moving parts which<br />
could cause damage to the cord.<br />
9. Do not use any attachment not re<strong>com</strong>mended or sold by the battery charger<br />
manufacturer. Use of unauthorised attachments or battery packs could lead to a<br />
significant risk of electric shock, fire or personal injury.<br />
ERBAUER 24V 165MM SINGLE BEVEL MITRE SAW
10. Keep the power cord and the charger body from heat sources. Heat can<br />
damage the charger body and/or internal parts.<br />
11. Do not use this charger if the cord or plug is damaged. A damaged cord or plug<br />
must be replaced before the charger can be used.<br />
12. Do not use the charger if it has been dropped, received a sharp blow or in any<br />
other way has been damaged. Have the charger checked at an authorised service<br />
centre.<br />
13. Do not disassemble charger. Take to an authorised service centre when service<br />
or repair is required.<br />
14. Unplug the charger from the mains power supply when attempting<br />
maintenance or cleaning. This will reduce the risk of electric shock.<br />
15. Disconnect the charger from the mains supply when not in use. Store in a<br />
locked cupboard out of children’s reach. Do not store with any other small metallic items<br />
that could fall into the charger battery-pack port. Do not store in locations where the<br />
temperature may reach or exceed 50 0 C.<br />
16. Do not touch any of the uninsulated terminals in either the battery charger or<br />
the battery pack. Terminals may be ‘live’ and there is a risk of electric shock.<br />
WARNING<br />
This machine is not intended for use by persons (including children) with reduced<br />
physical, sensory or mental capabilities, or lack of experience and knowledge, unless<br />
they have been given supervision or instruction concerning the safe use of the<br />
machine by a person responsible for their safety.<br />
Children should be supervised to ensure that they do not have access to, and are not<br />
allowed to play with, this machine.<br />
CARE OF YOUR ERBAUER BATTERY PACK<br />
1. Do not charge the battery pack when the temperature is below 0°C (32°F) or<br />
above 40°C (104°F). Allow to cool down after charging. Charging is at its most<br />
efficient when carried out between 18-24 0 C.<br />
2. Only use the battery charger supplied with your Erbauer machine. Other<br />
chargers may be dangerous.<br />
3. Always protect the battery terminals when the battery pack is not used. Cover<br />
the terminals with a heavy insulation tape to ensure that a short circuit cannot occur.<br />
Batteries, when stored for a long period of time, will discharge naturally.<br />
4. Do not short the battery pack. Do not attempt to open the battery pack. If the<br />
casing is damaged or cracked, do not use or charge. Send the damaged battery pack<br />
for recycling.<br />
Warning: A battery short can cause a large current flow, overheating, possible<br />
burns and even irreparable damage to the battery.<br />
ERBAUER 24V 165MM SINGLE BEVEL MITRE SAW
5. Do not touch the terminals with any conductive material.<br />
6. Avoid storing the battery pack in a container with other metal objects such as<br />
nails, coins, etc. Do not carry the battery pack in a pocket or similar containing other<br />
metallic objects.<br />
7. Do not expose the battery pack to water or rain.<br />
8. Do not store the battery pack in locations where the temperature may reach or<br />
exceed 50°C (122°F).<br />
9. Do not incinerate the battery pack even if it is severely damaged or is <strong>com</strong>pletely<br />
worn out. The battery pack can explode in a fire.<br />
10. Be careful not to drop, shake or strike the battery.<br />
11. Under extreme conditions electrolyte may be leak from the battery. If contact<br />
accidentally occurs, flush your skin with water. If electrolyte contacts your eyes,<br />
additionally seek medical help. Electrolyte from the battery may cause irritation or burns<br />
Caution: Do not let familiarity with your mitre saw make you careless. Remember that a<br />
careless fraction of a second is sufficient to cause severe injury.<br />
Important note<br />
Be sure the supply is the same as the voltage given on the rating plate. The tool is fitted<br />
with a two-core cable and plug. Remove the mains plug from socket before carrying out<br />
any adjustment or servicing.<br />
SAFETY RULES FOR LASER LIGHT<br />
The laser light/laser radiation used is Class 2 with maximum 1mW power and 650nm<br />
wavelength.<br />
These lasers do not normally present an optical hazard, although staring at the beam<br />
may causeflash blindness.<br />
WARNING: Do not stare directly at the laser beam. A hazard may exist if you<br />
deliberately stare into the beam, please observe all safety rules as follows:<br />
- The laser shall be used and maintained in accordance with the manufacturer’s<br />
instructions.<br />
- Never aim the beam at any person or an object other than the workpiece.<br />
- The laser beam shall not be deliberately aimed at personnel and shall be prevented<br />
from being directed towards the eye of a person for longer than 0.25s.<br />
- Always ensure the laser beam is aimed at a sturdy workpiece without reflective<br />
surfaces. i.e. wood or rough coated surfaces are acceptable. Bright shiny reflective<br />
sheet steel or the like is not suitable for laser use as the reflective surface could direct<br />
the beam back at the operator.<br />
- Do not change the laser light assembly with a different type. Repairs must be carried<br />
out by the laser manufacturer or an authorised agent.<br />
ERBAUER 24V 165MM SINGLE BEVEL MITRE SAW
SPECIFIC SAFETY RULES & SYMBOLS<br />
WARNING!<br />
Do not operate machine if warning and / or instruction labels are missing or damaged.<br />
Symbol Description<br />
V Volts<br />
A Amperes<br />
Hz Hertz<br />
Min-1<br />
Speed RPM<br />
DC<br />
Direct Current<br />
~ Alternating Current<br />
no No Load Speed<br />
90 min<br />
Double Insulated<br />
Wear Safety Goggles<br />
Wear Ear Protection<br />
Wear Dust Mask<br />
Read <strong>Instruction</strong> Manual<br />
Laser Warning Symbol<br />
Conforms to relevant<br />
safety standards<br />
General Warning<br />
For indoor use only<br />
Charging time<br />
Max charging temperature<br />
Do not throw into fire<br />
Do not throw into water<br />
or expose to rain<br />
Only use genuine Erbauer replacement saw blades. Unauthorised blades may be<br />
dangerous! Keep saw blades securely fastened. Check the blade flanges for debris<br />
before installing any new blade. Do not use dull, broken or damaged blades. Check the<br />
blade regularly for condition and wear. A damaged or worn blade should be replaced<br />
immediately. Beware of ejecting chips as they may be HOT. Always make provision for<br />
the safe handling of excess material. Keep the machine base and rotary table free from<br />
dirt and other debris.<br />
ERBAUER 24V 165MM SINGLE BEVEL MITRE SAW
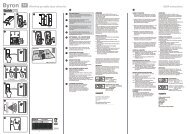
RH OVERVIEW OF MITRE SAW<br />
Fig 1<br />
5<br />
1. SLIDE CARRIAGE LOCK KNOB<br />
2. SAFETY HEAD RELEASE LEVER<br />
3. POSITIVE STOP LOCKING LEVER<br />
4. MITRE LOCK HANDLE<br />
5. MITRE LOCK HAND-WHEEL<br />
6. SAW HEAD LOCK PIN<br />
7. DEPTH GAUGE<br />
8. BATTERY<br />
4<br />
ERBAUER 24V 165MM SLIDING BEVEL MITRE SAW SPECIFICATION<br />
2<br />
ERBAUER 24V 165MM SINGLE BEVEL MITRE SAW<br />
7<br />
6<br />
1<br />
8<br />
3
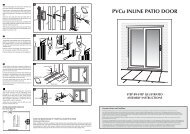
Fig 2<br />
15<br />
9. DUST BAG OUTLET<br />
10. TABLE TOP<br />
11. ON/OFF TRIGGER SWITCH<br />
12. TRIGGER SWITCH SAFETY LOCK BUTTON<br />
13. LASER SWITCH<br />
14. RETRACTABLE SAFETY GUARD<br />
15. HOLD DOWN CLAMP<br />
16. CARRY HANDLE<br />
17. FENCE<br />
18. MITRE SCALE<br />
19. MOUNTING HOLES<br />
9<br />
ERBAUER 24V 165MM SLIDING BEVEL MITRE SAW SPECIFICATION<br />
10<br />
19<br />
ERBAUER 24V 165MM SINGLE BEVEL MITRE SAW<br />
16<br />
13<br />
17<br />
18<br />
12<br />
14<br />
11
TECHNICAL DATA<br />
Volts: 24V DC<br />
Rated No-load speed 4500 min-1<br />
Net weight: 9.5 kg (With Battery) 8.26 kg (Without Battery)<br />
Blade Diameter (6.5”) 165mm<br />
Bore Diameter (5/8”) 16mm<br />
Blade Thickness 2.6mm<br />
Maximum Cutting Capacity (Wood)<br />
At 90 0 mitre x 90 0 bevel 180mm x 50mm<br />
At 45 0 mitre x 45 0 bevel 125mm x 20mm<br />
0 0 mitre x 45 0 bevel 50mm (H) x 125mm (L)<br />
45 0 mitre x 0 0 bevel 20mm (H) x 180mm (L)<br />
Charger Input 230-240V<br />
Charger Output 24V DC<br />
Charging Time 90 mins (approx)<br />
Discharge time 30 mins<br />
Battery Type NiCd<br />
Rated Voltage 24V DC<br />
Rating 2.0Ah<br />
NOISE AND VIBRATION DATA<br />
Sound pressure level L PA = 94 dB(A) K=3dB(A)<br />
Sound power level L WA = 107 dB(A) K=3dB(A)<br />
Vibration level:
ACCESORIES<br />
1x instruction manual<br />
1x ‘C’- Spanner ( for blade release)<br />
1x Hex-headed spanner ( for blade release)<br />
1x Hex Key (for fence adjustment)<br />
1x Dust Collection bag<br />
1x Hold-down clamp<br />
1x Battery charger<br />
1x 24v battery<br />
1x Blade (fitted)<br />
Additional Accessories<br />
In addition to the standard accessories supplied with this machine, other accessories are<br />
available to improve its performance, these include the following items:<br />
1. Clamping System – the design of this machine allows for the use of a top clamp which can<br />
be fitted either side of the blade in the sockets incorporated into the fence.<br />
Additional accessories can be obtained by contacting your local dealer (or Erbauer Power<br />
Tools).<br />
GETTING STARTED<br />
CAUTION! ALWAYS REMOVE BATTERY PACK BEFORE MAKING ANY ADJUSTMENTS.<br />
1. MOUNTING YOUR MITRE SAW<br />
Warning: To reduce the risk of injury from unexpected saw movement, place the saw in the desired<br />
location either on a workbench or other suitable machine stand. The base of the saw has four<br />
mounting holes through which suitable bolts can be placed to secure the mitre saw. If the saw is to be<br />
used in one location, permanently fasten it to the workbench using appropriate fastenings. Locking<br />
washers and nuts should be used on the underside of the workbench.<br />
1. Tighten the mitre and bevel locks. See operating instructions.<br />
2. To avoid injury from flying debris, position the saw so that other people or bystanders<br />
cannot stand too close (or behind) it.<br />
3. Locate the saw on a firm, level surface where there is plenty of room for handling and<br />
properly supporting the workpiece.<br />
4. Support the saw so the machine table is level and the saw does not rock.<br />
5. Bolt or clamp the saw securely to its support stand or workbench.<br />
ERBAUER 24V 165MM SINGLE BEVEL MITRE SAW
Fig 1<br />
Fig 2<br />
Fig 3<br />
Fig 4<br />
1<br />
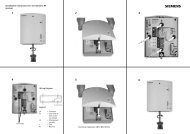
2. INSTALLING OR REMOVING A BLADE<br />
Warning: Only use genuine Erbauer blades<br />
which are designed for this machine. Ensure that<br />
the maximum speed of the blade is <strong>com</strong>patible<br />
with the machine.<br />
Note: It is re<strong>com</strong>mended that the operator<br />
considers wearing protective gloves when handling<br />
the blade during installation or when changing the<br />
machines blade.<br />
1. Ensure the cutting head is up and the battery is<br />
removed from the machine. See section (Installing/<br />
removing the Battery Pack) below.<br />
2. Press the lower guard lock lever and rotate the<br />
lower guard upwards to access the blade cover<br />
plate.<br />
3 Release the cover plate from the machine by<br />
removing the cross-headed screw securing the<br />
black cover plate to the top guard (Fig 1). Store<br />
this screw safely for future use.<br />
4. The front locating screw is a fixed shoulder<br />
screw and should not be touched. Slide and rotate<br />
the cover plate to expose the blade arbor nut. (Fig<br />
2)<br />
5. Locate the pins of the ‘C’ spanner into the holes<br />
in the outer blade flange, and hold the spanner<br />
firmly to prevent the arbor from rotating. (Fig. 3)<br />
6. Using the supplied Hex-headed spanner release<br />
the arbor screw to remove the blade. (Fig. 4)<br />
Note: The arbor screw has a left hand thread.<br />
ERBAUER 24V 165MM SINGLE BEVEL MITRE SAW
7. Install the new 165 mm (6.5”) blade. Make<br />
sure the rotation arrow on the blade matches the<br />
clockwise rotation arrow on the upper guard. The<br />
blade teeth should always point downward at the<br />
front of the saw. (Fig 5)<br />
8. Re-install the outer blade flange ensuring that<br />
it is seated correctly on the arbor.<br />
9. Refit and hand-tighten the arbor screw.<br />
10. Prevent arbor rotation by using the ‘C’<br />
spanner as in point 5 above<br />
11. Tighten the arbor screw using moderate<br />
force, but do not overtighten.<br />
12. Rotate the cover plate back to its original<br />
position, ensuring that the lower blade guard<br />
<strong>com</strong>pletely covers the blade.<br />
13. Ensure that the lower blade guard operating<br />
cog has engaged with the geared quadrant<br />
operating lever. (Fig 6)<br />
14. Replace the cross-headed screw and tighten<br />
to secure the cover plate into its operational<br />
position.<br />
15. Ensure that both blade changing spanners<br />
are removed and safely stored for future use.<br />
16. Check the operation of the guard mechanism.<br />
Warning: Ensure the blade guard is fully functional<br />
before using the machine.<br />
Note: Spacers and spindle rings should not be used<br />
with this machine and/or blade<br />
Fig 5<br />
Fig 6<br />
ERBAUER 24V 165MM SINGLE BEVEL MITRE SAW
Fig 7<br />
3. DEBRIS COLLECTION BAG<br />
The Debris Collection Bag should be attached at<br />
the debris extraction port.<br />
1. Slide the frame of the collection bag on to the<br />
outlet of the extraction port, ensuring that it is<br />
firmly connected. (Fig 7)<br />
2. To release the bag, slide the frame in the<br />
opposite direction.<br />
Note: To ensure optimal dust collection, empty the<br />
dust bag when it be<strong>com</strong>es approximately 2/3<br />
full.<br />
4. CHARGING A BATTERY PACK PRIOR TO<br />
USE<br />
A Battery Pack must be inserted into the tool as<br />
detailed below. It is important that the Battery<br />
Pack is of the designated type re<strong>com</strong>mended<br />
for this machine.<br />
Newly purchased Battery Packs do not <strong>com</strong>e fully<br />
charged, and should be charged before use.<br />
Note: Battery power and performance will improve<br />
after several discharge/charging cycles have<br />
been <strong>com</strong>pleted.<br />
WARNING: The battery pack and battery charger<br />
supplied are specially designed to work<br />
together. Do not attempt to use any other<br />
charger or battery pack with this Erbauer Mitre<br />
Saw.<br />
1. Position the charger on a work bench or similar<br />
in a well ventilated location away from any heat<br />
source and ensure that the charger cannot be<br />
covered by workshop cloths etc.<br />
2. Plug the charger into a suitable power socket.<br />
The red LED will illuminate.<br />
3. Slide the Erbauer 24V battery pack into the<br />
docking port of the charger while squeezing<br />
the buttons located on either side of the battery<br />
casing. The battery will only fit in one way<br />
round.<br />
ERBAUER 24V 165MM SINGLE BEVEL MITRE SAW
4. Firmly slide the battery pack down into the<br />
charger to ensure terminal connection. The<br />
battery locking tabs should positively engage<br />
the charger.<br />
5. Press the button on the top RH side of the<br />
charger just below the LED indicators. The<br />
green LED will illuminate to show that the<br />
battery is fast charging.<br />
6. Remove the battery pack from the charger<br />
when the green LED goes out (approx 1<br />
hour), and store the charger safely for future<br />
use. Remove the battery pack by pressing<br />
the two buttons on either side of the pack and<br />
slide the pack from the charger.<br />
5. INSTALLING OR REMOVING THE BATTERY<br />
PACK<br />
Check that the battery pack is of the designated<br />
type for this machine. We re<strong>com</strong>mend<br />
that the trigger switch is locked in the<br />
OFF position when removing or inserting<br />
the Battery Pack. Refer to OPERATING<br />
INSTRUCTIONS 4.<br />
a. Slide the Battery Pack onto the back of the<br />
machines handle. The Battery can only fit one<br />
way round.<br />
b. Firmly slide the Battery Pack fully onto the<br />
tools handle to engage the locking tabs. The<br />
electrical connections inside the handle will<br />
be made automatically.<br />
c. To remove the Battery Pack, simply press<br />
the two locking buttons with your finger and<br />
thumb and slide the Battery Pack from the<br />
handle.<br />
ERBAUER 24V 165MM SINGLE BEVEL MITRE SAW
Fig 8<br />
Fig 9<br />
6. HOLD DOWN CLAMP<br />
1. Hold down clamps can be fitted on either side<br />
of the saw and are fully adjustable to suit the size<br />
of the workpiece (see fig 8). The clamp will fit into<br />
either of the posts integrated into the machine<br />
fence.<br />
2. Do not operate the saw without clamping the<br />
workpiece.<br />
3. Make sure that the hold down clamp securing<br />
screws are tightened.<br />
Warning: Always check clamp position does not<br />
interfere with any saw operation. Before switching<br />
on, lower the saw head to ensure the clamp<br />
clears the guard and saw head assembly.<br />
7. FENCE<br />
The width of the fence ‘mouth’ can be altered<br />
by adjusting the LH side of the fence. This<br />
may be necessary to provide clearance for the<br />
blade when extreme mitre and bevel angles are<br />
selected. (Fig 9)<br />
1. Ensure that the battery is removed from the<br />
machine.<br />
2. Loosen the two countersunk headed screws<br />
with the hex key provided.<br />
3. Slide the adjustable fence front plate to the<br />
desired position.<br />
4. Check that the blade does not foul the fence by<br />
conducting a ‘dry run’ with the cutting head set to<br />
the required bevel and mitre angle.<br />
5. When satisfied that the blades path is<br />
unobstructed tighten the two screws and replace<br />
the battery.<br />
ERBAUER 24V 165MM SINGLE BEVEL MITRE SAW
OPERATING INSTRUCTIONS<br />
Caution: The Mitre Saw should be inspected<br />
(particularly for the correct functioning of<br />
the safety guards) before each use. Do not<br />
connect the saw to the power supply until a<br />
safety inspection has been carried out.<br />
Ensure that the operator is adequately trained<br />
in the use, adjustment and maintenance of<br />
the machine, before connecting to the power<br />
supply and operating the saw.<br />
WARNING: To reduce the risk of injury, always<br />
remove the battery from the saw before<br />
changing or adjusting any of the machines<br />
parts. Compare the direction of the rotation<br />
arrow on the guard to the direction arrow on<br />
the blade. The blade teeth should always point<br />
downward at the front of the saw. Check the<br />
tightness of the arbor screw.<br />
1. THE LASER GUIDE<br />
This saw is equipped with a laser cutting<br />
guide which is powered from the battery<br />
pack. This allows the operator to preview the<br />
path of the blade through the workpiece but<br />
should be regarded as a useful guide only.<br />
The slide ON/OFF switch for the Laser Guide<br />
is positioned on the LH side of the operating<br />
handle. (Fig 10)<br />
Avoid direct eye contact, and do not use on<br />
material that could reflect the laser beam.<br />
WARNING:<br />
Do not stare directly at the laser beam. A<br />
hazard may exist if you deliberately stare into<br />
the beam, please observe all safety rules as<br />
follows.<br />
• The laser beam shall not be deliberately<br />
aimed at personnel and shall be prevented<br />
from being directed towards the eyes of a<br />
person.<br />
Fig 10<br />
ERBAUER 24V 165MM SINGLE BEVEL MITRE SAW
Fig 11<br />
• Always ensure the laser beam is only aimed<br />
at workpieces without reflective surfaces, i.e.<br />
wood or rough coated surfaces are acceptable.<br />
• Do not change the laser module assembly<br />
with a different type.<br />
• Repairs to the laser module must only be<br />
conducted by Erbauer Power Tools or their<br />
authorised agent.<br />
2. RELEASING THE SAW HEAD<br />
a) Gently press down on the cutting handle.<br />
b) Pull out the cutting head stop latching knob<br />
and allow the head to rise to its upper position.<br />
(Fig 11)<br />
c) Twisting the latching knob ¼ of a turn in<br />
either direction will prevent the latching knob<br />
from re-engaging its locking socket.<br />
d) When operations are <strong>com</strong>pleted the latching<br />
knob should be returned to its original position<br />
so that the cutting head can be locked in its<br />
down position<br />
Note; We re<strong>com</strong>mend that when the machine is<br />
not in use the cutting head is locked in its down<br />
position, and the latching knob fully engaged in<br />
its socket.<br />
3. PREPARING TO MAKE A CUT<br />
a) Avoid awkward operations and hand<br />
positions where a sudden slip could cause<br />
fingers or hands to move into the blade.<br />
b) Cut only one workpiece at a time.<br />
c) Clear everything except the workpiece and<br />
related support devices away from the blade<br />
before turning the mitre saw on.<br />
d) Secure workpiece using clamps to hold<br />
the workpiece securely and use additional<br />
worpiece supports as necessary.<br />
ERBAUER 24V 165MM SINGLE BEVEL MITRE SAW
4. THE TRIGGER SWITCH<br />
The on/off trigger switch is located in the front<br />
handle. To switch on, the safety lock button<br />
located on the LH side of the handle just in front<br />
of the laser slide switch must first be pressed in.<br />
(Fig 12)The trigger switch can then be used.<br />
When a cut is <strong>com</strong>pleted and the trigger switch<br />
is released the trigger safety lock button will<br />
automatically lock the trigger switch in the ‘off’<br />
position.<br />
5. BODY AND HAND POSITION<br />
a) Never place hands within the ‘no hands<br />
zone’ (at least 150mm away from the blade).<br />
Pictograms on the machines table are provided<br />
as an aid to safe working practices. Keep hands<br />
away from the path of the blade.<br />
b) Hold the workpiece firmly to the fence<br />
to prevent any movement. Use a clamp if<br />
necessary but check that it is positioned so that<br />
it does not foul the blade.<br />
c) Before attempting a cut, make a ‘dry run’ with<br />
the power off so that you can see the path of the<br />
blade.<br />
d) After <strong>com</strong>pleting a cut keep your hands in<br />
position until the trigger has been released and<br />
the blade has <strong>com</strong>e to a <strong>com</strong>plete halt.<br />
6. CHOP CUTTING<br />
The slide lock knob (Fig 13) is tightened to lock<br />
the cutting head at its rearmost position. The<br />
saw handle is pushed down to cut through the<br />
workpiece. This type of cut is used mainly for<br />
narrow pieces.<br />
a) Place the workpiece on the table and against the<br />
fence in the desired position. Secure with clamps if<br />
necessary.<br />
b) Grasp the saw handle.<br />
c) Turn on the saw using the trigger switch and<br />
allow the blade to reach full operating speed.<br />
Fig 12<br />
Fig 13<br />
ERBAUER 24V 165MM SINGLE BEVEL MITRE SAW
Fig 14<br />
d) Press the lower guard release lever to release<br />
the saw head.<br />
e) Gently push the saw head down and cut<br />
through the workpiece.<br />
f) After the cut is <strong>com</strong>pleted, turn off the saw using<br />
the trigger switch, and allow the blade to <strong>com</strong>e to<br />
a <strong>com</strong>plete halt.<br />
7. SLIDE CUTTING<br />
Caution: NEVER pull the saw towards you<br />
when making a cut. The blade can suddenly<br />
climb up on top of the workpiece and force<br />
itself toward you.<br />
This saw is equipped with a sliding carriage<br />
system.<br />
Loosening the slide lock knob will release the<br />
slide (Fig 14) and allow the cutting head to<br />
move forwards and backwards.<br />
During slide cutting the saw blade is lowered<br />
into the workpiece and then pushed to the rear<br />
of the saw to <strong>com</strong>plete the cut. This type of cut<br />
can be used for cutting wide pieces.<br />
1. Put the workpiece against fence and secure<br />
with clamps as appropriate.<br />
2. Loosen the slide lock knob.<br />
3. Grasp the saw handle and pull the cutting<br />
head until the arbor (centre of saw blade) is<br />
over the front edge of the workpiece.<br />
4. Press the lower blade guard locking trigger<br />
for cutting head release.<br />
5. Switch on the saw and allow the saw to<br />
reach full speed.<br />
6. Push the saw handle all the way down and<br />
cut through the leading edge of the workpiece.<br />
7. Gently push the saw handle towards the<br />
fence <strong>com</strong>pleting the cut.<br />
8. Push the cutting head to the full rear position<br />
after each cut.<br />
9. Release the trigger to switch off the saw.<br />
Allow the blade to <strong>com</strong>e to a <strong>com</strong>plete<br />
halt before moving hands or removing the<br />
workpiece.<br />
ERBAUER 24V 165MM SINGLE BEVEL MITRE SAW
8. MITRE CUTTING<br />
An angle of up to 45 0 to the left or right can be<br />
obtained and a protractor scale can be found<br />
on the front of the machine table. Positive stops<br />
are provided at 15 0 , 22.5 0 , 30 0 and 45 0 right and<br />
left.<br />
1. Loosen the slide locking knob and push the<br />
cutting head back as far as it will go and lock<br />
the slide.<br />
2. Loosen the mitre angle lock knob. (Fig 15 a)<br />
3. Push down the positive stop locking lever.<br />
(Fig 15 b)<br />
4. Turn the rotary table to the desired angle as<br />
indicated by the mitre angle pointer.<br />
5. Tighten the mitre angle lock knob to hold the<br />
desired angle.<br />
6. If necessary unlock the cutting head by<br />
loosening the slide locking knob. This will<br />
allow the cutting head to move backwards and<br />
forwards (required when cutting wide boards).<br />
7. Start the saw and allow it to reach full speed<br />
before <strong>com</strong>mencing operations.<br />
9. BEVEL CUTTING<br />
The cutting head can be tilted up to 45 0 to the<br />
left hand side only. A large Bevel Lock hand<br />
wheel can be found at the rear of the machine,<br />
and a 0-45 0 protractor scale is positioned on<br />
the slide carriage casting to the front of the<br />
hand wheel. (Fig 16)<br />
1. Lock the cutting head down with the head<br />
latching pin.<br />
2. Loosen the bevel lock hand wheel.<br />
3. Tilt the cutting head to the required angle. A<br />
protractor scale and pointer is provided to aid<br />
setting.<br />
4. Tighten the bevel lock hand wheel securely<br />
when the desired angle is achieved.<br />
5. Unlatch the cutting head.<br />
6. Release the slide (if necessary) to cut wide<br />
workpieces.<br />
7. Stand to the left side of the handle to make<br />
the cut.<br />
8. When the cut is <strong>com</strong>pleted, release the<br />
trigger switch and allow the saw blade to<br />
<strong>com</strong>e to a <strong>com</strong>plete halt, before removing the<br />
workpiece or your hands from the saw.<br />
Fig 15<br />
Fig 16<br />
ERBAUER 24V 165MM SINGLE BEVEL MITRE SAW<br />
15B<br />
1
Fig 17<br />
10. COMPOUND CUTTING<br />
A <strong>com</strong>pound cut is a <strong>com</strong>bination of a mitre and<br />
bevel cut.<br />
a) Select the required mitre angle as previously<br />
described.<br />
b) Select the required bevel angle as previously<br />
described.<br />
c) Ensure the tightness of all adjustment/locking<br />
screws before making a cut.<br />
11. SUPPORTNG LONG WORKPIECES<br />
The free end of a long workpiece should be<br />
supported at the same height as the machine<br />
table. The operator should consider using a<br />
remote workpiece support stand, or enlisting<br />
<strong>com</strong>petent trained help to support long<br />
workpieces.<br />
12. DEPTH STOP (Fig 17)<br />
Use of the depth stop allows the operator to cut<br />
slots in the workpiece. The downward travel of<br />
the saw head can be set so that the saw blade<br />
does not <strong>com</strong>pletely cut through the workpiece.<br />
Note: It is advisable that the depth of cut is<br />
checked using a scrap piece of timber to ensure<br />
that the slot cut is correct.<br />
By making a cut in the workpiece, and then<br />
repeating the cut but with the workpiece slightly<br />
repositioned to the left or right, it is possible to<br />
perform trenching cuts.<br />
To use the depth stop:<br />
1. Loosen the locking nut.<br />
2. Deploy the depth stop plate by easing it outwards.<br />
3. Adjust the socket headed screw to limit the saw<br />
heads travel to the required depth.<br />
4. Once set to the desired depth, tighten the locknut<br />
against the retaining bracket to lock the depth stop<br />
screw and ensure that there is no movement.<br />
5. When cutting is <strong>com</strong>plete re-adjust the depth<br />
stop so that the cutting head can be locked in<br />
the down position by the head latching pin.<br />
6. Return the depth stop plate to its original<br />
position.<br />
ERBAUER 24V 165MM SINGLE BEVEL MITRE SAW
13. CUTTING BOWED MATERIAL<br />
Before cutting any workpiece, check to see if<br />
it is bowed. If it is bowed the workpiece must<br />
be positioned and cut as shown. See Figs 18<br />
& 19<br />
Do not position the workpiece incorrectly or<br />
cut the workpiece without the support of the<br />
fence.<br />
14. CLEARING JAMMED MATERIAL<br />
1. Turn the mitre saw “OFF” by releasing the<br />
trigger switch.<br />
2. Allow the blade to <strong>com</strong>e to a <strong>com</strong>plete halt.<br />
3. Remove the battery pack from the mitre<br />
saw.<br />
4. Remove any jammed material from the unit.<br />
5. Re-install the battery pack.<br />
15. TRANSPORTING<br />
When transporting the saw between<br />
locations make sure that:<br />
1. The saw head is locked in the down<br />
position.<br />
2. The rotary table mitre handle, the bevel<br />
locking lever and the slide locking knob are all<br />
securely tightened.<br />
3. Use the transportation handle cut-outs on<br />
either side of the machine base to lift the saw.<br />
Do not lift the saw by the switch handle alone.<br />
Note<br />
Although <strong>com</strong>pact this saw is quite heavy,<br />
Enlist <strong>com</strong>petent help, if necessary, when<br />
transporting this saw.<br />
MAINTENANCE & ADJUSTMENTS<br />
PRECISION SETTING OF ANGLES<br />
Warning: Before making any adjustments, or<br />
carrying out maintenance to the saw, make<br />
sure that it is disconnected from the mains<br />
supply.<br />
Fig 18<br />
Fig 19<br />
ERBAUER 24V 165MM SINGLE BEVEL MITRE SAW
Fig 20<br />
Fig 21<br />
Fig 22<br />
90 0<br />
When all adjustments, settings or maintenance<br />
have been <strong>com</strong>pleted, make sure that all keys<br />
or wrenches have been removed, and that all<br />
screws, bolts and other fittings are securely<br />
tightened.<br />
While the machine has been factory set, it is<br />
advisable that the 0 O setting of the rotary table<br />
and the 90 O perpendicular setting of the tilt<br />
head be checked, as these positions may have<br />
moved in transit.<br />
To confirm the 0 0 rotary table setting:<br />
a) Set the rotary table at 0 0 and tighten the<br />
rotary table lock handle.<br />
b) Use an engineers square (not supplied) to<br />
check that the angle between the machines<br />
fence guide and the blade is 90 0 . (Fig 20)<br />
c) If the angle requires adjustment, loosen<br />
the two fence guide clamp screws and align<br />
the fence guide against the engineers square.<br />
Retighten the clamp screws.<br />
Similarly check that the angle of the saw blade<br />
to the face of the table is 90 0 . (Fig 21)<br />
To adjust:<br />
a) Loosen the locknut<br />
b) Using a suitable hex key screw the 90 0<br />
adjustment screw clockwise or counter<br />
clockwise until correct alignment has been<br />
achieved. (Fig 22)<br />
c) Retighten the locknut.<br />
ERBAUER 24V 165MM SINGLE BEVEL MITRE SAW
The 45 0 bevel setting can also be adjusted.<br />
a) Set the cutting head to 45 0 and check the<br />
angle between the blade and the machine<br />
table with a 45 0 set square (not provided).<br />
(Fig 23)<br />
b) To adjust, loosen the 45 0 adjusting screw<br />
locknut and using a suitable hex key turn the<br />
adjusting screw clockwise or anti- clockwise<br />
until the correct alignment is achieved. (Fig 24)<br />
c) Retighten the locknut.<br />
The position of bevel scale pointer may<br />
have moved in transit or after use. Use a<br />
screwdriver to adjust it if necessary.<br />
ALIGNING THE LASER<br />
Warning: For your safety, carry out all<br />
adjustments with the machine disconnected<br />
from the power supply. Only switch the laser<br />
on to confirm that adjustments have been<br />
successful.<br />
Your saw is equipped with a Laser cutting<br />
guide using a Class II laser beam. This laser is<br />
powered from the machines battery pack. The<br />
saw must be connected to the power source<br />
and the laser on/off switch must be turned on<br />
for the laser line to show.<br />
Laser radiated when laser guide is turned on.<br />
Avoid direct eye contact.<br />
Laser Warning Label: Max output
Fig 25<br />
Four laser module mounting/adjustment screws<br />
are provided. Two hex socket grub screws are<br />
positioned on the LH side of the laser housing<br />
(Fig 25), and one on the RH side of the laser<br />
housing. A final cross-headed fixing screw is<br />
to be found just below the laser lens. These<br />
screws gently hold the laser module in place and<br />
on alignment by bearing on the laser modules<br />
casing. It is important that during any adjustment<br />
the pressure on the laser module casing is<br />
maintained as closely as possible to the factory<br />
setting. Do not over tighten any one screw –<br />
damage to the laser casing could result.<br />
B) Adjusting the Angle of the Laser Guide<br />
1) Loosen the cross-headed screw.<br />
2) Loosen the single screw on the RH side of the<br />
laser housing ¼ a turn.<br />
3) Turn the laser element in the desired direction<br />
to adjust the laser angle.<br />
4) Retighten the adjustment screws.<br />
C) Aligning the Laser Beam<br />
1. Loosen the cross-headed screw.<br />
1) Loosen the right hand screw ¼ of a turn.<br />
2) Use the two adjusting screws on the LH side<br />
of the laser housing.<br />
3) Adjust both screws until laser alignment is<br />
achieved.<br />
4) Retighten right hand screw.<br />
5) Retighten the cross-headed screw<br />
Note: Use only the correct sized hex key when<br />
adjusting the grub screws. Turn one screw at a<br />
time and only ¼ turn in either direction before<br />
checking laser alignment. Maintain as far as<br />
possible the original factory pressure setting that<br />
these screws exert on the laser module<br />
LUBRICATION & CLEANING<br />
Note<br />
Any maintenance must be carried out with the<br />
machine switched off and disconnected from the<br />
mains power supply.<br />
All motor bearings in this machine are lubricated<br />
for life. No further lubrication is required.<br />
ERBAUER 24V 165MM SINGLE BEVEL MITRE SAW
etailer for recycling advice.<br />
PLUG REPLACEMENT<br />
Apply light machine oil to the machines pivot points<br />
and lower blade The fuse operating in the main arm. plug Avoid of your excessive power oil, toolto<br />
which sawdust should will always cling. be replaced with one of<br />
identical rating.<br />
Periodically, sawdust may accumulate under the work<br />
table and the<br />
Check<br />
base.<br />
the<br />
Use<br />
voltage<br />
a vacuum<br />
given on<br />
cleaner<br />
your power<br />
to remove<br />
tool<br />
matches the supply voltage.<br />
this sawdust.<br />
Use a clean, The slightly power damp tool is cloth supplied to clean with a the fi tted plastic plug,<br />
parts of the however machine. if you Do not should use need solvents to fi t a or new similar plug<br />
products which follows could the instruction damage the below. plastic parts.<br />
WARNING: Do IMPORTANT<br />
not attempt to clean by inserting pointed<br />
objects through The openings wire in the in mains the machines lead are casings coloured etc. in The<br />
machines air accordance vents should with be the cleaned following using code: <strong>com</strong>pressed<br />
dry air. Blue ---Neutral<br />
Brown ---Live<br />
PLUG REPLACEMENT The wire that is coloured blue must be<br />
connected to the terminal that is marked with<br />
The fuse in the<br />
the<br />
main<br />
letter<br />
plug<br />
N.<br />
of<br />
The<br />
your<br />
wire<br />
power<br />
that is<br />
tool<br />
coloured<br />
should always<br />
brown<br />
must be connected to the terminal that is<br />
be replaced with one of identical rating.<br />
marked with the letter L. A 13AMP (BS1363<br />
Check the voltage given on your power tool matches the<br />
or BS1363/A) plug must be used and a 5 AMP<br />
supply voltage.<br />
fuse must be fi tted.<br />
The power tool is supplied with a fitted plug, however if you<br />
should need to<br />
A 13AMP<br />
fit a new<br />
(BS1363<br />
plug follows<br />
or BS1363/A)<br />
the instruction<br />
plug<br />
below.<br />
must be<br />
IMPORTANT used and a 5 AMP fuse must be fi tted.<br />
The wire in the mains lead are coloured in accordance with<br />
the following code:<br />
Blue ---Neutral<br />
Brown ---Live<br />
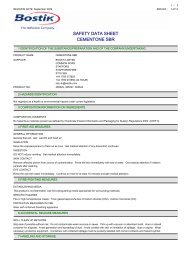
5 AMP<br />
FUSE<br />
BLUE<br />
N (NEUTRAL)<br />
BROWN<br />
L (LIVE)<br />
OUTER<br />
SLEEVE<br />
The wire that is coloured blue must be connected to the<br />
terminal that is marked with the letter N. The wire that is<br />
coloured brown must be connected to the terminal that is<br />
marked with the letter L. A 13AMP (BS1363 or BS1363/A)<br />
plug must be 30used<br />
and a 5 AMP fuse must be fitted.<br />
A 13AMP (BS1363 or BS1363/A) plug must be used and a 5<br />
AMP fuse must be fitted.<br />
ERBAUER 216MM (8”) SLIDING MITRE SA<br />
ENVIRONMENTAL PROTECTION<br />
CABLE GRIP<br />
Waste electrical products should not be disposed<br />
of with household waste. Please recycle where<br />
facilities exist. Check with your Local Authority or<br />
retailer for recycling advice.<br />
ERBAUER 24V 165MM SINGLE BEVEL MITRE SAW
DECLARATION OF CONFORMITY<br />
We, Importer<br />
Erbauer (UK) Ltd.<br />
BA22 8RT<br />
Declare that the product<br />
Complies with the essential health and safety requirements of the following directives:<br />
<br />
“2004/108/EC” – EMC Directive. “2006/42/EC” – Machinery Directive. “2006/95/EC - Low<br />
Authorised Signatory<br />
<br />
Date: 30/09/2010 <br />
Signature: <br />
Name Peter Harries<br />
<br />
Erbauer (UK) Ltd <br />
Quality Manager <br />
<br />
<br />
<br />
<br />
<br />
<br />
Voltage Directive”<br />
Standards and technical specifications referred to:<br />
EN55014-1: 2006<br />
EN55014-2/A2:2008<br />
EN61000-6-3: 2007<br />
EN61029-2-9: 2002<br />
EN61029-1: 2009<br />
EN60335-1<br />
EN60335-2-29<br />
EN50366<br />
EN61000-3-2<br />
EN61000-3-3<br />
<br />
<br />
<br />
<br />
<br />
<br />
<br />
<br />
<br />
<br />
<br />
<br />
<br />
<br />
ERBAUER<br />
<br />
24V<br />
<br />
165MM SINGLE BEVEL<br />
<br />
MITRE SAW