ERF298MSW - Free-Instruction-Manuals.com
ERF298MSW - Free-Instruction-Manuals.com
ERF298MSW - Free-Instruction-Manuals.com

You also want an ePaper? Increase the reach of your titles
YUMPU automatically turns print PDFs into web optimized ePapers that Google loves.
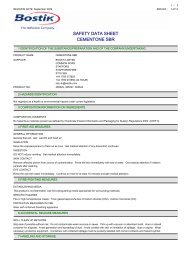
Fig 8<br />
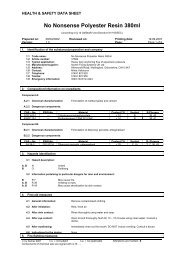
Fig 9<br />
6. HOLD DOWN CLAMP<br />
1. Hold down clamps can be fitted on either side<br />
of the saw and are fully adjustable to suit the size<br />
of the workpiece (see fig 8). The clamp will fit into<br />
either of the posts integrated into the machine<br />
fence.<br />
2. Do not operate the saw without clamping the<br />
workpiece.<br />
3. Make sure that the hold down clamp securing<br />
screws are tightened.<br />
Warning: Always check clamp position does not<br />
interfere with any saw operation. Before switching<br />
on, lower the saw head to ensure the clamp<br />
clears the guard and saw head assembly.<br />
7. FENCE<br />
The width of the fence ‘mouth’ can be altered<br />
by adjusting the LH side of the fence. This<br />
may be necessary to provide clearance for the<br />
blade when extreme mitre and bevel angles are<br />
selected. (Fig 9)<br />
1. Ensure that the battery is removed from the<br />
machine.<br />
2. Loosen the two countersunk headed screws<br />
with the hex key provided.<br />
3. Slide the adjustable fence front plate to the<br />
desired position.<br />
4. Check that the blade does not foul the fence by<br />
conducting a ‘dry run’ with the cutting head set to<br />
the required bevel and mitre angle.<br />
5. When satisfied that the blades path is<br />
unobstructed tighten the two screws and replace<br />
the battery.<br />
ERBAUER 24V 165MM SINGLE BEVEL MITRE SAW