1400W Mitre Saw 01 - Free-Instruction-Manuals.com
1400W Mitre Saw 01 - Free-Instruction-Manuals.com
1400W Mitre Saw 01 - Free-Instruction-Manuals.com

Create successful ePaper yourself
Turn your PDF publications into a flip-book with our unique Google optimized e-Paper software.
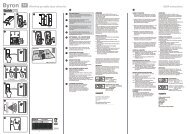
SAFETY AND OPERATING MANUAL<br />
<strong>1400W</strong> MITRE SAW ENB475MSW<br />
Original <strong>Instruction</strong>s V1.0
Read all safety warnings and all instructions before use. Failure to follow the warnings and<br />
instructions may result in electric shock, fire and/or serious injury.<br />
Save all warnings and instructions for future reference.<br />
<strong>1400W</strong> MITRE SAW ENB475MSW
GENERAL SAFETY INSTRUCTIONS<br />
WARNING! When using electric tools basic safety precautions should always<br />
be followed to reduce the risk of fire, electric shock and personal injury<br />
including the following.<br />
Read all these instructions before attempting to operate this product and save these<br />
instructions.<br />
1. Keep work area clear.<br />
- Cluttered areas and benches invite injuries.<br />
2. Consider work area environment.<br />
- Do not expose tools to rain.<br />
- Do not use tools in damp or wet locations.<br />
- Keep work area well lit.<br />
- Do not use tools in the presence of flammable liquids or gases.<br />
3. Guard against electric shock.<br />
- Avoid body contact with earthed or grounded surfaces (e.g. Pipes, radiators, ranges,<br />
refrigerators, other metal surfaces).<br />
4. Keep other persons away.<br />
- Do not let persons, especially children, not involved in the work touch the tool or the<br />
extension cord and keep them away from the work area<br />
5. Store idle tools.<br />
-When not in use, tools should be stored in a dry locked-up place, out of reach of children.<br />
6. Do not force the tool.<br />
- It will do the job better and safer at the rate for which it was intended.<br />
7. Use the right tool.<br />
- Do not force small tools to do the job of a heavy duty tool.<br />
- Do not use tools for purposes not intended; for example do not use circular saws to<br />
cut tree limbs or logs.<br />
8. Dress properly.<br />
- Do not wear loose clothing or jewellery, they can be caught in moving parts.<br />
- Non-skid footwear is re<strong>com</strong>mended when working outdoors.<br />
- Wear protective hair covering to contain long hair.<br />
9. Use protective equipment.<br />
- Use safety glasses.<br />
- Use face or dust mask if working operations create dust.<br />
10. Connect dust extraction equipment.<br />
- If the tool is provided for the connection of dust extraction and collecting equipment,<br />
ensure these are connected and properly used.<br />
<strong>1400W</strong> MITRE SAW ENB475MSW
11. Do not abuse the cord.<br />
- Never yank the cord to disconnect it from the socket Keep the cord away from heat, oil<br />
and sharp edges.<br />
12. Secure work.<br />
- Where possible use damps or a vice to hold the work. It is safer than using your hand.<br />
13. Do not overreach.<br />
- Keep proper footing and balance at all times.<br />
14. Maintain tools with care.<br />
- Keep cutting tools sharp and clean for better and safer performance.<br />
- Follow instruction for lubricating and changing accessories.<br />
- Inspect tool cords periodically and if damaged have them repaired by an authorised<br />
service facility.<br />
- Inspect extension cords periodically and replace if damaged.<br />
- Keep handles dry, clean and free from oil and grease.<br />
15. Disconnect tools.<br />
- When not in use, before servicing and when changing accessories such as blades, bits<br />
and cutters, disconnect tools from the power supply.<br />
16. Remove adjusting keys and wrenches.<br />
- Form the habit of checking to see that keys and adjusting wrenches are removed from<br />
the tool before turning it on.<br />
17. Avoid unintentional starting.<br />
- Ensure switch is in “off” position when plugging in.<br />
18. Use outdoor extension leads.<br />
- When the tool is used outdoors, use only extension cords intended for outdoor use and<br />
so marked.<br />
19. Stay alert.<br />
- Watch what you are doing, use <strong>com</strong>mon sense and do not operate the tool when you<br />
are tired.<br />
20. Check damaged parts.<br />
- Before further use of tool, it should be carefully checked to determine that it will operate<br />
properly and perform its intended function.<br />
- Check for alignment of moving parts, binding of moving parts, breakage of parts,<br />
mounting and any other conditions that may affect its operation.<br />
- A guard or other part that is damaged should be properly repaired or replaced by an<br />
authorised service centre unless otherwise indicated in this instruction<br />
manual.<br />
- Have defective switches replaced by an authorised service centre.<br />
- Do not use the tool if the switch does not turn it on and off.<br />
21. Warning.<br />
- The use of any accessory or attachment other than one re<strong>com</strong>mended in this instruction<br />
<strong>1400W</strong> MITRE SAW ENB475MSW
manual may present a risk of personal injury.<br />
22. Have your tools repaired by qualified person.<br />
- This electric tool <strong>com</strong>plies with the relevant safety rules. Repairs should only be carried<br />
out by qualified persons using original spare parts, otherwise this may result in<br />
considerable danger to the user.<br />
SPECIAL SAFETY INSTRUCTIONS<br />
1.If the supply cord is damaged, it must be replaced by the manufacturer, its service agent<br />
or similarly qualified persons in order to avoid a hazard.<br />
2. Only wood or products such as medium density fibre board can be cut with this saw.<br />
Other materials may shatter or cause the blade to grab.<br />
3. Never fit substandard blades to the saw. Only fit correctly sized saw blade.<br />
4. Let the blade reach full speed before <strong>com</strong>mencing the cut.<br />
5. Do not use damaged or worn blades.<br />
6. Ensure that the directional arrow marked on the blade corresponds with the rotational<br />
direction of motor.<br />
7. Ensure that the movable guards operate freely without jamming.<br />
8. Never cut pieces too small to be held securely against the straight guide leave enough<br />
space for the hand to be a safe distance from the blade.<br />
9. Regularly check the blade securing bolt.<br />
10. Do not run the machine with any part of the casing missing or damaged.<br />
11. Do not start the saw when the blade is inserted into the workpiece.<br />
12. Let the blade <strong>com</strong>e to a <strong>com</strong>plete stop before removing any jammed or offcut material<br />
from around the blade area. Do not attempt to stop the blade by placing sideways pressure<br />
on the blade disc.<br />
13. Before cutting let the saw blade run freely for a few seconds. If it makes an unfamiliar<br />
sound or vibration switch it off immediately and disconnect from the power supply.<br />
Investigate cause or consult your dealer.<br />
14. Ensure all securing clamps are tight and check for excessive play.<br />
15. Never try to cut freehand. Always ensure that the workpiece is securely pressed<br />
against the straight guide and table support surface.<br />
16. Disconnect from the mains supply, pull down the handle of the saw. With the blade in<br />
its furthest down position, rotate the blade by hand to ensure it is free from obstruction.<br />
Repeat this procedure at all maximum mitre and bevel positions before <strong>com</strong>mencing work.<br />
17. Ensure that the workpiece to be cut off has sufficient room to move sideways. Failure<br />
to do so may result in the off cut binding against the blade.<br />
18. Ensure that irregular or round piece to be cut off has sufficient room to move or twist so<br />
that they cannot pinch the blade.<br />
<strong>1400W</strong> MITRE SAW ENB475MSW
19. Do not forget to remove any adjustment keys, spanners and wrenches before<br />
switching on the tool.<br />
20. When the machine is in operation, keep hands away from the cutting area.<br />
21. Always ensure the safety guard is in working order before use. Should the guard not<br />
close quickly over the saw blade, do not use.<br />
22. Do not tie or wedge open the safety guard.<br />
23. Only use blades with the correct bore size for the spindle.<br />
24. Do not use saw blade which does not <strong>com</strong>ply with the characteristics specified in these<br />
instructions.<br />
25. Do not use saw blades made of high speed steel.<br />
26. Do not cut into screws or nails. Inspect workpiece for nails and screws before use.<br />
27.Use a Residual Circuit Breaker on all 230-240V Power tools. This can help minimise<br />
the risk of an electrical shock if an earth fault or short circuits occurs.<br />
28. If using a power cable extension ensure that the cable is fully unwound and that its<br />
length is less than 30m. Lengths over 30 m will effect the tools performance as a result of<br />
voltage drop.<br />
29. Always use the appropriate safety equipment that is required for the product. e.g.<br />
Goggles / Safety Spectacles, Ear defenders (essential with tools with a noise rating of over<br />
80 dB(A), Gloves and face masks. In all cases ensure that the safety equipment is in good<br />
condition.<br />
30.Ensure that there is adequate general or localised lighting.<br />
31.Ensure that the machine is always fixed to a bench, whenever possible. Always to<br />
clamp work pieces to the saw table.<br />
32.Always stand to one side when operating the saw.<br />
33.Use only blades as re<strong>com</strong>mended by the manufacturer and which conform to EN 847-1.<br />
34.If the table insert is damaged or worn, have it replaced by an authorised service centre.<br />
35. Rags, cloths, cord and string and the like should never be left around the work area.<br />
36. Only use the saw with guards in good working order and properly maintained, and in<br />
position.<br />
37. Keep the floor area free of loose material e.g. chips and cut-offs.<br />
38. Ensure the speed marked on the saw blade is at least equal to the speed marked on<br />
the saw<br />
39. Warning. Refrain from removing any cut-offs or other parts of the work piece from the<br />
cutting area whilst the machine is running and the saw head is not in the rest position.<br />
40.The mitre saw can be safely carried by the carrying handle but only once it has been<br />
removed from the mains power and secured in the locked down position.<br />
41. Ensure that the arm is properly secure when bevelling.<br />
42. When cutting long pieces which extend well over the table width, ensure that the ends<br />
are adequately supported at the same height as the saw table top. Supports should be<br />
positioned in such a way to ensure that the workpiece does not fall to the ground once the<br />
<strong>1400W</strong> MITRE SAW ENB475MSW
NOISE INFORMATION<br />
Wear hearing protection!<br />
Measured sound values determined according to EN 61029.<br />
The noise figures quoted are emission levels and are not necessarily safe working levels.<br />
Whilst there is a correlation between the emission and exposure levels, this cannot be<br />
used reliably to determine whether or not further precautions are required. Factors that<br />
influence the actual level of exposure of work-force include the characteristics of the work<br />
room, the other sources of noise, etc. i.e.<br />
the number of machines and other adjacent processes, and the length of time for which an<br />
operator is exposed to the noise. Also the permissible exposure level can vary from<br />
country. This information, however, will enablethe user of the machine to make a better<br />
evaluation of the hazard and risk.<br />
VIBRATION<br />
The European Physical Agents (Vibration) Directive has been brought in to help reduce<br />
hand arm vibration syndrome injuries to power tool users. The directive requires power tool<br />
manufacturers and suppliers to provide indicative vibration test results to enable users to<br />
make informed decisions as to the period of time a power tool can be used safely on a<br />
daily basis and the choice of tool.<br />
Vibration total values (triax vector sum) determined according to EN 61029:<br />
Cutting into wood Vibration emission value ah = 2.382 m/s²<br />
Uncertainty K = 1.5 m/s²<br />
The declared vibration emission value should be used as a minimum level and should be<br />
used with the current guidance on vibration.<br />
The declared vibration emission been measured in accordance with a standardised test<br />
stated aboveand may be used to <strong>com</strong>pare one tool with another tool.The declared vibration<br />
emission value may also be used in a preliminary assessment of exposure.<br />
<strong>1400W</strong> MITRE SAW ENB475MSW
WARNING!<br />
The vibration emission value during actual use of the power tool can differ from the<br />
declared value depending on the ways in which the tool is used dependent on the following<br />
examples and other variations on how the tool is used:<br />
How the tool is being used and the materials being cut or drilled.<br />
The tool being in good condition and well maintained<br />
The use the correct accessory for the tool and ensuring it is sharp and in good condition.<br />
The tightness of the grip on the handles.<br />
And the tool is being used as intended by its design and these instructions.<br />
While working with this power tool, hand/arm vibrations occur. Adopt the correct working<br />
practices in order to reduce the exposure to vibration.<br />
This tool may cause hand-arm vibration syndrome if its use is not adequately managed.<br />
WARNING!<br />
Identify safety measures to protect the operator that are based on an estimation of<br />
exposure in the actual conditions of use (taking account of all parts of the operating cycle<br />
such as the times when the tool is switched off and when it is running idle in addition to the<br />
trigger time).<br />
Vibration and noise reduction<br />
To reduce the impact of noise and vibration emission, limit the time of operation, use<br />
low-vibration and low-noise operating modes as well as wear personal protective<br />
equipment.<br />
Take the following points into account to minimize the vibration and noise exposure risks:<br />
1.Only use the product as intended by its design and these instructions.<br />
2.Ensure that the product is in good condition and well maintained.<br />
3.Use correct application tools for the product and ensure they in good condition.<br />
4.Keep tight grip on the handles/grip surface.<br />
5.Maintain this product in accordance with these instructions and keep it well lubricated<br />
(where appropriate).<br />
6.Plan your work schedule to spread any high vibration tool use across a number of days.<br />
Emergency<br />
Familiarise yourself with the use of this product by means of this instruction<br />
manual. Memorise the safety directions and follow them to the letter. This will help to<br />
prevent risks and hazards.<br />
<strong>1400W</strong> MITRE SAW ENB475MSW
1.Always be alert when using this product, so that you can recognise and handle risks<br />
early. Fastv intervention can prevent serious injury and damage to property.<br />
2.Switch off and disconnect from the power supply if there is any malfunction. Have the<br />
product checked by a qualified specialist and repaired, if necessary, before you put it into<br />
operation again.<br />
Health Surveillance<br />
All employees should be part of an employer’s health surveillance scheme to help identity<br />
any vibration related diseases at an early stage, prevent disease progression and help<br />
employees stay in work.<br />
Residual risks<br />
Even if you are operating this product in accordance with all the safety requirements,<br />
potential risks of injury and damage remain. The following dangers can arise in connection<br />
with the structure and design of this product:<br />
1.Health defects resulting from vibration emission if the product is being used over long<br />
periods of time or not adequately managed and properly maintained.<br />
2.Injuries and damage to property due to broken application tools or the sudden impact of<br />
hidden objects during use.<br />
3.Danger of injury and property damage caused by flying objects.<br />
WARNING!<br />
This product produces an electromagnetic field during operation! This field may under<br />
some circumstances interfere with active or passive medical implants! To reduce the risk of<br />
serious or fatal injury, we re<strong>com</strong>mend persons with medical implants to consult their doctor<br />
and the medical implant manufacturer before operating this product!<br />
Important note<br />
Be sure the supply is the same as the voltage given on the rating plate. Remove the mains<br />
plug / battery pack before carrying out any adjustment or servicing.<br />
Intended use<br />
The machine is intended as a stationary machine for making straight lengthways and<br />
crossways cuts in wood. Horizontal mitre angles of -45° to +45° as well as vertical bevel<br />
angles of 0° to +45° are possible.<br />
<strong>1400W</strong> MITRE SAW ENB475MSW
SYMBOLS<br />
WARNING - To reduce the risk of injury, user must read the<br />
instruction manual<br />
Wear gloves protection<br />
Warning<br />
Wear ear protection<br />
Wear eye protection<br />
Wear respiratory protection<br />
Double insulated for additional protection.<br />
Conforms to relevant safety standards<br />
Waste electrical products should not be disposed of with household waste.<br />
Please recycle where facilities exist.Check with your Local Authority or retailer<br />
for recycling advice.<br />
yyWxx Manufacturing date code:Year of manufacturing (20yy) and week of<br />
manufacturing (Wxx);<br />
<strong>1400W</strong> MITRE SAW ENB475MSW
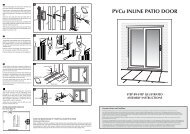
Components and controls<br />
1<br />
2<br />
11<br />
21<br />
22<br />
1 Dust extraction port<br />
2 <strong>Mitre</strong> lock<br />
3 Release latch<br />
4 Upper fixed blade guard<br />
5 Blade bolt cover<br />
6 Guard retraction arm<br />
7 Low blade guard<br />
8 <strong>Mitre</strong> scale<br />
9 Table insert<br />
10 <strong>Mitre</strong> table<br />
11 Fence<br />
12 <strong>Saw</strong> arm<br />
13 Release knob<br />
3<br />
20<br />
4<br />
5<br />
6<br />
7<br />
8<br />
9<br />
10<br />
12<br />
25<br />
14<br />
14 Vertical clamp<br />
15 Handle<br />
16 Switch trigger<br />
17 45°Bevel adjustment screw<br />
18 Support bar location holes<br />
19 Bevel lock<br />
20 Bevel scale<br />
21 0°Bevel adjustment screw<br />
22 Spindle lock button<br />
23 Dust bag<br />
24 Hex key<br />
25 Support stand<br />
26 Fence locking screw<br />
<strong>1400W</strong> MITRE SAW ENB475MSW<br />
23<br />
13<br />
18<br />
24<br />
19<br />
15<br />
18<br />
16<br />
26<br />
17
TECHNICAL DATA<br />
Voltage: 230-240V ~ 50Hz<br />
Input power: <strong>1400W</strong><br />
No load speed: 5000/min<br />
Blade diameter: Ø210mm<br />
Blade teeth: 24TCT<br />
Blade arbour: Ø30mm<br />
<strong>Mitre</strong> table angles: -45°/0°/+45°<br />
Straight cut at 0° x 0°: 120×55 mm<br />
<strong>Mitre</strong> cut at 45° x 0°: 83×55 mm<br />
Bevel cut at<br />
0°x 45°(Left): 120×30 mm<br />
Compound mitre cut at<br />
45°x 45°(Left): 83×30 mm<br />
Weight: 6.7kg<br />
A new section for Noise level and vibration data shall be on vibration section<br />
NOISE INFORMATION<br />
Sound pressure level LpA= 100dB(A) Uncertainty K=3dB<br />
Sound power level LwA = 113dB(A) Uncertainty K=3dB<br />
Wear ear protection when sound pressure is over 80dB(A)<br />
ACCESSORIES<br />
This COMPOUND MITRE SAW <strong>com</strong>es with the following accessories:<br />
• 24 Teeth blade (fitted)<br />
• Dust bag<br />
• Workpiece clamp<br />
• Support stand<br />
• 6mm Hex key<br />
<strong>1400W</strong> MITRE SAW ENB475MSW
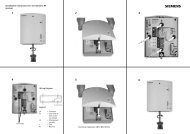
ASSEMBLY<br />
Fig.1<br />
a<br />
Fig.2<br />
Fig.3<br />
Fig.4<br />
Fig.5<br />
18<br />
Note: Before using the tool, read<br />
the instruction book carefully.<br />
WARNING: To prevent the accidental starting<br />
that could cause possible serious personal<br />
injury, ALWAYS assemble all parts to your saw<br />
BEFORE connecting it to the power supply. The saw<br />
should NEVER be connected to a power supply<br />
when you are assembling parts, making<br />
adjustments, installing or removing blades, or when<br />
not in use.<br />
1. DUST EXTRACTION PORT (Fig. 1)<br />
To reduce build up of saw dust and maintain top<br />
efficiency of cutting, the saw dust collection can be<br />
achieved by clipping a dust bag on the dust<br />
extraction port.<br />
A dust bag is provided for use on your mitre saw. To<br />
install it, simply fit the dust bag over the extraction<br />
port on the upper blade guard.<br />
To empty the dust bag, remove it from the dust<br />
exhaust port, open the dust bag by unzipping the<br />
slide fastener.<br />
NOTE:To ensure optimal dust collecting, empty the<br />
dust bag when it be<strong>com</strong>es filled to approximately<br />
2/3 of its capacity.<br />
2. SUPPORT STAND (Fig. 2-4)<br />
Remove the screw (a) from support stand(18).<br />
Insert ends of support stand into the holes in the<br />
back of the base plate and screw in the screw on<br />
support stand as shown in Fig.2,3 & 4.<br />
WARNING:Always assemble the support<br />
stand when using the product.<br />
3. MOUNTING HOLES (Fig. 5)<br />
Before use, the saw can be fixed to a firm, level<br />
surface with the 4 mounting bolts (Not supplied).<br />
<strong>1400W</strong> MITRE SAW ENB475MSW
Fig.6<br />
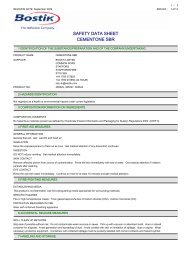
OPERATION<br />
Fig.7<br />
Fig.8<br />
3<br />
Fig.9<br />
16<br />
b<br />
Four holes are provided in the base of the saw to<br />
enable it to be fixed to a bench, or other supporting<br />
surface.<br />
To mount the saw, proceed as follows:<br />
1) Locate and mark where the saw is to be mounted.<br />
2) Drill 4 holes through the surface.<br />
3) Place the mitre saw on the surface aligning holes<br />
in base with holes drilled in the surface. Install bolts,<br />
washers and hex nuts.<br />
4. Workpiece clamp (Fig.6)<br />
When cutting workpiece, the boards should always<br />
be clamped with a hold-down clamp (provided) as<br />
shown in Fig.6.<br />
1. RELEASING THE SAW HEAD (Fig.7, 8)<br />
When boxed or during storage, transportation, the<br />
saw head is locked in the down position. To release<br />
the head ready for operation, apply downward<br />
pressure and pull out the lock pin (b). The head will<br />
be raised gently to upper position.<br />
2. TO MAKE A CUT (Fig. 9)<br />
1) Connect the machine to power outlet, ensure that<br />
the mains cable is clear of the blade and the base<br />
plate.<br />
2) Position the material to be cut on the rotary table,<br />
ensure it is firmly held so that it will not move during<br />
cutting.<br />
Ensure that the rotary table locking screws(17) and<br />
the bevel lock (19) are tightened before cutting.<br />
3) Press the switch trigger (16) and allow the saw<br />
blade to run up the speed.<br />
4) Still holding in the trigger, press the safety<br />
release latch (3) towards the handle. It will then be<br />
possible to push the saw head down by the handle.<br />
5) Continue to move the saw head down smoothly<br />
and make the cut exerting only gentle pressure on<br />
the downward stroke, letting the saw do the work.<br />
<strong>1400W</strong> MITRE SAW ENB475MSW
c<br />
Fig.10<br />
Fig.11<br />
Fig.12<br />
Loosen<br />
Tighten<br />
MAINTENANCE<br />
3. MITRE CUTS (Fig. 10)<br />
A mitre cut is made at 0° bevel and any mitre angle<br />
in the range from 45° left to 45° right.<br />
Release the rotary table locking screw (c). Move<br />
the saw to the desired angle by twisting so that the<br />
table turns. Set at the desired angle, and tighten the<br />
rotary table lock screw (c). Make your cut.<br />
4.BEVEL CUTS (Fig. 11, 12)<br />
A bevel cut is made at 0° mitre and any bevel angle<br />
in the range of 0° to 45° right.<br />
The saw can be moved from the normal 0°<br />
perpendicular position to an angled position down<br />
to 45° from the horizontal, on the left only.<br />
5. COMPOUND ANGLE CUTS (Fig. 10)<br />
A <strong>com</strong>pound cut is a cut requiring both a mitre<br />
setting and a bevel setting.<br />
Compound mitre cuts can be achieved by setting<br />
both the mitre and bevel angles simultaneously.<br />
Follow the procedures for mitre and bevel cuts to<br />
achieve the desired angles.<br />
6. The sliding upper fence section (Fig. 10)<br />
The left hand side of the fence may be necessary<br />
to provide clearance for the moving cutting head<br />
when actual bevel or <strong>com</strong>pound angles are selected.<br />
To adjust the fence:<br />
Loosen the fence locking screw(26) by provided<br />
hex key. Slide the upper section of the Fence<br />
leftwards to the required position and tighten the<br />
screw(26).<br />
Note: Conduct a 'dry run' with the power off to<br />
confirm that there is no interference between<br />
moving parts as the Cutting Head is lowered.<br />
WARNING: Remove the plug from the socket<br />
before carrying out any adjustment, servicing or<br />
maintenance.<br />
When all the adjustments, settings or maintenance<br />
have been done, make sure that all keys and<br />
<strong>1400W</strong> MITRE SAW ENB475MSW
Fig.13<br />
Fig.14<br />
Fig.15<br />
g1<br />
g2<br />
Fig.16<br />
Fig.17<br />
d<br />
d<br />
d<br />
e<br />
f1<br />
f2<br />
wrenches have been removed and that all screws,<br />
bolts and other fittings are securely tightened.<br />
There are no user serviceable parts in your power<br />
tool. Never use water or chemical cleaners to<br />
clean your power tool. Wipe clean with a dry cloth.<br />
Always store your power tool in a dry place. Keep<br />
the motor ventilation slots clean. Keep all working<br />
controls free of dust. Occasionally you may see<br />
sparks through the ventilation slots. This is normal<br />
and will not damage your power tool.<br />
If the supply cord of this power tool is damaged, it<br />
must be replaced by a specially prepared cord<br />
available through the service organization.<br />
1. PRECISION SETTING OF ANGLES<br />
(Fig. 13-14)<br />
While the machine has been factory set, it is<br />
advisable that the 0° setting of the rotary table and<br />
the 0° perpendicular setting of the tilt be checked,<br />
as these positions may have moved in transit.<br />
(Ensure power is disconnected while making<br />
these adjustments).<br />
To confirm the 0° rotary table setting, set the rotary<br />
table at 0° and tighten the rotary table locking<br />
screw. Check that the angle between the straight<br />
guide and the blade is 90° using a try square<br />
(d, not supplied) as shown in Fig.13.<br />
If the angle requires adjustment, loosen the<br />
locking screws (e) for straight guide, and align the<br />
fence against the try square.<br />
Re-tighten the locking screws (e) for straight guide.<br />
Similarly, check that the angle of the blade to the<br />
face of the rotary table is 90°. If necessary, adjust<br />
the tilt angle of the saw head at the 90° position<br />
by loosening the set screw (f1) for 90°. When the<br />
90°position is correct, tighten the lock nut (f2) on<br />
the set screw for 90°. (Fig. 15, 16)<br />
The 45° bevel tilt should also be adjusted use<br />
a 45° set square or mitre gauge (d , not supplied),<br />
to check the 45° angle, adjust the set screw (g1)<br />
for 45° to set the correct stop position, then tighten<br />
<strong>1400W</strong> MITRE SAW ENB475MSW
Fig.18<br />
Fig.19<br />
Fig.20<br />
Fig.21<br />
Fig.22<br />
h2<br />
h1<br />
h3<br />
22<br />
the locknut (g2) on the set screw for 45°.<br />
(Fig. 16,17)<br />
2. CHANGING THE SAW BLADE(Fig. 18-22)<br />
NOTE: Blade securing bolt has a left hand thread.<br />
Remove the blade, (we re<strong>com</strong>mend the use of a<br />
stout glove for this). Clean any saw dust and<br />
debris from the arbor and saw blade securing<br />
flanges.<br />
1.Release the screw (h1) to remove the guard<br />
retraction arm (6).(Fig. 18)<br />
2.Release the screw(h2).(Fig. 19)<br />
3.Press the spindle lock button (22), and use the<br />
provided hex key (24) to release the screw (h3) at<br />
the same time.(Fig. 20)<br />
4.release the blade.(Fig. 21,22)<br />
To refit the blade, follow the above procedure in<br />
reverse order. If you want to take the inner flange<br />
out for cleaning, refit it as shown in Fig.23.<br />
Fig.23<br />
Blade<br />
Inner<br />
flange<br />
Outer flange<br />
CAUTION: ALWAYS install the blade with the blade<br />
teeth and the arrow printed on the side of the blade<br />
pointing down at the front of the saw. The direction<br />
of blade rotation is also stamped with an arrow on<br />
the upper blade guard.<br />
3. MOVING THE SAW<br />
1. When transporting the saw with fixed locations,<br />
make sure that the saw head is locked in the lower<br />
position.<br />
2. The rotary table locking knob, the bevel lock knob<br />
must all be securely tightened.<br />
<strong>1400W</strong> MITRE SAW ENB475MSW<br />
Boltleft<br />
hand<br />
thread
Fig.24<br />
ENVIRONMENTAL PROTECTION<br />
3. Use the transportation handle to lift the saw. Do<br />
not lift the saw by the switch handle.<br />
4. PLUG REPLACEMENT (Fig.24)<br />
Your Power Tool is supplied with a fitted plug,<br />
however if you need to fit a new plug follow the<br />
instruction below.<br />
IMPORTANT<br />
The wires in the mains lead are coloured in<br />
accordance with the following code:<br />
Blue = Neutral Brown = Live<br />
As the colours of the wires in the mains lead of this<br />
appliance may not correspond with the coloured<br />
markings identifying the terminals in your plug,<br />
proceed as follows:<br />
The wire which is coloured blue must be connected<br />
to the terminal which is marked with N.<br />
The wire which is coloured brown must be<br />
connected to the terminal which is marked with the<br />
letter L .<br />
If a 13 AMP (BS 1363/A) Plug is used, a 13 AMP<br />
Fuse must be fitted, or if any other type of plug is<br />
used a 13 AMP Fuse must be fitted, either in the<br />
Plug or Adaptor, or on the Distribution Board.<br />
Note: If a moulded plug is fitted and has to be<br />
removed take great care in disposing of the plug<br />
and severed cable, it must be destroyed to prevent<br />
engaging into a socket.<br />
If the supply cord is damaged it must be replaced<br />
by a service agent or a similarly qualified person in<br />
order to avoid hazard.<br />
This product is marked with the selective sorting symbol on waste electrical and<br />
electronic equipment. This means that this product should not be disposed of with<br />
household waste but must be supported by a collection system in accordance with<br />
Directive 2<strong>01</strong>2/19/EU. It will then be recycled or dismantled to minimise impacts on<br />
the environment, electrical and electronic products are potentially hazardous to the<br />
environment and human health due to the presence of hazardous substances.<br />
<strong>1400W</strong> MITRE SAW ENB475MSW
Declaration of Conformity<br />
We, Importer<br />
Powersmith Ltd., BA22 8RT<br />
Declare that the product<br />
<strong>1400W</strong> MITRE SAW<br />
ENB475MSW<br />
Complies with the following Directives:<br />
Machine Directive 2006/42/EC<br />
and/or Low voltage directive 2006/95/EC<br />
EMC directive 2004/108/EC<br />
2<strong>01</strong>1/65/EU Restrictions of the Use of Certain Hazardous Substances in<br />
Electrical and Electronic Equipment<br />
2<strong>01</strong>2/19/EU Waste Electrical and Electronic Equipment (WEEE)<br />
Standards and technical specifications referred to:<br />
EN61029-1: 2009<br />
EN61029-2-9: 2002<br />
EN55<strong>01</strong>4-1: 2006+A1<br />
EN55<strong>01</strong>4-2: 1997+A1+A2<br />
EN61000-3-2: 2006+A1+A2<br />
EN61000-3-3: 2008<br />
Authorised Signatory and technical file holder<br />
Date: 20/09/12<br />
Signature:<br />
Name: Peter Harries<br />
Powersmith Ltd. Trade House , Mead Avenue ,BA22 8RT<br />
Quality Manager 2<strong>01</strong>2<br />
<strong>1400W</strong> MITRE SAW ENB475MSW