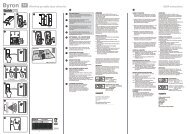
Instruction Manual - Evolution Power Tools Ltd.
Instruction Manual - Evolution Power Tools Ltd.
Instruction Manual - Evolution Power Tools Ltd.

Create successful ePaper yourself
Turn your PDF publications into a flip-book with our unique Google optimized e-Paper software.
SDS4-800 HAMMER DRILL<br />
<strong>Instruction</strong><br />
<strong>Manual</strong><br />
Read instructions before operating this tool.<br />
®<br />
www.evolutionbuild.com<br />
10.11.10_V3
2<br />
®<br />
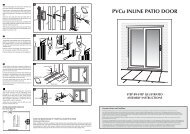
FIG 1 FIG 2<br />
FIG 3 FIG 4<br />
www.evolutionbuild.com<br />
TABLE OF CONTENTS<br />
TABLE OF CONTENTS GB<br />
EC - Declaration of Conformity<br />
Important Information<br />
12 Month Limited Warranty<br />
General Safety Rules<br />
Labels & Symbols<br />
Additional Specific Safety Rules<br />
Specification<br />
Assembly<br />
Functional Description<br />
Operation<br />
Maintenance<br />
Environmental Protection<br />
Service Parts Lists<br />
EC EC - DECLARATION - DECLARATION OF OF CONFORMITY GB<br />
We, the importer<br />
<strong>Evolution</strong> <strong>Power</strong> <strong>Tools</strong> <strong>Ltd</strong>.<br />
Venture One<br />
Longacre Close<br />
Sheffield<br />
S20 3FR<br />
Declare that the product<br />
Part numbers: ZIC-SD6A-20<br />
<strong>Evolution</strong>: SDS4, SDS4-800<br />
SDS 4 Function Hammer Drill<br />
Complies with the essential requirements of the following<br />
European Directives:<br />
2006/42/EC – Machine Directive<br />
2006/95/EC – Low Voltage Directive<br />
2004/108/EC – EMC Directive<br />
2002/95/EC – Restriction of the use of Certain Hazardous<br />
Substances in Electrical and Electric Equipment<br />
Standards and Technical specifications referred to:-<br />
EN55014-1 : 2006<br />
EN55014-2 : 2001+A1<br />
EN61000-3-2 : 2000<br />
EN61000-3-3 : 2005+A2<br />
EN60745-1 : 2006<br />
EN60745-2-6 : 2007+A11<br />
All documentation is held on file at the above address and is<br />
available, on request for review.<br />
Authorized Signatory<br />
Date: 01/9/2010<br />
Name: Mr Matthew J Gavins<br />
Position: Managing Director<br />
Year of Manufacture: 2010<br />
SDS4-800 HAMMER DRILL<br />
IMPORTANT GB<br />
IMPORTANT<br />
Please read these operating and safety instructions<br />
carefully and completely. For your own safety, before using<br />
this equipment check that the voltage is correct and that all<br />
handles and parts are firmly secured. If you are uncertain<br />
about any aspect of using this equipment, please contact<br />
our Technical Helpline.<br />
Technical Helpline UK 0870 609 2297<br />
Technical Helpline USA 1-866-EVO-TOOL<br />
SDS HAMMER DRILL<br />
Congratulations on your purchase of an <strong>Evolution</strong> <strong>Power</strong> <strong>Tools</strong><br />
SDS 4 Function Hammer Drill. Please complete your product<br />
registration on line to validate your machine’s warranty period<br />
and ensure prompt service if needed. We sincerely thank you<br />
for selecting a product from <strong>Evolution</strong> <strong>Power</strong> <strong>Tools</strong>.<br />
WARRANTY GB<br />
12 MONTH LIMITED WARRANTY. <strong>Evolution</strong> power tools<br />
reserves the right to make improvements and modifications<br />
to design without prior notice.<br />
<strong>Evolution</strong> <strong>Power</strong> <strong>Tools</strong> will, within twelve (12) months from the<br />
original date of purchase, repair or replace any goods found<br />
to be defective in materials or workmanship. This warranty is<br />
void if the tool being returned has been used to drill / chisel<br />
materials beyond the recommendations in the <strong>Instruction</strong><br />
<strong>Manual</strong> or if the drill has been damaged by accident, neglect,<br />
or improper service. This warranty does not apply to machines<br />
and / or components which have been altered, changed, or<br />
modified in any way, or subjected to use beyond recommended<br />
capacities and specifications. Electrical components are subject<br />
to respective manufacturers’ warranties. All goods returned<br />
defective shall be returned prepaid freight to <strong>Evolution</strong> <strong>Power</strong><br />
<strong>Tools</strong>. <strong>Evolution</strong> <strong>Power</strong> <strong>Tools</strong> reserves the right to optionally<br />
repair or replace it with the same or equivalent item. There<br />
is no warranty – written or verbal – for chisel / drill bits. In no<br />
event shall <strong>Evolution</strong> <strong>Power</strong> <strong>Tools</strong> be liable for loss or damage<br />
resulting directly or indirectly from the use of our merchandise<br />
or from any other cause. <strong>Evolution</strong> <strong>Power</strong> <strong>Tools</strong> is not liable for<br />
any costs incurred on such goods or consequential damages.<br />
No officer, employee or agent of <strong>Evolution</strong> <strong>Power</strong> <strong>Tools</strong> is<br />
authorized to make oral representations of fitness or to waive<br />
any of the foregoing terms of sale and none shall be binding<br />
on <strong>Evolution</strong> <strong>Power</strong> <strong>Tools</strong>. Questions relating to this limited<br />
warranty should be directed to the company’s head office, or<br />
call the appropriate Helpline number.<br />
IMPORTANT IMPORTANT SAFETY SAFETY INSTRUCTIONS<br />
INSTRUCTIONS GB<br />
To reduce the risk of electric shock, this equipment is fitted<br />
with an approved cord and plug for its intended country of<br />
use. Do not change the cord or plug in any way.<br />
www.evolutionbuild.com 3
GENERAL SAFETY RULES<br />
GENERAL SAFETY RULES GB<br />
Read and understand all instructions before<br />
operating this product. Failure to follow all<br />
instructions listed below, may result in electric<br />
shock, fire and / or serious personal injury.<br />
SAVE THESE INSTRUCTIONS FOR FUTURE REFERENCE.<br />
WARNING! When using electric tools basic safety<br />
precautions should always be followed to reduce the risk of<br />
fire, electric shock and personal injury including the following:<br />
Read all these instructions before attempting to operate<br />
this product and save these instructions.<br />
The term “power tool” in the warnings refers to your<br />
mains-operated (corded) power tool or battery-operated<br />
(cordless) power tool.<br />
CAUTION! This is a very powerful machine. When using<br />
this drill it is essential that the following rules are followed.<br />
1. When drilling it is common that the drill bit jams in the<br />
material being drilled. This will result in the drill trying to rotate<br />
around the drill bit and potentially to come out of your grip.<br />
This SDS drill has a safety clutch mechanism. This safety<br />
clutch mechanism will be activated and stop the drive to the<br />
drill, BUT only if you resist the initial forces caused by the<br />
jamming, by securely holding the drill with BOTH hands.<br />
As this is a powerful machine, these forces are significant.<br />
2. ALWAYS ensure that the front handle is firmly fixed in<br />
place and secure.<br />
3. The front and rear handles must be firmly held to resist<br />
any movement of the drill when the drill or drill bit becomes<br />
jammed.<br />
4. ALWAYS use the drill when standing on a firm and secure<br />
platform or on the ground. (DO NOT USE ON LADDERS<br />
OR STEPS)<br />
5. NEVER start the drill with the drill bit jammed in position.<br />
6. DO NOT stretch to hold the drill. Do not drill above shoulder<br />
height or below knee height, as the drill cannot be securely held.<br />
7. This machine is not suitable for use with TCT core drill<br />
bits, diamond core drill bits, and diamond drill bits.<br />
GENERAL SAFETY RULES<br />
When using electric tools, basic safety precautions should<br />
always be followed to reduce the risk of fire, electric shock<br />
and personal injury.<br />
Please read all of these instructions before attempting<br />
to operate this machine. Save this manual for future<br />
reference.<br />
1. Keep work area clear. Cluttered work areas invite accidents.<br />
2. Consider work area environment. Do not expose tools<br />
to rain. Do not use tools in damp or wet locations. Keep work<br />
area well lit. Never use tools near flammable liquids or gases.<br />
4<br />
®<br />
www.evolutionbuild.com<br />
3. Protect yourself against electric shock. Avoid body<br />
contact with earthed or grounded surfaces.<br />
4. Keep other people away. Do not let others, especially<br />
children, come close to the work, and touch the tool or the<br />
extension lead. Keep them away from the work area.<br />
5. Store idle tools. When not in use, tools should be<br />
stored in a dry locked-up place, out of children’s reach.<br />
6. Never force the tools. Your tools will be more efficient and<br />
safer when used at the rate for which they were intended.<br />
7. Use the right tool. Do not force small tools to do the job of<br />
a heavy duty tool. Do not use tools for purposes not intended;<br />
for example do not use circular saws to cut tree limbs or logs.<br />
8. Dress properly. Do not wear loose clothing or jewellery<br />
which may get caught in moving parts. Non-skid footwear<br />
is recommended when working outdoors. If you have long<br />
hair, tie it back and wear protective hair covering.<br />
9. Use protective equipment. Use safety glasses.<br />
Use face or dust mask if cutting operations create dust.<br />
10. Connect dust extraction equipment. If the machines<br />
have a connection for dust extraction equipment, ensure<br />
these are connected and properly used.<br />
11. Do not damage the cable. Never pull the power cable<br />
to disconnect the machine. Keep the cable away from heat,<br />
oil and sharp edges.<br />
12. Secure workpiece. Where possible, use clamps or a vice<br />
to hold the workpiece. It’s much safer than using your hands.<br />
13. Don’t over reach. Keep proper footing and balance at<br />
all times.<br />
14. Maintain tools in good working condition.<br />
Keep cutting tools sharp and clean for better performance and<br />
optimum safety. Follow instructions for lubricating and changing<br />
accessories. Inspect power cables regularly and, if damaged,<br />
have them replaced by an authorised service centre. Inspect<br />
extension cables regularly and replace immediately if damaged.<br />
Keep handles dry, clean and free from oil and grease at all times.<br />
15. Disconnect tools. Disconnect tools from the power supply<br />
when not in use, before any maintenance operation and when<br />
changing accessories such as blades, bits, cutters, etc.<br />
16. Remove adjusting keys and spanners. Get into the<br />
habit of checking that adjusting keys and spanners have<br />
been removed from the machine before turning it on.<br />
17. Avoid unintentional starting. Ensure switch is in “off”<br />
position before plugging in the machine.<br />
18. Use proper extension leads. When the tool is used<br />
outdoors, use only extension leads intended for outdoor<br />
use and labelled as such.<br />
19. Stay alert. Concentrate on what you are doing, use<br />
common sense and do not operate the tool when you are tired.<br />
20. Check that no part is damaged. Before using a tool, make<br />
sure that it is in good working order. Check the alignment and<br />
condition of moving parts, mounting and any other aspect that<br />
may affect its operation. A guard or other part that is damaged<br />
should be properly repaired or replaced by an authorised service<br />
centre unless otherwise indicated in this instruction manual. Do<br />
not use the tool if the switch does not turn on and off.<br />
21. Warning. The use of any accessory or attachment other<br />
than one recommended in this instruction manual may<br />
present a risk of personal injury.<br />
22. Have your tool repaired at an authorised service<br />
centre. This electric tool complies with current safety rules.<br />
Repairs should only be carried out by an authorised service<br />
centre using original spare parts. Failing this, the user could<br />
expose themselves to considerable danger.<br />
HEALTH HEALTH ADVICE ADVICE GB<br />
WARNING! When drilling, sanding, sawing or grinding, dust<br />
particles will be produced. In some instances, depending<br />
on the materials you are working with, this dust can be<br />
particularly harmful to you (e.g. lead from old gloss paint).You<br />
are advised to consider the risks associated with the materials<br />
you are working with and to reduce the risk of exposure.<br />
You should:<br />
-Work in a well-ventilated area.<br />
-Work with approved safety equipment, such as dust masks<br />
that are specially designed to filter microscopic particles.<br />
LABELS & SYMBOLS GB<br />
WARNING! Do not operate machine if warning and /<br />
or instruction labels are missing or damaged. Contact<br />
<strong>Evolution</strong> <strong>Power</strong> <strong>Tools</strong> for replacement labels.<br />
Symbol Description<br />
V Volts<br />
A Amperes<br />
Hz Hertz<br />
Min -1<br />
Revolutions, strokes,<br />
surface speed, orbits etc.<br />
per minute<br />
~ Alternating Current<br />
n0<br />
No Load Speed<br />
Double Insulated<br />
Wear Safety Goggles<br />
Wear Ear Protection<br />
Do Not Touch<br />
Wear Dust Protection<br />
Restriction of Hazardous<br />
Substances Directive<br />
CE certification<br />
Waste electrical and<br />
electronic equipment<br />
To obtain an additional copy of your manual, please contact<br />
<strong>Evolution</strong> <strong>Power</strong> <strong>Tools</strong> at :<br />
UK 0870 609 2297<br />
USA 1-866-EVO-TOOL<br />
WEB www.evolutionpowertools.com<br />
SDS4-800 HAMMER DRILL<br />
ADDITIONAL SPECIFIC SAFETY RULES<br />
ADDITIONAL SPECIFIC SAFETY RULES GB<br />
Do not let familiarity with this product (gained from<br />
repeated use) replace strict adherence to hammer drill<br />
safety rules. If you use this tool incorrectly you could suffer<br />
serious personal injury.<br />
1. Hold tools by the insulated gripping surfaces when<br />
performing an operation where the cutting tool may<br />
contact hidden wiring or its own cord. Contact with a<br />
‘live’ wire will make exposed metal parts of the tool ‘live’<br />
and shock the operator.<br />
2. Always be sure you have a firm footing. Be sure no<br />
one is below you when using the tool in high locations.<br />
3. Hold the tool firmly with both hands. Always use the<br />
side grip.<br />
4. Keep hands away from rotating parts.<br />
5. Do not leave the tool running. Operate the tool only<br />
when hand-held.<br />
6. Do not touch the bit or the workpiece immediately<br />
after operation; they may be extremely hot and could<br />
burn your skin.<br />
7. Some materials contain chemicals which may be toxic.<br />
Take caution to prevent dust inhalation and skin contact.<br />
Follow material supplier safety data.<br />
CAUTION! Always unplug drill from the mains supply before<br />
changing the drill bit, servicing, cleaning or adjusting the drill.<br />
SPECIFICATIONS<br />
<strong>Evolution</strong> SDS4-800<br />
Motor (230/110v – 50/60 Hz) 650W<br />
Impact Energy: 1.6J<br />
Speed Range: 0-1100min-1 Machine Weight: 2.8 kg<br />
Product Dimensions (HxWxD) 210mm x 320mm x 85mm<br />
Recommended Maximum Duty Cycle: 30 mins<br />
Max. Drill Diameter (Steel): 13mm<br />
Max. Drill Diameter (Concrete): 20mm<br />
Max. Drill Diameter (Wood): 30mm<br />
Sound Pressure Level (Under Load): Lpa =88.6dB (A)<br />
Lwa =99.6dB (A)<br />
K = 3dB (A)<br />
Vibration:<br />
ah 14.015 m/s2 K 1.5 m/s2 SPECIFICATIONS GB<br />
The declared vibration total value has been measured in<br />
accordance with a standard test method and may be used<br />
for comparing one tool with another.<br />
The declared vibration total value may also be used in a<br />
preliminary assessment of exposure.<br />
WARNING: The vibration emission during actual use of<br />
the power tool can differ from the declared total value<br />
depending on the ways in which the tool is used. The need<br />
to identify safety measures and to protect the operator are<br />
based on an estimation of exposure in the actual conditions<br />
www.evolutionbuild.com 5
of use (taking account of all parts of the operating cycle,<br />
such as the times the tool is switched off, when it is<br />
running idle, in addition to trigger time).<br />
ASSEMBLY ASSEMBLY GB<br />
Your <strong>Evolution</strong> <strong>Power</strong> <strong>Tools</strong> saw is shipped complete.<br />
Remove all contents from the box and inspect to ensure no<br />
damage was incurred during shipping, and that the items<br />
listed below are included.<br />
Description Quantity<br />
<strong>Instruction</strong> <strong>Manual</strong> 1<br />
Side Handle 1<br />
Depth Gauge 1<br />
SDS Drills 1 x 6mm x 160mm<br />
1 x 8mm x 160mm<br />
1 x 10mm x 160mm<br />
SDS Chisels 1 x 25mm x 250mm<br />
1 x Point x 250mm<br />
Carry Case 1<br />
GETTING STARTED<br />
GETTING STARTED GB<br />
CAUTION! ALWAYS DISCONNECT THE DRILL FROM<br />
POWER SOURCE BEFORE MAKING ADJUSTMENTS.<br />
Refer to the “Service Parts List Drawing”.<br />
FUNCTIONAL<br />
FUNCTIONAL<br />
DESCRIPTION<br />
DESCRIPTION GB<br />
CAUTION! Always be sure that the tool is switched off and<br />
unplugged before adjusting or checking a function on the tool.<br />
Switch action (see FIG 1)<br />
CAUTION!<br />
• Before plugging in the tool, always check to see that the<br />
switch trigger actuates properly and returns to the ‘OFF’<br />
position when released.<br />
• The switch can be locked in the ‘ON’ position for ease of<br />
operator comfort during extended use. Apply caution when<br />
locking the tool in the ‘ON’ position and maintain a firm grip<br />
on the tool.<br />
To start the tool, simply pull the switch trigger. Tool speed<br />
is increased by increasing pressure on the switch trigger.<br />
Release the switch trigger to stop the drill.<br />
For continuous operation, pull the switch trigger and then<br />
push in the lock button.<br />
To stop the tool from the locked position, pull the switch<br />
trigger fully, then release it.<br />
A speed control screw is provided so that the maximum<br />
tool speed can be limited (variable). Turn the speed control<br />
screw clockwise for higher speed, and counterclockwise<br />
for lower speed.<br />
6<br />
®<br />
www.evolutionbuild.com<br />
Reversing switch action (see FIG 1)<br />
This drill has a reversing switch to change the direction of<br />
rotation. Move the reversing switch lever to the required<br />
position (clockwise or counterclockwise rotation) as<br />
indicated by the arrows on the drill body.<br />
CAUTION!<br />
• Always check the direction of rotation before operation.<br />
• Use the reversing switch only after the tool comes to a<br />
complete stop. Changing the direction of rotation before the<br />
tool stops may damage the tool.<br />
Selecting the action mode (see FIG 2)<br />
This tool has a 4 position action mode selecting switch.<br />
Push in the locking button on the switch lever and rotate<br />
the switch to the desired position. Release the locking<br />
button and ensure that the button has locked the switch in<br />
the required position.<br />
The 4 positions are:<br />
• Drill<br />
• Hammer Drill<br />
• Chisel (unlocked)<br />
• Chisel (locked)<br />
Installing the side handle (see FIG 3)<br />
CAUTION! Always be sure that the tool is switched off and<br />
unplugged before carrying out any work on the tool.<br />
Always use the side grip handle to ensure operating safety.<br />
Install the side grip handle onto the drill collar and secure in<br />
place by tightening the handle. Note that the handle may be<br />
swung through 360 o . Ensure that the side handle is pushed<br />
fully home against the drill body before tightening.<br />
Depth Gauge (see FIG 3)<br />
The depth gauge is convenient for drilling holes of uniform<br />
depth. To install, loosen the side grip handle and insert the<br />
depth gauge into the hexagonal hole. Adjust to suit and<br />
tighten the side grip handle to lock both the handle and<br />
depth gauge into the desired position.<br />
Installing or removing a drill bit or chisel (see FIG 4)<br />
CAUTION! Always be sure that the tool is switched of and<br />
unplugged before carrying out any work on the tool.<br />
Carefully insert the SDS chisel or bit into the SDS chuck.<br />
Gently pull the bit into the chuck whilst rotating the bit<br />
slowly. Pull back on the chuck collar and continue pulling<br />
the bit gently until positive location is felt and the bit slides<br />
fully home into the chuck.<br />
Only remove the bit when operations have finished and the<br />
bit has completely cooled down.<br />
To remove the bit, slide the chuck collar rearward and<br />
carefully pull the bit out of the chuck<br />
OPERATION<br />
OPERATION GB<br />
Standard Drilling Operation<br />
Ensure that the action mode selecting switch is set on the<br />
standard drill mode. See FIG 2<br />
CAUTION!<br />
• Using excessive force on the tool will not speed up the<br />
drilling. Excessive pressure will only serve to damage the<br />
tip of the bit, decrease the tool performance and shorten<br />
the service life of the tool.<br />
• There is tremendous force exerted on the tool / bit at the<br />
time of hole break-through. Hold the tool firmly and take<br />
care when the bit begins to break through the workpiece.<br />
• Always secure small workpieces in a vice or other hold<br />
down device.<br />
Drilling Wood<br />
When drilling wood the best results will be obtained by<br />
using dedicated wood bits equipped with a guide screw.<br />
The guide screw makes drilling easier by pulling the bit into<br />
the workpiece.<br />
Drilling Metal<br />
When drilling metal the best results will be obtained by using<br />
a dedicated twist drill designed for metal drilling. To prevent<br />
the bit from slipping when starting a hole, make an indentation<br />
with a centre-punch and hammer at the point to be drilled.<br />
Place the point of the bit into the indentation and begin drilling.<br />
Use an appropriate lubricant for the material being drilled with<br />
the exception of iron and brass which should be drilled dry.<br />
Hammer Drilling Operation<br />
Select the hammer drill function on the mode selection<br />
switch. See FIG 2<br />
CAUTION! There is a sudden twisting force exerted on<br />
the tool / bit at the time of hole break-through, when the<br />
hole becomes clogged with chips and particles, or when<br />
striking reinforcing rods embedded in concrete. Always use<br />
the side grip handle and firmly hold the tool by both the<br />
side handle and the switch handle during hammer drilling<br />
operations. Failure to do so could result in loss of control of<br />
the tool and potential injury to the operator.<br />
Be sure to use a dedicated tungsten-carbide tipped drill bit.<br />
Position the bit at the desired location for the hole, then pull<br />
the switch trigger. Do not force the tool. Consistent light<br />
pressure gives the best results. Keep the tool in position<br />
and prevent it from slipping away from the hole.<br />
Do not apply extra pressure if the hole becomes clogged<br />
with chips or particles. Instead allow the tool to run at<br />
idle and then partially remove the bit from the hole. By<br />
repeating this several times the hole will be cleaned out and<br />
normal drilling may be resumed.<br />
SDS4-800 HAMMER DRILL<br />
Chiselling Operations<br />
Set the mode selection switch to the preferred operator<br />
position, either chisel (locked) or chisel (unlocked). See FIG 2<br />
CAUTION! When using the tool for chiselling operations it<br />
is very important that the operator wears all the appropriate<br />
safety equipment. Safety glasses and dust masks are<br />
essential and other apparel such as gloves, safety shoes,<br />
ear protectors etc should be worn as necessary.<br />
Ensure that all marking out is completed before any<br />
chiselling is attempted.<br />
Insert the required chisel into the SDS chuck and ensure<br />
positive location. Offer the chisel up to the worksurface and<br />
holding the tool firmly with both hands begin the chiselling<br />
operation. Switch on the tool and begin to cut.<br />
Do not force the tool. Gentle consistent pressure works best.<br />
Do not try to remove too much material in one pass. Several<br />
repeat passes may be needed to achieve the required results.<br />
MAINTENANCE<br />
MAINTENANCE GB<br />
Note: Any maintenance must be carried out with the<br />
machine switched off and disconnected from the mains/<br />
battery power supply.<br />
Check that all safety features and guards are operating<br />
correctly on a regular basis. Only use this machine if all<br />
guards/safety features are fully operational.<br />
All motor bearings in this machine are lubricated for life.<br />
No further lubrication is required.<br />
Use a clean, slightly damp cloth to clean the plastic parts of<br />
the machine. Do not use solvents or similar products which<br />
could damage the plastic parts.<br />
WARNING! Do not attempt to clean by inserting pointed<br />
objects through openings in the machines casings etc.<br />
The machines air vents should be cleaned using<br />
compressed dry air.<br />
Excessive sparking may indicate the presence of dirt in<br />
the motor or worn out carbon brushes. If this is suspected<br />
have the machine serviced and the brushes replaced at an<br />
authorized service centre.<br />
ENVIRONMENTAL PROTECTION GB<br />
Waste electrical products should not be disposed of with<br />
household waste. Please recycle where facilities exist.<br />
Check with your Local Authority or retailer for<br />
recycling advice.<br />
www.evolutionbuild.com 7
8<br />
®<br />
SERVICE PARTS LIST DRAWING<br />
www.evolutionbuild.com<br />
www.evolutionbuild.com<br />
SDS4-800 HAMMER DRILL<br />
9
10<br />
NOTES<br />
®<br />
www.evolutionbuild.com<br />
NOTES<br />
www.evolutionbuild.com<br />
SDS4-800 HAMMER DRILL<br />
11