set up instructions for rdh rf.qxd - Free-Instruction-Manuals.com
set up instructions for rdh rf.qxd - Free-Instruction-Manuals.com
set up instructions for rdh rf.qxd - Free-Instruction-Manuals.com

You also want an ePaper? Increase the reach of your titles
YUMPU automatically turns print PDFs into web optimized ePapers that Google loves.
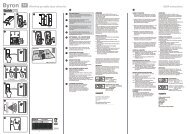
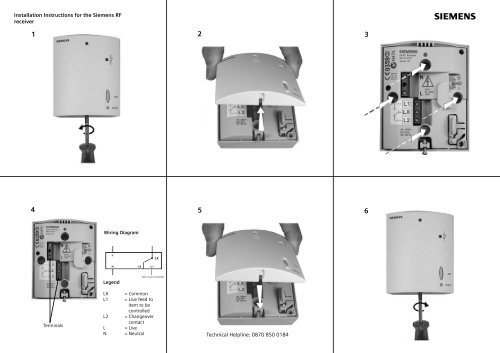
Installation <strong>Instruction</strong>s <strong>for</strong> the Siemens RF<br />
receiver<br />
s<br />
1 2 3<br />
4 5<br />
6<br />
Wiring Diagram<br />
Legend<br />
Item to be controlled<br />
Terminals<br />
LX<br />
L1<br />
L2<br />
L<br />
N<br />
= Common<br />
= Live feed to<br />
item to be<br />
controlled<br />
= Changeover<br />
contact<br />
= Live<br />
= Neutral<br />
Technical Helpline: 0870 850 0184
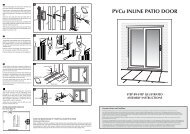
Note: The transmitter and receiver are s<strong>up</strong>plied in a single box already configured. This<br />
procedure only needs to be followed in case of <strong>com</strong>munication issues<br />
1 2 3<br />
Configuration <strong>Instruction</strong>s <strong>for</strong> the Siemens RF<br />
units<br />
Press and release SET button, this<br />
puts the receiver into learn mode<br />
Press and release LEARN button<br />
on the back of the transmitter<br />
Good signal is indicated by the LED<br />
flashing green, then solid<br />
No signal is indicated by the LED<br />
flashing red, then solid<br />
4 5 6<br />
To test transmission press TEST on the<br />
transmitter<br />
This will switch relay on in receiver irrespective<br />
of temperature<br />
RF TEST appears in transmitter display. To switch<br />
test off press TEST again<br />
Orange LED indicates relay is on Pressing the RESET button <strong>for</strong> about 4<br />
seconds will erase all ID codes in the<br />
receiver. The <strong>set</strong> <strong>up</strong> procedure has to<br />
be repeated to regain <strong>com</strong>munication<br />
PKGPT01027A
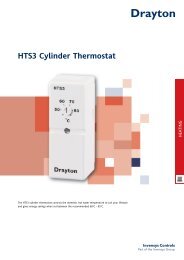
SIEMENS<br />
RDH/RDJ-RF/RECEIVER. RCR10/433<br />
N<br />
L<br />
AC<br />
230<br />
VOLT<br />
L1<br />
LX<br />
NOTE, LX, L1 & L2 ARE<br />
‘VOLTS FREE’ CONTACTS.<br />
L2<br />
BOILER<br />
TERMINAL BLOCK<br />
REMOVE LINK - Marked<br />
(TO EXTERNALCONTROLS)<br />
&<br />
CONNECT AS SHOWN
SIEMENS<br />
RDH/RDJ- RF/RECEIVER. RCR10/433<br />
N<br />
L<br />
AC<br />
230<br />
VOLT<br />
L1<br />
LX<br />
L2<br />
WIRE<br />
LINK<br />
L - LX<br />
230 VOLT, SWITCH LIVE<br />
TO BOILER OR VALVE<br />
NOTE, LX, L1 & L2 ARE VOLTS FREE CONTACTS.<br />
TO SWITCH, 230VOLT MAINS LIVE ON L1, PUT LINK BETWEEN L & LX
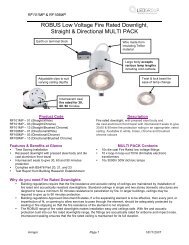
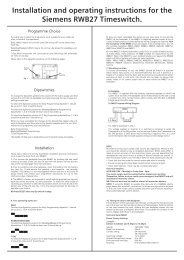
How to use your Siemens RDH10/RDH10RF<br />
Digital Room Thermostat<br />
s<br />
This leaflet gives you easy to follow <strong>instructions</strong> on how to use your RDH10 digital room thermostat.<br />
How do I <strong>set</strong> the required temperature?<br />
Turn the rotary dial to the left to decrease the<br />
required temperature, or to the right to increase the<br />
required temperature.<br />
LCD Display<br />
The required temperature is displayed next to the<br />
following symbol<br />
T<br />
The RESET button on the back of the controller can be pressed to return the controller<br />
to the factory <strong>set</strong>tings<br />
Rotary Dial<br />
Batteries Compartment<br />
Guide to symbols<br />
On LCD Display<br />
Actual room temperature in °C<br />
T<br />
The selected temperature<br />
Indicates there is a call <strong>for</strong> heat<br />
Indication of low battery life, this signifies batteries must be replaced<br />
Technical Helpline: 0870 850 0184<br />
PKGPT01020A