ERF298MSW - Free-Instruction-Manuals.com
ERF298MSW - Free-Instruction-Manuals.com
ERF298MSW - Free-Instruction-Manuals.com

Create successful ePaper yourself
Turn your PDF publications into a flip-book with our unique Google optimized e-Paper software.
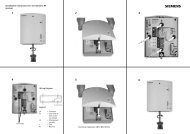
8. MITRE CUTTING<br />
An angle of up to 45 0 to the left or right can be<br />
obtained and a protractor scale can be found<br />
on the front of the machine table. Positive stops<br />
are provided at 15 0 , 22.5 0 , 30 0 and 45 0 right and<br />
left.<br />
1. Loosen the slide locking knob and push the<br />
cutting head back as far as it will go and lock<br />
the slide.<br />
2. Loosen the mitre angle lock knob. (Fig 15 a)<br />
3. Push down the positive stop locking lever.<br />
(Fig 15 b)<br />
4. Turn the rotary table to the desired angle as<br />
indicated by the mitre angle pointer.<br />
5. Tighten the mitre angle lock knob to hold the<br />
desired angle.<br />
6. If necessary unlock the cutting head by<br />
loosening the slide locking knob. This will<br />
allow the cutting head to move backwards and<br />
forwards (required when cutting wide boards).<br />
7. Start the saw and allow it to reach full speed<br />
before <strong>com</strong>mencing operations.<br />
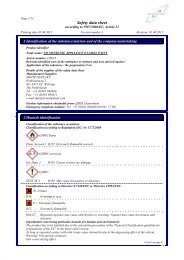
9. BEVEL CUTTING<br />
The cutting head can be tilted up to 45 0 to the<br />
left hand side only. A large Bevel Lock hand<br />
wheel can be found at the rear of the machine,<br />
and a 0-45 0 protractor scale is positioned on<br />
the slide carriage casting to the front of the<br />
hand wheel. (Fig 16)<br />
1. Lock the cutting head down with the head<br />
latching pin.<br />
2. Loosen the bevel lock hand wheel.<br />
3. Tilt the cutting head to the required angle. A<br />
protractor scale and pointer is provided to aid<br />
setting.<br />
4. Tighten the bevel lock hand wheel securely<br />
when the desired angle is achieved.<br />
5. Unlatch the cutting head.<br />
6. Release the slide (if necessary) to cut wide<br />
workpieces.<br />
7. Stand to the left side of the handle to make<br />
the cut.<br />
8. When the cut is <strong>com</strong>pleted, release the<br />
trigger switch and allow the saw blade to<br />
<strong>com</strong>e to a <strong>com</strong>plete halt, before removing the<br />
workpiece or your hands from the saw.<br />
Fig 15<br />
Fig 16<br />
ERBAUER 24V 165MM SINGLE BEVEL MITRE SAW<br />
15B<br />
1