Liebert Nfinity Maintenance Bypass Cabinet - Jonweb.net
Liebert Nfinity Maintenance Bypass Cabinet - Jonweb.net
Liebert Nfinity Maintenance Bypass Cabinet - Jonweb.net

Create successful ePaper yourself
Turn your PDF publications into a flip-book with our unique Google optimized e-Paper software.
AC Power<br />
For Business-Critical Continuity<br />
<strong>Liebert</strong> ® <strong>Nfinity</strong> <strong>Maintenance</strong> <strong>Bypass</strong> <strong>Cabi<strong>net</strong></strong><br />
User Manual
TABLE OF CONTENTS<br />
IMPORTANT SAFETY INSTRUCTIONS . . . . . . . . . . . . . . . . . . . . . . . . . . . . . . . . . . . . . . . . . . . . . . . .1<br />
GLOSSARY OF SYMBOLS . . . . . . . . . . . . . . . . . . . . . . . . . . . . . . . . . . . . . . . . . . . . . . . . . . . . . . .2<br />
1.0 GENERAL DESCRIPTION . . . . . . . . . . . . . . . . . . . . . . . . . . . . . . . . . . . . . . . . . . . . . . . . . . .3<br />
1.1 System Description. . . . . . . . . . . . . . . . . . . . . . . . . . . . . . . . . . . . . . . . . . . . . . . . . . . . . . . . . . . 3<br />
1.1.1 Features . . . . . . . . . . . . . . . . . . . . . . . . . . . . . . . . . . . . . . . . . . . . . . . . . . . . . . . . . . . . . . . . . . . . 3<br />
1.1.2 Standard Components . . . . . . . . . . . . . . . . . . . . . . . . . . . . . . . . . . . . . . . . . . . . . . . . . . . . . . . . . 3<br />
1.1.3 Options . . . . . . . . . . . . . . . . . . . . . . . . . . . . . . . . . . . . . . . . . . . . . . . . . . . . . . . . . . . . . . . . . . . . . 3<br />
2.0 MODES OF OPERATION. . . . . . . . . . . . . . . . . . . . . . . . . . . . . . . . . . . . . . . . . . . . . . . . . . . .7<br />
2.1 UPS Mode . . . . . . . . . . . . . . . . . . . . . . . . . . . . . . . . . . . . . . . . . . . . . . . . . . . . . . . . . . . . . . . . . . 7<br />
2.2 <strong>Bypass</strong> Mode . . . . . . . . . . . . . . . . . . . . . . . . . . . . . . . . . . . . . . . . . . . . . . . . . . . . . . . . . . . . . . . . 7<br />
3.0 MAJOR COMPONENTS . . . . . . . . . . . . . . . . . . . . . . . . . . . . . . . . . . . . . . . . . . . . . . . . . . . .8<br />
3.1 <strong>Bypass</strong> Switch. . . . . . . . . . . . . . . . . . . . . . . . . . . . . . . . . . . . . . . . . . . . . . . . . . . . . . . . . . . . . . . 8<br />
3.2 User Selectable Output Distribution. . . . . . . . . . . . . . . . . . . . . . . . . . . . . . . . . . . . . . . . . . . . . 8<br />
3.2.1 Optional Transformer. . . . . . . . . . . . . . . . . . . . . . . . . . . . . . . . . . . . . . . . . . . . . . . . . . . . . . . . . . 8<br />
4.0 PREPARATION . . . . . . . . . . . . . . . . . . . . . . . . . . . . . . . . . . . . . . . . . . . . . . . . . . . . . . . . . .9<br />
4.1 Inspection . . . . . . . . . . . . . . . . . . . . . . . . . . . . . . . . . . . . . . . . . . . . . . . . . . . . . . . . . . . . . . . . . . 9<br />
4.2 Environment . . . . . . . . . . . . . . . . . . . . . . . . . . . . . . . . . . . . . . . . . . . . . . . . . . . . . . . . . . . . . . . . 9<br />
4.3 Required Setup Equipment . . . . . . . . . . . . . . . . . . . . . . . . . . . . . . . . . . . . . . . . . . . . . . . . . . . . 9<br />
4.4 Site Preparation . . . . . . . . . . . . . . . . . . . . . . . . . . . . . . . . . . . . . . . . . . . . . . . . . . . . . . . . . . . . . 9<br />
5.0 UNLOADING . . . . . . . . . . . . . . . . . . . . . . . . . . . . . . . . . . . . . . . . . . . . . . . . . . . . . . . . . . .10<br />
5.1 Unloading the <strong>Liebert</strong> <strong>Nfinity</strong> <strong>Maintenance</strong> <strong>Bypass</strong> <strong>Cabi<strong>net</strong></strong> . . . . . . . . . . . . . . . . . . . . . . . . 10<br />
5.2 Stationary Mounting . . . . . . . . . . . . . . . . . . . . . . . . . . . . . . . . . . . . . . . . . . . . . . . . . . . . . . . . 11<br />
6.0 CABLE INSTALLATION. . . . . . . . . . . . . . . . . . . . . . . . . . . . . . . . . . . . . . . . . . . . . . . . . . . .12<br />
6.1 Wiring Preparation. . . . . . . . . . . . . . . . . . . . . . . . . . . . . . . . . . . . . . . . . . . . . . . . . . . . . . . . . . 12<br />
6.2 Preparing Internal Wiring . . . . . . . . . . . . . . . . . . . . . . . . . . . . . . . . . . . . . . . . . . . . . . . . . . . . 12<br />
6.3 Dual Source Configuration . . . . . . . . . . . . . . . . . . . . . . . . . . . . . . . . . . . . . . . . . . . . . . . . . . . 12<br />
6.4 Removing the Cover Plates . . . . . . . . . . . . . . . . . . . . . . . . . . . . . . . . . . . . . . . . . . . . . . . . . . . 14<br />
6.5 Power Cable Installation . . . . . . . . . . . . . . . . . . . . . . . . . . . . . . . . . . . . . . . . . . . . . . . . . . . . . 14<br />
6.6 REPO Connection. . . . . . . . . . . . . . . . . . . . . . . . . . . . . . . . . . . . . . . . . . . . . . . . . . . . . . . . . . . 14<br />
6.7 Input and Output Wiring. . . . . . . . . . . . . . . . . . . . . . . . . . . . . . . . . . . . . . . . . . . . . . . . . . . . . 15<br />
7.0 OPERATION . . . . . . . . . . . . . . . . . . . . . . . . . . . . . . . . . . . . . . . . . . . . . . . . . . . . . . . . . . .20<br />
7.1 Start-Up and Initialization . . . . . . . . . . . . . . . . . . . . . . . . . . . . . . . . . . . . . . . . . . . . . . . . . . . 20<br />
7.2 Shutting Down the UPS. . . . . . . . . . . . . . . . . . . . . . . . . . . . . . . . . . . . . . . . . . . . . . . . . . . . . . 20<br />
7.3 Transferring the System from UPS to <strong>Maintenance</strong> <strong>Bypass</strong> Operation . . . . . . . . . . . . . . . . 20<br />
7.4 Transferring the System from <strong>Maintenance</strong> <strong>Bypass</strong> to UPS Operation . . . . . . . . . . . . . . . . 20<br />
i
8.0 MAINTENANCE . . . . . . . . . . . . . . . . . . . . . . . . . . . . . . . . . . . . . . . . . . . . . . . . . . . . . . . . .21<br />
8.1 Proper Care. . . . . . . . . . . . . . . . . . . . . . . . . . . . . . . . . . . . . . . . . . . . . . . . . . . . . . . . . . . . . . . . 21<br />
8.2 Scheduled <strong>Maintenance</strong> . . . . . . . . . . . . . . . . . . . . . . . . . . . . . . . . . . . . . . . . . . . . . . . . . . . . . . 21<br />
8.2.1 Replacing Fan Filters—Transformer Models Only . . . . . . . . . . . . . . . . . . . . . . . . . . . . . . . . . 21<br />
9.0 SPECIFICATIONS. . . . . . . . . . . . . . . . . . . . . . . . . . . . . . . . . . . . . . . . . . . . . . . . . . . . . . . .22<br />
FIGURES<br />
Figure 1 Front view . . . . . . . . . . . . . . . . . . . . . . . . . . . . . . . . . . . . . . . . . . . . . . . . . . . . . . . . . . . . . . . . . . . . . . 4<br />
Figure 2 Rear view (without transformer) . . . . . . . . . . . . . . . . . . . . . . . . . . . . . . . . . . . . . . . . . . . . . . . . . . . . 5<br />
Figure 3 Rear view (with transformer) . . . . . . . . . . . . . . . . . . . . . . . . . . . . . . . . . . . . . . . . . . . . . . . . . . . . . . . 6<br />
Figure 4 <strong>Bypass</strong> operation modes . . . . . . . . . . . . . . . . . . . . . . . . . . . . . . . . . . . . . . . . . . . . . . . . . . . . . . . . . . . 7<br />
Figure 5 Clearances . . . . . . . . . . . . . . . . . . . . . . . . . . . . . . . . . . . . . . . . . . . . . . . . . . . . . . . . . . . . . . . . . . . . . . 9<br />
Figure 6 Jumper removal—transformer models and non-transformer models . . . . . . . . . . . . . . . . . . . . . . 12<br />
Figure 7 <strong>Liebert</strong> <strong>Nfinity</strong> <strong>Maintenance</strong> <strong>Bypass</strong> <strong>Cabi<strong>net</strong></strong> with transformer . . . . . . . . . . . . . . . . . . . . . . . . . . 13<br />
Figure 8 <strong>Liebert</strong> <strong>Nfinity</strong> <strong>Maintenance</strong> <strong>Bypass</strong> <strong>Cabi<strong>net</strong></strong> without transformer . . . . . . . . . . . . . . . . . . . . . . . 13<br />
Figure 9 Electrical connections—transformer model MBC . . . . . . . . . . . . . . . . . . . . . . . . . . . . . . . . . . . . . . 16<br />
Figure 10 Electrical connections—non-transformer model MBC . . . . . . . . . . . . . . . . . . . . . . . . . . . . . . . . . . 17<br />
Figure 11 Connecting <strong>Liebert</strong> <strong>Nfinity</strong> to <strong>Liebert</strong> <strong>Nfinity</strong> <strong>Maintenance</strong> <strong>Bypass</strong> with transformer . . . . . . . . 18<br />
Figure 12 Connecting <strong>Liebert</strong> <strong>Nfinity</strong> to a <strong>Liebert</strong> <strong>Maintenance</strong> <strong>Bypass</strong> <strong>Cabi<strong>net</strong></strong> without transformer . . . 19<br />
TABLES<br />
Table 1 Common receptacle and hardwire options. . . . . . . . . . . . . . . . . . . . . . . . . . . . . . . . . . . . . . . . . . . . . 8<br />
Table 2 <strong>Maintenance</strong> <strong>Bypass</strong> <strong>Cabi<strong>net</strong></strong> physical data . . . . . . . . . . . . . . . . . . . . . . . . . . . . . . . . . . . . . . . . . . . 9<br />
Table 3 <strong>Liebert</strong> <strong>Nfinity</strong> power cable and protection ratings . . . . . . . . . . . . . . . . . . . . . . . . . . . . . . . . . . . . 14<br />
ii
IMPORTANT SAFETY INSTRUCTIONS<br />
SAVE THESE INSTRUCTIONS<br />
This manual contains important instructions that should be closely followed during installation and<br />
maintenance of this <strong>Maintenance</strong> <strong>Bypass</strong> <strong>Cabi<strong>net</strong></strong>.<br />
This product is designed for commercial/industrial use only. This product is not intended for use with<br />
life support and other designated “critical” devices. Maximum load must not exceed that shown on the<br />
UPS and the <strong>Maintenance</strong> <strong>Bypass</strong> <strong>Cabi<strong>net</strong></strong> rating label.<br />
!<br />
WARNING<br />
Lethal voltages may be present within this unit even when it is apparently not operating.<br />
Observe all cautions and warnings in this manual. Failure to do so may result in serious<br />
injury or death. Never work alone.<br />
The <strong>Liebert</strong> <strong>Nfinity</strong> <strong>Maintenance</strong> <strong>Bypass</strong> <strong>Cabi<strong>net</strong></strong> is designed for use on properly grounded (earthed)<br />
208/240VAC, 60Hz supply, for installation by qualified personnel. This UPS equipment is intended to<br />
be installed by a qualified / certified electrician who must review and approve customer supplied wiring,<br />
circuit breakers, intended loads and verify correct input, output and grounded (earthed) connections<br />
to ensure compliance with technical standards and national and local electrical codes.<br />
Installation instructions and warning notices are located in the Installation section of this manual.<br />
!<br />
WARNING<br />
To reduce the risk of fire:<br />
• The NMB1x and NMB4x models must be connected to a circuit provided with 100 amperes<br />
maximum branch circuit overcurrent protection in accordance with applicable national and<br />
local electrical codes.<br />
• The NMB5x and NMB8x models must be connected to a circuit provided with 125 amperes<br />
maximum branch circuit overcurrent protection in accordance with applicable national and<br />
local electrical codes.<br />
Operate the UPS equipment in an indoor environment only in an ambient temperature range of 32°F<br />
to 104°F (0°C to 40°C). Install it in a clean environment, free from conductive contaminants, moisture,<br />
flammable liquids, gases, or corrosive substances.<br />
Never block or insert any object into the ventilation holes or other openings.<br />
1
GLOSSARY OF SYMBOLS<br />
Risk of Electrical Shock<br />
Indicates Warning or Caution Followed by Important Instructions<br />
AC Input<br />
AC Output<br />
i<br />
Requests the user to consult the manual<br />
Equipment Grounding Conductor<br />
ON<br />
OFF<br />
2
General Description<br />
1.0 GENERAL DESCRIPTION<br />
Congratulations on your purchase of <strong>Liebert</strong>’s <strong>Nfinity</strong> <strong>Maintenance</strong> <strong>Bypass</strong> <strong>Cabi<strong>net</strong></strong> with Configurable<br />
Output Distribution. As with every <strong>Liebert</strong> product, we stand behind our quality. If you have<br />
any questions concerning this <strong>Maintenance</strong> <strong>Bypass</strong> <strong>Cabi<strong>net</strong></strong>, please feel free to contact your local<br />
dealer, <strong>Liebert</strong> representative, or call the appropriate Technical Support number listed on the back of<br />
this manual.<br />
To ensure proper installation and operation of this unit, please read this manual thoroughly.<br />
Installation must be done by a qualified/certified electrician, but general operation may be performed<br />
without special training.<br />
1.1 System Description<br />
The <strong>Liebert</strong> <strong>Nfinity</strong> <strong>Maintenance</strong> <strong>Bypass</strong> <strong>Cabi<strong>net</strong></strong> is intended for use with the <strong>Liebert</strong> <strong>Nfinity</strong> UPS.<br />
Typical applications include supporting workstations, servers, <strong>net</strong>work, telecom or other sensitive<br />
electronic equipment.<br />
The <strong>Liebert</strong> <strong>Nfinity</strong> <strong>Maintenance</strong> <strong>Bypass</strong> <strong>Cabi<strong>net</strong></strong> was designed to provide maximum system availability<br />
to business critical equipment. The <strong>Liebert</strong> <strong>Nfinity</strong> <strong>Maintenance</strong> <strong>Bypass</strong> <strong>Cabi<strong>net</strong></strong> allows for<br />
transfer of connected loads to an alternate power path allowing full isolation of the UPS. The UPS can<br />
then be turned “OFF” and removed from service with no interruption of power to connected loads.<br />
1.1.1 Features<br />
• Supports up to 20 kVA loads<br />
• High speed transfer switch<br />
• Compact design<br />
• Highly configurable<br />
• Multiple power path indicators<br />
1.1.2 Standard Components<br />
• Casters and leveling feet<br />
• Easily accessible terminal blocks<br />
• Supports Lockout/Tagout Program<br />
• Support/mounting brackets for additional stability<br />
• Provisions for hardwire output<br />
• Dual-source compatible for increased availability<br />
1.1.3 Options<br />
• Output transformer for isolation<br />
• Field-installable output distribution<br />
3
General Description<br />
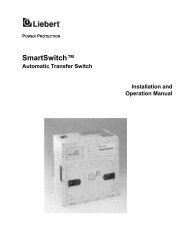
Figure 1<br />
Front view<br />
Output breaker<br />
(CB1)<br />
<strong>Bypass</strong> availability<br />
indicator (amber)<br />
<strong>Bypass</strong> switch<br />
(SW1)<br />
UPS output<br />
availability<br />
indicator<br />
(green)<br />
UPS input power<br />
present (amber)<br />
UPS input<br />
switch (SW2)<br />
Cooling fans<br />
(transformer<br />
models only)<br />
Support bracket<br />
4
General Description<br />
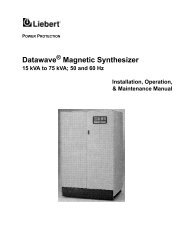
Figure 2<br />
Rear view (without transformer)<br />
Configurable output<br />
distribution (optional)<br />
Hardwire output<br />
(standard)<br />
Hardwire output<br />
terminal block (TB5)<br />
UPS input (TB3)<br />
UPS output (TB4)<br />
<strong>Maintenance</strong> bypass<br />
input (TB1)<br />
<strong>Maintenance</strong> bypass<br />
input (TB2)<br />
Support bracket<br />
5
General Description<br />
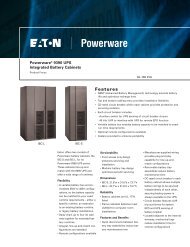
Figure 3<br />
Rear view (with transformer)<br />
Configurable output<br />
distribution (optional)<br />
Hardwire output<br />
(standard)<br />
Hardwire output<br />
terminal block (TB6)<br />
Tap selector (TB4)<br />
UPS output (TB5)<br />
<strong>Maintenance</strong> bypass<br />
input (TB1) (TB2)<br />
UPS input (TB3)<br />
Support bracket<br />
6
Modes of Operation<br />
2.0 MODES OF OPERATION<br />
The <strong>Liebert</strong> <strong>Nfinity</strong> <strong>Maintenance</strong> <strong>Bypass</strong> <strong>Cabi<strong>net</strong></strong> is designed to operate in two modes: UPS Mode and<br />
<strong>Bypass</strong> Mode.<br />
2.1 UPS Mode<br />
While the <strong>Liebert</strong> <strong>Nfinity</strong> <strong>Maintenance</strong> <strong>Bypass</strong> <strong>Cabi<strong>net</strong></strong> is in UPS Mode, the UPS is supplying the<br />
connected load with continuous, high quality AC power. In this mode of operation, the load is protected<br />
by the UPS. The <strong>Bypass</strong> Switch rotated toward the green lamp indicates this mode.<br />
2.2 <strong>Bypass</strong> Mode<br />
When the <strong>Liebert</strong> <strong>Nfinity</strong> <strong>Maintenance</strong> <strong>Bypass</strong> <strong>Cabi<strong>net</strong></strong> is in the <strong>Bypass</strong> Mode, it provides an alternate<br />
path for power to the connected equipment. Should the UPS need to be taken out of service for<br />
limited maintenance or repair, manual activation of the bypass will cause an immediate transfer of<br />
the equipment from the UPS inverter to the bypass source.<br />
The amber lamp illuminated in the <strong>Maintenance</strong> <strong>Bypass</strong> Switch compartment indicates bypass is<br />
available. In this mode of operation the load is NOT protected by the UPS. The <strong>Bypass</strong> Switch rotated<br />
toward the amber lamp indicates this mode. See 7.0 - Operation for instructions on use.<br />
Figure 4<br />
<strong>Bypass</strong> operation modes<br />
UPS MODE<br />
BYPASS MODE<br />
UPS output<br />
available<br />
(green)<br />
<strong>Bypass</strong><br />
available<br />
(amber)<br />
UPS Input source (amber)<br />
ON = AC power supplied to UPS input<br />
OFF = AC power removed from UPS input<br />
7
Major Components<br />
3.0 MAJOR COMPONENTS<br />
The following is a general description of each component and its functions. Please review this section<br />
carefully, as it will give you a better understanding as to how the <strong>Liebert</strong> <strong>Nfinity</strong> <strong>Maintenance</strong> <strong>Bypass</strong><br />
<strong>Cabi<strong>net</strong></strong> operates.<br />
3.1 <strong>Bypass</strong> Switch<br />
The <strong>Bypass</strong> Switch allows easy and rapid transfer of connected loads between the UPS and <strong>Bypass</strong><br />
source.<br />
3.2 User Selectable Output Distribution<br />
Several receptacle and hardwire options are available as user selectable output distribution. These<br />
are factory configured when ordered and also allow for field upgrades.<br />
Table 1<br />
Common receptacle and hardwire options<br />
15 Amp Options 20 Amp Options 30 Amp Options<br />
5-15R2 5-20R2 (T-slot) L5-30R<br />
L5-15R2 L5-20R L6-30R-208<br />
6-15R2-208 L6-20R-208 L6-30R-240<br />
6-15R2-240 L6-20R-240 L14-30R-240<br />
L6-15R2-208<br />
L6-15R2-240<br />
15A,120V, 1 pole breaker w/ 1/2" &<br />
3/4" knockouts<br />
15A,208V, 2 pole breaker w/ 1/2" &<br />
3/4" knockouts<br />
15A,240V, 2 pole breaker w/ 1/2" &<br />
3/4" knockouts<br />
Other Options<br />
• Single Position Blanking Plate<br />
• Hardwire Option<br />
L14-20R-240<br />
20A,120V, 1 pole breaker w/ 1/2" &<br />
3/4" knockouts<br />
20A,208V, 2 pole breaker w/ 1/2" &<br />
3/4" knockouts<br />
20A,240V, 2 pole breaker w/ 1/2" &<br />
3/4" knockouts<br />
30A,120V, 1 pole breaker w/ 1/2" &<br />
3/4" knockouts<br />
30A,208V, 2 pole breaker w/ 1/2" &<br />
3/4" knockouts<br />
30A,240V, 2 pole breaker w/ 1/2" &<br />
3/4" knockouts<br />
3.2.1 Optional Transformer<br />
Models offering a transformer are designed to accept the same input voltage as the UPS and provide<br />
240 / 208 / 120 / 120 output. Models with transformers are provided with redundant cooling fans and<br />
user serviceable fan filters. The fans operate only when the system is in <strong>Bypass</strong> mode.<br />
8
Preparation<br />
4.0 PREPARATION<br />
These installation instructions provide all the information needed for positioning the <strong>Liebert</strong> <strong>Nfinity</strong><br />
<strong>Maintenance</strong> <strong>Bypass</strong> <strong>Cabi<strong>net</strong></strong> (including environmental requirements) and for connecting the input<br />
and output power cables.<br />
4.1 Inspection<br />
Upon receiving the <strong>Liebert</strong> <strong>Nfinity</strong> <strong>Maintenance</strong> <strong>Bypass</strong> <strong>Cabi<strong>net</strong></strong>, examine the packaging for any<br />
signs of mishandling or damage. If any damage is noted, contact your local dealer or <strong>Liebert</strong> representative<br />
and notify your carrier.<br />
4.2 Environment<br />
The <strong>Liebert</strong> <strong>Nfinity</strong> <strong>Maintenance</strong> <strong>Bypass</strong> <strong>Cabi<strong>net</strong></strong> environment must be free of conductive contaminants<br />
and excessive moisture (water condensation), flammable vapors, chemical fumes, or corrosive<br />
gases and liquids.<br />
4.3 Required Setup Equipment<br />
The tools below are required in order to properly set up your <strong>Liebert</strong> <strong>Nfinity</strong> <strong>Maintenance</strong> <strong>Bypass</strong><br />
<strong>Cabi<strong>net</strong></strong>:<br />
•pallet jack<br />
• 1/2" (13 mm) wrench<br />
• torque wrench<br />
• flat-head screwdriver<br />
• #2 Phillips screwdriver<br />
• 3/16" (5 mm) Allen wrench<br />
4.4 Site Preparation<br />
When deciding where to locate your <strong>Maintenance</strong> <strong>Bypass</strong> <strong>Cabi<strong>net</strong></strong>, consider the weight and size of the<br />
unit. Make sure that the structural integrity of the floor can withstand the weight. Refer to the table<br />
below for dimensional considerations:<br />
Table 2<br />
<strong>Maintenance</strong> <strong>Bypass</strong> <strong>Cabi<strong>net</strong></strong> physical data<br />
Dimensions<br />
Model With Transformer Without Transformer<br />
W x D x H<br />
In (mm)<br />
9.5 x 26.5 x 30.4<br />
(241.3 x 673.1 x 772.16)<br />
Weight 287 lb (130 kg) 85 lb (38 kg)<br />
Check to make sure that your <strong>Liebert</strong> <strong>Nfinity</strong> <strong>Maintenance</strong> <strong>Bypass</strong> <strong>Cabi<strong>net</strong></strong> will be located in a wellventilated<br />
area with at least 12 inches (304mm) in front of and behind it. Transformer based models<br />
are forced air cooled with the aid of two internal cooling fans.<br />
Figure 5<br />
Clearances<br />
12" (304mm)<br />
12" (304mm)<br />
9
Unloading<br />
5.0 UNLOADING<br />
The unit frame is bolted to the shipping pallet to ensure safety. <strong>Liebert</strong> recommends using a pallet<br />
jack to transport the unit to its operating location prior to unbolting the unit.<br />
5.1 Unloading the <strong>Liebert</strong> <strong>Nfinity</strong> <strong>Maintenance</strong> <strong>Bypass</strong> <strong>Cabi<strong>net</strong></strong><br />
Metal ramp<br />
storage area<br />
!<br />
CAUTION<br />
This <strong>Liebert</strong> <strong>Nfinity</strong> <strong>Maintenance</strong> <strong>Bypass</strong> <strong>Cabi<strong>net</strong></strong> is heavy (see weight in Table 2). At least<br />
two people should assist to unload it from the pallet.<br />
1. Once the <strong>Liebert</strong> <strong>Nfinity</strong> <strong>Maintenance</strong> <strong>Bypass</strong><br />
<strong>Cabi<strong>net</strong></strong> is near the desired operating location,<br />
remove the cardboard cover.<br />
2. Use a 1/2" (13mm) wrench to remove the eight<br />
mounting bolts (four per bracket) from the pallet<br />
brackets. Remove mounting brackets from the pallet<br />
and <strong>Liebert</strong> <strong>Nfinity</strong> <strong>Maintenance</strong> <strong>Bypass</strong> <strong>Cabi<strong>net</strong></strong>.<br />
Keep brackets and bolts for future transportation of<br />
the <strong>Liebert</strong> <strong>Nfinity</strong> <strong>Maintenance</strong> <strong>Bypass</strong> <strong>Cabi<strong>net</strong></strong> or<br />
for securing the cabi<strong>net</strong> to the floor.<br />
3. Remove the metal ramp from the bottom of the pallet,<br />
rotating it 180°. Fit ramp onto opposite side of pallet (in slot) as shown below.<br />
Ramp fitted<br />
to pallet<br />
Mounting bolts<br />
in bracket<br />
4. Using two people, slowly roll the <strong>Liebert</strong> <strong>Nfinity</strong> <strong>Maintenance</strong> <strong>Bypass</strong> <strong>Cabi<strong>net</strong></strong> down the ramp<br />
until the unit is on a level surface (see below, left).<br />
5. Once the <strong>Liebert</strong> <strong>Nfinity</strong> <strong>Maintenance</strong> <strong>Bypass</strong> <strong>Cabi<strong>net</strong></strong> is in the desired location, adjust the<br />
leveling feet to secure its position (see below, right).<br />
Ease <strong>Maintenance</strong> <strong>Bypass</strong><br />
<strong>Cabi<strong>net</strong></strong> down ramp<br />
Adjustable<br />
leveling foot<br />
Casters<br />
10
5.2 Stationary Mounting<br />
Unloading<br />
Additional stability can be added by bolting the mounting brackets (used in shipping) to the floor.<br />
Mounting bracket<br />
on rear of unit<br />
For greater stability, use a higher-grade bolt. Refer to the dimensions below when drilling holes for<br />
stationary mounting.<br />
4-3/4"<br />
(120 mm)<br />
4-3/4"<br />
(120 mm)<br />
28"<br />
(711 mm)<br />
Centerline of Unit<br />
5/16" (8mm) diameter<br />
6 places<br />
Top View of <strong>Liebert</strong> <strong>Nfinity</strong><br />
<strong>Maintenance</strong> <strong>Bypass</strong> <strong>Cabi<strong>net</strong></strong><br />
11
Cable Installation<br />
6.0 CABLE INSTALLATION<br />
6.1 Wiring Preparation<br />
!<br />
WARNING<br />
Please read this section thoroughly before attempting to install wiring to this unit.<br />
Be sure that the unit is not connected to any AC mains power source or UPS before installing any wiring<br />
to this unit. This <strong>Liebert</strong> <strong>Nfinity</strong> <strong>Maintenance</strong> <strong>Bypass</strong> <strong>Cabi<strong>net</strong></strong> should be installed by a qualified /<br />
certified electrician.<br />
6.2 Preparing Internal Wiring<br />
The <strong>Liebert</strong> <strong>Nfinity</strong> <strong>Maintenance</strong> <strong>Bypass</strong> <strong>Cabi<strong>net</strong></strong> is factory-configured for single-source installations.<br />
If your installation requires dual-source capabilities, the <strong>Liebert</strong> <strong>Nfinity</strong> <strong>Maintenance</strong> <strong>Bypass</strong> <strong>Cabi<strong>net</strong></strong>’s<br />
wiring must be modified.<br />
6.3 Dual Source Configuration<br />
Modifying the wiring consists of removing the jumpers between TB1 and TB2 as described below:<br />
1. Remove cover plates.<br />
2. Identify TB1 and TB2.<br />
3. Using a 3/16" Allen wrench, loosen terminal mounting jumpers between TB1 and TB2.<br />
4. Remove jumpers and retighten terminals to 50 in-lb.<br />
5. Connect primary source to TB2 and secondary source to TB1.<br />
Figure 6<br />
Jumper removal—transformer models and non-transformer models<br />
TRANSFORMER MODELS<br />
GEC<br />
TB1 TB2 TB3<br />
Cables to be removed<br />
NON-TRANSFORMER MODELS<br />
TB1<br />
Cables to be removed<br />
TB2<br />
12
Cable Installation<br />
Figure 7<br />
Input 2<br />
Input 1<br />
<strong>Liebert</strong> <strong>Nfinity</strong> <strong>Maintenance</strong> <strong>Bypass</strong> <strong>Cabi<strong>net</strong></strong> with transformer<br />
TB2<br />
TB1<br />
Single input jumper<br />
(remove for dual<br />
input feeds)<br />
SW2<br />
UPS Input<br />
Switch<br />
TB4<br />
208/240V<br />
Tap Selector<br />
Transformer<br />
SW1<br />
<strong>Bypass</strong><br />
Switch<br />
CB1<br />
Output<br />
Breaker<br />
TB6<br />
Output<br />
TB3<br />
UPS Input<br />
TB5<br />
UPS Output<br />
Figure 8<br />
<strong>Liebert</strong> <strong>Nfinity</strong> <strong>Maintenance</strong> <strong>Bypass</strong> <strong>Cabi<strong>net</strong></strong> without transformer<br />
Input 2<br />
TB2<br />
TB5<br />
Output<br />
Single input jumper<br />
(remove for dual input feeds)<br />
SW1<br />
<strong>Bypass</strong><br />
Switch<br />
CB1<br />
Output<br />
Breaker<br />
Input 1<br />
TB1<br />
SW2<br />
UPS Input<br />
Switch<br />
TB3<br />
TB4<br />
UPS Input<br />
UPS Output<br />
13
Cable Installation<br />
6.4 Removing the Cover Plates<br />
On the back of the <strong>Liebert</strong> <strong>Nfinity</strong> <strong>Maintenance</strong> <strong>Bypass</strong><br />
<strong>Cabi<strong>net</strong></strong>, cover plates are over the input and output terminals<br />
(see illustration at right). Remove these using a<br />
phillips screwdriver. Keep screws and plates to one side.<br />
6.5 Power Cable Installation<br />
Refer to Table 3 below when selecting cables.<br />
Table 3<br />
6.6 REPO Connection<br />
<strong>Liebert</strong> <strong>Nfinity</strong> power cable and<br />
protection ratings<br />
Models NMB1x & NMB4x<br />
Max Input Current<br />
Input Protection<br />
Max Output Current<br />
Input/ Output<br />
Terminal Details<br />
Models NMB5x & NMB8x<br />
Max Input Current<br />
Input Protection<br />
Max Output Current<br />
Input/ Output<br />
Terminal Details<br />
100 A<br />
100 A<br />
100 A<br />
Max: 2/0 (70 mm 2 )<br />
Min: 6 AWG (16 mm 2 )<br />
125 A<br />
125 A<br />
125 A<br />
Max: 2/0 (70 mm 2 )<br />
Min: 6 AWG (16 mm 2 )<br />
NOTES<br />
If an output transformer is fitted, the <strong>Liebert</strong> <strong>Nfinity</strong> <strong>Maintenance</strong> <strong>Bypass</strong> has a five-cycle<br />
inrush current that is 10 times the rated output current. This must be taken into account when<br />
selecting the overload protection device at the AC input supply distribution point. To avoid<br />
random tripping on start up, it is recommended that the AC input supply be protected with a<br />
circuit breaker capable of withstanding this initial inrush.<br />
Transient and steady state earth leakage currents may occur when starting the equipment.<br />
This should be taken into account when selecting ground current detection devices, as these<br />
will carry the earth leakage currents of both the UPS equipment and the load.<br />
Refer to the <strong>Liebert</strong> <strong>Nfinity</strong> user manual for information on connecting the REPO.<br />
14
Cable Installation<br />
6.7 Input and Output Wiring<br />
NOTE<br />
Input wiring must be installed using conduit.<br />
208 input voltage jumper—if only the connections for 208 VAC are made between the UPS and<br />
the <strong>Liebert</strong> <strong>Nfinity</strong> <strong>Maintenance</strong> <strong>Bypass</strong>, the 208 input voltage jumper must be installed for<br />
proper operation. To install this jumper, place the jumper wire provided in the accessory kit<br />
between Pin 1 and Pin 2 on TB4.<br />
To connect the input wiring:<br />
1. Locate the input wiring access (see<br />
illustration at right).<br />
2. Remove the knockout and pull the three/four<br />
input wires through it, allowing some slack<br />
for installation.<br />
3. Secure the conduit to the rear panel of the<br />
<strong>Liebert</strong> <strong>Nfinity</strong> <strong>Maintenance</strong> <strong>Bypass</strong> <strong>Cabi<strong>net</strong></strong>.<br />
4. Input power cables connect to hex terminals<br />
on the input terminal block.<br />
5. Insert the ground (earth) wire through the<br />
earth lug and tighten it to the proper torque<br />
value (120 in-lb). Then connect the wires to<br />
the block connections as shown at right. Using<br />
a torque wrench, turn the screws clockwise<br />
until tightened to the proper torque value<br />
(50 in-lb).<br />
NOTE<br />
The <strong>Liebert</strong> <strong>Nfinity</strong> UPS and <strong>Liebert</strong><br />
<strong>Nfinity</strong> <strong>Maintenance</strong> <strong>Bypass</strong> with<br />
transformer contain an isolation<br />
transformer that generates a neutral<br />
conductor for the connected equipment.<br />
The UPS and <strong>Maintenance</strong> <strong>Bypass</strong> with<br />
transformer are a separately derived<br />
source and contain a<br />
neutral-to-ground bonding jumper. A<br />
grounding electrode conductor (GEC)<br />
must be installed in accordance with<br />
national and local wiring codes and<br />
regulations.<br />
Input<br />
Conduit<br />
RIGHT HAND OPTION<br />
( LOOKING FROM FRONT OF UNIT )<br />
REAR VIEW<br />
LEFT HAND OPTION<br />
( LOOKING FROM FRONT OF UNIT )<br />
REAR VIEW<br />
15
Cable Installation<br />
Figure 9<br />
Electrical connections—transformer model MBC<br />
Common Ground<br />
Wire Connection Torque<br />
Value: 13 in-lb<br />
G<br />
120V<br />
240V<br />
208V<br />
G<br />
120V<br />
G<br />
Common Ground<br />
Wire Connection Torque<br />
Value: 120 in-lb<br />
Common Ground<br />
Wire Connection Torque<br />
Value: 120 in-lb<br />
TB6 Hardwire Output<br />
Terminal Block<br />
Wire Connection Torque<br />
Value: 35 in-lb<br />
Wire Connection Torque<br />
Value: 120 in-lb<br />
1 2 3<br />
TB6<br />
4<br />
TB4 Tap Selector<br />
Terminal Block<br />
Wire Connection<br />
Torque Value: 28 in-lb<br />
TB1 & TB2 <strong>Maintenance</strong><br />
<strong>Bypass</strong> Terminal Blocks<br />
Wire Connection Torque<br />
Value: 50 in-lb<br />
GEC<br />
GEC (Grounding Electrode Conductor)<br />
Wire Connection Torque Value: 120 in-lb<br />
1 2 3<br />
TB4<br />
5 6 7 8<br />
TB5<br />
TB1 TB2 TB3<br />
L1 L2 L1 L2 L1 L2<br />
G G G<br />
TB5 UPS Output<br />
Terminal Block<br />
Wire Connection Torque<br />
Value: 28 in-lb<br />
TB3 UPS Input<br />
Terminal Block<br />
Wire Connection Torque<br />
Value: 50 in-lb<br />
Common Ground<br />
Wire Connection<br />
Torque Value: 120 in-lb<br />
16
Cable Installation<br />
Figure 10 Electrical connections—non-transformer model MBC<br />
Common Ground<br />
Wire Connection Torque<br />
Value: 13 in-lb<br />
Common Ground<br />
Wire Connection Torque<br />
Value: 120 in-lb<br />
G<br />
120V<br />
240V<br />
208V<br />
G<br />
120V<br />
G<br />
Common Ground<br />
Wire Connection Torque<br />
Value: 120 in-lb<br />
TB5 Hardwire Output Terminal<br />
Block<br />
Wire Connection Torque<br />
Value: 35 in-lb<br />
Wire Connection Torque<br />
Value: 120 in-lb<br />
1 2 3<br />
TB5<br />
4<br />
TB3 UPS Input Terminal<br />
Block<br />
Wire Connection Torque<br />
Value: 28 in-lb<br />
TB1 <strong>Maintenance</strong> <strong>Bypass</strong> Terminal<br />
Block<br />
Wire Connection Torque<br />
Value: 50 in-lb<br />
G<br />
G<br />
L1 L2<br />
TB3<br />
TB1<br />
G<br />
5 6 7 8<br />
TB4<br />
TB2<br />
N L1 L2 N L1 L2<br />
TB4 UPS Output Terminal<br />
Block<br />
Wire Connection Torque<br />
Value: 28 in-lb<br />
TB2 <strong>Maintenance</strong> <strong>Bypass</strong><br />
Terminal Block<br />
Wire Connection Torque<br />
Value: 50 in-lb<br />
Common Ground<br />
Wire Connection<br />
Torque Value: 120 in-lb<br />
17
Figure 11 Connecting <strong>Liebert</strong> <strong>Nfinity</strong> to <strong>Liebert</strong> <strong>Nfinity</strong> <strong>Maintenance</strong> <strong>Bypass</strong> with transformer<br />
Input 2<br />
Input 1<br />
TB2<br />
L1<br />
L2<br />
G<br />
TB1<br />
L1<br />
L2<br />
G<br />
GEC<br />
LIEBERT NFINITY MAINTENANCE BYPASS<br />
CABINET WITH TRANSFORMER<br />
Remove these two<br />
wires for dual source<br />
(see NOTE below)<br />
TB3<br />
TB4<br />
TB5<br />
L1 L2 G 1 2 3 1 2 3 4<br />
G<br />
TB6<br />
1<br />
2<br />
3<br />
4<br />
G<br />
G<br />
Cable Installation<br />
120 120<br />
208<br />
240<br />
Flexible<br />
conduit<br />
208 240<br />
L1 L2 G 1 2 3 1 2 3 4 5<br />
TB1<br />
TB2<br />
TB3<br />
GEC<br />
See <strong>Liebert</strong><br />
<strong>Nfinity</strong> user manual<br />
for details on<br />
connecting GEC.<br />
Ensure that both tap<br />
selectors are set to the<br />
correct input voltage<br />
LIEBERT NFINITY UPS<br />
NOTE<br />
1. SINGLE-SOURCE FEED—If feeding the <strong>Liebert</strong> <strong>Nfinity</strong> <strong>Maintenance</strong> <strong>Bypass</strong> <strong>Cabi<strong>net</strong></strong><br />
from a single source, the input connection may be made to either TB1 or TB2.<br />
2. DUAL-SOURCE FEED—If feeding the <strong>Liebert</strong> <strong>Nfinity</strong> <strong>Maintenance</strong> <strong>Bypass</strong> <strong>Cabi<strong>net</strong></strong> from<br />
a dual source, the UPS input supply connection must be made to TB1 and the bypass input<br />
supply connection must be made to TB2. The jumpers between TB1 and TB2 must be<br />
removed.<br />
3. If connected equipment is a combination of 208 VAC and 120 VAC, use a three-phase panel<br />
board connected to the output terminal TB6.<br />
18
Cable Installation<br />
Figure 12 Connecting <strong>Liebert</strong> <strong>Nfinity</strong> to a <strong>Liebert</strong> <strong>Maintenance</strong> <strong>Bypass</strong> <strong>Cabi<strong>net</strong></strong> without transformer<br />
TB2<br />
L1<br />
LIEBERT NFINITY MAINTENANCE BYPASS CABINET<br />
WITHOUT TRANSFORMER<br />
TB5<br />
1<br />
120 120<br />
208<br />
240<br />
Input 2<br />
L2<br />
N<br />
2<br />
3<br />
4<br />
G<br />
TB1<br />
L1<br />
Remove these three<br />
wires for dual source<br />
(see NOTE below)<br />
G<br />
Input 1<br />
L2<br />
N<br />
G<br />
G<br />
G<br />
TB3<br />
TB4<br />
L1 L2 G 1 2 3 4<br />
Flexible<br />
conduit<br />
L1 L2 G 1 2 3 1 2 3 4 5<br />
TB1<br />
TB2<br />
TB3<br />
GEC<br />
See <strong>Liebert</strong><br />
<strong>Nfinity</strong> user manual<br />
for details on<br />
connecting GEC.<br />
Ensure that the tap<br />
selector is set to the<br />
correct input voltage<br />
LIEBERT NFINITY UPS<br />
NOTE<br />
1. SINGLE-SOURCE FEED—If feeding the <strong>Liebert</strong> <strong>Nfinity</strong> <strong>Maintenance</strong> <strong>Bypass</strong> <strong>Cabi<strong>net</strong></strong><br />
from a single source, the input connection may be made to either TB1 or TB2.<br />
2. DUAL-SOURCE FEED—If feeding the <strong>Liebert</strong> <strong>Nfinity</strong> <strong>Maintenance</strong> <strong>Bypass</strong> <strong>Cabi<strong>net</strong></strong> from<br />
a dual source, the UPS input supply connection must be made to TB1 and the bypass input<br />
supply connection must be made to TB2. The jumpers between TB1 and TB2 must be<br />
removed.<br />
3. If connected equipment is a combination of 208 VAC and 120 VAC, use a three-phase panel<br />
board connected to the output terminal TB5.<br />
19
Operation<br />
7.0 OPERATION<br />
7.1 Start-Up and Initialization<br />
To start up the <strong>Liebert</strong> <strong>Nfinity</strong> UPS while it is connected to the <strong>Liebert</strong> <strong>Nfinity</strong> <strong>Maintenance</strong> <strong>Bypass</strong>:<br />
1. Set the <strong>Maintenance</strong> <strong>Bypass</strong> switch (SW1) to the UPS position on the <strong>Liebert</strong> <strong>Nfinity</strong><br />
<strong>Maintenance</strong> <strong>Bypass</strong> <strong>Cabi<strong>net</strong></strong>.<br />
2. Close the UPS Source Switch (SW2) on the <strong>Liebert</strong> <strong>Nfinity</strong> <strong>Maintenance</strong> <strong>Bypass</strong> <strong>Cabi<strong>net</strong></strong>.<br />
3. Close the output circuit breaker (CB1) on the <strong>Liebert</strong> <strong>Nfinity</strong> <strong>Maintenance</strong> <strong>Bypass</strong> <strong>Cabi<strong>net</strong></strong>.<br />
4. Close the input circuit breaker (CB1) on the UPS.<br />
5. On the UPS, close the Control Enable switch (SW2).<br />
6. After the UPS has initialized, turn the UPS output on by pushing the Standby button.<br />
7.2 Shutting Down the UPS<br />
To power down the UPS system:<br />
1. Turn the UPS output Off by pushing the Standby button.<br />
2. Open the Control Enable switch (SW2) on the UPS.<br />
3. Open the input circuit breaker (CB1) on the UPS.<br />
4. Open the UPS Source Switch (SW2) on the <strong>Liebert</strong> <strong>Nfinity</strong> <strong>Maintenance</strong> <strong>Bypass</strong> <strong>Cabi<strong>net</strong></strong>.<br />
5. Open the output circuit breaker (CB1) on the <strong>Liebert</strong> <strong>Nfinity</strong> <strong>Maintenance</strong> <strong>Bypass</strong> <strong>Cabi<strong>net</strong></strong>.<br />
7.3 Transferring the System from UPS to <strong>Maintenance</strong> <strong>Bypass</strong> Operation<br />
1. Verify that the amber <strong>Bypass</strong> lamp is illuminated<br />
2. Turn the <strong>Bypass</strong> Switch (SW1) to the bypass position on the <strong>Liebert</strong> <strong>Nfinity</strong> <strong>Maintenance</strong> <strong>Bypass</strong><br />
<strong>Cabi<strong>net</strong></strong>. The connected equipment is now powered from the bypass source and is not protected.<br />
7.4 Transferring the System from <strong>Maintenance</strong> <strong>Bypass</strong> to UPS Operation<br />
1. Close the UPS Source Switch (SW2) on the <strong>Liebert</strong> <strong>Nfinity</strong> <strong>Maintenance</strong> <strong>Bypass</strong> <strong>Cabi<strong>net</strong></strong>.<br />
2. Close the input circuit breaker (CB1) on the UPS.<br />
3. Close the Control Enable Switch (SW2) on the UPS.<br />
4. Turn the UPS output On by pushing the Standby button on the UPS.<br />
5. Verify that the green UPS lamp is illuminated.<br />
6. Turn the <strong>Bypass</strong> Switch to the UPS position on the <strong>Liebert</strong> <strong>Nfinity</strong> <strong>Maintenance</strong> <strong>Bypass</strong> <strong>Cabi<strong>net</strong></strong>.<br />
20
<strong>Maintenance</strong><br />
8.0 MAINTENANCE<br />
8.1 Proper Care<br />
Keeping your <strong>Liebert</strong> <strong>Nfinity</strong> <strong>Maintenance</strong> <strong>Bypass</strong> <strong>Cabi<strong>net</strong></strong> operating properly is imperative to optimal<br />
performance and life of the unit. It is recommended that a certified technician perform preventive<br />
and corrective maintenance. <strong>Liebert</strong> Global Services (LGS) is dedicated to ensuring the highest level<br />
of performance and unmatched support for your <strong>Liebert</strong> <strong>Nfinity</strong> <strong>Maintenance</strong> <strong>Bypass</strong> <strong>Cabi<strong>net</strong></strong>. Contact<br />
an LGS representative for services to guarantee maximum reliability and system availability.<br />
8.2 Scheduled <strong>Maintenance</strong><br />
<strong>Liebert</strong> recommends performing the following maintenance at least monthly:<br />
• Check, clean and replace filters.<br />
• Verify that airflow is not obstructed.<br />
<strong>Liebert</strong> recommends performing the following maintenance annually:<br />
• Verify all power connections.<br />
• Verify that all output distribution modules are operating properly.<br />
8.2.1 Replacing Fan Filters—Transformer Models Only<br />
The <strong>Liebert</strong> <strong>Nfinity</strong> <strong>Maintenance</strong> <strong>Bypass</strong> <strong>Cabi<strong>net</strong></strong> intake fans contain filters that will need to be<br />
replaced or cleaned periodically, depending on the surrounding environment. Check by noting the<br />
condition of the two filters. If filters are dirty, replace or wash them. The filters may be taken out of<br />
the UPS for replacement or cleaning by removing the plastic cover over the filter frame. Use caution<br />
when replacing filters when fans are running.<br />
Fan Filters<br />
The fan filters are washable and may be reused. To wash these filters, place them under a running<br />
faucet (with the dirty side down) to remove dirt and dust. Blot dry with a towel and allow to air-dry<br />
before reusing it.<br />
21
Specifications<br />
9.0 SPECIFICATIONS<br />
General & Environmental<br />
Mechanical<br />
Dimensions<br />
Unit Rating<br />
Safety Standards<br />
Rating<br />
kVA<br />
Amps<br />
Models NMB1x and NMB4x = 18<br />
Models NMB5x and NMB8x = 20<br />
Models NMB1x and NMB4x = 100 max<br />
Models NMB5x and NMB8x = 125 max<br />
UL 1778, c-UL<br />
Width<br />
9.5 (241)<br />
Depth In (mm)<br />
26.5 (700)<br />
Height 30.4 (775)<br />
Weight<br />
lb (kg)<br />
287 (130)<br />
transformer model<br />
85 (39)<br />
transformerless model<br />
Environmental<br />
Operating Temperature (max) F (C) 32º - 104º (0º - 40º)<br />
Relative Humidity % 0-95% non-condensing<br />
Maximum Operating Altitude Ft (M) 10,000 (3000)<br />
Input Data<br />
Nominal Input Voltage VAC 208 or 240<br />
Input Frequency (nominal) Hz 60<br />
Input Frequency Range Hz 55-65<br />
Output Data 208/240 240 208<br />
Output Voltage VAC 120/120/208/240 120/120/240* 120/120/208*<br />
Transfer Time msec
Ensuring The High Availability<br />
Of Mission-Critical Data And Applications.<br />
Emerson Network Power, the global leader in enabling business-critical<br />
continuity, ensures <strong>net</strong>work resiliency and adaptability through<br />
a family of technologies—including <strong>Liebert</strong> power and cooling<br />
technologies—that protect and support business-critical systems.<br />
<strong>Liebert</strong> solutions employ an adaptive architecture that responds<br />
to changes in criticality, density and capacity. Enterprises benefit<br />
from greater IT system availability, operational flexibility and<br />
reduced capital equipment and operating costs.<br />
While every precaution has been taken to ensure the accuracy<br />
and completeness of this literature, <strong>Liebert</strong> Corporation assumes no<br />
responsibility and disclaims all liability for damages resulting from use of<br />
this information or for any errors or omissions.<br />
© 2008 <strong>Liebert</strong> Corporation<br />
All rights reserved throughout the world. Specifications subject to change<br />
without notice.<br />
® <strong>Liebert</strong> is a registered trademark of <strong>Liebert</strong> Corporation.<br />
All names referred to are trademarks<br />
or registered trademarks of their respective owners.<br />
Technical Support / Service<br />
Web Site<br />
www.liebert.com<br />
Monitoring<br />
800-222-5877<br />
<strong>Liebert</strong>.monitoring@emerson.com<br />
Outside the US: 614-841-6755<br />
Single-Phase UPS<br />
800-222-5877<br />
upstech@emerson<strong>net</strong>workpower.com<br />
Outside the US: 614-841-6755<br />
Three-Phase UPS<br />
800-543-2378<br />
powertech@emerson<strong>net</strong>workpower.com<br />
Environmental Systems<br />
800-543-2778<br />
Outside the United States<br />
614-888-0246<br />
Locations<br />
United States<br />
1050 Dearborn Drive<br />
P.O. Box 29186<br />
Columbus, OH 43229<br />
Europe<br />
Via Leonardo Da Vinci 8<br />
Zona Industriale Tognana<br />
35028 Piove Di Sacco (PD) Italy<br />
+39 049 9719 111<br />
Fax: +39 049 5841 257<br />
Asia<br />
7/F Dah Sing Financial Centre<br />
108 Gloucester Road<br />
Wanchai<br />
Hong Kong<br />
852 2572 2201<br />
Fax: 852 2519 9210<br />
SL-23960_REV05_03-09<br />
Emerson Network Power.<br />
The global leader in enabling Business-Critical Continuity.<br />
AC Power<br />
Embedded Computing<br />
Connectivity<br />
Embedded Power<br />
DC Power<br />
Monitoring<br />
Outside Plant<br />
Power Switching & Controls<br />
Precision Cooling<br />
EmersonNetworkPower.com<br />
Racks & Integrated <strong>Cabi<strong>net</strong></strong>s<br />
Services<br />
Surge Protection<br />
Business-Critical Continuity, Emerson Network Power and the Emerson Network Power logo are trademarks and service marks of Emerson Electric Co.<br />
©2008 Emerson Electric Co.