tranquil moments® - Brookstone
tranquil moments® - Brookstone
tranquil moments® - Brookstone

You also want an ePaper? Increase the reach of your titles
YUMPU automatically turns print PDFs into web optimized ePapers that Google loves.
<strong>tranquil</strong><br />
moments ®<br />
travel sound therapy system
®<br />
<strong>tranquil</strong> moments<br />
travel sound therapy system<br />
better by brookstone ®<br />
We believe that exacting standards are the core of our success.<br />
This product has been thoroughly tested to be certain it meets<br />
our rigorous quality control criteria.<br />
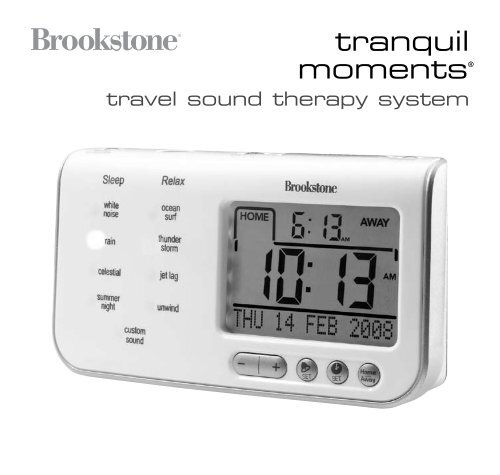
With our Tranquil Moments ® Travel Sound Therapy System,<br />
you’re sure to sleep and relax better—anywhere you go. Eight<br />
clinically proven therapeutic sounds are divided into two channels<br />
(Sleep and Relax) to help you achieve healthier states of mind.<br />
And a dual-time alarm clock with calendar lets you wake to<br />
soothing sounds at home or away.<br />
1
CAUTION<br />
• TO REDUCE THE RISK OF ELECTRIC SHOCK, DO NOT REMOVE COVER OR<br />
BACK. THERE ARE NO USER-SERVICEABLE PARTS INSIDE.<br />
• TO REDUCE THE RISK OF FIRE OR ELECTRIC SHOCK, DO NOT EXPOSE THIS<br />
UNIT TO WATER OR MOISTURE.<br />
The lightning flash with arrow-head symbol within an equilateral<br />
triangle is intended to alert the user to the presence of uninsulated<br />
“dangerous RISK OF ELECTRIC voltage” within SHOCKthe unit’s enclosure that may be of<br />
DO NOT OPEN<br />
sufficient magnitude to constitute a risk of electric shock.<br />
OCK<br />
The exclamation point within an equilateral triangle is intended<br />
to alert the user to the presence of important operating and<br />
maintenance (servicing) instructions in the literature<br />
accompanying the unit.<br />
2
CAUTION<br />
1. All the safety and operating instructions should be read, followed,<br />
adhered to and retained for future reference.<br />
2. The unit should not be used near water, such as a bathtub, swimming<br />
pool, washbowl, kitchen sink, laundry tub, or in a wet basement.<br />
3. Care should be taken so that objects do not fall and liquids are not<br />
spilled onto the unit.<br />
4. Do not reach for the unit if it has fallen into water. Unplug it immediately.<br />
5. The unit should be placed away from heat sources, such as radiators,<br />
heat registers, stoves, or other appliances (including amplifiers) that<br />
produce heat.<br />
6. This unit may be subject to interference from external sources such<br />
as transformers, electric motors or other electronic devices. To avoid<br />
distortion created by such sources, it is advised that you place the<br />
unit as far away from such sources as possible.<br />
7. Do not apply excessive force when using any switches or controls.<br />
3
8. The unit should be connected to a power supply only of the type<br />
described in the operating instructions or as marked on the unit.<br />
9. Precautions should be taken so that the grounding or polarization<br />
means of the unit are not defeated.<br />
10. Power supply cords should be routed so that they are not likely to<br />
be walked on or pinched by items placed on or against them, paying<br />
particular attention to cords at plugs, convenience receptacles and the<br />
point where they exit the unit.<br />
11. The unit is equipped with an attachment plug with overload protection.<br />
This is a safety feature. If replacement of the plug is required, be sure<br />
the service technician has used a replacement plug specified by the<br />
manufacturer that has the same overload protection as the original plug.<br />
12. The unit should be cleaned only as recommended in the instructions.<br />
13. The AC Adapter should be unplugged from the outlet when left unused<br />
for long periods of time.<br />
14. The user should not attempt to service the unit beyond that described<br />
in the operating instructions.<br />
4
15. If using the AC ADAPTER to power the unit, ensure it is properly<br />
connected to the electrical outlet before turning the unit on.<br />
16. When moving the unit, be sure to first unplug the AC ADAPTER.<br />
17. Choose the installation location of your unit carefully. Avoid placing<br />
it in direct sunlight or close to a heat source.<br />
18. Avoid locations that are subject to vibrations, excessive dust, cold<br />
temperatures and moisture.<br />
19. To prevent the likelihood of lightning damage, disconnect the AC<br />
ADAPTER from your household wall outlet during an electrical storm.<br />
20. Always keep this manual in a safe place for future reference.<br />
5
fcc information<br />
This equipment has been tested and found to comply with the limits for a<br />
Class B Digital Device, pursuant to part 15 of the FCC Rules. These limits are<br />
designed to provide reasonable protection against harmful interference in<br />
a residential installation. This equipment generates, uses, and can radiate<br />
radio frequency energy, and if not installed and used in accordance with<br />
the instructions, may cause harmful interference to radio communications.<br />
However, there is no guarantee that interference will not occur in a<br />
particular installation.<br />
If this equipment does cause harmful interference to radio or television<br />
reception, which can be determined by turning the equipment off and<br />
on, the user is encouraged to try to correct the interference by one or<br />
more of the following measures:<br />
• Reorient or relocate the receiving antenna.<br />
• Increase the separation between the equipment and receiver.<br />
6
• Connect the equipment to an outlet on a circuit different from which<br />
the receiver is connected.<br />
• Consult the dealer or an experienced radio/TV technician for help.<br />
This device complies with Part 15 of the FCC Rules. Operation is subject<br />
to the following two conditions:<br />
1. This device may not cause harmful interference.<br />
2. This device must accept any interference received, including<br />
interference that may cause undesired operation.<br />
INTERNATIONAL USE<br />
Your unit is easily converted for international use. Should a foreign country<br />
have different voltage or wall plug standards, an AC Adapter other than the<br />
one included with your unit will be needed. Ensure that the adapter is 7.5V<br />
DC output (150 mA minimum) with the appropriate plug size and polarity.<br />
7
1<br />
2 3 4 5<br />
6<br />
7<br />
8 9 10 11 12<br />
8
location of controls<br />
1. SLEEP ENHANCE<br />
2. SELECT<br />
3. ON/OFF<br />
4. SNOOZE<br />
5. DISPLAY<br />
6. SOUND SESSIONS<br />
7. DISPLAY<br />
8.<br />
9.<br />
10. SET<br />
11. SET<br />
12. HOME/AWAY<br />
9
13<br />
22<br />
21<br />
20<br />
14<br />
15<br />
19<br />
16<br />
17<br />
18<br />
10
13. BATTERY COMPARTMENT COVER<br />
14. RESET<br />
15. BACKUP BATTERY COMPARTMENT COVER<br />
16. BACKUP BATTERY INSULATION STRIP<br />
17. 7.5V DC<br />
18.<br />
19.<br />
20. VOLUME WHEEL<br />
21. SPEAKER<br />
22. RECORD<br />
Accessories (not shown)<br />
• AC Adapter<br />
• Travel Pouch<br />
11
POWER SOURCES<br />
The unit is powered by 4 AA batteries (not included) or the included<br />
AC Adapter.<br />
In addition, the unit comes with a CR2032 button cell backup battery,<br />
which will ensure your settings are not lost if the 4 AA batteries or the<br />
AC Adapter is removed.<br />
It is recommended that 4 AA batteries be installed in the unit at all times.<br />
The 4 AA batteries will power the unit during travel and prolong the life<br />
of the backup battery.<br />
Installing the Batteries<br />
1. Remove the BATTERY COMPARTMENT cover.<br />
2. Remove backup battery insulation strip.<br />
3. Insert 4 AA batteries (not included) according to polarity indicators<br />
inside the compartment.<br />
4. Replace the battery compartment cover.<br />
12
Using the ac adapter<br />
Insert one end of the AC Adapter into 7.5V DC<br />
into an electrical outlet.<br />
Note:<br />
and the other end<br />
• When using the AC Adapter, no power is drawn from the batteries.<br />
• Ensure any replacement adapters provide 7.5V DC output and are rated<br />
for a minimum of 150 mA. The connector plug must be 5.5mm in<br />
diameter and center pin positive.<br />
13
SETTING THE time and date<br />
You can set the time and date for a Home and for an Away location.<br />
Ensure is in the unlock position. Refer to Using the Lock Feature.<br />
14<br />
1. To set your Home time, press HOME/AWAY until your Home time<br />
appears on the DISPLAY. Refer to Figure 1.<br />
2. Press and hold SET. The unit beeps and the hour flashes on<br />
the DISPLAY.<br />
3. Press or incrementally until the correct hour displays.<br />
Or press and hold or to move at a faster rate.<br />
4. Press SET again. The minutes flash on the DISPLAY.<br />
5. Press or incrementally until the correct minutes display.<br />
Or press and hold or to move at a faster rate.<br />
6. Press SET again. The year flashes on the DISPLAY.<br />
7. Press or incrementally until the correct year displays.<br />
Or press and hold or to move at a faster rate.<br />
8. Press SET again. The month flashes on the DISPLAY.<br />
9. Press or incrementally until the correct month displays.<br />
Or press and hold or to move at a faster rate.
10. Press SET again. The day/date flashes on the DISPLAY.<br />
11. Press or incrementally until the correct day/date displays.<br />
Or press and hold or to move at a faster rate.<br />
12. Press SET again. 12hr flashes on the DISPLAY.<br />
13. Press or to select either 12- or 24-hour format.<br />
14. Press SET to save your selections.<br />
15. To set your Away time, press HOME/AWAY until your<br />
Away time appears on the DISPLAY. Refer to Figure 2.<br />
16. Repeat steps 2-14 above.<br />
Figure 1 Figure 2<br />
15
SETTING THE ALARM time<br />
You can set the alarm time for a Home and for an Away location.<br />
Ensure is in the unlock position. Refer to Using the Lock Feature.<br />
1. To set your Home alarm time, press HOME/AWAY until your<br />
Home time appears on the DISPLAY.<br />
2. Press and hold SET. The unit beeps and the hour flashes on<br />
the DISPLAY.<br />
3. Press or incrementally until the desired hour appears.<br />
Or press and hold or to move at a faster rate.<br />
4. Press SET again. The minutes flash on the DISPLAY.<br />
5. Press or incrementally until the desired minutes appear.<br />
Or press and hold or to move at a faster rate.<br />
6. Press SET again. The alarm volume flashes on the DISPLAY.<br />
16
7. Press or incrementally until the desired volume level appears (0-20).<br />
(For use when waking to a SOUND SESSION. Refer to Setting the Alarm<br />
Sound/Turning the Alarm On.)Or press and hold or to move at a<br />
faster rate.<br />
8. Press SET to save your selections.<br />
9. To set your Away alarm time, press HOME/AWAY<br />
until your Away time appears on the DISPLAY.<br />
10. Repeat steps 2-8 above.<br />
setting the alarm sound/turning the alarm on<br />
You can wake at Home or Away to a SOUND SESSION or to the unit’s beeper.<br />
To wake to a SOUND SESSION at Home:<br />
1. Press HOME/AWAY until your Home time appears on the DISPLAY.<br />
2. Press ON/OFF to turn on the Sound Session feature.<br />
3. Press SELECT repeatedly until the indicator for your desired SOUND SESSION<br />
illuminates. For Custom Sound refer to Recording a Custom Sound.<br />
17
4. Press ON/OFF to turn off the Sound Session feature.<br />
5. Press SET incrementally until HOME ALARM SND appears on the bottom<br />
of the DISPLAY. SOUND appears in the upper left corner of<br />
the DISPLAY.<br />
To wake to the unit’s beeper at Home:<br />
Press SET incrementally until HOME ALARM BEEP appears on the bottom<br />
of the DISPLAY. BEEP appears in the upper left corner of the DISPLAY.<br />
Repeat the above steps for your Away alarm sound.<br />
using the alarm<br />
When the alarm sounds, press ON/OFF or SET to turn it off.<br />
Using the Snooze Alarm<br />
When the alarm sounds, press SNOOZE to turn it off. The alarm sounds<br />
one more time in 15 minutes. When the alarm sounds after the second<br />
snooze, press ON/OFF to turn it off.<br />
Note: To turn the alarm off completely, press ON/OFF.<br />
18
turning the alarm feature off<br />
Press SET repeatedly until either HOME ALARM OFF or AWAY ALARM OFF<br />
appears at the bottom of the display. The alarm will not sound at the set<br />
alarm time.<br />
viewing your alarm time and sound<br />
Press DISPLAY. Your alarm time (and sound if the alarm is on) appears<br />
momentarily on the DISPLAY. Your Home alarm time (and sound) displays<br />
first, then your Away alarm time (and sound).<br />
sound therapy<br />
The unit has eight sound sessions divided into two categories:<br />
Sleep and Relax. For details on the sleep therapy built into these sessions,<br />
refer to The Scientific Breakthrough Behind Tranquil Moments ® .<br />
19
Sleep<br />
1. White Noise: The steady flow of a cascading waterfall is perfect as<br />
natural white noise for masking unwanted background sounds.<br />
2. Rain: A <strong>tranquil</strong> rainfall provides a peaceful setting for relaxation<br />
and sleep. The rain sound is particularly good at masking higher<br />
toned background noise.<br />
3. Celestial: Deep pulsations from string instruments coax your mind<br />
into a Delta brainwave state thereby encouraging a restful and<br />
rejuvenating sleep.<br />
4. Summer Night: A slowed down chorus of crickets combined with<br />
NASA recorded sounds from Jupiter activate Delta brainwaves and<br />
create a wonderfully calming environment.<br />
20
Relax<br />
1. Ocean Surf: The ocean surf provides a calm rhythm that helps you<br />
drift off to sleep or creates a relaxing oceanside environment.<br />
2. Thunderstorm: Unwind to the exhilarating, but soothing sound<br />
of distant thunder as gentle rain falls upon a remote lake.<br />
3. Jet Lag: Using Theta entrainment, produces drifting, non-linear music<br />
combined with slowed nature sounds and special pulse-rates to help slow<br />
the body’s rhythms and encourages relaxation that can help reset one’s<br />
internal body clock. Use during flight or upon reaching your destination.<br />
4. Unwind: A soothing array of musical instruments and slowed down<br />
natural human body sounds stimulate Alpha brainwaves for the<br />
ultimate in deep relaxation.<br />
21
ecording a CUSTOM SOUND<br />
The Custom Sound recording feature allows you to record a single<br />
message up to 15 seconds in length. Sound Sessions must be off in<br />
order to record a custom sound.<br />
1. Press and hold RECORD. The unit beeps.<br />
2. Record a memo into the SPEAKER.<br />
Note: Recording starts when REC MEMO 15 sec appears on the<br />
DISPLAY and starts counting down in one-second increments<br />
from 15 seconds.<br />
3. Release RECORD to stop recording.<br />
Note: The unit automatically stops recording after 15 seconds.<br />
Playing a sound session or a CUSTOM SOUND<br />
1. Press ON/OFF to turn the unit on.<br />
2. Press SELECT repeatedly until the indicator for your desired<br />
SOUND SESSION illuminates.<br />
22
using the timer<br />
You can set the timer to shut the unit off after 30, 60 or 90 minutes.<br />
1. Press and hold ON/OFF for two seconds. The status of the timer<br />
appears on the display (i.e. TIMER OFF).<br />
2. Press or to select your desired shutoff time. Your shutoff time<br />
appears on the display to the right of the time and the countdown<br />
time appears on the bottom of the display.<br />
Note:<br />
• The volume gradually decreases from the set level to 0 over the<br />
last 10 minutes.<br />
• Press and hold ON/OFF to deactivate the timer.<br />
• When the timer is activated and a sound is playing when you press<br />
ON/OFF, the sound will turn off but the timer remains activated for<br />
the next time a sound is played.<br />
23
Using the Sleep Enhancement feature<br />
Sleep Center research has proven that a gradual slowing of sounds helps<br />
promote better sleep and relaxation.<br />
When activated, the playback speed of the Sound Sessions gradually slows<br />
down over a 20-minute period to gently lull you to sleep.<br />
Once the playback speed reaches its slowest point (close to one half of<br />
normal speed) at the 20-minute mark, the playback speed will remain at<br />
this level until the unit automatically turns itself off.<br />
1. With the unit on, press SLEEP ENHANCE. SE ON appears at the bottom<br />
of the display.<br />
2. Press SELECT repeatedly until the indicator for your desired SOUND<br />
SESSION illuminates.<br />
Note:<br />
• To turn the Sleep Enhancement feature off, press SLEEP ENHANCE again.<br />
• The sound does not shut off abruptly. Rather, it gradually fades away<br />
in the last 10 minutes.<br />
24
using the lock feature<br />
The Lock feature ensures that your settings do not change if the buttons<br />
on the unit are accidentally pressed.<br />
To lock your settings, slide down. To unlock your settings, slide up.<br />
Using the Backlight<br />
If using the AC Adapter to power the unit, the backlight is always illuminated<br />
at a reduced brightness level. Press SNOOZE to illuminate the backlight at<br />
100% brightness for five seconds.<br />
The backlight brightness level can be adjusted while using the AC Adapter.<br />
To change the brightness level, press and hold SNOOZE for at least five<br />
seconds. Release SNOOZE when your desired brightness level is reached.<br />
If using batteries to power the unit, the backlight illuminates only when<br />
activated. Press SNOOZE to illuminate the backlight for five seconds.<br />
25
adjusting the volume<br />
To adjust the volume, rotate the VOLUME WHEEL up or down until<br />
you reach your desired listening level.<br />
using headphones<br />
For private listening, insert your headphones into .<br />
resetting the unit<br />
Reset the unit if it is not working properly by removing the BATTERY<br />
COMPARTMENT COVER and inserting a thin, pointed object into RESET.<br />
The unit will reset to the original factory settings.<br />
26
eplacing the backup battery<br />
The backup battery may need to be replaced if the unit does not<br />
operate correctly after the primary batteries are replaced. Common<br />
indications that the battery needs to be replaced include:<br />
• Missing or scrambled display when replacing alkaline batteries.<br />
• Buzzing noise when replacing alkaline batteries.<br />
To replace Backup Battery:<br />
1. Remove the BATTERY COMPARTMENT cover and 4 AA batteries.<br />
2. Using a small Phillips screwdriver, turn the screw on the BACKUP<br />
BATTERY COMPARTMENT counterclockwise and remove.<br />
3. Remove the old battery and insert a new CR2032 button cell<br />
battery with the positive side facing up.<br />
4. Replace the BACKUP BATTERY COMPARTMENT COVER.<br />
5. Replace the screw and turn clockwise to tighten.<br />
6. Replace the 4 AA batteries according to the polarity indicators.<br />
7. Replace the battery compartment cover.<br />
27
The Scientific Breakthrough<br />
Behind TRANQUIL MOMENTS ®<br />
All of us experience different states of consciousness throughout our daily<br />
lives. Some states are frequent, such as ordinary waking consciousness,<br />
sleep and dreaming, while others are less frequent states, like when we are<br />
particularly aware or extra creative. All of these states exhibit a unique pattern<br />
of brainwaves that have been mapped and measured over years by many<br />
experts, particularly by Dr. Jeffrey Thompson.<br />
By understanding the variety of brainwaves that occur during these different<br />
states, Dr. Thompson has been able to develop sounds, music and techniques<br />
that cause your brain to produce the state that you want to experience.<br />
Totally safe and clinically proven, this work has helped millions of people<br />
sleep better, relax easier and think more effectively.<br />
28
One technique commonly used by Dr. Thompson is entrainment. This naturally<br />
derived technique is the tendency of our brainwaves to adjust to our sound<br />
environment so they vibrate in harmony (for example, two pendulum clocks<br />
mounted side by side on the same wall will gradually start to swing at the<br />
same rate as they become entrained). This principle is universal and found<br />
in chemistry, pharmacology, biology, medicine, psychology, sociology,<br />
astronomy, architecture and more.<br />
Four sounds—Celestial, Summer Night, Jet Lag and Unwind—<br />
utilize these techniques.<br />
Delta Waves (0.5 – 3.5 Hz):<br />
Delta waves are associated with the deepest levels of physical relaxation.<br />
Delta is the rhythm of dreamless sleep and its presence usually corresponds<br />
with physical rejuvenation and healing.<br />
Celestial and Summer Night utilize Delta entrainment to induce sleep.<br />
29
Theta Waves (3.5 – 7.0 Hz):<br />
Theta waves reflect a state of mind that is attuned to intense creativity,<br />
visualization, imagination, and problem solving in a non-sleep state and<br />
emotional healing in the sleep state. Theta waves are produced during<br />
deep meditation, dreaming and daydreaming. Rapid eye movement (REM)<br />
is common in this state. Jet Lag utilizes Theta entrainment to help slow the<br />
body’s rhythm and encourage relaxation that can help reset one’s internal<br />
body clock.<br />
Alpha Waves (7.0 – 13.0 Hz):<br />
Alpha waves indicate an alert state with a quiet mind (e.g. a person who has<br />
completed a task and sits down to rest is often in an Alpha state). In this state<br />
attention may be focused outward for problem solving or inward to achieve<br />
an alert meditative state (e.g. pondering). Increased Alpha is often present in<br />
the brainwaves of people who practice meditation, yoga and tai chi.<br />
Unwind utilizes ALPHA entrainment to promote stress reduction or an alert<br />
state of relaxation.<br />
30
Care and Maintenance<br />
Clean with a soft, dry cloth. Do not use harsh solvents<br />
as they may damage the finish.<br />
specifications<br />
Uses one backup CR2032 button cell battery (included).<br />
Uses four AA batteries (not included).<br />
31
One (1) Year Limited Warranty<br />
<strong>Brookstone</strong>® warrants this product against defects in materials and/or workmanship under<br />
normal use for a period of ONE (1) YEAR from the date of purchase by the original purchaser<br />
(“Warranty Period”). If a defect arises and a valid claim is received within the Warranty<br />
Period, at its option, <strong>Brookstone</strong> will either 1) repair the defect at no charge, using new or<br />
refurbished replacement parts, or 2) replace the product with a new product that is at least<br />
functionally equivalent to the original product, or 3) provide a store credit in the amount of<br />
the purchase price of the original product. A replacement product or part, including a userinstallable<br />
part installed in accordance with instructions provided by <strong>Brookstone</strong>, assumes<br />
the remaining warranty of the original product. When a product or part is exchanged, any<br />
replacement item becomes your property and the replaced item becomes <strong>Brookstone</strong>’s property.<br />
When a store credit is given, the original product must be returned to <strong>Brookstone</strong> and becomes<br />
<strong>Brookstone</strong>’s property.<br />
Obtaining Service: To obtain warranty service, call <strong>Brookstone</strong> Limited Warranty Service at<br />
1-800-292-9819. Please be prepared to describe the product that needs service and the nature of the<br />
problem. A purchase receipt is required. All repairs and replacements must be authorized in advance.<br />
Service options, parts availability and response times will vary. You are responsible for delivery and the cost<br />
of delivery of the product or any parts to the authorized service center for replacement, per our instructions.<br />
Limits and Exclusions: Coverage under this Limited Warranty is limited to the United States<br />
of America, including the District of Columbia and the U.S. Territories of Guam, Puerto Rico,<br />
and the U.S. Virgin Islands.This Limited Warranty applies only to products manufactured for<br />
<strong>Brookstone</strong> that can be identified by the “<strong>Brookstone</strong>” trademark, trade name, or logo affixed<br />
to them or their packaging. The Limited Warranty does not apply to any non-<strong>Brookstone</strong>
products. Manufacturers or suppliers other than <strong>Brookstone</strong> may provide their own warranties<br />
to the purchaser, but <strong>Brookstone</strong>, in so far as permitted by law, provides these products<br />
“as is.” This warranty does not apply to: a) damage caused by failure to follow instructions<br />
relating to product’s use or the installation of components; b) damage caused by accident, abuse,<br />
misuse, fire, floods, earthquake or other external causes; c) damage caused by service performed<br />
by anyone who is not a representative of <strong>Brookstone</strong>; d) accessories used in conjunction with a<br />
covered product; e) a product or part that has been modified to alter functionality or capability;<br />
f) items intended to be periodically replaced by the purchaser during the normal life of the product<br />
including, without limitation, batteries or light bulbs; g) to any product sold “as is” including,<br />
without limitation, floor demonstration models and refurbished items; or h) a product that is used<br />
commercially or for a commercial purpose.<br />
BROOKSTONE SHALL NOT BE LIABLE FOR INCIDENTAL OR CONSEQUENTIAL DAMAGES RESULTING<br />
FROM THE USE OF THIS PRODUCT, OR ARISING OUT OF ANY BREACH OF THIS WARRANTY. TO THE<br />
EXTENT PERMITTED BY APPLICABLE LAW, BROOKSTONE DISCLAIMS ANY AND ALL STATUTORY OR<br />
IMPLIED WARRANTIES, INCLUDING, WITHOUT LIMITATION, WARRANTIES OF MERCHANTABILITY,<br />
FITNESS FOR A PARTICULAR PURPOSE AND WARRANTIES AGAINST HIDDEN OR LATENT DEFECTS.<br />
IF BROOKSTONE CANNOT LAWFULLY DISCLAIM STATUTORY OR IMPLIED WARRANTIES, THEN TO<br />
THE EXTENT PERMITTED BY LAW, ALL SUCH WARRANTIES SHALL BE LIMITED IN DURATION TO<br />
THE DURATION OF THIS EXPRESS WARRANTY.<br />
Some states disallow the exclusion or limitation of incidental or consequential damages or how long<br />
an implied warranty lasts, so the above exclusions or limitations may not apply to you. This warranty<br />
gives you specific legal rights and you may also have other rights, which vary from state to state.
B e t t e r b y B r o o k s t o n e ® W e c r e a t e p r o d u c t s<br />
t o m a k e l i f e b e t t e r . T h r o u g h i n n o v a t i v e<br />
d e s i g n , b e s t - i n - c l a s s p r o d u c t s e l e c t i o n a n d<br />
a n u n y i e l d i n g c o m m i t m e n t t o e x c e l l e n c e , w e<br />
m a x i m i z e t h e q u a l i t y o f o u r p r o d u c t s — a n d<br />
h e l p y o u e n h a n c e t h e q u a l i t y o f y o u r l i f e .<br />
Merrimack, New Hampshire 03054 • Customer Service 800-846-3000 • www.<strong>Brookstone</strong>.com<br />
590877