

ULTRA Plus+ 1500 Airless Paint Sprayer - Graco Inc.
ULTRA Plus+ 1500 Airless Paint Sprayer - Graco Inc.
ULTRA Plus+ 1500 Airless Paint Sprayer - Graco Inc.

Create successful ePaper yourself
Turn your PDF publications into a flip-book with our unique Google optimized e-Paper software.
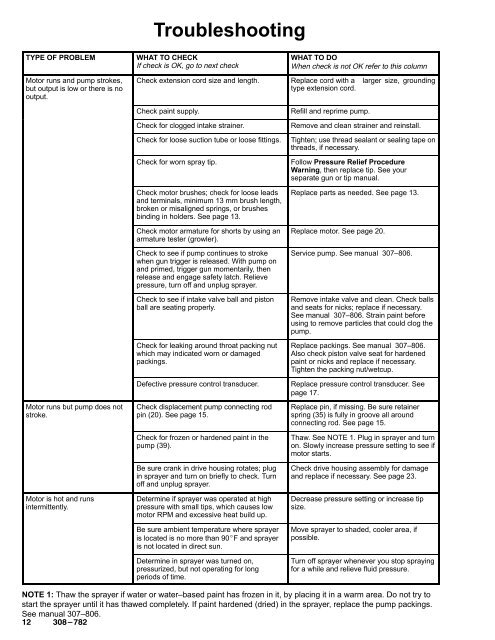
Troubleshooting<br />
TYPE OF PROBLEM<br />
Motor runs and pump strokes,<br />
but output is low or there is no<br />
output.<br />
WHAT TO CHECK<br />
If check is OK, go to next check<br />
WHAT TO DO<br />
When check is not OK refer to this column<br />
Check extension cord size and length. Replace cord with a larger size, grounding<br />
type extension cord.<br />
Motor runs but pump does not<br />
stroke.<br />
Motor is hot and runs<br />
intermittently.<br />
Check paint supply.<br />
Check for clogged intake strainer.<br />
Check for loose suction tube or loose fittings.<br />
Check for worn spray tip.<br />
Check motor brushes; check for loose leads<br />
and terminals, minimum 13 mm brush length,<br />
broken or misaligned springs, or brushes<br />
binding in holders. See page 13.<br />
Check motor armature for shorts by using an<br />
armature tester (growler).<br />
Check to see if pump continues to stroke<br />
when gun trigger is released. With pump on<br />
and primed, trigger gun momentarily, then<br />
release and engage safety latch. Relieve<br />
pressure, turn off and unplug sprayer.<br />
Check to see if intake valve ball and piston<br />
ball are seating properly.<br />
Check for leaking around throat packing nut<br />
which may indicated worn or damaged<br />
packings.<br />
Defective pressure control transducer.<br />
Check displacement pump connecting rod<br />
pin (20). See page 15.<br />
Check for frozen or hardened paint in the<br />
pump (39).<br />
Be sure crank in drive housing rotates; plug<br />
in sprayer and turn on briefly to check. Turn<br />
off and unplug sprayer.<br />
Determine if sprayer was operated at high<br />
pressure with small tips, which causes low<br />
motor RPM and excessive heat build up.<br />
Be sure ambient temperature where sprayer<br />
is located is no more than 90F and sprayer<br />
is not located in direct sun.<br />
Determine in sprayer was turned on,<br />
pressurized, but not operating for long<br />
periods of time.<br />
Refill and reprime pump.<br />
Remove and clean strainer and reinstall.<br />
Tighten; use thread sealant or sealing tape on<br />
threads, if necessary.<br />
Follow Pressure Relief Procedure<br />
Warning, then replace tip. See your<br />
separate gun or tip manual.<br />
Replace parts as needed. See page 13.<br />
Replace motor. See page 20.<br />
Service pump. See manual 307–806.<br />
Remove intake valve and clean. Check balls<br />
and seats for nicks; replace if necessary.<br />
See manual 307–806. Strain paint before<br />
using to remove particles that could clog the<br />
pump.<br />
Replace packings. See manual 307–806.<br />
Also check piston valve seat for hardened<br />
paint or nicks and replace if necessary.<br />
Tighten the packing nut/wetcup.<br />
Replace pressure control transducer. See<br />
page 17.<br />
Replace pin, if missing. Be sure retainer<br />
spring (35) is fully in groove all around<br />
connecting rod. See page 15.<br />
Thaw. See NOTE 1. Plug in sprayer and turn<br />
on. Slowly increase pressure setting to see if<br />
motor starts.<br />
Check drive housing assembly for damage<br />
and replace if necessary. See page 23.<br />
Decrease pressure setting or increase tip<br />
size.<br />
Move sprayer to shaded, cooler area, if<br />
possible.<br />
Turn off sprayer whenever you stop spraying<br />
for a while and relieve fluid pressure.<br />
NOTE 1: Thaw the sprayer if water or water–based paint has frozen in it, by placing it in a warm area. Do not try to<br />
start the sprayer until it has thawed completely. If paint hardened (dried) in the sprayer, replace the pump packings.<br />
See manual 307–806.


