You also want an ePaper? Increase the reach of your titles
YUMPU automatically turns print PDFs into web optimized ePapers that Google loves.
<strong>AVR</strong>320<br />
harman/kardon<br />
Main Remote Control Functions<br />
IMPORTANT NOTE: The <strong>AVR</strong> 320’s remote<br />
may be programmed to control up to eight<br />
devices, including the <strong>AVR</strong> 320. Before using the<br />
remote, it is important to remember to press the<br />
Input Selector Button e that corresponds<br />
to the unit you wish to operate. In addition, the<br />
<strong>AVR</strong> 320’s remote is shipped from the factory to<br />
operate the <strong>AVR</strong> 320 and most <strong>Harman</strong> <strong>Kardon</strong><br />
CD or DVD players and cassette decks. The<br />
remote is also capable of operating a wide variety<br />
of other products using the control codes<br />
that are part of the remote. Before using the<br />
remote with other products, follow the instructions<br />
on pages 37–41 to program the proper<br />
codes for the products in your system.<br />
It is also important to remember that many of<br />
the buttons on the remote take on different<br />
functions, depending on the product selected<br />
using the Device Control Selectors. The descriptions<br />
shown here primarily detail the functions<br />
of the remote when it is used to operate the<br />
<strong>AVR</strong> 320. (See page 39 for information about<br />
alternate functions for the remote’s buttons.)<br />
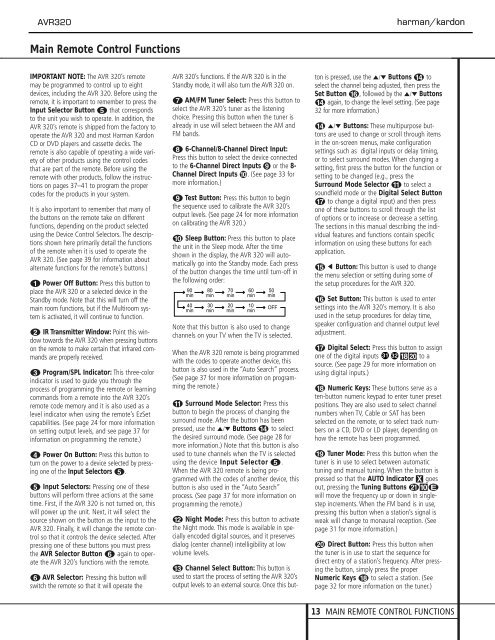
a Power Off Button: Press this button to<br />
place the <strong>AVR</strong> 320 or a selected device in the<br />
Standby mode. Note that this will turn off the<br />
main room functions, but if the Multiroom system<br />
is activated, it will continue to function.<br />
b IR Transmitter Window: Point this window<br />
towards the <strong>AVR</strong> 320 when pressing buttons<br />
on the remote to make certain that infrared commands<br />
are properly received.<br />
c Program/SPL Indicator: This three-color<br />
indicator is used to guide you through the<br />
process of programming the remote or learning<br />
commands from a remote into the <strong>AVR</strong> 320’s<br />
remote code memory and it is also used as a<br />
level indicator when using the remote’s EzSet<br />
capabilities. (See page 24 for more information<br />
on setting output levels, and see page 37 for<br />
information on programming the remote.)<br />
d Power On Button: Press this button to<br />
turn on the power to a device selected by pressing<br />
one of the Input Selectors e.<br />
e Input Selectors: Pressing one of these<br />
buttons will perform three actions at the same<br />
time. First, if the <strong>AVR</strong> 320 is not turned on, this<br />
will power up the unit. Next, it will select the<br />
source shown on the button as the input to the<br />
<strong>AVR</strong> 320. Finally, it will change the remote control<br />
so that it controls the device selected. After<br />
pressing one of these buttons you must press<br />
the <strong>AVR</strong> Selector Button f again to operate<br />
the <strong>AVR</strong> 320’s functions with the remote.<br />
f <strong>AVR</strong> Selector: Pressing this button will<br />
switch the remote so that it will operate the<br />
<strong>AVR</strong> 320’s functions. If the <strong>AVR</strong> 320 is in the<br />
Standby mode, it will also turn the <strong>AVR</strong> 320 on.<br />
g AM/FM Tuner Select: Press this button to<br />
select the <strong>AVR</strong> 320’s tuner as the listening<br />
choice. Pressing this button when the tuner is<br />
already in use will select between the AM and<br />
FM bands.<br />
h 6-Channel/8-Channel Direct Input:<br />
Press this button to select the device connected<br />
to the 6-Channel Direct Inputs ª or the 8-<br />
Channel Direct Inputs ‚. (See page 33 for<br />
more information.)<br />
i Test Button: Press this button to begin<br />
the sequence used to calibrate the <strong>AVR</strong> 320’s<br />
output levels. (See page 24 for more information<br />
on calibrating the <strong>AVR</strong> 320.)<br />
j Sleep Button: Press this button to place<br />
the unit in the Sleep mode. After the time<br />
shown in the display, the <strong>AVR</strong> 320 will automatically<br />
go into the Standby mode. Each press<br />
of the button changes the time until turn-off in<br />
the following order:<br />
90<br />
min<br />
40<br />
min<br />
80<br />
min<br />
30<br />
min<br />
70<br />
min<br />
20<br />
min<br />
60<br />
min<br />
10<br />
min<br />
50<br />
min<br />
OFF<br />
Note that this button is also used to change<br />
channels on your TV when the TV is selected.<br />
When the <strong>AVR</strong> 320 remote is being programmed<br />
with the codes to operate another device, this<br />
button is also used in the “Auto Search” process.<br />
(See page 37 for more information on programming<br />
the remote.)<br />
k Surround Mode Selector: Press this<br />
button to begin the process of changing the<br />
surround mode. After the button has been<br />
pressed, use the ⁄/¤ Buttons n to select<br />
the desired surround mode. (See page 28 for<br />
more information.) Note that this button is also<br />
used to tune channels when the TV is selected<br />
using the device Input Selector e.<br />
When the <strong>AVR</strong> 320 remote is being programmed<br />
with the codes of another device, this<br />
button is also used in the “Auto Search”<br />
process. (See page 37 for more information on<br />
programming the remote.)<br />
l Night Mode: Press this button to activate<br />
the Night mode. This mode is available in specially<br />
encoded digital sources, and it preserves<br />
dialog (center channel) intelligibility at low<br />
volume levels.<br />
m Channel Select Button: This button is<br />
used to start the process of setting the <strong>AVR</strong> 320’s<br />
output levels to an external source. Once this button<br />
is pressed, use the ⁄/¤ Buttons n to<br />
select the channel being adjusted, then press the<br />
Set Button p, followed by the ⁄/¤ Buttons<br />
n again, to change the level setting. (See page<br />
32 for more information.)<br />
n ⁄/¤ Buttons: These multipurpose buttons<br />
are used to change or scroll through items<br />
in the on-screen menus, make configuration<br />
settings such as digital inputs or delay timing,<br />
or to select surround modes. When changing a<br />
setting, first press the button for the function or<br />
setting to be changed (e.g., press the<br />
Surround Mode Selector k to select a<br />
soundfield mode or the Digital Select Button<br />
q to change a digital input) and then press<br />
one of these buttons to scroll through the list<br />
of options or to increase or decrease a setting.<br />
The sections in this manual describing the individual<br />
features and functions contain specific<br />
information on using these buttons for each<br />
application.<br />
o ‹ Button: This button is used to change<br />
the menu selection or setting during some of<br />
the setup procedures for the <strong>AVR</strong> 320.<br />
p Set Button: This button is used to enter<br />
settings into the <strong>AVR</strong> 320’s memory. It is also<br />
used in the setup procedures for delay time,<br />
speaker configuration and channel output level<br />
adjustment.<br />
q Digital Select: Press this button to assign<br />
one of the digital inputs 31 32 *Ó to a<br />
source. (See page 29 for more information on<br />
using digital inputs.)<br />
r Numeric Keys: These buttons serve as a<br />
ten-button numeric keypad to enter tuner preset<br />
positions. They are also used to select channel<br />
numbers when TV, Cable or SAT has been<br />
selected on the remote, or to select track numbers<br />
on a CD, DVD or LD player, depending on<br />
how the remote has been programmed.<br />
s Tuner Mode: Press this button when the<br />
tuner is in use to select between automatic<br />
tuning and manual tuning. When the button is<br />
pressed so that the AUTO Indicator X goes<br />
out, pressing the Tuning Buttons u)≠<br />
will move the frequency up or down in singlestep<br />
increments. When the FM band is in use,<br />
pressing this button when a station’s signal is<br />
weak will change to monaural reception. (See<br />
page 31 for more information.)<br />
t Direct Button: Press this button when<br />
the tuner is in use to start the sequence for<br />
direct entry of a station’s frequency. After pressing<br />
the button, simply press the proper<br />
Numeric Keys r to select a station. (See<br />
page 32 for more information on the tuner.)<br />
13 MAIN REMOTE CONTROL FUNCTIONS


