


You also want an ePaper? Increase the reach of your titles
YUMPU automatically turns print PDFs into web optimized ePapers that Google loves.
<strong>AVR</strong>320<br />
harman/kardon<br />
Front Panel Controls<br />
˘<br />
¯<br />
˜<br />
ˆ<br />
ı<br />
1<br />
Ù<br />
Û<br />
Ú<br />
Ò<br />
apple<br />
2<br />
3 5<br />
7 9<br />
! #<br />
%<br />
&<br />
( Ô<br />
4<br />
6 8 )<br />
@<br />
$<br />
^<br />
*<br />
Ó<br />
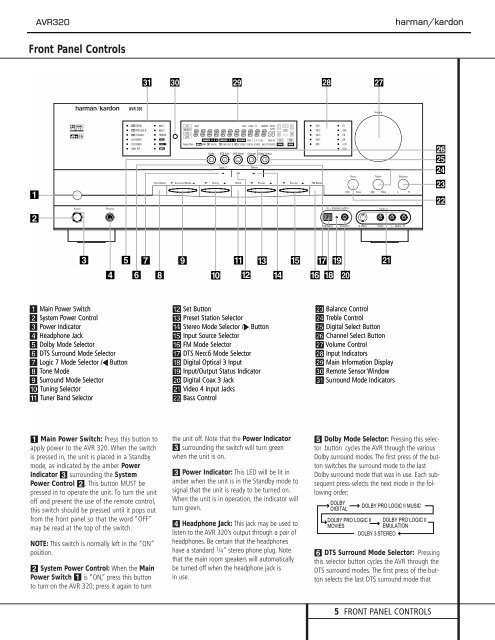
1 Main Power Switch<br />
2 System Power Control<br />
3 Power Indicator<br />
4 Headphone Jack<br />
5 Dolby Mode Selector<br />
6 DTS Surround Mode Selector<br />
7 Logic 7 Mode Selector /‹ Button<br />
8 Tone Mode<br />
9 Surround Mode Selector<br />
) Tuning Selector<br />
! Tuner Band Selector<br />
@ Set Button<br />
# Preset Station Selector<br />
$ Stereo Mode Selector /› Button<br />
% Input Source Selector<br />
^ FM Mode Selector<br />
& DTS Neo:6 Mode Selector<br />
* Digital Optical 3 Input<br />
( Input/Output Status Indicator<br />
Ó Digital Coax 3 Jack<br />
Ô Video 4 Input Jacks<br />
apple Bass Control<br />
Ò Balance Control<br />
Ú Treble Control<br />
Û Digital Select Button<br />
Ù Channel Select Button<br />
ı Volume Control<br />
ˆ Input Indicators<br />
˜ Main Information Display<br />
¯ Remote Sensor Window<br />
˘ Surround Mode Indicators<br />
1 Main Power Switch: Press this button to<br />
apply power to the <strong>AVR</strong> 320. When the switch<br />
is pressed in, the unit is placed in a Standby<br />
mode, as indicated by the amber Power<br />
Indicator 3 surrounding the System<br />
Power Control 2.This button MUST be<br />
pressed in to operate the unit. To turn the unit<br />
off and prevent the use of the remote control,<br />
this switch should be pressed until it pops out<br />
from the front panel so that the word “OFF”<br />
may be read at the top of the switch.<br />
NOTE: This switch is normally left in the “ON”<br />
position.<br />
2 System Power Control: When the Main<br />
Power Switch 1 is “ON,” press this button<br />
to turn on the <strong>AVR</strong> 320; press it again to turn<br />
the unit off. Note that the Power Indicator<br />
3 surrounding the switch will turn green<br />
when the unit is on.<br />
3 Power Indicator: This LED will be lit in<br />
amber when the unit is in the Standby mode to<br />
signal that the unit is ready to be turned on.<br />
When the unit is in operation, the indicator will<br />
turn green.<br />
4 Headphone Jack: This jack may be used to<br />
listen to the <strong>AVR</strong> 320’s output through a pair of<br />
headphones. Be certain that the headphones<br />
have a standard 1 /4" stereo phone plug. Note<br />
that the main room speakers will automatically<br />
be turned off when the headphone jack is<br />
in use.<br />
5 Dolby Mode Selector: Pressing this selector<br />
button cycles the <strong>AVR</strong> through the various<br />
Dolby surround modes. The first press of the button<br />
switches the surround mode to the last<br />
Dolby surround mode that was in use. Each subsequent<br />
press selects the next mode in the following<br />
order:<br />
DOLBY<br />
DIGITAL<br />
DOLBY PRO LOGIC II MUSIC<br />
DOLBY PRO LOGIC II DOLBY PRO LOGIC II<br />
MOVIES<br />
EMULATION<br />
DOLBY 3 STEREO<br />
6 DTS Surround Mode Selector: Pressing<br />
this selector button cycles the <strong>AVR</strong> through the<br />
DTS surround modes. The first press of the button<br />
selects the last DTS surround mode that<br />
5 FRONT PANEL CONTROLS


