You also want an ePaper? Increase the reach of your titles
YUMPU automatically turns print PDFs into web optimized ePapers that Google loves.
<strong>AVR</strong>320<br />
harman/kardon<br />
Main Remote Control Functions<br />
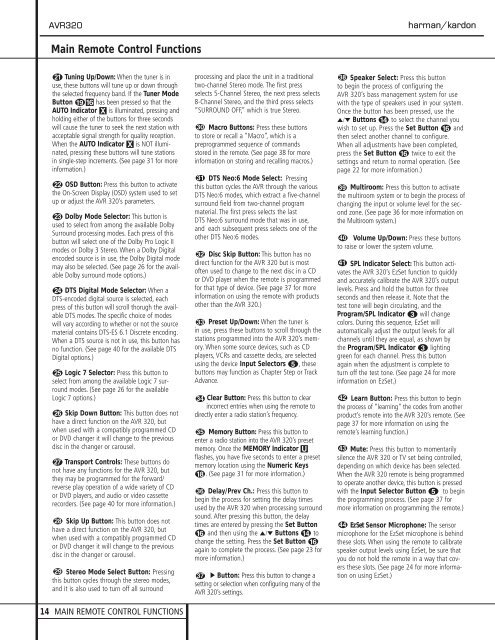
u Tuning Up/Down: When the tuner is in<br />
use, these buttons will tune up or down through<br />
the selected frequency band. If the Tuner Mode<br />
Button s^ has been pressed so that the<br />
AUTO Indicator X is illuminated, pressing and<br />
holding either of the buttons for three seconds<br />
will cause the tuner to seek the next station with<br />
acceptable signal strength for quality reception.<br />
When the AUTO Indicator X is NOT illuminated,<br />
pressing these buttons will tune stations<br />
in single-step increments. (See page 31 for more<br />
information.)<br />
v OSD Button: Press this button to activate<br />
the On-Screen Display (OSD) system used to set<br />
up or adjust the <strong>AVR</strong> 320’s parameters.<br />
w Dolby Mode Selector: This button is<br />
used to select from among the available Dolby<br />
Surround processing modes. Each press of this<br />
button will select one of the Dolby Pro Logic II<br />
modes or Dolby 3 Stereo. When a Dolby Digital<br />
encoded source is in use, the Dolby Digital mode<br />
may also be selected. (See page 26 for the available<br />
Dolby surround mode options.)<br />
x DTS Digital Mode Selector: When a<br />
DTS-encoded digital source is selected, each<br />
press of this button will scroll thorugh the available<br />
DTS modes. The specific choice of modes<br />
will vary according to whether or not the source<br />
material contains DTS-ES 6.1 Discrete encoding.<br />
When a DTS source is not in use, this button has<br />
no function. (See page 40 for the available DTS<br />
Digital options.)<br />
y Logic 7 Selector: Press this button to<br />
select from among the available Logic 7 surround<br />
modes. (See page 26 for the available<br />
Logic 7 options.)<br />
z Skip Down Button: This button does not<br />
have a direct function on the <strong>AVR</strong> 320, but<br />
when used with a compatibly programmed CD<br />
or DVD changer it will change to the previous<br />
disc in the changer or carousel.<br />
` Transport Controls: These buttons do<br />
not have any functions for the <strong>AVR</strong> 320, but<br />
they may be programmed for the forward/<br />
reverse play operation of a wide variety of CD<br />
or DVD players, and audio or video cassette<br />
recorders. (See page 40 for more information.)<br />
28 Skip Up Button: This button does not<br />
have a direct function on the <strong>AVR</strong> 320, but<br />
when used with a compatibly programmed CD<br />
or DVD changer it will change to the previous<br />
disc in the changer or carousel.<br />
29 Stereo Mode Select Button: Pressing<br />
this button cycles through the stereo modes,<br />
and it is also used to turn off all surround<br />
14 MAIN REMOTE CONTROL FUNCTIONS<br />
processing and place the unit in a traditional<br />
two-channel Stereo mode. The first press<br />
selects 5-Channel Stereo, the next press selects<br />
8-Channel Stereo, and the third press selects<br />
“SURROUND OFF,” which is true Stereo.<br />
30 Macro Buttons: Press these buttons<br />
to store or recall a “Macro”, which is a<br />
preprogrammed sequence of commands<br />
stored in the remote. (See page 38 for more<br />
information on storing and recalling macros.)<br />
31 DTS Neo:6 Mode Select: Pressing<br />
this button cycles the <strong>AVR</strong> through the various<br />
DTS Neo:6 modes, which extract a five-channel<br />
surround field from two-channel program<br />
material. The first press selects the last<br />
DTS Neo:6 surround mode that was in use,<br />
and each subsequent press selects one of the<br />
other DTS Neo:6 modes.<br />
32 Disc Skip Button: This button has no<br />
direct function for the <strong>AVR</strong> 320 but is most<br />
often used to change to the next disc in a CD<br />
or DVD player when the remote is programmed<br />
for that type of device. (See page 37 for more<br />
information on using the remote with products<br />
other than the <strong>AVR</strong> 320.)<br />
33 Preset Up/Down: When the tuner is<br />
in use, press these buttons to scroll through the<br />
stations programmed into the <strong>AVR</strong> 320’s memory.<br />
When some source devices, such as CD<br />
players, VCRs and cassette decks, are selected<br />
using the device Input Selectors e, these<br />
buttons may function as Chapter Step or Track<br />
Advance.<br />
34 Clear Button: Press this button to clear<br />
incorrect entries when using the remote to<br />
directly enter a radio station’s frequency.<br />
35 Memory Button: Press this button to<br />
enter a radio station into the <strong>AVR</strong> 320’s preset<br />
memory. Once the MEMORY Indicator U<br />
flashes, you have five seconds to enter a preset<br />
memory location using the Numeric Keys<br />
r. (See page 31 for more information.)<br />
36 Delay/Prev Ch.: Press this button to<br />
begin the process for setting the delay times<br />
used by the <strong>AVR</strong> 320 when processing surround<br />
sound. After pressing this button, the delay<br />
times are entered by pressing the Set Button<br />
p and then using the ⁄/¤ Buttons n to<br />
change the setting. Press the Set Button p<br />
again to complete the process. (See page 23 for<br />
more information.)<br />
37 › Button: Press this button to change a<br />
setting or selection when configuring many of the<br />
<strong>AVR</strong> 320’s settings.<br />
38 Speaker Select: Press this button<br />
to begin the process of configuring the<br />
<strong>AVR</strong> 320’s bass management system for use<br />
with the type of speakers used in your system.<br />
Once the button has been pressed, use the<br />
⁄/¤ Buttons n to select the channel you<br />
wish to set up. Press the Set Button p and<br />
then select another channel to configure.<br />
When all adjustments have been completed,<br />
press the Set Button p twice to exit the<br />
settings and return to normal operation. (See<br />
page 22 for more information.)<br />
39 Multiroom: Press this button to activate<br />
the multiroom system or to begin the process of<br />
changing the input or volume level for the second<br />
zone. (See page 36 for more information on<br />
the Multiroom system.)<br />
40 Volume Up/Down: Press these buttons<br />
to raise or lower the system volume.<br />
41 SPL Indicator Select: This button activates<br />
the <strong>AVR</strong> 320’s EzSet function to quickly<br />
and accurately calibrate the <strong>AVR</strong> 320’s output<br />
levels. Press and hold the button for three<br />
seconds and then release it. Note that the<br />
test tone will begin circulating, and the<br />
Program/SPL Indicator c will change<br />
colors. During this sequence, EzSet will<br />
automatically adjust the output levels for all<br />
channels until they are equal, as shown by<br />
the Program/SPL Indicator c lighting<br />
green for each channel. Press this button<br />
again when the adjustment is complete to<br />
turn off the test tone. (See page 24 for more<br />
information on EzSet.)<br />
42 Learn Button: Press this button to begin<br />
the process of “learning” the codes from another<br />
product’s remote into the <strong>AVR</strong> 320’s remote. (See<br />
page 37 for more information on using the<br />
remote’s learning function.)<br />
43 Mute: Press this button to momentarily<br />
silence the <strong>AVR</strong> 320 or TV set being controlled,<br />
depending on which device has been selected.<br />
When the <strong>AVR</strong> 320 remote is being programmed<br />
to operate another device, this button is pressed<br />
with the Input Selector Button e to begin<br />
the programming process. (See page 37 for<br />
more information on programming the remote.)<br />
44 EzSetSensor Microphone: The sensor<br />
microphone for the EzSet microphone is behind<br />
these slots. When using the remote to calibrate<br />
speaker output levels using EzSet, be sure that<br />
you do not hold the remote in a way that covers<br />
these slots. (See page 24 for more information<br />
on using EzSet.)


