

Metric thread repair Kit - Harbor Freight Tools
Metric thread repair Kit - Harbor Freight Tools
Metric thread repair Kit - Harbor Freight Tools

Create successful ePaper yourself
Turn your PDF publications into a flip-book with our unique Google optimized e-Paper software.
<strong>Metric</strong> Thread Repair <strong>Kit</strong><br />
Model 98873<br />
Instruction Sheet<br />
Due to continuing improvements, actual product may differ slightly from the product described herein.<br />
Distributed exclusively by <strong>Harbor</strong> <strong>Freight</strong> <strong>Tools</strong> ® .<br />
3491 Mission Oaks Blvd., Camarillo, CA 93011<br />
Visit our website at: http://www.harborfreight.com<br />
Read this material before using this product. Failure to do so can<br />
result in serious injury.<br />
Save this instruction sheet.<br />
Copyright © 2008 by <strong>Harbor</strong> <strong>Freight</strong> <strong>Tools</strong> ® . All rights reserved. No portion of this instruction sheet<br />
or any artwork contained herein may be reproduced in any shape or form without the express written<br />
consent of <strong>Harbor</strong> <strong>Freight</strong> <strong>Tools</strong>.<br />
For technical questions or replacement parts, please call 1-800-444-3353.<br />
Safety Rules<br />
1.<br />
2.<br />
3.<br />
4.<br />
5.<br />
6.<br />
WARNING! Read all instructions<br />
Failure to follow all instructions<br />
listed below may result in electric<br />
shock, fire, and/or serious injury.<br />
This product is not a toy. Keep it out of reach of children.<br />
Wear ANSI approved safety goggles and heavy work<br />
gloves when using this product.<br />
Handle with care. <strong>Tools</strong> are sharp.<br />
When cutting <strong>thread</strong>s, use only with Tap Handle, Tapping<br />
Machine and Die Handle (not included). Do not<br />
use high speed drill or powered tool to cut <strong>thread</strong>s or<br />
install the <strong>thread</strong> inserts.<br />
Firmly secure work piece to work bench before working.<br />
Do not attempt to hold work piece by hand during<br />
operation.<br />
The warnings, precautions, and instructions discussed<br />
in this instruction sheet cannot cover all possible<br />
conditions and situations that may occur. It must be<br />
understood by the operator that common sense and<br />
caution are factors which cannot be built into this product,<br />
but must be supplied by the operator.<br />
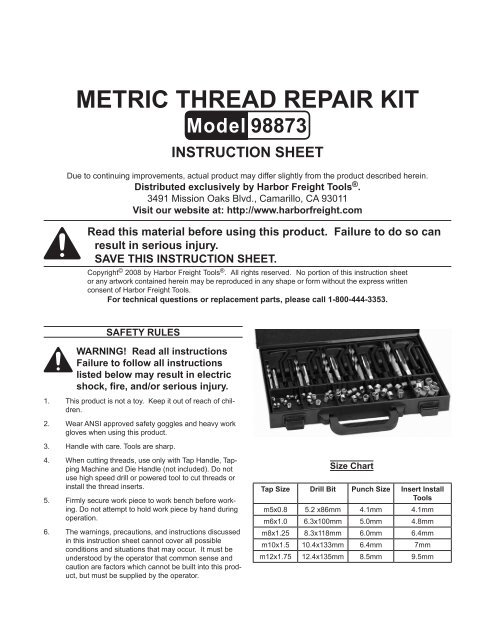
Size Chart<br />
Tap Size Drill Bit Punch Size Insert Install<br />
<strong>Tools</strong><br />
m5x0.8 5.2 x86mm 4.1mm 4.1mm<br />
m6x1.0 6.3x100mm 5.0mm 4.8mm<br />
m8x1.25 8.3x118mm 6.0mm 6.4mm<br />
m10x1.5 10.4x133mm 6.4mm 7mm<br />
m12x1.75 12.4x135mm 8.5mm 9.5mm
Thread Insert Material<br />
Drill Bits and Taps Material<br />
Specifications<br />
Unpacking<br />
Stainless Steel<br />
High Speed Steel<br />
When unpacking, check to make sure that the item is<br />
intact and undamaged. If any parts are missing or broken,<br />
please call <strong>Harbor</strong> <strong>Freight</strong> <strong>Tools</strong> at the number shown on the<br />
cover of this instruction sheet as soon as possible.<br />
1.<br />
2.<br />
3.<br />
Item Description QTY.<br />
1 Drill Bits (see Size Chart) 5<br />
2 Thread Cutting Taps (see Size Chart) 5<br />
3 Insert Tool 1<br />
4 Insert Collars (see Size Chart) 5<br />
5 10 Thread Inserts in each size 50<br />
6 Punch <strong>Tools</strong> (see Size Chart) 5<br />
7 2.5 mm Hex Wrench 1<br />
Instructions<br />
Read the entire Safety Rules section<br />
at the beginning of this instruction sheet<br />
including all text under subheadings therein<br />
before set up or use of this product.<br />
Set up<br />
This kit is used to replace damaged <strong>thread</strong>s in metal or<br />
hard plastic.<br />
Secure your work piece firmly in a vise, with clamps, or<br />
some other means to prevent it from moving during the<br />
<strong>repair</strong> operation.<br />
Have cutting oil and a rag ready.<br />
5.<br />
6.<br />
7.<br />
Using the 2.5 mm Hex Wrench, adjust the col-<br />
lar on the Insert Tool so that the tang of<br />
the insert is about midway in the slot with<br />
the <strong>thread</strong>s compressed. See Figure 1.<br />
Figure 1.<br />
Collar Adjusted<br />
too Low.<br />
Collar Adjusted<br />
Correctly.<br />
Collar Adjusted<br />
too High.<br />
Using the Correct Size Insert Tool, screw the insert<br />
clockwise into the hole. The insert will compress to fit<br />
the hole as it is inserted. See Figure 2.<br />
Figure 2.<br />
After the insert<br />
is in the hole,<br />
remove the<br />
Tang by placing<br />
the Punch<br />
Tool on it and<br />
striking the<br />
Punch Tool<br />
with a hammer<br />
(not included).<br />
See Figure 3.<br />
Figure 3.<br />
Tang<br />
Insert Tool<br />
Collar<br />
1.<br />
2.<br />
3.<br />
Operation<br />
Determine the size of the <strong>thread</strong>ed hole that you want.<br />
Drill out the hole, using the included drill bit to the<br />
proper size. Refer to the Size Chart on page 1 of this<br />
manual. When drilling metal parts, use a little cutting<br />
oil to lubricate and cool the drill bit.<br />
If you are going to make the <strong>thread</strong>ed hole larger<br />
than the original, drill it out in steps, using a series of<br />
increasingly larger drill bits until the desired size is<br />
reached.<br />
8.<br />
To prevent accidents,<br />
clean,<br />
then store<br />
the product<br />
indoors out of<br />
children’s reach.<br />
Steel Insert<br />
Note: Replacement parts are not available for this item.<br />
4.<br />
Clamp the Tap in a Tap Handle (not included). Us the<br />
same size tap as the <strong>thread</strong> size desired.<br />
SKU 98873 For technical questions, please call 1-800-444-3353.


