Moultrie D-555i - Trail Camera
Moultrie D-555i - Trail Camera
Moultrie D-555i - Trail Camera

You also want an ePaper? Increase the reach of your titles
YUMPU automatically turns print PDFs into web optimized ePapers that Google loves.
Important Battery lnformation<br />
- Only use Alkaline batteries. We recommend the use of Duracell or Energizer batteries.<br />
- Do not mix old and new batteries. Always replace ALL the batteries at the same time.<br />
- When the camera is not in use, please remove the batteries.<br />
<strong>Moultrie</strong> Limited Warranty<br />
This product has been thoroughly tested and inspected before shipment. It is guaranteed from<br />
defects in material and workmanship from the date of purchase for 1 year. Under this limited<br />
guarantee we agree to replace or repair free of charge any part or parts which have been found to<br />
be defective in original material or workmanship. Should you require in-warranty service, call our<br />
Customer Service Department. If your problem cannot be addressed over the telephone, we may<br />
need you to send us your defective product plus proof of purchase.<br />
You must register your camera at www.moultriefeeders.com/warranty to activate<br />
your 1-year warranty.<br />
I<br />
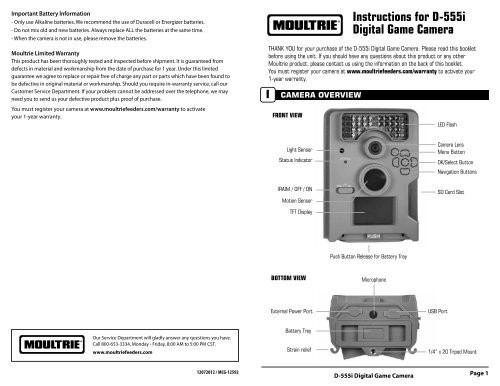
CAMERA OVERVIEW<br />
Instructions for D-<strong>555i</strong><br />
Digital Game <strong>Camera</strong><br />
THANK YOU for your purchase of the D-<strong>555i</strong> Digital Game <strong>Camera</strong>. Please read this booklet<br />
before using the unit. If you should have any questions about this product or any other<br />
<strong>Moultrie</strong> product, please contact us using the information on the back of this booklet.<br />
You must register your camera at www.moultriefeeders.com/warranty to activate your<br />
1-year warranty.<br />
FRONT VIEW<br />
LED Flash<br />
Light Sensor<br />
Status Indicator<br />
<strong>Camera</strong> Lens<br />
Menu Button<br />
OK/Select Button<br />
Navigation Buttons<br />
IRAIM / OFF / ON<br />
Motion Sensor<br />
SD Card Slot<br />
TFT Display<br />
Push Button Release for Battery Tray<br />
BOTTOM VIEW<br />
Microphone<br />
External Power Port<br />
USB Port<br />
Our Service Department will gladly answer any questions you have.<br />
Call 800-653-3334, Monday - Friday, 8:00 AM to 5:00 PM CST.<br />
www.moultriefeeders.com<br />
Battery Tray<br />
Strain relief<br />
1/4” x 20 Tripod Mount<br />
12072012 / MCG-12592<br />
D-<strong>555i</strong> Digital Game <strong>Camera</strong><br />
Page 1
I<br />
CAMERA OVERVIEW (cont.)<br />
IRAIM / OFF / ON<br />
IR Aim - (default Off) When IR Aim is ON and the PIR sensor detects motion, the red LED on the front<br />
of the camera will come on for 2 seconds and then shut off.<br />
MENU BUTTON<br />
The Menu Button selects <strong>Camera</strong> Setup or Main Screen. When camera mode is selected, the LEFT and<br />
RIGHT buttons navigate through the menu options. The Menu Button is also used to wake-up the<br />
camera and turn on the display when the camera is in power saving (or sleep) mode.<br />
OK, UP/DOWN and LEFT/RIGHT BUTTONS<br />
The OK button selects the item to be changed. The UP/DOWN and LEFT/RIGHT buttons are used to<br />
step through the menu options. Pressing the OK button again, selects the option indicated on the<br />
display. The OK button is also used to manually take a picture.<br />
BATTERY COMPARTMENT<br />
The camera is powered by six (6) C-cell alkaline batteries. Push the battery compartment release<br />
button to eject the battery tray. Hold your hand under the battery tray when ejecting. Install batteries<br />
as indicated on the engravings on the battery tray, taking care to note the correct polarity.<br />
See Important Battery Information section on the back page of this manual.<br />
SD CARD SLOT<br />
Accepts up to a 32GB SD Card for photo and video storage.<br />
NOTE: An SD Card must be installed for the camera to operate (sold separately).<br />
USB PORT<br />
Download still pictures and video onto your computer by connecting a USB cable (sold separately)<br />
to the USB port.<br />
EXTERNAL POWER PORT<br />
Accepts the <strong>Moultrie</strong> PowerPanel or <strong>Moultrie</strong> Battery Box accessories (sold separately) only.<br />
Refer to www.moultriefeeders.com for more information.<br />
NOTE: The use of any other power source will void your warranty and possibly harm your camera.<br />
Page 2<br />
D-<strong>555i</strong> Digital Game <strong>Camera</strong>
B<br />
Page 18<br />
Page 14<br />
PLOTSTALKER ACTIVITY SEARCH<br />
ACTIVITY SEARCH<br />
The Search Feature will scan through your photos and automatically<br />
look for changes in regions that you identify in Setup.<br />
In search mode, the PlotStalker software scans through the .mlt photo file, stops<br />
on a photo when changes are found in your identified region, and then highlights<br />
the changes in blue. You can click anywhere in the video viewing area to remove<br />
the blue highlights.<br />
ACTIVITY SEARCH SETUP<br />
Click the Settings button to activate<br />
the Region and Sensitivity settings<br />
for the Activity Search<br />
DEFINE SEARCH MCG-12592 REGION<br />
Provides the ability to search for<br />
changes in the photo in a specific<br />
region rather than the entire photo.<br />
FCC Statements<br />
<strong>Moultrie</strong> Products, LLC<br />
Note: Changes and modifications not expressly approved by the party responsible could void the user’s authority to operate this device.<br />
This device complies with Part 15 of the FCC Rules. Operation is subject to the following two conditions: (1) This device may not cause harmful<br />
interference, and (2) this device must accept any interference received, including interference that may cause undesired operation.<br />
NOTE: THE MANUFACTURER IS NOT RESPONSIBLE FOR ANY RADIO OR TV INTERFERENCE CAUSED BY UNAUTHORIZED MODIFICATIONS TO THIS<br />
EQUIPMENT. 1 SUCH Click MODIFICATIONS on the COULD Set VOID Motion THE USER’S Search AUTHORITY Area TO OPERATE Button. THE EQUIPMENT.<br />
NOTE: This device complies with the limits for a Class B digital device, pursuant to Part 15 of the FCC Rules. These limits are designed to provide<br />
reasonable protection against harmful interference in a residential installation. This device generates, uses, and can radiate radio frequency energy<br />
2 Use the mouse to select and drag the red outline around the area you want to<br />
and, if not installed and used in accordance with the instructions, may cause harmful interference to radio communications. However, there is no<br />
guarantee that search interference for will not movement. occur in a particular This installation. allows If this device you does to focus cause harmful on interference a very precise to radio or television area if reception,<br />
which can be determined by turning the equipment off and on, the user is encouraged to try to correct the interference by one or more of the<br />
required.<br />
following measures:<br />
- Reorient or relocate the receiving antenna.<br />
- lncrease 3the separation Click OK between button the equipment on the and receiver. Settings Popup window to confirm your settings and<br />
- Connect the equipment into an outlet on a circuit different from that to which the receiver is connected.<br />
exit the menu.<br />
- Consult the dealer or an experienced radio/TV technician for help.<br />
SENSITIVITY<br />
1 Set to High, Medium or Low - This sets the level of pixel change the program<br />
will detect. Note; a pixel change will occur with a color, intensity, lighting or<br />
movement so this setting is critical to obtain the desired results.<br />
DEFAULT SETTINGS<br />
1 Click on Default button to return to the default values for Search Area and<br />
Sensitivity settings.<br />
GPS Latitude - 000.000000 N<br />
GPS Longitude - 000.000000 W<br />
II<br />
STEP 1<br />
STEP 2<br />
STEP 3<br />
STEP 4<br />
STEP 5<br />
STEP 6<br />
STEP 7<br />
III<br />
QUICK START INSTRUCTIONS<br />
Press the PUSH BUTTON RELEASE on the bottom of <strong>Camera</strong> and use the knob to pull the<br />
slide-out Battery Tray. Install six (6) C-cell alkaline batteries with polarities as indicated in<br />
the Slide Battery the Tray. UNLOCK Re-install switch the Battery on the Tray bottom and insert of <strong>Camera</strong> your SD and card. use the knob to pull the<br />
slide-out Battery Tray. Install or eight(8) AA size alkaline or lithium batteries<br />
Thread the provided Mounting Strap through the Eyelets on the back of the camera and<br />
with polarities as indicated in the Battery Tray. Re-install the Battery Tray.<br />
secure to a tree or pole approximately 36” from the ground as shown.<br />
Turn<br />
Thread<br />
<strong>Camera</strong><br />
the<br />
on<br />
provided<br />
by sliding<br />
Mounting<br />
IR AIM/OFF/ON<br />
Strap<br />
switch<br />
through<br />
to the<br />
the<br />
ON<br />
Eyelets<br />
position.<br />
on the back of the<br />
camera and secure to a tree or pole approximately 36" from the ground as shown.<br />
Press the MENU button to enter the main menu, press up and<br />
OK<br />
Turn<br />
to select<br />
<strong>Camera</strong><br />
camera<br />
on<br />
setup.<br />
by sliding<br />
Press OK<br />
ON/OFF/IR<br />
to enter General<br />
TEST<br />
setup.<br />
switch<br />
Set to Time the and ON Date position. by pressing OK, using UP/DOWN to adjust Eyelet<br />
selected<br />
Press the<br />
field,<br />
MODE<br />
LEFT/RIGHT<br />
button<br />
to move<br />
one time<br />
to the<br />
to<br />
next<br />
get<br />
field<br />
to the<br />
and OK<br />
when done.<br />
<strong>Camera</strong> Setup Menu. Set Time and Date by pressing<br />
Press ENTER, MENU button using UP/DOWN to return to main to adjust menu selected screen. field,<br />
Press LEFT/RIGHT DOWN and OK to to move select to CAPTURE the next MODE. field and ENTER<br />
when done.<br />
Switch camera to IR Aim. Aim camera using motion<br />
detection Press MODE to determine button target until area. MENU Walk SELECTION<br />
in front of the Mounting<br />
camera screen at is the displayed. desired distance Use the and UP/DOWN the camera LED buttons will<br />
Strap<br />
flash until showing the MAIN the covered SCREEN area. option is highlighted<br />
yellow. Press ENTER.<br />
Switch camera to ON. Your camera will now automatically<br />
take Your pictures <strong>Camera</strong> whenever will now an animal automatically is detected take in range, pictures<br />
based whenever on the default an animal settings is detected below. in range -based on<br />
the default settings below.<br />
DEFAULT<br />
Capture Mode<br />
SETTINGS<br />
TRAIL CAM (Still)<br />
Photo Quality<br />
2.0 MP<br />
Photo Delay after each photo is taken 5 SEC<br />
General<br />
Motion Freeze ON<br />
Motion Detect Time Lapse<br />
Multi Shot Count OFF<br />
DATE/TIME: Video 01/01/99 Resolution<br />
12:00am EVENT DELAY: 10 SECONDS VGA INTERVAL: 10 SECONDS<br />
ERASE IMAGES: Video NO Length PHOTO OR VIDEO: PHOTO 5 SEC MULTI PROGRAM: 2 PROGRAM<br />
CAPTURE MODE: Video MOTION DETECT Audio PHOTO QUALITY: HIGH (4 MP) ON PROGRAM 1 WAKE UP: 6 AM<br />
IR FLASH: <strong>Camera</strong> AUTO Name MULTI-SHOTS: OFF MOULTRIECAM<br />
PROGRAM 1 SLEEP: 9 AM<br />
GEOTAGGING: Temperature<br />
OFF MOTION FREEZE: ON FAHRENHEIT<br />
PROGRAM 2 WAKE UP: 4 PM<br />
CAMERA NAME: Info MOULTRIECAM Strip printed on VIDEO photos LENGTH: 10 SECONDS ON PROGRAM 2 SLEEP: 7 PM<br />
TEMPERATURE: Plot FAHRENHEIT Frequency<br />
15 PHOTO SECONDS QUALITY: HIGH (4 MP)<br />
Plot Duration<br />
3 HOUR<br />
GPS Longitude & Latitude:<br />
000.000000 N / 000.000000 W<br />
Default Setting<br />
NO<br />
Delete All?<br />
NO<br />
Security Code 00000<br />
D-<strong>555i</strong> Digital Game <strong>Camera</strong><br />
D-<strong>555i</strong> Digital Game <strong>Camera</strong><br />
Page 3<br />
PlotStalker Software M-880 GameSpy Digital <strong>Camera</strong><br />
Page 3
IV<br />
CAPTURE MODES<br />
X<br />
MOULTRIE ACCESSORIES<br />
You will see one of three status screen displays after you slide the IRAIM/OFF/ON switch to the ON<br />
position. After 15 seconds the camera will enter sleep mode and wake up when motion is detected.<br />
Motion Detect Mode - Photo<br />
When the camera has been programmed for Motion Detect<br />
Mode - Photo, the camera will take still images when motion is<br />
detected. The following will be displayed on the Status Screen.<br />
MOTION DETECT MODE<br />
PHOTO<br />
Battery:<br />
Est. Days:<br />
Taken/Capacity:<br />
10 SEC<br />
43%<br />
0020 Days<br />
0021 / 034506<br />
Using a Tree Mount<br />
The camera can also be mounted directly to a<br />
tree using a mounting bracket that attaches<br />
directly to a tree or pole. Strap the tree mount<br />
to the tree and secure, then attach the camera<br />
to the tree mount using the tree mount socket<br />
located on the back of the camera.<br />
Motion Detect Mode - Video<br />
When the camera has been programmed for Motion Detect<br />
Mode - Video, the camera will take video when motion is<br />
detected. The following will be displayed on the Status Screen.<br />
MOTION DETECT MODE<br />
VIDEO<br />
Battery:<br />
Est. Days:<br />
Taken/Capacity:<br />
10 SEC<br />
43%<br />
0020 Days<br />
0021 / 034506<br />
Using the <strong>Moultrie</strong> <strong>Camera</strong> Power Panel<br />
Place near the tree where the camera is mounted.<br />
Place for best exposure to sun. To attach to a<br />
tripod secure the power panel to the tripod<br />
angled upward for best exposure. Plug the power<br />
panel to the Power Panel Plug. This will extend the<br />
life of your camera in the field.<br />
Note: Leave internal batteries in the camera<br />
during use. The <strong>Camera</strong> Power Panel needs<br />
4 hours of sunlight to fully power the camera.<br />
Time Lapse<br />
When the camera has been programmed for Time Lapse<br />
photography, the camera will observe a full day of activity in<br />
the field during Time Lapse mode. The camera will record a<br />
block still images following the Time Lapse program setting.<br />
The following will be displayed on the Status Screen.<br />
TIME LAPSE MODE<br />
Battery:<br />
Est. Days:<br />
Taken/Capacity:<br />
30 SEC<br />
43%<br />
0020 Days<br />
0021 / 034506<br />
Using the <strong>Moultrie</strong> Battery Box<br />
Extend the field life of your <strong>Moultrie</strong> camera with a<br />
long-lasting, rechargeable external power source.<br />
Place near the tree where the camera is mounted.<br />
Plug the Battery Box to the Power Panel Plug.<br />
This will extend the life of your camera in the field.<br />
Hybrid Mode<br />
The camera operates in Time Lapse Mode during the<br />
programmed intervals and Motion Detect Mode for the<br />
remainder of the day.<br />
HYBRID MODE<br />
5 MIN<br />
Battery:<br />
Est. Days:<br />
Taken/Capacity:<br />
43%<br />
0020 Days<br />
0021 / 034506<br />
Page 4 D-<strong>555i</strong> Digital Game <strong>Camera</strong> Page 17<br />
D-<strong>555i</strong> Digital Game <strong>Camera</strong>
IX<br />
VIEWING TIME LAPSE (cont.)<br />
V<br />
SETUP AND PROGRAMMING<br />
To turn photo sequences into Time Lapse Video<br />
Reasons you may want to create a video with your images:<br />
• Makes it easier to e-mail your image sequences.<br />
• Allows you to select the range of images you want included, to eliminate uninteresting images.<br />
• Allows you to store the images as a video rather than a large number of images.<br />
When the cameras power is turned ON, the LCD screen will<br />
show the operation mode of the camera. At this time, the<br />
picture count and the estimated battery life will also be<br />
displayed. If no buttons are pressed within 10 seconds the<br />
LCD screen will enter sleep mode to conserve battery life.<br />
It will then enter Motion Detect mode and activate when<br />
motion is detected. To wake the camera manually, press<br />
and hold the menu button until you see this default screen<br />
on the display.<br />
MOTION DETECT MODE<br />
PHOTO<br />
Battery:<br />
Est. Days:<br />
Taken/Capacity:<br />
10 SEC<br />
43%<br />
0020 Days<br />
0021 / 034506<br />
1. Download time lapse images to Time Lapse Software.<br />
(see section on downloading images).<br />
2. Click on File. You will see the screen image to the right.<br />
3. Choose a starting image (frame) and an ending<br />
image (frame). Note: The frame limit is 300.<br />
4. Choose the frame rate. Options include 1, 5, 10, 20,<br />
and 30 frames per second (fps).<br />
Note: The frame rate says how many images of a video are displayed every second a video is<br />
played. The higher frame rate a video has the smoother movement appears in the video. However,<br />
a higher frame rate video will create a larger file and will require more memory.<br />
5. Choose the video resolution:<br />
Note: The higher the resolution, the sharper the image. However, higher resolutions create<br />
a larger file and will require more memory. VGA (640x480) / 720p / 1080p<br />
6. Choose frame filter: None, Low, Medium, or High.<br />
7. Click on Save the Video As. Name the video and choose the location file folder you wish<br />
to save it in.<br />
8. Click Start Video Export. The program will start to convert the images to video based on the<br />
settings chosen above. The green bars will advance until the conversion is complete.<br />
Note: Click on Cancel to abort the transfer.<br />
Setup Selection Setting<br />
After the camera is turned ON the LCD display will indicate the<br />
status screen. Press the Menu button and the Setup Selection<br />
screen will appear. Press the OK button, the selection will be<br />
marked with an “X”. Press the Up/Down buttons to change<br />
the settings. Press the OK button again to Iock in selection.<br />
Press the Right button to move to the next setting. Using this<br />
method you can customize your camera’s feature settings.<br />
Setting Motion Detect Features<br />
When you choose Motion Detect the LCD Display will automatically start showing the different<br />
features within Motion Detect. Using the navigation process, set the features to your needs.<br />
Event Delay Setting<br />
Use the Up/Down buttons to choose between delay settings<br />
(10 sec, 30 sec, 1 min, 5min, 10min or 30 min). When your<br />
selection has been made, press the OK button to confirm the<br />
selection. Press the Right button to move to the next screen.<br />
SETUP SELECTION<br />
X<br />
EVENT DELAY<br />
X<br />
TIME LAPSE<br />
MOTION DETECT<br />
GENERAL<br />
5 MINUTES<br />
1 MINUTE<br />
30 SECONDS<br />
10 SECONDS<br />
To View Time Lapse Video<br />
1. Find the video in the folder<br />
you saved it into.<br />
2. Click on the video.<br />
3. The video will be open up<br />
automatically in QuickTime<br />
player. To install a free version<br />
of QuickTime, follow the on screen<br />
instructions at www.apple.com/quicktime/download.<br />
4. Press play to view your time lapse video.<br />
Setting Photo or Video<br />
Use the Up/Down buttons to choose between VIDEO or<br />
PHOTO mode. When your selections has been made, press<br />
the OK button to confirm the selection. Press the Right<br />
button to move to the next screen.<br />
PHOTO OR VIDEO<br />
X<br />
VIDEO<br />
PHOTO<br />
Page 16<br />
Time Lapse Software<br />
D-<strong>555i</strong> Digital Game <strong>Camera</strong><br />
Page 5
Setting Photo Quality<br />
Press the OK button. Use the Up/Down buttons to choose<br />
between 4 image quality settings.<br />
1. Enhanced (8 MP): 3840 x 2160<br />
2. High (4 MP): 2688 x 1512<br />
3. Med (2 MP): 1920 x 1080<br />
4. Low (0.9 MP): 1280 x 720<br />
Press the OK button to confirm the selection.<br />
Press the Right button to move to the next screen.<br />
PHOTO QUALITY<br />
X<br />
ENHANCED (8MP)<br />
HIGH (4MP)<br />
MEDIUM (2MP)<br />
LOW (0.9MP)<br />
IX<br />
VIEWING TIME LAPSE<br />
This easy-to-use software allows you to advance through the series of images a number of different ways:<br />
BEGIN/END<br />
Goes to the first or last photo in the Plot File.<br />
Video Length<br />
Use the Up/Down buttons to choose between 5 video length<br />
settings (5, 10, 30, 60 or 90 seconds). When your selection<br />
has been made, press the OK button to confirm the selection.<br />
Press the Right button to move to the next screen.<br />
Note: With night time video, only 5 and 10 seconds length are<br />
available. If you set length higher than 10 seconds, the video<br />
will be taken in 10 seconds duration during night time.<br />
VIDEO LENGTH<br />
X<br />
60 SECONDS<br />
30 SECONDS<br />
10 SECONDS<br />
5 SECONDS<br />
FRAME BY FRAME SEARCH<br />
Individually step forward or backward through each photo.<br />
Audio On/Off<br />
Use the Up/Down buttons to choose between Audio On or<br />
Audio Off when taking a video. When your selection has been<br />
made, press the OK button to confirm the selection. Press the<br />
Right button to move to the next screen.<br />
AUDIO ON/OFF<br />
X<br />
AUDIO ON<br />
AUDIO OFF<br />
REWIND/PAUSE/PLAY<br />
Play photos in sequence, pause, or play the photos in reverse order.<br />
These functions simulate a video and are useful for manually searching<br />
changes in the photos. When a sequence is being played, press<br />
fast-forward or fast-rewind multiple times to increase speed. (1x-5x)<br />
Setting Multiple-Shots<br />
Use the Up/Down buttons to choose between settings.<br />
Choose how many pictures you would like to be taken in a<br />
sequence when the camera is triggered (1 to 10 pictures).<br />
When your selection has been made, press the OK button to<br />
confirm the selection. Press the Right button to move to the<br />
next screen.<br />
MULTI-SHOTS<br />
Setting General Features<br />
When you choose General the LCD Display will automatically start showing the different features<br />
within General. Using the navigation process, set the features you desire.<br />
Setting Date and Time<br />
Use the Up/Down buttons to move from one value to the<br />
next. Press the OK button to lock in selections. When all your<br />
selections have been made, and the date and time has been<br />
set, press the Right button to move to the next screen.<br />
X<br />
DATE/TIME<br />
08 / 16 / 2012<br />
02 : 34 pm<br />
4-SHOTS<br />
3-SHOTS<br />
2-SHOTS<br />
OFF<br />
SEARCH<br />
This function allows quick scanning of images foreword and back. The<br />
scan pauses when the software detects a change in pixel content from<br />
the last photo viewed. We detect change based on averages so it<br />
will not be as accurate as a manual frame by frame search.<br />
Search Region<br />
Click on Set Search Region Button.<br />
This allows you to define a specific search<br />
area, rather than the whole photo. Drag the<br />
red outline to the area you want to search.<br />
This allows you to focus on a very precise area<br />
if required.<br />
Search Steps<br />
This allows for even faster scans by skipping<br />
the selected amount of images (1-50). The<br />
higher this setting, the lower the search<br />
results as it is ignoring selected photos. You<br />
may find this option helpful if you have a<br />
very large quantity of photos to scan.<br />
Click OK.<br />
Click on Motion Search Advance button.<br />
Page 6 D-<strong>555i</strong> Digital Game <strong>Camera</strong> Page 15<br />
Time Lapse Software
VIII<br />
TIME LAPSE SOFTWARE<br />
SOFTWARE INSTALLATION<br />
Download your free Time Lapse software at www.moultriefeeders.com/timelapsesoftware<br />
Erase Images<br />
Use the Up/Down buttons to choose between Yes - erase all<br />
images, or No - does not change stored images. When your<br />
selection has been made, press the OK button to confirm the<br />
selection. Press the Right button to move to the next screen.<br />
ERASE IMAGES?<br />
X<br />
YES<br />
NO<br />
INTRODUCTION<br />
In time-lapse photography a series<br />
of still photos are taken at regular<br />
time intervals. The PlotStalker<br />
Software allows you to load the<br />
time lapse file that was captured<br />
from your <strong>Moultrie</strong> Game <strong>Camera</strong><br />
and scroll backward and forward<br />
through your photos, single step,<br />
search for activity in a designated<br />
area, and save the files.<br />
Setting Capture Mode<br />
Press the OK button. Use the Up/Down buttons to choose between operating modes.<br />
This camera has 3 modes.<br />
1. Motion Detect - Capture photo or video when motion<br />
or heat is detected.<br />
2. Time lapse - Capture photo based on the Time Lapse<br />
program setting.<br />
3. Hybrid - Uses a combination of Time Lapse and<br />
Auto modes at different times of the day.<br />
Press the OK button to lock in selection.<br />
Press the Right button to move to the next setting.<br />
CAPTURE MODE<br />
X<br />
HYBRID<br />
TIME LAPSE<br />
MOTION DETECT<br />
SYSTEM REQUIREMENTS<br />
Computer: Intel® Pentium® 4 or AMD Athlon® 64 processor or above; 1GB RAM minimum;<br />
100 MB hard disk space minimum.<br />
Reset to Default settings<br />
You can reset your camera to the factory default settings.<br />
Use the Up/Down buttons to choose between Yes - all setups<br />
restored to factory default, or No - keep the custom settings.<br />
When your selection has been made, press the OK button to<br />
confirm the selection. Press the Right button to move to the<br />
next screen.<br />
RESET TO DEFAULT?<br />
X<br />
YES<br />
NO<br />
Operating System: Microsoft® Windows® 32 bit - XP with Service Pack 2 or later; Windows Vista®<br />
Home Premium, Business, Ultimate, or Enterprise with Service Pack 1;<br />
or Windows 7<br />
Download Images<br />
1. Double-click on Time Lapse<br />
Icon to open the software.<br />
2. Click on File -> Open Photo Folder<br />
3. Browse through your files to<br />
the folder where the images you<br />
wish to view are stored.<br />
4. Once the folder is selected, click OK.<br />
5. The images saved in the folder are<br />
now available to view through<br />
the Time Lapse Software.<br />
Setting (IR) Infrared Flash<br />
Use the Up/Down buttons to choose between:<br />
AUTO- IR flash will fire depending on light intensity<br />
OFF- IR flash is permanently off<br />
Press the OK button to confirm the selection.<br />
Press the Rightbutton to move to the next screen.<br />
IR FLASH<br />
X<br />
OFF<br />
AUTO<br />
Page 14<br />
Time Lapse Software<br />
D-<strong>555i</strong> Digital Game <strong>Camera</strong><br />
Page 7
Motion Freeze<br />
Use the Up/Down buttons to choose between Motion Freeze<br />
on or off. This feature maximizes the image clarity during<br />
night photos. When this feature is on the camera will use a<br />
maximum exposure time of 1/20sec for the night photos.<br />
Other adjustments are made to increase the brightness and<br />
clarity of the photo. When this feature is turned off the camera<br />
will use a maximum exposure time of 1/8sec for the night<br />
photos. When your selection has been made, press the OK<br />
button to confirm the selection. Press the Right button to<br />
move to the next screen.<br />
MOTION FREEZE<br />
X<br />
ON<br />
OFF/EXT.FLASH<br />
VII<br />
VIEWING YOUR IMAGES<br />
There are a number of ways for you download and view<br />
the pictures, videos in the field or at another location.<br />
Removing the SD Card<br />
To remove the SD Memory Card, open the camera cover<br />
and push gently on the SD card and it will pop out slightly<br />
allowing you to remove it. Load the SD card into the<br />
player or card reader to view or move stored images to<br />
another location.<br />
ATTENTION: Use extreme caution when enabling GEOTAGGING within your camera and uploading photographs<br />
to the internet. This information could give someone the exact location of your camera.<br />
Your use of the geotagging features of this camera is at your own risk. Neither <strong>Moultrie</strong> nor any person associated with <strong>Moultrie</strong><br />
makes any warranty or representation with respect to security of any data linked to photographs uploaded to the Internet. In no event<br />
will <strong>Moultrie</strong> or its affiliates be liable for damages of any kind arising out of or in connection with your use of the camera,<br />
the geotagging feature or any other features associated with this camera.<br />
Geotagging<br />
Use the Up/Down buttons to choose between:<br />
ON - Geotagging data will be stored in the metadata<br />
of the JPEG file.<br />
(Remember to input the geotagging data according<br />
to the next two screens.)<br />
OFF - Geotagging data will not be stored.<br />
Press the OK button to confirm the selection.<br />
Press the Right button to move to the next screen.<br />
Latitude<br />
Press the OK button. The first position will start blinking.<br />
Use the Up/Down buttons to set each position. Press OK<br />
to move to the next position. Repeat the process until all<br />
positions are set.<br />
GEOTAGGING<br />
X<br />
LATITUDE<br />
N 36º 15’ 22”<br />
ON<br />
OFF<br />
Important<br />
Make sure that the camera is in the OFF position before<br />
removing SD card.<br />
ln the Field<br />
You can download the pictures, videos, and time lapse<br />
pictures with the aid of external devices. To download,<br />
use an external player or card reader that is<br />
supported by 12V DC or Mini USB Jack.<br />
At Home<br />
Remove the entire camera and transport to another location to download images. To connect the<br />
camera to a PC computer, turn the camera ON, press the MENU button once to change to SETUP<br />
Mode. Connect the USB cord (not included) between the USB out port and the PC computer. The<br />
computer will recognize the camera as a removable drive. The unit works with Windows XP/Vista/7.<br />
Copy the images and videos from the camera onto your PC for further editing or printing. When the<br />
USB cable is disconnected, the camera will go back to SETUP mode.<br />
Longitude<br />
Press the OK button. The first position will start blinking.<br />
Use the Up/Down buttons to set each position. Press OK<br />
to move to the next position. Repeat the process until all<br />
positions are set.<br />
LONGITUDE<br />
W 086º 48’ 55”<br />
See the full line of <strong>Moultrie</strong> camera accessories at www.moultriefeeders.com<br />
Page 8<br />
D-<strong>555i</strong> Digital Game <strong>Camera</strong><br />
D-<strong>555i</strong> Digital Game <strong>Camera</strong><br />
Page 13
VI<br />
CAMERA SPECIFICATIONS<br />
Memory & Storage<br />
Your camera supports external SD memory cards ONLY and will accept up to a 32GB card. Using large<br />
memory cards can slow the camera response. The camera cannot capture any photo or video without<br />
external memory. Please insert an SD memory card to operate camera. Estimates are based on the<br />
most common types of memory cards that can be purchased at electronic stores, office supply stores,<br />
or online. Estimates may vary based on camera settings or environmental conditions.<br />
Imprint Info<br />
Use the Up/Down buttons to choose between:<br />
YES - <strong>Camera</strong> Name, Time, etc, information will be imprinted<br />
at the bottom of the image/video as an infromation bar<br />
Note: Remember to input the camera name in the setup<br />
and set the clock accordingly.<br />
NO - No information bar will be imprinted.<br />
Press the OK button to confirm the selection. Press the Right<br />
button to move to the next screen.<br />
IMPRINT INFO?<br />
X<br />
YES<br />
NO<br />
Important<br />
Always turn the unit off when inserting or removing an SD memory card to avoid damage and ensure<br />
that the camera properly updates the memory information.<br />
Photo Mode<br />
SD Card Size: 2 GB 16 GB<br />
ENHANCED 3840 x 2160 400 3700<br />
HIGH 2688 x 1512 900 7400<br />
MED 1920 x 1080 1800 14900<br />
LOW 1280 x 720 4100 33000<br />
Video Mode<br />
SD Card Size: 2 GB 16 GB<br />
AVI 1280 x 720 (based on 10 sec video) 150 1200<br />
Actual capacity will vary based on image properties.<br />
Specifications<br />
Operational Mode<br />
Motion Detect / Time Lapse / Hybrid<br />
Resolution<br />
8.0 MP<br />
Still Resolutions<br />
JPEG<br />
Low 1280 x 720, Med 1920 x 1080,<br />
High 2688 x 1512, Enhanced 3840 x 2160<br />
Video Resolutions AVI - 1280 x 720<br />
SD Memory Card<br />
Up to 32 GB SD card (not included)<br />
Format<br />
JPEG - Still pictures, AVI - Video clips<br />
Power Supply<br />
6 C-cell Alkaline batteries (not included)<br />
Temperature<br />
The temperature is imprinted on each photo and can<br />
be in degrees Fahrenheit or Celsius. To change the<br />
temperature units, press the Up/Down buttons to<br />
highlight the desired setting. Press the OK button to<br />
save the setting and return to the <strong>Camera</strong> Setup Menu.<br />
Setting <strong>Camera</strong> Name<br />
Press the OK button. Use the Up/Down and Left/Right<br />
buttons to select an identity for your camera. For example,<br />
you can use a name or a location; the identity you wish to<br />
use is up to you. Set all characters and press the Right<br />
button to go to the next screen.<br />
Security Code<br />
Use the Up/Down and Left/Right buttons to select a 5-digit<br />
security code for your camera. Press the OK button. Press the<br />
Right button.<br />
Note: Please remember your security code. If the code is<br />
lost, you can contact <strong>Moultrie</strong> customer support to reset the<br />
password. (Charges may apply)<br />
TEMPERATURE<br />
CELSIUS<br />
X<br />
FAHRENHEIT<br />
CAMERA NAME<br />
MOULTRIECAM<br />
SECURITY CODE<br />
0 0 0 0 0<br />
Page 12<br />
D-<strong>555i</strong> Digital Game <strong>Camera</strong><br />
D-<strong>555i</strong> Digital Game <strong>Camera</strong><br />
Page 9
Upgrade Firmware<br />
The firmware version is displayed at the bottom of this<br />
screen. Press Up/Down to choose setting.<br />
YES - To upgrade firmware.<br />
NO - Keep current firmware.<br />
Make sure that a SD card with the new firmware is inserted<br />
into the camera. Press the OK button to make selection. Make<br />
sure the process is completed before pressing other buttons<br />
or powering the camera Off. Press Right button to go back to<br />
Setup Selection screen.<br />
UPGRADE FIRMWARE<br />
X<br />
D<strong>555i</strong> – 12592<br />
YES<br />
NO<br />
Setting Program Wake up<br />
Use the Up/Down buttons to choose between 24 different<br />
settings: any hour from MlDNlGHT to 11 PM. This will<br />
determine what time the camera will wake up during the<br />
program and begin its time lapse program. Press the OK<br />
button to confirm the selection.<br />
PROGRAM 1 WAKEUP<br />
X<br />
8 AM<br />
7 AM<br />
6 AM<br />
5 AM<br />
Setting Time Lapse Features<br />
When you choose Time Lapse, the LCD Display will automatically start showing the different features<br />
within Time Lapse. Using the navigation process, set the features to your preference.<br />
Interval Time Setting<br />
Use the Up/Down buttons to choose between 10, 30 sec;<br />
1, 5, 10, 15 or 30 minutes / 1, 3, 6 hours or 1 day. Press the OK<br />
button to confirm the selection. Press the Right button to<br />
move to the next screen.<br />
TIME LAPSE INTERVAL<br />
X<br />
5 MIN<br />
1 MIN<br />
30 SEC<br />
10 SEC<br />
Setting Program Sleep<br />
When wakeup time is set, the camera will automatically<br />
move to the Sleep option. Set the sleep time after the<br />
wakeup time you already set. This will set the wake up and<br />
sleep during the time lapse photography. Press the OK<br />
button to confirm the selection.<br />
NOTE: Repeat the above steps for each Program to be set.<br />
PROGRAM 1 SLEEP<br />
X<br />
11 AM<br />
10 AM<br />
9 AM<br />
8 AM<br />
Setting Multi-Program<br />
Use the Up/Down buttons to choose between 4 available<br />
settings: 1 PROGRAM, 2 PROGRAM, 3 PROGRAM or<br />
4 PROGRAM. This indicates the number of cycle the camera<br />
will operate within a 24 hours period. Press the OK button<br />
to confirm the selection. Press the Right button to move to<br />
the next screen.<br />
MULTI-PROGRAM<br />
X<br />
4 PROGRAM<br />
3 PROGRAM<br />
2 PROGRAM<br />
1 PROGRAM<br />
Setting Photo Quality<br />
Use the Up/Down buttons to choose between 4 image<br />
quality settings:<br />
1. Enhanced (8 MP): 3840 x 2160<br />
2. High (4 MP): 2688 x 1512<br />
3. Med (2 MP): 1920 x 1080<br />
4. Low (0.9 MP): 1280 x 720<br />
Press the OK button to confirm the selection.<br />
Press the Right button to move to the next screen.<br />
PHOTO QUALITY<br />
X<br />
ENHANCED (8MP)<br />
HIGH (4MP)<br />
MEDIUM (2MP)<br />
LOW (0.9MP)<br />
Page 10<br />
D-<strong>555i</strong> Digital Game <strong>Camera</strong><br />
D-<strong>555i</strong> Digital Game <strong>Camera</strong><br />
Page 11