

EFIS App for iPad manual - X-Plane.com
EFIS App for iPad manual - X-Plane.com
EFIS App for iPad manual - X-Plane.com

Create successful ePaper yourself
Turn your PDF publications into a flip-book with our unique Google optimized e-Paper software.
3. (Windows 7 only:) Click Change settings, then click<br />
Allow if asked <strong>for</strong> confirmation.<br />
4. Select the check box next to X-<strong>Plane</strong>, and then click<br />
OK.<br />
To allow X-<strong>Plane</strong> through the firewall in Mac OS,<br />
1. Open System Preferences from the <strong>App</strong>le menu.<br />
2. Click Security (called Security & Privacy in OSX Lion).<br />
3. Click the Firewall tab.<br />
4. Unlock the pane by clicking the lock in the lower-left<br />
corner and enter the administrator username and<br />
password.<br />
5. Click Advanced to customize the firewall configuration.<br />
6. Click the + (plus) button, then select your copy of X-<br />
<strong>Plane</strong>.app. This is found in the X-<strong>Plane</strong> 9 or X-<strong>Plane</strong> 10<br />
installation directory, which is located by default on<br />
your desktop. With X-<strong>Plane</strong> selected, click Add.<br />
C. Configuring an Up-to-Date Copy of X-<strong>Plane</strong><br />
With the mobile device on the same network and desktop<br />
software updated to version 9.61 or later, it’s time to configure<br />
the desktop software to interface with the device.<br />
Be<strong>for</strong>e we begin, make sure that the <strong>iPad</strong> is on and running<br />
<strong>EFIS</strong> <strong>App</strong>. This will ensure that it is transmitting over the<br />
network so that the desktop copy of X-<strong>Plane</strong> can interface with<br />
it.<br />
In the desktop copy of X-<strong>Plane</strong>, move the mouse to the top of<br />
the screen, making the menu bar appear. Click Settings, then<br />
select Net Connections, as seen in the following image.<br />
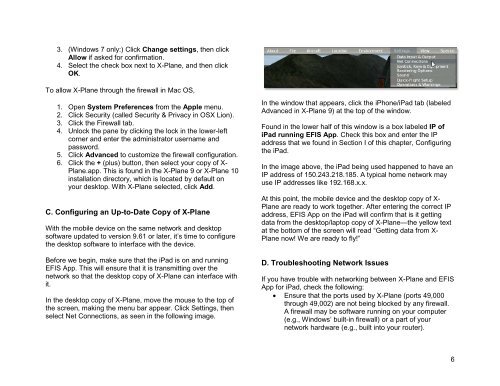
In the window that appears, click the iPhone/<strong>iPad</strong> tab (labeled<br />
Advanced in X-<strong>Plane</strong> 9) at the top of the window.<br />
Found in the lower half of this window is a box labeled IP of<br />
<strong>iPad</strong> running <strong>EFIS</strong> <strong>App</strong>. Check this box and enter the IP<br />
address that we found in Section I of this chapter, Configuring<br />
the <strong>iPad</strong>.<br />
In the image above, the <strong>iPad</strong> being used happened to have an<br />
IP address of 150.243.218.185. A typical home network may<br />
use IP addresses like 192.168.x.x.<br />
At this point, the mobile device and the desktop copy of X-<br />
<strong>Plane</strong> are ready to work together. After entering the correct IP<br />
address, <strong>EFIS</strong> <strong>App</strong> on the <strong>iPad</strong> will confirm that is it getting<br />
data from the desktop/laptop copy of X-<strong>Plane</strong>—the yellow text<br />
at the bottom of the screen will read “Getting data from X-<br />
<strong>Plane</strong> now! We are ready to fly!”<br />
D. Troubleshooting Network Issues<br />
If you have trouble with networking between X-<strong>Plane</strong> and <strong>EFIS</strong><br />
<strong>App</strong> <strong>for</strong> <strong>iPad</strong>, check the following:<br />
• Ensure that the ports used by X-<strong>Plane</strong> (ports 49,000<br />
through 49,002) are not being blocked by any firewall.<br />
A firewall may be software running on your <strong>com</strong>puter<br />
(e.g., Windows’ built-in firewall) or a part of your<br />
network hardware (e.g., built into your router).<br />
6


