2004 Rear Shock Owner's Manual - FOX - Birota
2004 Rear Shock Owner's Manual - FOX - Birota
2004 Rear Shock Owner's Manual - FOX - Birota

Create successful ePaper yourself
Turn your PDF publications into a flip-book with our unique Google optimized e-Paper software.
<strong>2004</strong> <strong>Rear</strong> <strong>Shock</strong> Owner’s <strong>Manual</strong><br />
FLOAT - FLOAT R - FLOAT L - FLOAT RL<br />
Vanilla - Vanilla R - Vanilla RC<br />
AVA - TALAS - SBC Enduro - SBC Brain - K2 Pull <strong>Shock</strong><br />
<strong>FOX</strong> RACING SHOX<br />
130 Hangar Way, Watsonville, CA 95076<br />
831.274.6500 FAX 831.768.9312<br />
E-Mail: service@foxracingshox.com<br />
Website: www.foxracingshox.com<br />
1
Table of Contents<br />
Introduction ............................................................................................ 3<br />
General Information<br />
Contact Info ................................................................ 3<br />
Method of Shipping ..................................................... 3<br />
Methods of Payment ................................................... 3<br />
Service / Warranty ........................................................ 3<br />
International Service Centers ....................................... 3<br />
Warranty Policy ........................................................... 4<br />
Disclaimer ................................................................. 4<br />
Consumer Safety ........................................................ 5<br />
<strong>Shock</strong> Terminology ..................................................... 5<br />
General Set-Up Instructions<br />
Measuring Sag ............................................................ 6<br />
General Maintenance ................................................. 6<br />
FLOAT <strong>Shock</strong>s<br />
Vanilla <strong>Shock</strong>s<br />
Pump .................................................................... 7<br />
Adjusting Sag ............................................................. 8<br />
FLOAT Drawing & Features ......................................... 8<br />
FLOAT R Drawing & Features ...................................... 9<br />
Rebound Adjustment ................................... 9<br />
FLOAT L Drawing & Features ...................................... 9<br />
Compression Adjustment ............................. 9<br />
FLOAT RL Drawing & Features .................................. 10<br />
SBC Enduro FLOAT R & RL ....................................... 10<br />
Air Volume Adjuster - AVA ........................................... 11<br />
Travel Adjust Linear Air Spring - TALAS ....................... 11<br />
Air Sleeve Maintenance ............................................. 12<br />
SBC Brain ................................................................ 13<br />
K2 Razorback Pull <strong>Shock</strong> .......................................... 14<br />
Remote Lock-out ...................................................... 15<br />
Adjusting Sag ........................................................... 16<br />
Installing and Removing Springs ............................... 16<br />
Vanilla Drawing & Features ....................................... 17<br />
Vanilla R Drawings & Features .................................. 17<br />
Rebound Adjustment ................................. 17<br />
Vanilla RC Drawing & Features ................................. 18<br />
Compression Adjustment. .......................... 18<br />
International Versions<br />
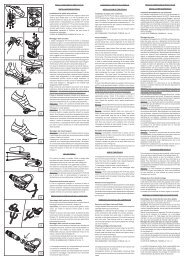
Français ................................................................... 19<br />
Italiano ..................................................................... 37<br />
Deutsch ................................................................... 55<br />
Espanol ................................................................... 73<br />
Japanese ................................................................. 91<br />
2
Introduction<br />
Thank you for choosing <strong>FOX</strong> Racing Shox for your bicycle. In doing so, you have chosen the number one shock<br />
absorber in the industry! All <strong>FOX</strong> Racing Shox products are designed, manufactured and assembled by the finest<br />
professionals in the industry. As a consumer and supporter of <strong>FOX</strong> Racing Shox products, you need to be aware of the<br />
importance of setting up your new shock correctly to ensure maximum performance. This manual will provide you with<br />
the step-by-step instructions of how to set up your shock. It is a good idea to keep your receipts with this manual and<br />
refer to it for service and warranty issues.<br />
General Information<br />
Contact Info<br />
<strong>FOX</strong> Racing Shox<br />
130 Hangar Way<br />
Watsonville, CA 95076<br />
Shipping Method<br />
Phone: 831.274.6500<br />
North America: 800.369.7469<br />
Fax: 831.768.9312<br />
We use UPS ground service within the USA.<br />
Service/Warranty<br />
E-mail: service@foxracingshox.com<br />
Website: www.foxracingshox.com<br />
Business Hours: Monday-Friday 8:00AM-5:00PM Pacific Time<br />
Method of Payment<br />
Visa, MasterCard,<br />
Cashier’s Check<br />
<strong>FOX</strong> Racing Shox USA is pleased to offer 48-hour* turnaround for product service, provided the following steps are taken.<br />
1. Contact <strong>FOX</strong> Racing Shox at 831.274.6500 or Authorized Service Center to obtain a Return Authorization Number<br />
(R.A. number) and shipping address. For Authorized Service Centers, please refer to the list below, contact <strong>FOX</strong><br />
Racing Shox or go to www.foxracingshox.com to determine the Service Center nearest you.<br />
2. Satisfactory proof of purchase receipt is required for warranty consideration.<br />
3. Mark the R.A. number and the Return Address clearly on the outside of the package and send the item(s) to <strong>FOX</strong><br />
Racing Shox or your Authorized Service Center with shipping charges pre-paid by sender.<br />
4. Include a description of the problem, bicycle information (manufacturer, year and model), type of <strong>FOX</strong> Racing Shox<br />
product, spring rate and return address with daytime phone number.<br />
*Authorized Service Centers operate independently. Service and Warranty turnaround times may vary.<br />
Australia<br />
Dirt Works<br />
011 612-9679-8400<br />
dirtworks@dirtworks.com.au<br />
Belgium<br />
Sabma<br />
011 32 87-631980<br />
sabma@skynet.be<br />
Brazil<br />
Plimax 2 Fast<br />
011 5511-251-0633<br />
astec@plimax.com<br />
Canada (West)<br />
Cycle Works<br />
780 440-3200<br />
mail@cycleworks.com<br />
Canada (East)<br />
Velocycle, Inc.<br />
514 849 5299<br />
velocycle@primus.ca<br />
Czech Republic<br />
Racebike<br />
00420 653 66 12 40<br />
rb@racebike.cz<br />
France<br />
FMF Sport Group<br />
011 33-494-541950<br />
fmfsportgroup@wanadoo.fr<br />
Germany<br />
<strong>Shock</strong> Therapy<br />
06126-2267700<br />
support@shock-therapy.com<br />
Germany<br />
Toxoholic's<br />
49 6331-258160<br />
toxoholics@t-online.de<br />
Israel<br />
DAA Sport Marketing<br />
972-(0)9-865-6960<br />
dan@daa.co.il<br />
Italy<br />
Pepi Innerhofer<br />
011-39-0473-56-3107<br />
info@pepi.it<br />
Japan<br />
Mom & Pop's<br />
011 81-586-43-6810<br />
mamapapa@mtg.biglobe.ne.jp<br />
Korea<br />
Xenon Sports International<br />
011-82-31-555-0077<br />
xenon@netsgo.com<br />
New Zealand<br />
Blue Shark Enterprises<br />
011 64-4-589-4535<br />
alastair@mountainbikes.co.nz<br />
Philippines<br />
Dan's Bike Shop<br />
011 63 34 435 3633<br />
dansbike@WBI.ph<br />
Spain<br />
Dirt Racing<br />
011 34-91-663-71-25<br />
mrojo.dirt@nexo.es<br />
Switzerland<br />
<strong>FOX</strong> Racing Shox Europe<br />
011 41-31-809-30-20<br />
frs-europe@bluewin.ch<br />
Thailand<br />
Uniwave Limited & UWC Co. Ltd.<br />
011 66 2 367 3470<br />
kanate@uniwave.net<br />
The Netherlands<br />
Cannondale Europe BV<br />
011 315 4158 9898<br />
repair@cannondale.com<br />
United Kingdom<br />
Mojo Suspension<br />
011 44-1633-615-815<br />
chris@mojo.co.uk<br />
United States<br />
<strong>FOX</strong> Racing Shox<br />
831-274-6500<br />
service@foxracingshox.com<br />
3
Warranty Policy<br />
The factory warranty period for your shock is one year from the original date of purchase of the bicycle or shock. A copy<br />
of the original purchase receipt must accompany any shock being considered for warranty service. Warranty is at the full<br />
discretion of <strong>FOX</strong> Racing Shox and will cover only defective materials and workmanship. Warranty duration and laws<br />
may vary from state to state and/or country to country.<br />
FLOAT, FLOAT R, FLOAT L, FLOAT RL Warranty: To maintain high performance, product longevity, and preserve<br />
warranty rights, periodic end user maintenance is required. (See the Maintenance Schedule for further instructions)<br />
To ensure peak performance, repairs and service to the shock must be performed by <strong>FOX</strong> Racing Shox in the USA or<br />
outside the USA by a <strong>FOX</strong> Racing Shox Authorized Service Center.<br />
Parts, components and assemblies subject to normal wear and tear are not covered under this warranty.<br />
<strong>FOX</strong> Racing Shox reserves the right to all final warranty or non-warranty decisions.<br />
General exclusions from this warranty shall include but are not limited to any failures caused by:<br />
Installation of parts or accessories that are not qualitatively equivalent to genuine <strong>FOX</strong> Racing Shox parts.<br />
Abnormal strain, neglect, abuse and/or misuse.<br />
Accident or collision damage.<br />
Modification of original parts.<br />
Lack of proper maintenance. (very important - see Maintenance Schedule)<br />
Any attempt to disassemble damper assembly.<br />
Shipping damages or loss (purchase of full value insurance is recommended).<br />
Damage to interior or exterior caused by improper cable routing, seatpost, rocks, crashes or improper installation.<br />
Oil changes or service not performed by <strong>FOX</strong> Racing Shox or an Authorized Service Center.<br />
Coil bind / Excessive spring preload (two turns maximum).<br />
Specific exclusions from this warranty shall include:<br />
Parts replaced due to normal wear and tear and/or routine maintenance.<br />
Parts subject to normal wear and tear and/or routine maintenance:<br />
Bushings and reducers<br />
Seals<br />
Suspension fluids<br />
<strong>FOX</strong> Racing Shox makes no other warranty of any kind, expressed or implied. All implied warranties of merchantability and<br />
fitness for a particular purpose which exceed the obligations and time limits stated in this warranty are hereby disclaimed<br />
by <strong>FOX</strong> Racing Shox and excluded from this warranty.<br />
Warranty Q & A<br />
Q. What costs are my responsibility during the warranty period?<br />
A. The customer is responsible for all costs of maintenance services, non-warranty repairs, accident and collision<br />
damages, oil, seals, bushings and reducers, and mounting hardware.<br />
Q. What are some examples of “abnormal” strain, neglect or abuse?<br />
A. These terms are general and overlap each other in areas. Specific examples are: Hucking, ghost riding, big drop,<br />
stunt / dare-devil riding, riding with broken parts, riding without oil in shock, too much preload, wrong spring rate, etc.<br />
Q. Does the warranty cover incidental costs such as shipping or transportation?<br />
A. No. The warranty is limited to repair of materials and/or workmanship.<br />
Q. May I perform any or all of the recommended maintenance shown in the owner’s manual?<br />
A. You may perform FLOAT Air Sleeve, bushing and reducer maintenance only. Oil changes, damper service and<br />
repairs must be performed by <strong>FOX</strong> Racing Shox or an Authorized Service Center.<br />
Disclaimer<br />
<strong>FOX</strong> Racing Shox is not responsible for any damages to you or others arising from riding, transporting or other use of<br />
your shock or bicycle. In the event that your shock breaks or malfunctions, <strong>FOX</strong> Racing Shox shall have no liability or<br />
obligation beyond the repair or replacement of your shock, pursuant to the terms outlined in the warranty provisions<br />
of this manual.<br />
4
Consumer Safety<br />
RIDING A BICYCLE IS DANGEROUS AND CAN RESULT IN DEATH OR SERIOUS INJURY. TAKE YOUR RESPONSIBILITY TO<br />
YOURSELF AND OTHERS SERIOUSLY.<br />
• Maintain your bicycle and suspension<br />
• Wear protective clothing, eye protection and a helmet<br />
• Ride within your limits<br />
• Tread lightly<br />
Your bike is equipped with <strong>FOX</strong> Racing Shox rear suspension. Before riding, take the time to read the <strong>FOX</strong> Racing Shox<br />
manual on set-up, use, and service of your shock. If you have questions, contact your Authorized <strong>FOX</strong> Racing Shox<br />
Service Center or call <strong>FOX</strong> Racing Shox directly at 831.274.6500.<br />
If your shock ever loses oil, or if it makes unusual noise, stop riding immediately and have the shock inspected by a<br />
dealer, Service Center or contact Fox Racing Shox. RIDING WITH A BROKEN OR MALFUNCTIONING SHOCK CAN<br />
RESULT IN LOSS OF CONTROL, CRASHING, AND POSSIBLE DEATH OR SERIOUS INJURY.<br />
Never modify your bike frame or shock. Only use genuine Fox Racing Shox parts for your shock. Any modification,<br />
improper service, or use of after-market replacement parts will void the warranty and could damage the shock or cause<br />
loss of control of the bike resulting in serious injury or death.<br />
Follow the scheduled maintenance recommendations in this <strong>Manual</strong>. Always have your shock serviced by Fox Racing<br />
Shox in the USA or an Authorized <strong>FOX</strong> Racing Shox Service Center outside the USA.<br />
YOUR <strong>FOX</strong> Racing Shox IS PRESSURIZED WITH NITROGEN. DO NOT EVER PRY OUT THE WHITE NYLON<br />
(PLASTIC) PLUG AT THE EYELET END OF SHOCK.<br />
THE CHARGED PORTION OF THE SHOCK SHOULD NEVER BE OPENED EXCEPT BY AN AUTHORIZED<br />
SERVICE CENTER.<br />
IF YOU HAVE AN AIR SHOCK (FLOAT), THE PORTION OF THE SHOCK THAT IS CHARGED WITH NITROGEN<br />
DOES NOT NEED TO BE OPENED IN ORDER TO PERFORM CLEANING AND LUBRICATION OF THE AIR<br />
SLEEVE CHAMBER.<br />
OPENING A NITROGEN PRESSURIZED SHOCK CAN BE DANGEROUS AND CAN RESULT IN INJURY.<br />
DO NOT DO IT.<br />
WARNING: DO NOT ATTEMPT TO PULL APART, OPEN, DISASSEMBLE OR SERVICE A SHOCK IF IT IS<br />
COMPRESSED OR HAS NOT RETURNED (WILL NOT RETURN) TO ITS ORIGINAL NEUTRAL LENGTH<br />
(WITH NO LOAD ON THE SHOCK). SERIOUS INJURY CAN RESULT.<br />
<strong>Shock</strong> Terminology<br />
<strong>Shock</strong> Sag: The amount the shock compresses with the rider on the bicycle in a normal riding position.<br />
Compression Damping: The oil damping resistance felt when trying to compress the shock.<br />
Rebound Damping: The oil damping resistance which controls the rate at which the shock will extend.<br />
Preload: The initial amount of force placed on a spring.<br />
Spring Rate: The force needed to compress a spring on inch.<br />
FLOAT: The acronym for <strong>FOX</strong> Load Optimum Air Technology which delivers the performance of a coil spring with the<br />
adjustability and light weight of an air shock.<br />
Vanilla: Coil spring technology specific to <strong>FOX</strong> which offers the utmost in bump performance and sets the standard<br />
against which all other technologies are measured.<br />
ProPedal Damping: Technology that provides pedaling efficiency as well as control and sensitivity for big and small hits.<br />
5
General Set-Up Instructions<br />
Measuring Sag<br />
To get the best performance from your <strong>FOX</strong> Racing Shox, it is necessary to adjust sag. Sag is how much the shock<br />
compresses or “sags” when you sit on the bicycle.<br />
Use this procedure to measure the sag on your <strong>FOX</strong> Racing Shox FLOAT and Vanilla shocks.<br />
Measurement #1<br />
1. Before sitting on the bicycle, measure and record the distance from the center of one mounting bolt to the center of<br />
the other mounting bolt. This is known as the “eye to eye” measurement.<br />
Measurement #2<br />
2. Sit on the bicycle in a normal riding position. Your weight should be distributed on the saddle and pedals. It may<br />
be necessary to hold yourself up against a wall or post to steady yourself. Do not bounce on the pedals or saddle.<br />
3. Have an assistant measure and record the eye to eye distance.<br />
Subtract Measurement #2 from Measurement #1. The difference is the sag.<br />
General Maintenance<br />
Maintenance Schedule<br />
Item<br />
New<br />
Every<br />
ride<br />
Every<br />
8<br />
hours<br />
Every<br />
40<br />
hours<br />
Annually<br />
and/or<br />
every 200<br />
hours<br />
Set<br />
sag (All shocks)<br />
X<br />
Set rebound (All shocks<br />
w/rebound adjust)<br />
X<br />
Clean shock<br />
shocks)<br />
body (All<br />
X<br />
Air sleeve maintenance<br />
(FLOAT shocks only)<br />
Wet & muddy conditions<br />
X<br />
Dry & dusty conditions<br />
X<br />
Clean & inspect<br />
bushings & reducers (All<br />
shocks)<br />
X<br />
Suspension fluid service<br />
(All shocks-must be<br />
performed by Service<br />
Center)<br />
Other Maintenance Considerations<br />
On FLOAT shocks there may be a small amount of air sleeve lubricant residue on the body. This is normal. If this<br />
residual air sleeve lubricant is not present, this is an indication that the FLOAT air sleeve should be re-lubed.<br />
If you ride in extreme conditions, service your shock more frequently.<br />
Wash your shock with soap and water ONLY.<br />
DO NOT USE A HIGH PRESSURE WASHER ON YOUR SHOCK!<br />
Extensive internal service should be performed by <strong>FOX</strong> Racing Shox or an Authorized <strong>FOX</strong> Racing Shox Service<br />
Center.<br />
X<br />
6
FLOAT <strong>Shock</strong>s<br />
Pump<br />
A <strong>FOX</strong> Racing Shox high pressure air pump is available for your FLOAT shock. It is used to add and release air<br />
pressure from your FLOAT shock. <strong>FOX</strong> Racing Shox part number is 027-00-001-A.<br />
Remove the air valve cap from the shock.<br />
Thread the pump’s valve chuck onto the shock’s air valve until pressure registers on the pump gauge. This takes approximately<br />
6 turns. Do not over-tighten pump on air valve as this will damage the pump chuck seal.<br />
Stroke the pump a few cycles. The pressure should increase slowly. If pressure increases rapidly check to make sure the<br />
pump is properly fitted and tightened onto the air valve.<br />
Note: If shock has no air pressure, the gauge will not register pressure.<br />
Pump to desired pressure setting. You can decrease pressure by pushing the black bleed valve. Pushing the bleed valve<br />
half way down, and holding it there, will allow pressure to escape from the pump and shock. Pushing the bleed valve all<br />
the way down and releasing it will allow only a small amount of pressure to escape (micro adjust). When unthreading the<br />
pump from the air valve fitting, the sound of the air loss is from the pump hose, not the shock itself.<br />
Note: When you attach the pump to the shock, the hose will need to fill with air. This will result in a lower pressure<br />
registering approximately 10 to 20 PSI on the gauge.<br />
Note: Average setting range is from 50 to 300 PSI. DO NOT EXCEED 300 PSI.<br />
Replace the air valve cap before riding.<br />
Warning: If your FLOAT shock has not returned to its original neutral length (eye to eye position), DO NOT<br />
attempt to disassemble the outer air sleeve or any other part of the shock. Air has become trapped in the Air<br />
Negative chamber and can cause serious injury if the shock is disassembled. This condition is known as<br />
“stuck down”. If the shock is stuck down, return it immediately to <strong>FOX</strong> Racing Shox or an Authorized <strong>FOX</strong><br />
Racing Shox Service Center for service. (see Service / Warranty for details)<br />
Procedure to check for a stuck down shock:<br />
1. Release air pressure from the shock.<br />
2. Using a <strong>FOX</strong> Racing Shox high pressure pump, pressurize the shock to 250 psi.<br />
3. If the shock does not extend it has become stuck down.<br />
DO NOT ATTEMPT TO PULL APART, OPEN, DISASSEMBLE OR SERVICE A SHOCK THAT IS STUCK DOWN.<br />
SERIOUS INJURY CAN RESULT. Contact <strong>FOX</strong> Racing Shox or an Authorized <strong>FOX</strong> Racing Shox Service Center for<br />
assistance.<br />
Note: While a “stuck down” shock is a serious condition and should only be serviced by <strong>FOX</strong> Racing Shox or an<br />
Authorized <strong>FOX</strong> Racing Shox Service Center, it is also rare.<br />
7
Adjusting Sag<br />
To get the best performance from your FLOAT shock, it is necessary to adjust sag. On your FLOAT shock this is done<br />
by adjusting the air pressure. The air pressure needed is determined by the rider’s weight and riding conditions. Sag is<br />
how much the shock compresses when you sit on the bicycle. Increasing air pressure will make the shock stiffer.<br />
Decreasing the air pressure will make the shock softer. (Note: It might be necessary to change air pressure to achieve<br />
the proper sag setting). The smoothest ride will be attained by running the air pressure low enough to occasionally<br />
bottom out.<br />
1. Locate the Schrader air valve on the shock and remove the valve cap.<br />
2. Screw your <strong>FOX</strong> Racing Shox pump onto the air valve until the pump shows pressure on the gauge. Do not over<br />
tighten.<br />
3. Add air pressure by pushing on the pump handle until desired pressure is shown on gauge. (See Pump Section)<br />
4. Unthread pump from air valve; measure the sag.<br />
Repeat step 1-4 until proper sag is achieved. Replace valve cap after sag is set.<br />
FLOAT Sag Table<br />
Common <strong>Shock</strong><br />
Lengths<br />
<strong>Shock</strong><br />
Travel<br />
Recommended Sag<br />
( inches) ( millimeters ) ( inches)<br />
( millimeters ) ( inches)<br />
(millimeters )<br />
5.500<br />
6.000<br />
6.500<br />
7.250<br />
7.875<br />
139.7<br />
152.4<br />
165.1<br />
184.2<br />
200.0<br />
1.00<br />
1.25<br />
1.50<br />
1.75<br />
2.00<br />
25.4<br />
31.8<br />
38.1<br />
44.4<br />
50.8<br />
.25<br />
.31<br />
.38<br />
.44<br />
.50<br />
6.4<br />
7.9<br />
9.5<br />
11.1<br />
12.7<br />
FLOAT<br />
<strong>Shock</strong> Features<br />
Adjustable Air Spring - Internal Floating Piston - Oil Damping - Self Adjusting Air Negative Spring<br />
Nitrogen Charged - Speed Sensitive Compression Damping<br />
8
FLOAT R<br />
<strong>Shock</strong> Features<br />
Adjustable Air Spring - Internal Floating Piston - Oil Damping - Self Adjusting Air Negative Spring<br />
Nitrogen Charged - Speed Sensitive Compression Damping - Externally Adjustable Rebound Damping<br />
Speed Sensitive Rebound Valve Stack<br />
Rebound Adjustment<br />
Rebound damping controls the rate at which the shock returns after it has been compressed. The red adjuster dial<br />
can be turned clockwise for slower rebound and counter-clockwise for faster rebound. There is a wide range of<br />
adjustment enabling the rider to tune the shock to any air pressure and riding condition. The proper rebound setting<br />
is a personal preference and varies depending on rider weight, riding style and riding conditions. As a general rule,<br />
rebound should be as fast as possible without kicking back and pushing the rider off the saddle when riding the<br />
bicycle in rough terrain. If rebound is too slow the suspension will not function properly and the wheel will not follow<br />
the changing terrain. Determining the proper rebound setting may take a number of rides. Use the “curb test” to start<br />
dialing in your rebound setting. Do this test on flat ground where there is little auto traffic and plenty of room. Ride at<br />
normal cruising speed and stay seated. Ride off a curb and monitor the rebound. If the bike oscillates a few times<br />
after landing the rebound is too fast. If the shock does not return promptly it is too slow. Start with the dial in the<br />
middle (about 12 clicks from full slow) and adjust 4 clicks in the direction needed. Single clicks of adjustment can be<br />
used to fine tune the rebound damping. During the first few rides, adjust the rebound damping and note the different<br />
ride characteristics. Your rebound damping setting may change with different riding conditions.<br />
FLOAT L<br />
<strong>Shock</strong> Features<br />
Adjustable Air Spring - Internal Floating Piston - Oil Damping - Self Adjusting Air Negative Spring<br />
Nitrogen Charged - Speed Sensitive Compression Damping - Factory Tuned Rebound Damping<br />
Compression Lock-out with High Speed Blow-off<br />
Compression Lock-out<br />
The compression lock-out is the blue lever. There are two options for lever position. For one option, the lever is at a 45°<br />
angle counter clockwise to the shock in the normal position. Moving the lever clockwise 90° increases compression<br />
damping which “locks-out” the shock. For the other option, the lever is in line with the shock in the normal position.<br />
Moving the lever 180° in either direction increases compression damping. The increased compression damping<br />
setting will be firm but will “blow-off” under a big hit or heavy load.<br />
9
FLOAT RL<br />
<strong>Shock</strong> Features<br />
Adjustable Air Spring - Internal Floating Piston - Oil Damping - Self Adjusting Air Negative Spring<br />
Nitrogen Charged - Speed Sensitive Compression Damping - Externally Adjustable Rebound Damping<br />
Speed Sensitive Rebound Valve Stack - Compression Lock-out with High Speed Blow-off<br />
Rebound Adjustment<br />
Please refer to Rebound Adjustment for FLOAT R.<br />
Compression Lock-out<br />
Please refer to Compression Lock-out instructions for Float L.<br />
Enduro FLOAT R & FLOAT RL<br />
The Enduro FLOAT R and Enduro FLOAT RL shocks feature a switch that adjusts travel. When the switch is in line<br />
with the shock, it is in Long Travel mode and has 1.875 inches of travel. When the switch is turned 90 o in either<br />
direction the shock changes to short travel mode and has 1.375 inches of travel. Spring Rate is also stiffer in short<br />
travel mode.<br />
Important - All air pressure adjustments, adding or releasing air pressure, must be done in the long travel mode.<br />
Sag should be set in the long travel position. (See page 8 for instructions on Adjusting Sag) If pressure is released<br />
when the shock is in the short travel mode it must be switched to long travel mode and pressurized to at least 10 psi<br />
greater than the starting pressure. For example, if the shock has 150 psi and the pressure is released in short travel<br />
mode, the shock must be switched to long travel mode and then pressurized to at least 160 psi. Pressure can then<br />
be released as long as the shock remains in long travel mode.<br />
The Enduro FLOAT R and Enduro FLOAT RL also feature a Rebound Adjuster Dial. Turning the dial clockwise slows<br />
the rebound. Counter-clockwise rotation speeds the rebound. Move the dial one click at a time until desired rebound<br />
is achieved.<br />
Travel Adjustment<br />
Rebound Adjuster<br />
Switch<br />
Switch in Short -Travel Position Switch in Long-Travel Position<br />
10
Air Volume Adjuster - AVA<br />
Some FLOAT shocks feature an Air Volume Adjuster or AVA. AVA technology affords a new level of fine tuning adjustment for<br />
mountain bike rear shocks. Turning the AVA ring increases or decreases the volume of the positive air spring chamber<br />
allowing the rider to alter the shape of the spring curve. The AVA system creates a shock that, in its smallest setting, is<br />
up to 30% more linear spring rate than a standard FLOAT shock. AVA allows as much as 200 lbs of adjustment in<br />
spring rate from fully closed to fully open when fully compressed.<br />
AVA is a pre-ride tuning feature. The AVA system is not intended to be used on the trail or on the fly.<br />
It is important to clean your shock, especially the threads of the AVA air sleeve prior to adjustment.<br />
In most cases, maximum air volume will be desired.<br />
Rotation of the AVA ring requires near complete deflation of<br />
the shock. Using a shock pump, let most or all of the air<br />
from the shock so that the AVA ring can be easily turned.<br />
Turn the ring until it just touches the wire ring which is<br />
snapped onto the air sleeve. This is the maximum volume<br />
setting. Pressurize the shock and set sag as normal. AVA<br />
does not affect sag. If the shock seems to bottom out too<br />
easily or too often, deflate the shock, rotate the ring to the<br />
next setting on the air sleeve. Pressurize the shock, set sag<br />
and test again for full stroke performance. Repeat this<br />
process until the setting that best fits your riding style and<br />
terrain is determined.<br />
Air sleeve service can be performed as on other FLOAT<br />
shocks. Clean AVA seals after every other normal FLOAT<br />
seal service, especially if riding conditions are muddy or<br />
dusty. Carefully remove wire rings and air sleeves. Clean<br />
and inspect seals and parts for damage or wear. Relubricate<br />
and carefully re-assemble. Refer to diagram for<br />
areas with critical sealing and lubrication needs.<br />
Wire Ring<br />
Critical Sealing Areas<br />
AVA Ring<br />
Travel Adjust Linear Air Spring - TALAS<br />
Some bicycles are equipped with <strong>FOX</strong> Racing Shox TALAS<br />
technology. TALAS stands for Travel Adjust Linear Air Spring.<br />
Travel can be adjusted changing the geometry of the bicycle<br />
to adapt to a wide variety of riding conditions and styles<br />
creating a versatile bicycle.<br />
To optimize the performance of the shock, it is important to<br />
set it up correctly. Take the time to tune the spring rate (air<br />
pressure), rebound damping (rate at which the shock returns)<br />
and become familiar with the performance of the shock.<br />
To set the air pressure on your TALAS equipped shock, see<br />
page 8 about setting sag. Sag should be set with the shock in<br />
the EXTEND position.<br />
Three Positions<br />
EXTEND<br />
-1/4<br />
-1/2<br />
EXTEND to<br />
TALAS <strong>Rear</strong> <strong>Shock</strong><br />
Adjustments<br />
-1/4<br />
Ye s<br />
-1/4<br />
to -1/2<br />
Ye s<br />
-1/2<br />
to EXTEND Ye s<br />
-1/2<br />
to -1/4<br />
No<br />
The TALAS shock has three (3) settings - EXTEND, -1/4 and -<br />
1/2. The -1/4 and -1/2 settings shorten the eye-to-eye length<br />
of the shock which will change the geometry of the bicycle.<br />
Rotate the lever to EXTEND for full extension. Rotate the lever<br />
one(1) click to the -1/4 position. The next time there is input<br />
into the shock, it will shorten 1/4”. Rotate the lever one(1)<br />
more click to -1/2. The overall eye-to-eye length of the shock<br />
will be 1/2” shorter. To fully extend the shock, rotate the lever<br />
to EXTEND, stand up and unweight the back of the bicycle.<br />
This will allow the shock to return to full extension.<br />
Contact <strong>FOX</strong> Racing Shox or an Authorized Service Center<br />
regarding service and repairs for TALAS equipped shocks.<br />
11
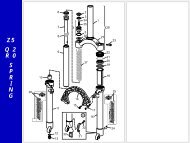
Air Sleeve Maintenance See www.foxracingshox.com for downloadable video instructions.<br />
Release all air pressure from Air Valve.<br />
Cycle shock a few times to release pressure from the air negative spring.<br />
Release all air pressure from Air Valve again.<br />
Remove shock from bike<br />
Remove aluminum reducers.<br />
Clamp shaft eyelet in a vise with soft jaws being careful not to crush the air valve, lock out lever, or rebound knob.<br />
Slide a screwdriver or punch through the body eyelet to keep the air sleeve from coming off the body.<br />
Loosen air sleeve by turning counter clockwise and slide it down the body.<br />
Remove screwdriver or punch.<br />
DAMPER<br />
ASSEMBLY<br />
GREASE LIBERALLY<br />
THREADS FOR AIR SLEEVE<br />
REDUCER<br />
SHAFT<br />
REDUCER<br />
SHAFT EYELET<br />
BODY EYELET<br />
SHOCK BODY<br />
BODY BEARING<br />
BODY SEAL<br />
BODY BEARING<br />
GREASE LIGHTLY<br />
AIR VALVE<br />
SHAFT EYELET O-RING<br />
GREASE BEARINGS, SEAL, & WIPER<br />
AIR SLEEVE WIPER<br />
AIR SLEEVE BEARING<br />
AIR SLEEVE BEARING<br />
AIR SLEEVE SEAL<br />
Cleaning and Inspecting<br />
Clean inside of the air sleeve with parts cleaner.<br />
Inspect the seal and bearing inside of the air sleeve.<br />
Replace if damaged or worn.<br />
Clean body, body seal, body bearings and shaft with parts cleaner.<br />
Inspect body seal and body bearings for wear or damage.<br />
Replace if damaged or worn.<br />
Greasing and Reassembling<br />
Lightly lube the shaft eyelet O-ring and shaft eyelet threads with FLOAT Fluid or Multi-purpose Lithium based grease<br />
(NLGI #2).<br />
Liberally lube the body seal and body bearing, leaving a reservoir of lube above the body bearing .<br />
Lightly grease the air sleeve seal, air sleeve bearing, and air sleeve wiper.<br />
Slide the air sleeve over the body until the air sleeve wiper is at the end of the body. Leave the air sleeve unthreaded<br />
at this time.<br />
(The air sleeve will be very difficult to compress because there is pressure trapped in the air negative chamber.<br />
Waiting until after the shock is mounted in the bike will allow the leverage of the bike to easily compress the shock.)<br />
Dry bushings and reducers.<br />
Install reducers in eyelet bushings.<br />
Install shock in bike.<br />
Carefully compress shock until you can screw on the air sleeve. Do not let the air sleeve slip off the body.<br />
Thread air sleeve onto shaft eyelet.<br />
Inflate shock using inflation instructions listed in the Pump Instructions.<br />
Note: If needed, the Air Sleeve Seal Kit part number is 803-00-050-B.<br />
12<br />
FLOAT Fluid part numbers: 025-03-002-A 5 cc Pillow Pack<br />
025-03-003-A 8 oz. Bottle
Specialized Bicycles with Brain and Brain Adjust Technology<br />
Your Specialized bicycle features a <strong>FOX</strong> Racing Shox FLOAT R with Brain Technology. This technology senses bumps<br />
in the trail and activates the suspension as necessary giving the rider the efficiency of a hardtail with all the benefits<br />
of a full suspension bicycle.<br />
To optimize the performance of the shock, it is important to set it up correctly. Taking the time to tune the spring rate<br />
(air pressure) and rebound damping (rate at which the shock returns) will greatly enhance the riding experience.<br />
Setting Air Pressure<br />
Set the air pressure according to the air spring chart below.<br />
1. Find the rider’s weight in the left column and set air pressure per the middle column.<br />
2. Set the rebound dial per the column on the right of the air spring chart.<br />
With the air pressure set appropriately, go out for a ride. The shock should achieve full travel (bottom out) once or<br />
twice during a normal ride. If the shock bottoms excessively, increase air pressure by 5psi. If it doesn’t reach full<br />
travel decrease air pressure by 5psi.<br />
Setting Rebound<br />
Rebound damping controls the rate at which the shock returns after it has compressed. The<br />
red adjuster dial is used to speed up or slow down the rebound damping.<br />
1. Turn the Rebound Adjuster Dial clockwise until it stops. This is the slowest setting.<br />
2. Consult the air pressure chart below and find the rider’s weight in the left column. Read<br />
across to the column on the right and find the corresponding number of clicks and set the<br />
Rebound Adjuster Dial accordingly by turning the dial counter-clockwise and counting the<br />
number of clicks. See page 9 for further information about setting rebound.<br />
Bump Threshold Adjustment<br />
Some Brain-equipped shocks feature a bump threshold adjustment. This changes the<br />
Brain’s sensitivity to bumps allowing a firmer (race) or softer (comfy) ride. Not all Brain<br />
shocks feature this adjustment.<br />
1. Rotate the blue lever at the base of the Brain away from the wheel to increase the bump<br />
threshold. This will make the Brain less sensitive thus requiring a larger bump to activate.<br />
2. Rotate the blue lever towards the wheel to decrease the bump threshold. This will<br />
increase the sensitivity of the Brain. Smaller bumps will now activate the suspension.<br />
Blue<br />
Lever<br />
More<br />
sensitive<br />
Less<br />
sensitive<br />
Air sleeve service can be performed as on other <strong>FOX</strong> Racing Shox FLOAT rear shocks. See page 12 for details. The<br />
strut on Epic shocks must be removed before removing the air sleeve. A 22mm open end wrench is required to<br />
remove the strut. Torque to 175-200 in-lb (19.5-22.5 N-m) when reinstalling. A 22mm crowfoot attachment and a<br />
torque wrench are required to install the strut.<br />
Note: Repairs and warranty issues related to the <strong>FOX</strong> FLOAT R shock with Brain Technology must be performed<br />
through an Authorized Specialized Dealer in your country. Please contact your Specialized Dealer for service, repair or<br />
warranty issues regarding your Specialized bicycle.<br />
Rider lbs<br />
and (kg)<br />
Air Pressure<br />
PSI<br />
Rebound<br />
clicks from<br />
closed<br />
90-100 (41-45)<br />
100-110 (45-50)<br />
110-120 (50-54)<br />
120-130 (54-60)<br />
130-140 (60-64)<br />
140-150 (64-68)<br />
150-160 (68-73)<br />
160-170 (73-77)<br />
170-180 (77-82)<br />
180-190 (82-86)<br />
190-200 (86-91)<br />
200-210 (91-95)<br />
210-220 (95-100)<br />
220-230 (100-104)<br />
230-240 (104-109)<br />
240-250 (109-113)<br />
250-265 (113-120)<br />
265-280 (120-127)<br />
280-295 (127-134)<br />
60-62<br />
62-65<br />
65-68<br />
68-71<br />
71-74<br />
74-79<br />
79-84<br />
84-89<br />
89-94<br />
94-99<br />
99-104<br />
104-114<br />
114-124<br />
124-134<br />
134-144<br />
144-154<br />
154-169<br />
169-184<br />
184-199<br />
21-20<br />
21-20<br />
20-18<br />
20-18<br />
18-16<br />
18-16<br />
18-16<br />
16-14<br />
16-14<br />
16-14<br />
14-12<br />
14-12<br />
14-12<br />
12-10<br />
12-10<br />
10-8<br />
10-8<br />
8-6<br />
6-4<br />
Travel Indicator<br />
O-ring<br />
Schrader Valve<br />
Rebound Adjuster Dial<br />
13
K2 Razorback Pull <strong>Shock</strong><br />
The K2 Razorback is equipped with a <strong>FOX</strong> Racing Shox FLOAT RL Pull <strong>Shock</strong>. Follow the instructions below to<br />
properly adjust the shock.<br />
Air Spring Pressure Adjustment<br />
To get the best performance from your K2 Razorback, it is necessary to adjust the suspension.<br />
The first step is to adjust the air pressure.<br />
The proper air pressure is a personal preference and varies upon your weight and riding style. During the first few<br />
rides you may want to adjust the air pressure to find your personal preference.<br />
Set air pressure (psi) equal to your body weight as a starting point. If necessary, adjust in 5psi increments to<br />
suit your personal preference.<br />
The valve closest to the bike is the air spring valve (Fig. 1).<br />
The valve that is located near the red rebound adjuster knob is a bleed valve (Fig. 1) and should always be set to 0 Psi.<br />
Do not use the spring chart on the chainstay of your bicycle. The air pressures listed may be too low and your<br />
suspension will not function properly.<br />
Rebound Adjustment<br />
All K2 Razorbacks have a shock with rebound adjustment.<br />
Rebound damping is adjusted by the red rebound adjuster knob.<br />
Rebound damping controls the speed at which the shock returns to its original position after the shock is compressed.<br />
The shock has 12 clicks of adjustment from fully closed. Turning the knob clockwise will cause the rebound to be slower.<br />
The proper rebound setting is a personal preference and varies upon your weight and riding style.<br />
Experts agree that rebound should be as fast as possible without kicking back and pushing the rider off the saddle<br />
when riding the bike in rough terrain. If rebound is set too slow, the suspension will not have the time to extend<br />
before hitting the next bump<br />
Note: When the red rebound wheel is advanced to positions towards full in, or full clock-wise, the blue lock-out lever<br />
will feel slack or such that minimal or no force is applied by the adjuster rod. This is not a functional fault.<br />
Lockout lever<br />
All Razorbacks come with a shock that has a lock-out<br />
lever (Fig. 2).<br />
The purpose of the lockout lever is to eliminate suspension<br />
movement when desired by the rider.<br />
The shock comes with a safety blow-off valve. If the bump<br />
force on the rear wheel is high enough the blow-off valve will<br />
open and the shock will compress.<br />
Bleed Valve<br />
R ider Weight Air Pressure (psi)<br />
90-100<br />
90-100<br />
100-110<br />
100-110<br />
Air Spring Valve<br />
Fig. 1<br />
Air Spring Valve<br />
110-120<br />
110-120<br />
120-130<br />
120-130<br />
130-140<br />
130-140<br />
140-150<br />
140-150<br />
150-160<br />
150-160<br />
160-170<br />
160-170<br />
170-180<br />
170-180<br />
180-190<br />
180-190<br />
190-200+<br />
190-200+<br />
Rebound Adjuster<br />
Lockout Lever<br />
Fig. 2<br />
14
Remote Lock-Out Instructions<br />
Clean eyelet and air sleeve with degreaser.<br />
Set shock lock-out to locked-out position. Fig. 2<br />
Remove lever with a 5/64 (or 2mm) hex key.<br />
DO NOT REMOVE CAM. DO NOT LOOSEN<br />
SET SCREWS.<br />
Place adapter plate on the eyelet and over<br />
the cam (M.Y. 2000 & 2001 only). Fig. 1<br />
New Remote Lever<br />
Torsion Spring<br />
Adapter Plate<br />
Cam<br />
Fig. 1 Adapter Plate, Spring and Lever Installation<br />
Insert torsion spring in corresponding hole on plate or eyelet. Fig. 1<br />
Position new remote lever over cam onto torsion spring arm. Fig. 1<br />
Rotate remote lever counter-clockwise to preload the spring and align the flat. Tighten set screw onto the flat of the<br />
cam. Fig. 3<br />
Attach cable stop collar onto air sleeve flange. Orient cable stop just off center. (Fig. 3) Overtightening the collar can<br />
crush the air sleeve. Tighten collar only until it is secure and does not rotate on air sleeve.<br />
Let air out of shock and cycle to full bottom out. Check clearances of all parts in compressed and extended positions.<br />
Cut cable and housing to length. Use only derailleur cable and housing. (1.1mm stainless cable is recommended)<br />
Run cable around radius on remote lever and through the hole. Push cable through housing and route along frame<br />
to cable stop collar and around remote lockout lever. Apply tension on cable and tighten set screw to hold the cable -<br />
DO NOT OVERTIGHTEN. Fig. 3<br />
Compression<br />
DampingClosed<br />
Adjust cable tension with the barrel<br />
+/-45 o Levers<br />
adjuster at handlebar mounted lever.<br />
Eyelet<br />
Compression<br />
DampingClosed<br />
Compression<br />
Damping<br />
Open<br />
Compression<br />
Damping Open<br />
Air Sleeve<br />
1/8”-5/16”<br />
3.0mm-8.0mm<br />
Cable Stop Collar<br />
0 o / 180 o<br />
Levers<br />
Remote Lock-Out Lever Installation Instructions<br />
The remote lock-out lever can be installed above or below the handlebar on either the left or right side. The lever<br />
comes pre-assemled to be mounted on top of the handlebar on the right side.<br />
To re-orient the lever, remove the lever assembly from the clamp assembly with a 2mm (or 5/64) hex wrench.<br />
Mount clamp assembly in desired location and re-mount lever assembly.<br />
DO NOT OVERTIGHTEN mounting screws.<br />
To adjust lever friction, use a 3mm hex wrench to tighten or loosen the button head screw in the middle of the lever<br />
housing. Use an 8mm (or 5/16) socket to hold the nut on the bottom of the lever housing.<br />
15
R<br />
Vanilla <strong>Shock</strong>s<br />
To get the best performance from your Vanilla shock, it is necessary to adjust sag. On the coil-over shocks this is done<br />
by adjusting the spring preload or changing springs. Sag is how much the shock compresses when you sit on the bicycle.<br />
Increasing spring preload will make the shock compress less. Decreasing the preload will make the shock compress<br />
more. The smoothest ride will be achieved with one turn of preload. (Note: it might be necessary to change spring rate<br />
to achieve the proper sag setting.) Adjusting sag setting is easiest with two people, the bike rider and an assistant.<br />
Adjusting Sag<br />
<strong>Shock</strong><br />
Travel<br />
Vanilla Sag Table<br />
Recommended Sag<br />
If more than 2 turns of preload are required to achieve<br />
the correct amount of sag, it is recommended that a<br />
higher rate spring be installed.<br />
( inches) ( millimeters ) ( inches)<br />
(millimeters )<br />
1.00<br />
1.25<br />
1.50<br />
1.75<br />
2.00<br />
2.25<br />
2.50<br />
2.75<br />
25.4<br />
31.7<br />
38.1<br />
44.4<br />
50.8<br />
57.1<br />
63.5<br />
69.9<br />
.25<br />
.31<br />
.38<br />
.44<br />
.50<br />
.56<br />
.63<br />
.69<br />
6.4<br />
7.9<br />
9.5<br />
11.1<br />
12.7<br />
14.3<br />
15.9<br />
17.5<br />
To set the preload, you need to adjust the spring preload ring. <strong>FOX</strong> Racing Shox recommends no more than 2 turns of<br />
preload. Adjust preload by turning the preload ring onto the body. Clockwise turns increase preload, which decreases<br />
the sag. Counterclockwise turns decrease preload, which increases sag.<br />
If desired preload cannot be achieved with the preload ring, change the spring (See Installing and Removing Springs).<br />
A stiffer spring (higher spring rate) decreases sag. A softer spring (lower spring rate) increases sag.<br />
Springs are available from <strong>FOX</strong> Racing Shox as well as authorized dealers and service centers. Numbers are<br />
printed on the outside of the spring coils indicating the rate (in pounds) and travel (in inches). Example: 550-1.95 is a<br />
550 pound-per-inch spring rate with 1.95 inches of travel. Please note this number when ordering replacement springs.<br />
Also be prepared with the make, model, and year of bicycle, shock travel, rider weight and riding style.<br />
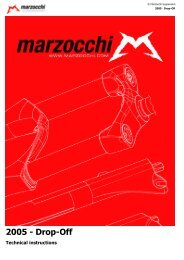
Installing and Removing Springs<br />
To remove the spring from your shock, follow these steps:<br />
Vanilla, Vanilla R & Vanilla RL<br />
Loosen and remove the preload ring from the body.<br />
Note: It might be necessary to remove the reducers from<br />
the body end of the shock to remove the spring.<br />
Slide the spring over the shock body.<br />
Install your new spring by sliding the spring over the<br />
shock body.<br />
Tighten the preload adjuster one full turn to keep the<br />
preload ring from shaking loose.<br />
S<br />
L<br />
O<br />
W<br />
E<br />
SPRING<br />
(SLIDE OVER BODY)<br />
BODY<br />
REDUCER<br />
REDUCER<br />
PRELOAD RING<br />
(REMOVE FROM BODY)<br />
SLOTTED REDUCER<br />
Vanilla RC<br />
SPRING<br />
RETAINER<br />
Back off preload ring to loosen the spring until the<br />
slotted spring retainer can be removed from the shock.<br />
Note: It might be necessary to remove the reducers from<br />
the shaft end of the shock to remove the spring.<br />
Slide the spring over the eyelet.<br />
Slide the new spring on over the eyelet, and re-install the<br />
spring retainer.<br />
SHAFT EYELET<br />
Note: The slotted spring ring retainer slot must rest on<br />
REDUCER<br />
the flat side of the spring. If the slot is straddling the gap<br />
caused by the end of the spring wire the slotted spring<br />
retainer may bend.<br />
Tighten the preload adjuster one full turn to keep the<br />
spring retainer from shaking loose.<br />
Align the slotted spring retainer so that the rebound<br />
knob is in the middle of the slot.<br />
S LOWER<br />
SPRING (SLIDE OVER SHAFT EYELET)<br />
PRELOAD RING<br />
(LOOSEN TO REMOVE SPRING)<br />
HAR<br />
D<br />
E R<br />
16
Vanilla<br />
<strong>Shock</strong> Features<br />
Adjustable Spring Preload - External Coil Spring - Internal Floating Piston - Oil Damping<br />
One Piece Aluminum Body - One Piece Eyelet - Nitrogen Charged - Speed Sensitive Compression Damping<br />
Vanilla R<br />
<strong>Shock</strong> Features<br />
Adjustable Spring Preload - External Coil Spring - Internal Floating Piston - Oil Damping<br />
One Piece Aluminum Body - One Piece Eyelet - Nitrogen Charged - Speed Sensitive Compression Damping<br />
Multi-Valve Piston - 12 Click Externally Adjustable Rebound Damping - Speed Sensitive Rebound Valve Stack<br />
REBOUND ADJUSTER<br />
KNOB (RED)<br />
Rebound Adjustment<br />
Rebound damping controls the rate at which the shock returns after it has been compressed. The red adjuster dial<br />
can be turned clockwise for slower rebound and counter-clockwise for faster rebound. There is a wide range of<br />
adjustment enabling the rider to tune the shock to any air pressure and riding condition. The proper rebound setting<br />
is a personal preference and varies depending on rider weight, riding style and riding conditions. As a general rule,<br />
rebound should be as fast as possible without kicking back and pushing the rider off the saddle when riding the<br />
bicycle in rough terrain. If rebound is too slow the suspension will not function properly and the wheel will not follow<br />
the changing terrain. Determining the proper rebound setting may take a number of rides. Use the “curb test” to start<br />
dialing in your rebound setting. Do this test on flat ground where there is little auto traffic and plenty of room. Ride at<br />
normal cruising speed and stay seated. Ride off a curb and monitor the rebound. If the bike oscillates a few times<br />
after landing the rebound is too fast. If the shock does not return promptly it is too slow. Start with the dial in the<br />
middle (about 12 clicks from full slow) and adjust 4 clicks in the direction needed. Single clicks of adjustment can be<br />
used to fine tune the rebound damping. During the first few rides, adjust the rebound damping and note the different<br />
ride characteristics. Your rebound damping setting may change with different riding conditions.<br />
17
Vanilla RC<br />
<strong>Shock</strong> Features<br />
Adjustable Spring Preload - External Coil Spring - Internal Floating Piston - Oil Damping<br />
One Piece Aluminum Body - One Piece Eyelet - Nitrogen Charged - Speed Sensitive Compression Damping<br />
Multi-Valve Piston - 12 Click Externally Adjustable Rebound Damping - Speed Sensitive Rebound Valve Stack<br />
Piggy Back Remote Reservoir - 12 Click Externally Adjustable Compression Damping<br />
Rebound Adjustment<br />
Please refer to Rebound Adjustment for Vanilla R.<br />
Compression Damping<br />
Compression damping on the Vanilla RC is adjusted by turning the blue knob. To make the shock harder to compress,<br />
turn the knob clockwise. Turn the knob counter-clockwise for easier compression. Adjust the compression on the first few<br />
rides and note the different characteristics. Your settings may change with different conditions. The smoothest ride will be<br />
attained with the compression adjuster in the softest setting.<br />
605-00-028-A 2003 <strong>FOX</strong> Racing Shox. <strong>2004</strong> <strong>Rear</strong> <strong>Shock</strong> Owner’s <strong>Manual</strong>. The information herein is provided as a guide. <strong>FOX</strong> Racing Shox<br />
reserves the right to change all or part without notice.<br />
18