2004 Rear Shock Owner's Manual - FOX - Birota
2004 Rear Shock Owner's Manual - FOX - Birota
2004 Rear Shock Owner's Manual - FOX - Birota

Create successful ePaper yourself
Turn your PDF publications into a flip-book with our unique Google optimized e-Paper software.
R<br />
Vanilla <strong>Shock</strong>s<br />
To get the best performance from your Vanilla shock, it is necessary to adjust sag. On the coil-over shocks this is done<br />
by adjusting the spring preload or changing springs. Sag is how much the shock compresses when you sit on the bicycle.<br />
Increasing spring preload will make the shock compress less. Decreasing the preload will make the shock compress<br />
more. The smoothest ride will be achieved with one turn of preload. (Note: it might be necessary to change spring rate<br />
to achieve the proper sag setting.) Adjusting sag setting is easiest with two people, the bike rider and an assistant.<br />
Adjusting Sag<br />
<strong>Shock</strong><br />
Travel<br />
Vanilla Sag Table<br />
Recommended Sag<br />
If more than 2 turns of preload are required to achieve<br />
the correct amount of sag, it is recommended that a<br />
higher rate spring be installed.<br />
( inches) ( millimeters ) ( inches)<br />
(millimeters )<br />
1.00<br />
1.25<br />
1.50<br />
1.75<br />
2.00<br />
2.25<br />
2.50<br />
2.75<br />
25.4<br />
31.7<br />
38.1<br />
44.4<br />
50.8<br />
57.1<br />
63.5<br />
69.9<br />
.25<br />
.31<br />
.38<br />
.44<br />
.50<br />
.56<br />
.63<br />
.69<br />
6.4<br />
7.9<br />
9.5<br />
11.1<br />
12.7<br />
14.3<br />
15.9<br />
17.5<br />
To set the preload, you need to adjust the spring preload ring. <strong>FOX</strong> Racing Shox recommends no more than 2 turns of<br />
preload. Adjust preload by turning the preload ring onto the body. Clockwise turns increase preload, which decreases<br />
the sag. Counterclockwise turns decrease preload, which increases sag.<br />
If desired preload cannot be achieved with the preload ring, change the spring (See Installing and Removing Springs).<br />
A stiffer spring (higher spring rate) decreases sag. A softer spring (lower spring rate) increases sag.<br />
Springs are available from <strong>FOX</strong> Racing Shox as well as authorized dealers and service centers. Numbers are<br />
printed on the outside of the spring coils indicating the rate (in pounds) and travel (in inches). Example: 550-1.95 is a<br />
550 pound-per-inch spring rate with 1.95 inches of travel. Please note this number when ordering replacement springs.<br />
Also be prepared with the make, model, and year of bicycle, shock travel, rider weight and riding style.<br />
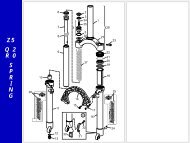
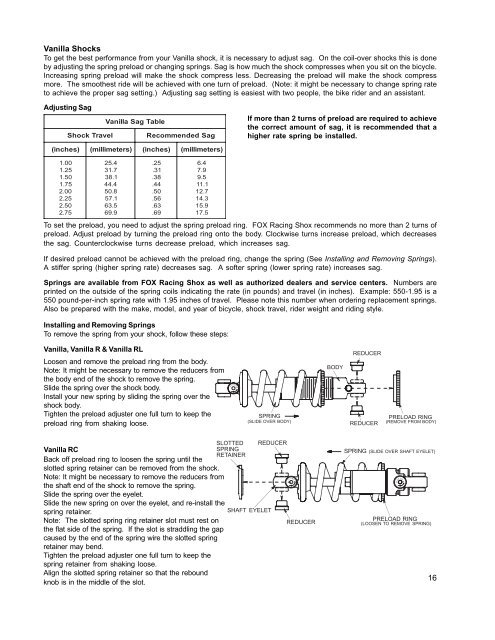
Installing and Removing Springs<br />
To remove the spring from your shock, follow these steps:<br />
Vanilla, Vanilla R & Vanilla RL<br />
Loosen and remove the preload ring from the body.<br />
Note: It might be necessary to remove the reducers from<br />
the body end of the shock to remove the spring.<br />
Slide the spring over the shock body.<br />
Install your new spring by sliding the spring over the<br />
shock body.<br />
Tighten the preload adjuster one full turn to keep the<br />
preload ring from shaking loose.<br />
S<br />
L<br />
O<br />
W<br />
E<br />
SPRING<br />
(SLIDE OVER BODY)<br />
BODY<br />
REDUCER<br />
REDUCER<br />
PRELOAD RING<br />
(REMOVE FROM BODY)<br />
SLOTTED REDUCER<br />
Vanilla RC<br />
SPRING<br />
RETAINER<br />
Back off preload ring to loosen the spring until the<br />
slotted spring retainer can be removed from the shock.<br />
Note: It might be necessary to remove the reducers from<br />
the shaft end of the shock to remove the spring.<br />
Slide the spring over the eyelet.<br />
Slide the new spring on over the eyelet, and re-install the<br />
spring retainer.<br />
SHAFT EYELET<br />
Note: The slotted spring ring retainer slot must rest on<br />
REDUCER<br />
the flat side of the spring. If the slot is straddling the gap<br />
caused by the end of the spring wire the slotted spring<br />
retainer may bend.<br />
Tighten the preload adjuster one full turn to keep the<br />
spring retainer from shaking loose.<br />
Align the slotted spring retainer so that the rebound<br />
knob is in the middle of the slot.<br />
S LOWER<br />
SPRING (SLIDE OVER SHAFT EYELET)<br />
PRELOAD RING<br />
(LOOSEN TO REMOVE SPRING)<br />
HAR<br />
D<br />
E R<br />
16