2004 Rear Shock Owner's Manual - FOX - Birota
2004 Rear Shock Owner's Manual - FOX - Birota
2004 Rear Shock Owner's Manual - FOX - Birota

Create successful ePaper yourself
Turn your PDF publications into a flip-book with our unique Google optimized e-Paper software.
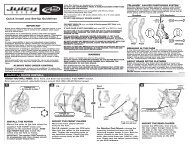
Remote Lock-Out Instructions<br />
Clean eyelet and air sleeve with degreaser.<br />
Set shock lock-out to locked-out position. Fig. 2<br />
Remove lever with a 5/64 (or 2mm) hex key.<br />
DO NOT REMOVE CAM. DO NOT LOOSEN<br />
SET SCREWS.<br />
Place adapter plate on the eyelet and over<br />
the cam (M.Y. 2000 & 2001 only). Fig. 1<br />
New Remote Lever<br />
Torsion Spring<br />
Adapter Plate<br />
Cam<br />
Fig. 1 Adapter Plate, Spring and Lever Installation<br />
Insert torsion spring in corresponding hole on plate or eyelet. Fig. 1<br />
Position new remote lever over cam onto torsion spring arm. Fig. 1<br />
Rotate remote lever counter-clockwise to preload the spring and align the flat. Tighten set screw onto the flat of the<br />
cam. Fig. 3<br />
Attach cable stop collar onto air sleeve flange. Orient cable stop just off center. (Fig. 3) Overtightening the collar can<br />
crush the air sleeve. Tighten collar only until it is secure and does not rotate on air sleeve.<br />
Let air out of shock and cycle to full bottom out. Check clearances of all parts in compressed and extended positions.<br />
Cut cable and housing to length. Use only derailleur cable and housing. (1.1mm stainless cable is recommended)<br />
Run cable around radius on remote lever and through the hole. Push cable through housing and route along frame<br />
to cable stop collar and around remote lockout lever. Apply tension on cable and tighten set screw to hold the cable -<br />
DO NOT OVERTIGHTEN. Fig. 3<br />
Compression<br />
DampingClosed<br />
Adjust cable tension with the barrel<br />
+/-45 o Levers<br />
adjuster at handlebar mounted lever.<br />
Eyelet<br />
Compression<br />
DampingClosed<br />
Compression<br />
Damping<br />
Open<br />
Compression<br />
Damping Open<br />
Air Sleeve<br />
1/8”-5/16”<br />
3.0mm-8.0mm<br />
Cable Stop Collar<br />
0 o / 180 o<br />
Levers<br />
Remote Lock-Out Lever Installation Instructions<br />
The remote lock-out lever can be installed above or below the handlebar on either the left or right side. The lever<br />
comes pre-assemled to be mounted on top of the handlebar on the right side.<br />
To re-orient the lever, remove the lever assembly from the clamp assembly with a 2mm (or 5/64) hex wrench.<br />
Mount clamp assembly in desired location and re-mount lever assembly.<br />
DO NOT OVERTIGHTEN mounting screws.<br />
To adjust lever friction, use a 3mm hex wrench to tighten or loosen the button head screw in the middle of the lever<br />
housing. Use an 8mm (or 5/16) socket to hold the nut on the bottom of the lever housing.<br />
15