77B91 El Grande Rollerball & Fountain Pen Kits ... - Woodcraft
77B91 El Grande Rollerball & Fountain Pen Kits ... - Woodcraft
77B91 El Grande Rollerball & Fountain Pen Kits ... - Woodcraft

Create successful ePaper yourself
Turn your PDF publications into a flip-book with our unique Google optimized e-Paper software.
<strong>77B91</strong><br />
<strong>El</strong> <strong>Grande</strong><br />
<strong>Rollerball</strong> & <strong>Fountain</strong> <strong>Pen</strong> <strong>Kits</strong><br />
Product #144632, 144633, 149179, 822948<br />
Revised<br />
12/31/09<br />
1. Cutting Blanks<br />
Cut two blanks ¾" x ¾", and each slightly longer than the two<br />
provided brass tubes. One blank will be approximately 1¾" long<br />
(pen top), the other approximately 2 1 /16" long (pen bottom).<br />
2. Drilling Blanks<br />
Using a 33 /64" bit (128465) drill a hole lengthwise through the<br />
center of the shorter blank (pen top). Repeat for the longer blank<br />
(pen bottom) using a 31 /64" bit (124672).<br />
3. Gluing Blanks to Tubes<br />
See General Instructions for details.<br />
4. Sanding Blanks to Length<br />
See General Instructions for details.<br />
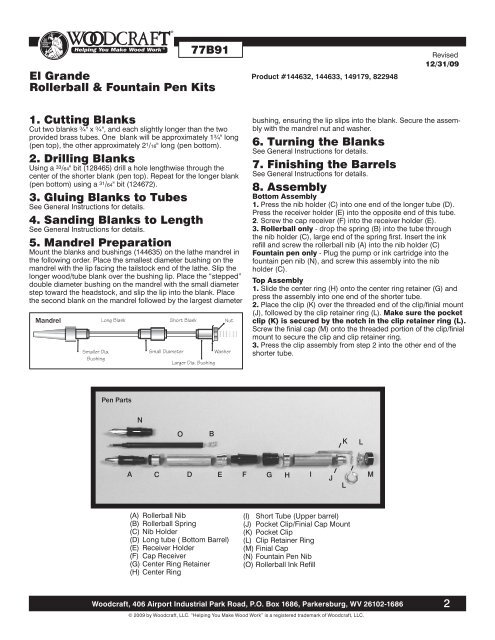
5. Mandrel Preparation<br />
Mount the blanks and bushings (144635) on the lathe mandrel in<br />
the following order. Place the smallest diameter bushing on the<br />
mandrel with the lip facing the tailstock end of the lathe. Slip the<br />
longer wood/tube blank over the bushing lip. Place the “stepped”<br />
double diameter bushing on the mandrel with the small diameter<br />
step toward the headstock, and slip the lip into the blank. Place<br />
the second blank on the mandrel followed by the largest diameter<br />
Mandrel<br />
bushing, ensuring the lip slips into the blank. Secure the assembly<br />
with the mandrel nut and washer.<br />
6. Turning the Blanks<br />
See General Instructions for details.<br />
7. Finishing the Barrels<br />
See General Instructions for details.<br />
8. Assembly<br />
Bottom Assembly<br />
1. Press the nib holder (C) into one end of the longer tube (D).<br />
Press the receiver holder (E) into the opposite end of this tube.<br />
2. Screw the cap receiver (F) into the receiver holder (E).<br />
3. <strong>Rollerball</strong> only - drop the spring (B) into the tube through<br />
the nib holder (C), large end of the spring first. Insert the ink<br />
refill and screw the rollerball nib (A) into the nib holder (C)<br />
<strong>Fountain</strong> pen only - Plug the pump or ink cartridge into the<br />
fountain pen nib (N), and screw this assembly into the nib<br />
holder (C).<br />
Top Assembly<br />
1. Slide the center ring (H) onto the center ring retainer (G) and<br />
press the assembly into one end of the shorter tube.<br />
2. Place the clip (K) over the threaded end of the clip/finial mount<br />
(J), followed by the clip retainer ring (L). Make sure the pocket<br />
clip (K) is secured by the notch in the clip retainer ring (L).<br />
Screw the finial cap (M) onto the threaded portion of the clip/finial<br />
mount to secure the clip and clip retainer ring.<br />
3. Press the clip assembly from step 2 into the other end of the<br />
shorter tube.<br />
<strong>Pen</strong> Parts<br />
N<br />
O<br />
B<br />
K<br />
L<br />
A C D E F G H I M<br />
J<br />
L<br />
(A) <strong>Rollerball</strong> Nib<br />
(B) <strong>Rollerball</strong> Spring<br />
(C) Nib Holder<br />
(D) Long tube ( Bottom Barrel)<br />
(E) Receiver Holder<br />
(F) Cap Receiver<br />
(G) Center Ring Retainer<br />
(H) Center Ring<br />
(I) Short Tube (Upper barrel)<br />
(J) Pocket Clip/Finial Cap Mount<br />
(K) Pocket Clip<br />
(L) Clip Retainer Ring<br />
(M) Finial Cap<br />
(N) <strong>Fountain</strong> <strong>Pen</strong> Nib<br />
(O) <strong>Rollerball</strong> Ink Refill<br />
<strong>Woodcraft</strong>, 406 Airport Industrial Park Road, P.O. Box 1686, Parkersburg, WV 26102-1686<br />
© 2009 by <strong>Woodcraft</strong>, LLC. “Helping You Make Wood Work” is a registered trademark of <strong>Woodcraft</strong>, LLC.<br />
2