Step 1: Step 2: Step 3: Step 4: 77C87 1 Caduceus Inlay Kit - Woodcraft
Step 1: Step 2: Step 3: Step 4: 77C87 1 Caduceus Inlay Kit - Woodcraft
Step 1: Step 2: Step 3: Step 4: 77C87 1 Caduceus Inlay Kit - Woodcraft

Create successful ePaper yourself
Turn your PDF publications into a flip-book with our unique Google optimized e-Paper software.
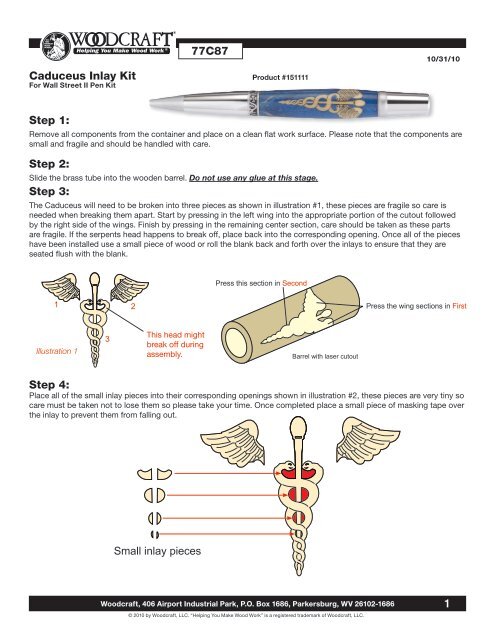
<strong>Caduceus</strong> <strong>Inlay</strong> <strong>Kit</strong>For Wall Street II Pen <strong>Kit</strong><strong>77C87</strong>Product #15111110/31/10<strong>Step</strong> 1:Remove all components from the container and place on a clean flat work surface. Please note that the components aresmall and fragile and should be handled with care.<strong>Step</strong> 2:Slide the brass tube into the wooden barrel. Do not use any glue at this stage.<strong>Step</strong> 3:The <strong>Caduceus</strong> will need to be broken into three pieces as shown in illustration #1, these pieces are fragile so care isneeded when breaking them apart. Start by pressing in the left wing into the appropriate portion of the cutout followedby the right side of the wings. Finish by pressing in the remaining center section, care should be taken as these partsare fragile. If the serpents head happens to break off, place back into the corresponding opening. Once all of the pieceshave been installed use a small piece of wood or roll the blank back and forth over the inlays to ensure that they areseated flush with the blank.Illustration 1This head mightbreak off duringassembly.<strong>Step</strong> 4:Place all of the small inlay pieces into their corresponding openings shown in illustration #2, these pieces are very tiny socare must be taken not to lose them so please take your time. Once completed place a small piece of masking tape overthe inlay to prevent them from falling out.<strong>Woodcraft</strong>, 406 Airport Industrial Park, P.O. Box 1686, Parkersburg, WV 26102-1686© 2010 by <strong>Woodcraft</strong>, LLC. “Helping You Make Wood Work” is a registered trademark of <strong>Woodcraft</strong>, LLC.1
<strong>Caduceus</strong> <strong>Inlay</strong> <strong>Kit</strong>For Wall Street II Pen <strong>Kit</strong><strong>77C87</strong>Product #15111110/31/10<strong>Step</strong> 5:Remove the brass tube and proceed by scuffing the exterior of the tube lightly with fine grit sandpaper. The brass tube isnow ready to be glued in, however before applying any adhesive ensure that the tube moves freely through the barrel. Ifthe barrel does not move freely you may need to sand the interior of the barrel slightly until the brass tube moves freely.Once the tube moves freely you are now ready to glue the tube to the barrel. We recommend using either a thick CA ora five minute epoxy for this process. It is critical to center the brass tube inside the barrel leaving equal amounts of thebarrel exposed on either end of the brass tube. Once cured, remove the masking tape. Clamp a piece of dowel rod intoyour vise and slide the barrel over the dowel. Using either a medium or thin CA glue apply a few drops of adhesive overthe inlay pieces keeping the glue to the edges staying clear of the cut lines of the wings and snake heads, this will ensureadhesion not only to the brass tube but to the individual pieces. Do not use accelerator. Allow the CA to cure naturally.Remove any adhesive that may have gotten on the inside of the brass tube.<strong>Step</strong> 6:Using a disk sander, square and sand the barrel to the length until you make contact with the brass tube ensuring not toshorten the overall length. Do Not Use a Barrel Trimmer For This Process.<strong>Step</strong> 7:Using the Wall St II bushings (#146597) mount the barrel and the bushings on the mandrel and place in the lathe. Use180 grit sandpaper to sand the barrel to the desired shape. Use progressively finer sandpaper until you are satisfied withthe finish. You may use a skew for this but make sure that it is very sharp to prevent unnecessary damage. You may alsouse a fine wood file for this as well. Remember that you are working with a blank made of many pieces. Proceed withcaution. Before you apply your finish rub some dark wood dust into the cut out lines on the wings and snake heads, thenseal it with thin CA to make the lines standout. Lightly sand and prepare for finish.<strong>Step</strong> 8:The barrel can now be finished. CA glues work well to fill any gaps and provides a great long lasting finish.<strong>Step</strong> 9:Follow your pen kit instructions to assemble your new pen.<strong>Woodcraft</strong>, 406 Airport Industrial Park, P.O. Box 1686, Parkersburg, WV 26102-1686© 2010 by <strong>Woodcraft</strong>, LLC. “Helping You Make Wood Work” is a registered trademark of <strong>Woodcraft</strong>, LLC.2