You also want an ePaper? Increase the reach of your titles
YUMPU automatically turns print PDFs into web optimized ePapers that Google loves.
<strong>Wall</strong> <strong>Street</strong> <strong>II</strong> <strong>Click</strong> <strong>Pen</strong> Kit<br />
77C52<br />
Revised<br />
06/30/12<br />
Product #148461, 148462, 149178, 149243, 150307, 150309,<br />
150546, 150864, 150865<br />
148461<br />
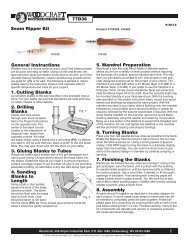
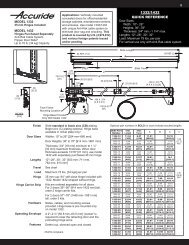
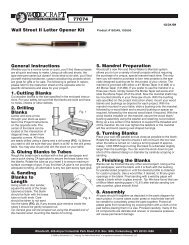
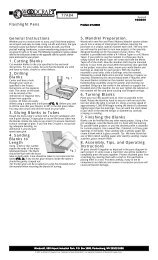
General Instructions<br />
Whether you’re a novice turner or a pro, you’ll find these projects<br />
are all quick and easy to make. Using cut-offs and shorts, the<br />
type everyone saves but doesn’t know what to do with, you’ll find<br />
yourself making handsome, custom woodturning projects which<br />
are great for gifts or for sale. The following is general in nature,<br />
please refer to the instruction sheet on the opposite side for<br />
specific dimensions and sizes for your project.<br />
1. Cutting Blanks<br />
Cut wooden blanks to the size specified in the enclosed instructions.<br />
For your safety, be sure that the blanks are solid and have<br />
no holes, checks or other defects.<br />
2. Drilling<br />
Blanks<br />
Center and bore a hole<br />
through your stock as specified<br />
in the Project Instructions<br />
on the opposite side. The<br />
center of the blank can be<br />
located at the intersection of<br />
diagonal lines, drawn from<br />
opposite corners. All holes<br />
Fig. 1<br />
are easily drilled using a clamp and a drill press (FIG. 1). Before<br />
you start to drill be sure that your blank is at 90° to the drill press<br />
table. You may also chuck and drill the stock on your lathe.<br />
3. Gluing Blanks to Tubes<br />
Rough the brass tube’s surface with a fine grit sandpaper and<br />
use a quick drying CA type glue to secure the brass tubes into<br />
the blanks. Rotate the tube as you insert it to ensure maximum<br />
surface coverage of glue. If you find that CA glue is not providing<br />
adequate bonding, an alternative is any two part epoxy type glue.<br />
4. Sanding<br />
Blanks to<br />
Length<br />
Using a belt or disc sander,<br />
square the ends of the brass<br />
tube/wood blank. The blank<br />
should be flush with the brass<br />
tube on both ends. Care<br />
Fig. 2<br />
should be taken to not sand<br />
into the tubes (FIG. 2). If any excess glue remains inside the<br />
tubes it should be gently scraped out.<br />
Tip: Excess glue can be scraped out using the threaded end of<br />
the mandrel when mounting the blanks for turning.<br />
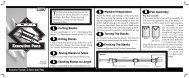
5. Mandrel Preparation<br />
<strong>Woodcraft</strong>’s new <strong>Pen</strong> and <strong>Pen</strong>cil Maker’s Mandrel system<br />
allows you to turn a variety of small projects without requiring<br />
the purchase of a unique, special mandrel each time. The only<br />
item you will need to purchase to turn new projects is the specially<br />
designed bushing set for the project of your choice. The<br />
mandrel is provided with either a #1 Morse Taper (141468) or a<br />
#2 Morse Taper (141469). If you prefer to use the mandrel in a<br />
three jaw chuck, simply loosen the Morse Taper set screw and<br />
slide the Morse Taper off of the shaft. Now the mandrel shaft may<br />
be mounted directly in your three jaw chuck. With the bushing<br />
sets specified on the project instruction sheet, mount your wood<br />
blanks and bushings as depicted for each project. With the<br />
mandrel mounted in your lathe, slide a bushing onto the mandrel,<br />
followed by a wood blank and a second bushing or spacer as<br />
required, followed by the second wood blank if required. With the<br />
wood blanks installed on the mandrel, secure the wood blank/<br />
bushing assembly using the washer and retaining nut provided.<br />
Bring up a live center in the tailstock to support the threaded end<br />
of the mandrel. Do not over tighten the tailstock or the mandrel<br />
will flex and bend causing oval shaped turnings.<br />
6. Turning Blanks<br />
Place your tool rest parallel and as close as possible to the blank.<br />
Rotate the blank by hand to ensure it will not touch the tool rest<br />
when the lathe is turned on. Using a turning speed of approximately<br />
1,000 RPM begin turning the blank to a diameter slightly<br />
larger than the bushings. You can work the stock down to just<br />
short of the desired design or diameter by carefully scraping or<br />
sanding.<br />
7. Finishing the Blanks<br />
Blanks can be finished like any other wood project. Using a fine<br />
grit sandpaper, sand the blank until it is flush with the bushing<br />
for parallel sided projects or until the desired profile is obtained<br />
for custom projects. Use a wood filler, if desired, to fill any grain<br />
openings in the blank. Final sanding with a wet/dry paper will<br />
create a blank which is glass smooth. Tip: We have found that use<br />
of Micro Mesh sanding paper (11L61) after wet/dry sanding creates<br />
a perfect, glass smooth finish.<br />
8. Assembly<br />
All parts should fit together as depicted in the parts diagram for<br />
each project. In some cases a pen press or machinists vise will<br />
be needed to completely press the parts together. Protect all<br />
plated parts from scratching by covering them with a cloth or thin<br />
pad before placing them in a vise. Proceed carefully, many of the<br />
kit components are delicate and uneven or excessive pressure<br />
will cause permanent damage.<br />
<strong>Woodcraft</strong>, 406 Airport Industrial Park, P.O. Box 1686, Parkersburg, WV 26102-1686<br />
© 2012 by <strong>Woodcraft</strong> Supply, LLC. “Helping You Make Wood Work” is a registered trademark of <strong>Woodcraft</strong> Supply, LLC.<br />
1
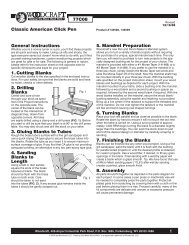
<strong>Wall</strong> <strong>Street</strong> <strong>II</strong> <strong>Click</strong> <strong>Pen</strong> Kit<br />
77C52<br />
Revised<br />
06/30/12<br />
Product #148461, 148462, 149178, 149243, 150307, 150309,<br />
150546, 150864, 150865<br />
1. Cutting Blanks<br />
Cut one blank 3 /4" x 3 /4" x 2 9 /16" long<br />
2. Drilling Blanks<br />
Using a 27 /64" bit, drill a hole lengthwise through the center of the<br />
blank.<br />
3. Gluing Blanks to Tubes<br />
See General Instructions for details.<br />
4. Sanding Blanks to Length<br />
See General Instructions for details.<br />
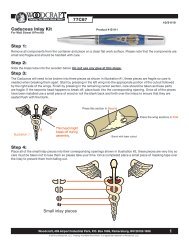
5. Mandrel Preparation<br />
This pen kit requires only two bushings. The bushings are identical.<br />
Slide one bushing on the mandrel with the lip of the bushing<br />
facing toward the tail stock, followed by the blank/tube assembly.<br />
Make sure the lip of the bushing seats inside the brass tube.<br />
Place the second bushing on the mandrel lip end first, again<br />
make sure the bushing lip seats inside the brass tube. If you are<br />
not using the <strong>Woodcraft</strong> Professional Mandrel you may have to<br />
Mandrel<br />
Tube Step<br />
Step Bushings<br />
Diameter Step<br />
make a wooden spacer to fill any gap on your mandrel between<br />
the bushings and blank assembly and threaded portion of your<br />
mandrel. Secure the bushings and blank assembly (and spacer<br />
if necessary) with the mandrel washer and nut.<br />
6. Turning the Blanks<br />
Turn the blank to match the outside diameter of the bushings.<br />
7. Finishing the Barrels<br />
See General Instructions for details.<br />
8. Assembly<br />
Style A: Press the Threaded Insert (B) into one end of the Turned<br />
Blank/Tube Assembly (C) until it is flush with the end of the tube.<br />
Next, using a sacrificial push-block with a 1 /4" hole, 3 /8" deep,<br />
press the Finial/Clip Assembly (D) into the opposite end of the<br />
tube. This will allow the pressing force to be placed on the Finial,<br />
not the Button. Slide the Spring (E) over the small end of the Refill<br />
(F) and insert the small pin of the Refill Adapter (G) into the hole<br />
in the center of the black upper end of the Refill (F). Insert this<br />
assembly spring end first into the Nib Assembly (A) and Screw<br />
the previously completed body onto the Nib Assembly.<br />
Style B: Press the Threaded Insert (B) into one end of the Turned<br />
Blank/Tube Assembly (C) until it is flush with the end of the tube.<br />
Next, using a sacrificial push-block with a 1 /4" hole, 3 /8" deep,<br />
press the Finial/Clip Assembly (D) into the opposite end of the<br />
tube. This will allow the pressing force to be placed on the Finial,<br />
not the Button. Slide the Spring (E) over the small end of the<br />
Refill (F) and insert into the Nib Assembly (A) spring end first and<br />
screw the previously completed body onto the Nib Assembly.<br />
Style A<br />
A B C D<br />
E F G<br />
Style B<br />
A B C D<br />
E<br />
F<br />
<strong>Woodcraft</strong>, 406 Airport Industrial Park, P.O. Box 1686, Parkersburg, WV 26102-1686<br />
© 2012 by <strong>Woodcraft</strong> Supply, LLC. “Helping You Make Wood Work” is a registered trademark of <strong>Woodcraft</strong> Supply, LLC.<br />
2