General Instructions 1. Cutting Blanks 2. Drilling Blanks ... - Woodcraft
General Instructions 1. Cutting Blanks 2. Drilling Blanks ... - Woodcraft
General Instructions 1. Cutting Blanks 2. Drilling Blanks ... - Woodcraft

You also want an ePaper? Increase the reach of your titles
YUMPU automatically turns print PDFs into web optimized ePapers that Google loves.
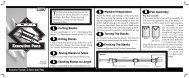
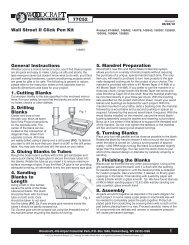
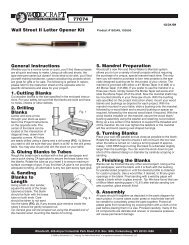
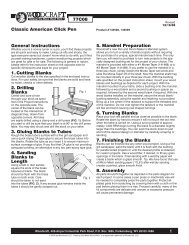
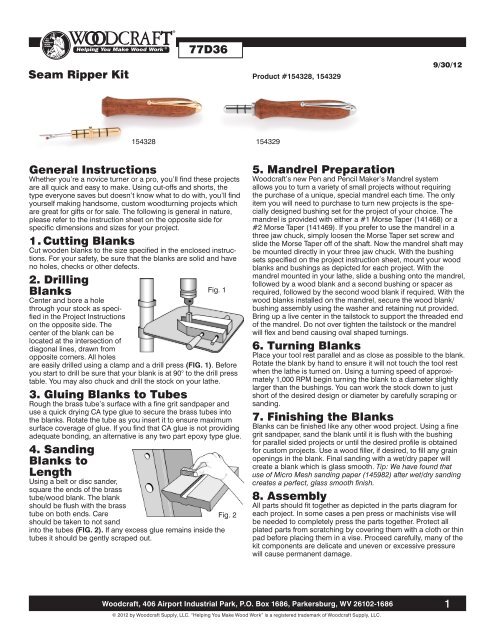
Seam Ripper Kit77D36Product #154328, 1543299/30/12154328 154329<strong>General</strong> <strong>Instructions</strong>Whether you’re a novice turner or a pro, you’ll find these projectsare all quick and easy to make. Using cut-offs and shorts, thetype everyone saves but doesn’t know what to do with, you’ll findyourself making handsome, custom woodturning projects whichare great for gifts or for sale. The following is general in nature,please refer to the instruction sheet on the opposite side forspecific dimensions and sizes for your project.<strong>1.</strong> <strong>Cutting</strong> <strong>Blanks</strong>Cut wooden blanks to the size specified in the enclosed instructions.For your safety, be sure that the blanks are solid and haveno holes, checks or other defects.<strong>2.</strong> <strong>Drilling</strong><strong>Blanks</strong>Center and bore a holethrough your stock as specifiedin the Project <strong>Instructions</strong>on the opposite side. Thecenter of the blank can belocated at the intersection ofdiagonal lines, drawn fromopposite corners. All holesFig. 1are easily drilled using a clamp and a drill press (FIG. 1). Beforeyou start to drill be sure that your blank is at 90° to the drill presstable. You may also chuck and drill the stock on your lathe.3. Gluing <strong>Blanks</strong> to TubesRough the brass tube’s surface with a fine grit sandpaper anduse a quick drying CA type glue to secure the brass tubes intothe blanks. Rotate the tube as you insert it to ensure maximumsurface coverage of glue. If you find that CA glue is not providingadequate bonding, an alternative is any two part epoxy type glue.4. Sanding<strong>Blanks</strong> toLengthUsing a belt or disc sander,square the ends of the brasstube/wood blank. The blankshould be flush with the brasstube on both ends. Careshould be taken to not sandinto the tubes (FIG. 2). If any excess glue remains inside thetubes it should be gently scraped out.Fig. 25. Mandrel Preparation<strong>Woodcraft</strong>’s new Pen and Pencil Maker’s Mandrel systemallows you to turn a variety of small projects without requiringthe purchase of a unique, special mandrel each time. The onlyitem you will need to purchase to turn new projects is the speciallydesigned bushing set for the project of your choice. Themandrel is provided with either a #1 Morse Taper (141468) or a#2 Morse Taper (141469). If you prefer to use the mandrel in athree jaw chuck, simply loosen the Morse Taper set screw andslide the Morse Taper off of the shaft. Now the mandrel shaft maybe mounted directly in your three jaw chuck. With the bushingsets specified on the project instruction sheet, mount your woodblanks and bushings as depicted for each project. With themandrel mounted in your lathe, slide a bushing onto the mandrel,followed by a wood blank and a second bushing or spacer asrequired, followed by the second wood blank if required. With thewood blanks installed on the mandrel, secure the wood blank/bushing assembly using the washer and retaining nut provided.Bring up a live center in the tailstock to support the threaded endof the mandrel. Do not over tighten the tailstock or the mandrelwill flex and bend causing oval shaped turnings.6. Turning <strong>Blanks</strong>Place your tool rest parallel and as close as possible to the blank.Rotate the blank by hand to ensure it will not touch the tool restwhen the lathe is turned on. Using a turning speed of approximately1,000 RPM begin turning the blank to a diameter slightlylarger than the bushings. You can work the stock down to justshort of the desired design or diameter by carefully scraping orsanding.7. Finishing the <strong>Blanks</strong><strong>Blanks</strong> can be finished like any other wood project. Using a finegrit sandpaper, sand the blank until it is flush with the bushingfor parallel sided projects or until the desired profile is obtainedfor custom projects. Use a wood filler, if desired, to fill any grainopenings in the blank. Final sanding with a wet/dry paper willcreate a blank which is glass smooth. Tip: We have found thatuse of Micro Mesh sanding paper (145982) after wet/dry sandingcreates a perfect, glass smooth finish.8. AssemblyAll parts should fit together as depicted in the parts diagram foreach project. In some cases a pen press or machinists vise willbe needed to completely press the parts together. Protect allplated parts from scratching by covering them with a cloth or thinpad before placing them in a vise. Proceed carefully, many of thekit components are delicate and uneven or excessive pressurewill cause permanent damage.<strong>Woodcraft</strong>, 406 Airport Industrial Park, P.O. Box 1686, Parkersburg, WV 26102-1686© 2012 by <strong>Woodcraft</strong> Supply, LLC. “Helping You Make Wood Work” is a registered trademark of <strong>Woodcraft</strong> Supply, LLC.1
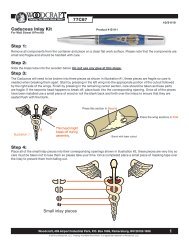
Seam Ripper Kit77D36Product #154328, 1543299/30/12<strong>1.</strong> <strong>Cutting</strong> <strong>Blanks</strong>Cut one blank 3 /4” x 3 /4” x 3 5 /16” long.<strong>2.</strong> <strong>Drilling</strong> <strong>Blanks</strong>Using a Letter “O” bit drill a hole lengthwise through the center ofthe blank. See <strong>General</strong> <strong>Instructions</strong> for details3. Gluing <strong>Blanks</strong> to TubesSee <strong>General</strong> <strong>Instructions</strong> for details.4. Sanding <strong>Blanks</strong> to LengthSee <strong>General</strong> <strong>Instructions</strong> for details.5. Mandrel PreparationThis kit requires bushing set #154330. The bushings are differentdiameters so placement is critical. Slide the smaller diameterbushing onto the mandrel (finial cap end) with the lip of thebushing facing the tailstock, followed by the tube/blank assembly.Make sure the lip of the bushing seats inside the brass tube.Place the larger diameter bushing (blade holder end) on themandrel lip end first, again making sure that the bushing lip seatsinside the brass tube. If you are not using the <strong>Woodcraft</strong> ProfessionalMandrel you may have to make a wooden spacer to fill anygap on your mandrel between the bushings and blank assemblyand threaded portion of your mandrel. Secure the bushingsand blank assembly (and spacer if necessary) with the mandrelwasher and nut.6. Turning the <strong>Blanks</strong>See <strong>General</strong> <strong>Instructions</strong> for details.7. Finishing the BarrelsSee <strong>General</strong> <strong>Instructions</strong> for details.8. AssemblyBegin the assembly process by sliding Clip (E) over the post ofthe Finial Cap (F) and press into the small end of the Blank TubeAssembly (D). Next take a small piece of fine grit sandpaper andsand the interior edges of the tube in the other end of the BlankTube Assembly (D). This is to remove any burrs or rough edgesthat could damage the O rings. Be sure to clean out any dirt ordebris once done. Roll one of the O rings (G) into each of the4 grooves on the Blade Holder (C). Slide the Seam Ripper Blade(A) small end first into the large end of the Threaded Blade Bushing(B). Place the Seam Ripper Blade Assembly (A, B) into theopen end of the Blade Holder (C) and thread into place.Mandrel Small bushing Large bushingSeam Ripper Kit Parts, Woodcvraft GoldCGDFABESeam Ripper Kit Parts, ChromeCGDFEAB<strong>Woodcraft</strong>, 406 Airport Industrial Park, P.O. Box 1686, Parkersburg, WV 26102-1686© 2012 by <strong>Woodcraft</strong> Supply, LLC. “Helping You Make Wood Work” is a registered trademark of <strong>Woodcraft</strong> Supply, LLC.2