Paediatric tracheostomy - Vula - University of Cape Town
Paediatric tracheostomy - Vula - University of Cape Town
Paediatric tracheostomy - Vula - University of Cape Town

Create successful ePaper yourself
Turn your PDF publications into a flip-book with our unique Google optimized e-Paper software.
OPEN ACCESS ATLAS OF OTOLARYNGOLOGY, HEAD &<br />
NECK OPERATIVE SURGERY<br />
PAEDIATRIC TRACHEOSTOMY<br />
The open <strong>tracheostomy</strong> technique in the<br />
paediatric patient differs from that<br />
undertaken in the adult. In the paediatric<br />
patient a formal stoma is created by<br />
suturing the tracheal wall to the skin with<br />
maturation sutures in addition to safety<br />
stay sutures placed in the tracheal wall.<br />
Terminology<br />
Tracheotomy refers to making an opening<br />
into the trachea whilst <strong>tracheostomy</strong> refers<br />
to creating a formal stoma and a communication<br />
between the trachea and the<br />
overlying skin.<br />
Indications<br />
Upper airway obstruction due to<br />
congenital or acquired causes<br />
Patients requiring long-term ventilation<br />
Failure to wean from conventional<br />
orotracheal or nasotracheal ventilation<br />
(eliminates dead space)<br />
Pulmonary toilet<br />
Preoperative evaluation<br />
Careful evaluation <strong>of</strong> each patient must be<br />
undertaken as to whether any other<br />
intervention might avoid a <strong>tracheostomy</strong>.<br />
Examination <strong>of</strong> nasopharynx, oropharynx<br />
and microlaryngoscopy and bronchoscopy<br />
Patients with airway obstruction should<br />
undergo examination <strong>of</strong> the upper airways<br />
as well as microlaryngoscopy and bronchoscopy<br />
to exclude treatable causes <strong>of</strong><br />
obstruction, thus eliminating the need for<br />
<strong>tracheostomy</strong>. It also permits accurate<br />
documentation <strong>of</strong> airway pathology for<br />
future comparison.<br />
Hasnaa Ismail-Koch and Nico Jonas<br />
Anatomy <strong>of</strong> the neck<br />
The cricoid and thyroid cartilages are<br />
difficult to palpate in the neonate and<br />
younger child because the neck is shorter,<br />
the laryngeal structures are more pliable<br />
and subcutaneous fat is more prominent.<br />
Hyperextending the neck may cause<br />
mediastinal structures to present in the<br />
neck. Check whether patients have<br />
undergone previous surgical procedures<br />
e.g. sternotomies resulting in scarring and<br />
altered anatomy.<br />
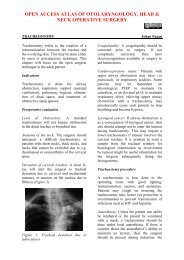
Chest X-ray<br />
Chest X-ray following assessment <strong>of</strong> the<br />
respiratory system is important to detect<br />
pulmonary disease that might be improved<br />
prior to surgery. It is also useful measure<br />
to establish the position <strong>of</strong> the trachea and<br />
to confirm that it is situated in the midline.<br />
Blood tests and coagulopathy<br />
<strong>Paediatric</strong> patients undergoing <strong>tracheostomy</strong><br />
will in general have other comorbidities;<br />
therefore blood tests are<br />
almost always required. Full blood count<br />
and electrolytes may be required for<br />
anaesthetic purposes. Cross matching<br />
blood might be required in patients with<br />
anaemia, especially in neonates where a<br />
small amount <strong>of</strong> blood loss can be<br />
clinically significant. Coagulopathies must<br />
be corrected prior to surgery.<br />
Cardiorespiratory status<br />
The cardiorespiratory status should be<br />
optimised preoperatively. A cardiology<br />
review must be obtained if there is any<br />
suspicion <strong>of</strong> underlying cardiac pathology.<br />
Relieving prolonged upper airway<br />
obstruction with a <strong>tracheostomy</strong> may result<br />
in respiratory distress due to loss <strong>of</strong>
hypoxic drive as a consequence <strong>of</strong> sudden<br />
change in CO 2 levels, or pulmonary<br />
oedema.<br />
Tracheostomy technique<br />
Microlaryngoscopy and bronchoscopy<br />
should be undertaken prior to <strong>tracheostomy</strong><br />
if the airway has not been previously<br />
assessed. If possible this is done with the<br />
child breathing spontaneously. The<br />
surgeon or anaesthetist can subsequently<br />
intubate the child and the surgeon may<br />
then proceed with the <strong>tracheostomy</strong>.<br />
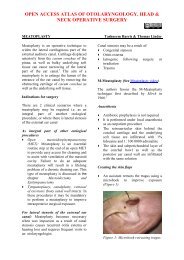
Minimum Kit<br />
A paediatric <strong>tracheostomy</strong> kit should<br />
include: size 11 & 15 scalpels, bipolar<br />
diathermy, fine dissecting scissors, fine<br />
artery clips x3, toothed forceps, skin<br />
retractors, suction, needle holder and<br />
suture cutting scissors, a local anaesthetic<br />
agent, size 4/0 non-absorbable suture (e.g.<br />
prolene), and size 4/0 absorbable suture<br />
(e.g. vicryl).<br />
The <strong>tracheostomy</strong> tube should be checked<br />
prior to the procedure; if a cuffed<br />
<strong>tracheostomy</strong> tube is required, the cuff<br />
should be checked for leaks. Select an<br />
appropriately-sized <strong>tracheostomy</strong> tube and<br />
a one-size-smaller <strong>tracheostomy</strong> tube<br />
(Table 1). Regarding <strong>tracheostomy</strong> tube<br />
length, a 1year old<br />
child requires a longer ‘paed’ tube.<br />
Select an appropriately-sized tracheal<br />
suction catheter; usually double that <strong>of</strong> the<br />
<strong>tracheostomy</strong> tube size e.g. a size 8<br />
catheter for size 4 <strong>tracheostomy</strong> tube. The<br />
length that the tube should be suctioned to<br />
should also be measured and recorded; this<br />
length is measured using an appropriatelysized<br />
tracheal suction catheter and is<br />
generally accepted to be 0.5cm longer than<br />
to the tip <strong>of</strong> the <strong>tracheostomy</strong> tube<br />
(Figures 1a,b).<br />
Age<br />
Tube size<br />
0-1month 3.0<br />
1-6months 3.5<br />
6-18months 4.0<br />
18months - 3yrs 4.5<br />
3-6yrs 5.0<br />
6-9yrs 5.5<br />
9-12yrs 6.0<br />
12-14yrs 6.5<br />
Table 1: Age-appropriate <strong>tracheostomy</strong><br />
tube sizes. Tube sizes vary with different<br />
companies having different outer<br />
diameters. The figures stated refer to<br />
Shiley tubes<br />
Figures 1 a, b: Measuring the correct<br />
suction tubing length which should not<br />
extend >5 mm past the tip <strong>of</strong> the<br />
<strong>tracheostomy</strong> tube<br />
a<br />
b<br />
2
Check that the correct anaesthetic<br />
connectors and tubing between the<br />
<strong>tracheostomy</strong> tube and anaesthetic circuit<br />
are present (Figure 2).<br />
a<br />
Figure 2: Connector between <strong>tracheostomy</strong><br />
tube and anaesthetic tubing<br />
Anaesthesia<br />
The child should ideally be intubated.<br />
Rarely when it is not possible to intubate<br />
the child, the most suitable way <strong>of</strong><br />
maintaining the airway and oxygenation<br />
should be determined; it may vary from<br />
facemask ventilation to intubating the child<br />
using a ventilating bronchoscope.<br />
Positioning and draping<br />
A shoulder roll is used to extend the neck<br />
and a head ring to stabilise the head. The<br />
head is taped in the midline position with<br />
an adherent surgical tape attached to the<br />
operating table, stuck down under the chin<br />
and then secured again to the operating<br />
table on the other side (Figures 3a,b). It<br />
may not be possible to fully extend the<br />
neck in certain cases for fear <strong>of</strong> causing<br />
atlantoaxial subluxation e.g. with Trisomy<br />
21 (Down’s syndrome) or achondroplasia.<br />
Care is taken to avoid excessive cervical<br />
hyperextension as it may cause mediastinal<br />
Figures 3 a, b: Positioning with shoulder<br />
roll, head ring and chin tape<br />
structures to present in the neck and place<br />
them at risk <strong>of</strong> injury.<br />
A clear sterile drape is ideally used over<br />
the head (Figure 4) as it makes it possible<br />
to observe the endotracheal tube<br />
throughout the procedure and makes it<br />
easier for the anaesthetist to manipulate the<br />
endotracheal tube.<br />
Skin Incision<br />
The site <strong>of</strong> the incision is marked midway<br />
between the cricoid cartilage and<br />
suprasternal notch (Figure 5). Local<br />
anaesthetic with adrenaline is infiltrated<br />
into the area <strong>of</strong> the planned incision. The<br />
maximum length <strong>of</strong> incision extends<br />
between the anterior borders <strong>of</strong> the<br />
b<br />
3
sternocleidomastoid, although this is rarely<br />
required. A vertical skin incision is<br />
reserved for urgent tracheostomies where<br />
preoperative intubation cannot be achieved<br />
and a surgical airway is urgently required.<br />
subcutaneous fat is removed from both the<br />
superior and inferior skin flaps using<br />
bipolar diathermy (Figure 6); this<br />
facilitates positioning <strong>of</strong> the maturation<br />
sutures. Emphasis is placed on meticulous<br />
haemostasis as well as dissecting strictly<br />
in the midline.<br />
Figure 4: Clear sterile drape making it<br />
possible to monitor and manipulate the<br />
orotracheal tube during surgery<br />
Figure 5: Surface landmarks: The incision<br />
(long line) is placed halfway between<br />
cricoid cartilage and suprasternal notch<br />
Removal <strong>of</strong> subcutaneous fat<br />
The incision is continued through skin into<br />
the subcutaneous layer <strong>of</strong> fat (more<br />
prominent in younger children). The<br />
Figure 6: Removing subcutaneous fat<br />
using bipolar dissection technique<br />
Exposure and parting <strong>of</strong> strap muscles<br />
The platysma muscle is generally absent in<br />
the midline. Care is taken not to transect<br />
the anterior jugular veins which are just<br />
superficial to the strap muscles within the<br />
investing cervical fascia; they can be<br />
preserved and retracted laterally. The<br />
midline cervical fascia between the strap<br />
muscles is identified (Figure 7). The strap<br />
muscles can then be parted in the midline<br />
using bipolar diathermy or blunt dissection<br />
and retracted laterally to expose the thyroid<br />
isthmus.<br />
Dividing thyroid isthmus<br />
The thyroid isthmus is retracted superiorly<br />
or divided using bipolar diathermy. The<br />
trachea is then cleaned using a small damp<br />
gauze swab or a peanut swab. Again<br />
meticulous haemostasis is ensured. The<br />
positions <strong>of</strong> the cricoid cartilage and<br />
tracheal rings 2-5 are determined. It is<br />
important to avoid injury<br />
4
Figure 7: Skin and subcutaneous tissue<br />
retracted to expose strap muscles<br />
to the first tracheal ring so that subglottic<br />
stenosis does not occur. Care must be<br />
taken to avoid the innominate artery which<br />
crosses the trachea lower down (usually<br />
below the 5th tracheal ring), as injury or<br />
pressure <strong>of</strong> the <strong>tracheostomy</strong> tube on the<br />
artery can rupture the vessel wall and<br />
cause fatal haemorrhage.<br />
Stay Sutures<br />
Non-absorbable stay sutures are passed<br />
through the tracheal wall on either side <strong>of</strong><br />
the midline prior to making any tracheal<br />
incisions (Figure 8). The needles at the<br />
ends <strong>of</strong> the sutures are then removed and<br />
the ends <strong>of</strong> each suture are secured in an<br />
artery clip on each side <strong>of</strong> the neck.<br />
Upward and lateral pull on the stay sutures<br />
brings the trachea to the surface to allow<br />
easy insertion <strong>of</strong> the tube in the event <strong>of</strong><br />
accidental decannulation or loss <strong>of</strong> the<br />
airway following incision <strong>of</strong> the trachea.<br />
Tracheal incision<br />
A vertical slit is made across two tracheal<br />
rings between the stay sutures in the<br />
midline <strong>of</strong> the tracheal wall between the<br />
2 nd -5 th tracheal rings.<br />
Figure 8: Placement <strong>of</strong> bilateral stay<br />
sutures in the tracheal wall on either side<br />
<strong>of</strong> the planned tracheal incision (double<br />
arrow)<br />
Maturation sutures<br />
Maturation sutures are absorbable sutures<br />
that secure the trachea to the skin, creating<br />
a formal, safe stoma and making<br />
reinsertion <strong>of</strong> a <strong>tracheostomy</strong> tube easier in<br />
the event <strong>of</strong> accidental decannulation<br />
(Figure 9). They are placed prior to<br />
insertion <strong>of</strong> the <strong>tracheostomy</strong> tube with the<br />
endotracheal tube still in place. The<br />
inferior maturation sutures are the most<br />
important, and are placed between the<br />
inferior end <strong>of</strong> the vertical tracheal slit and<br />
the inferior skin edge; they obliterate the<br />
space between the trachea and the skin and<br />
prevent formation <strong>of</strong> a false tract when<br />
inserting the <strong>tracheostomy</strong> tube.<br />
Between placing successive sutures the<br />
tracheal slit may be occluded in order to<br />
prevent anaesthetic gases escaping and to<br />
aid ventilation, by carefully pulling the<br />
stay sutures together and closing the<br />
tracheal incision.<br />
Insertion <strong>of</strong> <strong>tracheostomy</strong> tube<br />
Once the maturation sutures have been<br />
fashioned, the anaesthetist is alerted and<br />
the anaesthetic tubing, the circuit<br />
5
connection, the <strong>tracheostomy</strong> tube, an<br />
artery clip (in case dilatation <strong>of</strong> the stoma<br />
is required) and suction are made<br />
available.<br />
The obturator <strong>of</strong> the <strong>tracheostomy</strong> tube is<br />
then removed and the tube is connected to<br />
the anaesthetic circuit.<br />
a<br />
a<br />
b<br />
Figures 9 a, b: Placement <strong>of</strong> first maturation<br />
suture (a) and final formal stoma with<br />
four maturation sutures in place (b)<br />
The surgeon should be ready with the<br />
<strong>tracheostomy</strong> tube while the assistant<br />
carefully pulls upwards and laterally on the<br />
stay sutures to bring the trachea to the<br />
surface. The anaesthetist is asked to slowly<br />
withdraw the endotracheal tube until only<br />
the distal tip <strong>of</strong> the endotracheal tube is<br />
visible; the <strong>tracheostomy</strong> tube is then<br />
inserted under direct vision (Figure 10).<br />
b<br />
Figures 10 a, b: Endotracheal tube visible<br />
in stoma (a); the anaesthetist is asked to<br />
withdraw the tube until only the tip is<br />
visible prior to insertion <strong>of</strong> the<br />
<strong>tracheostomy</strong> tube<br />
The tip <strong>of</strong> the endotracheal tube should<br />
remain in position extending beyond the<br />
glottis to just above the tracheostoma until<br />
the <strong>tracheostomy</strong> tube has been secured.<br />
In the event <strong>of</strong> dislodgement or inability to<br />
ventilate via the <strong>tracheostomy</strong> tube the<br />
endotracheal tube can again be advanced<br />
past the stoma for the patient to be<br />
ventilated. The anaesthetist confirms<br />
correct placement <strong>of</strong> the tube by listening<br />
6
to the chest and by confirming the<br />
presence <strong>of</strong> CO 2 on the capnograph. The<br />
neck wound can then be partially sutured<br />
closed laterally if required. The tube is<br />
then secured around the neck using cotton<br />
tapes; the tension on the tapes should<br />
ensure that the tube is secure and cannot be<br />
pulled out when the head is flexed. A<br />
useful check to ensure correct tension on<br />
the tapes is that it should be possible to<br />
insert only one finger beneath the tapes.<br />
The <strong>tracheostomy</strong> tube should never be<br />
secured by suturing it to the skin, as the<br />
skin in a paediatric patient is very lax and<br />
can result in accidental decannulation<br />
while still sutured to the skin. A nonadherent<br />
dressing is placed under the<br />
flanges <strong>of</strong> the <strong>tracheostomy</strong> tube using an<br />
artery clip (Figure 11).<br />
Figure 11: Placement <strong>of</strong> dressing under<br />
flanges <strong>of</strong> <strong>tracheostomy</strong> tube<br />
The position <strong>of</strong> the tube is then assessed by<br />
passing a flexible fibreoptic scope through<br />
the <strong>tracheostomy</strong> tube. Ideally the tip <strong>of</strong><br />
the tube should be positioned well above<br />
the carina so that the tip does not slip down<br />
one bronchus on hyperflexing the neck.<br />
The stay sutures are then stuck to the chest<br />
wall and labeled “RIGHT” and “LEFT”,<br />
and ‘DO NOT REMOVE’ (Figure 12).<br />
Figure 12: Stay sutures are taped to the<br />
chest at end <strong>of</strong> the procedure<br />
Early postoperative complications<br />
Haemorrhage<br />
Pneumothorax, pneumomediastinum<br />
Damage to lateral structures such as the<br />
recurrent laryngeal nerves, carotid<br />
sheath or oesophagus<br />
Loss <strong>of</strong> respiratory drive<br />
Pulmonary oedema<br />
Tracheostomy tube problems such as<br />
displacement and blockage<br />
Subcutaneous emphysema (avoid by<br />
not suturing skin too tightly)<br />
Swallowing difficulties<br />
Local infection<br />
Postoperative care<br />
Chest X-ray to<br />
o Exclude pneumothorax<br />
o Exclude surgical emphysema<br />
o Check tube length and confirm<br />
tip position relative to carina<br />
If a cuffed tube is required the pressure<br />
in the cuff should be checked and<br />
monitored<br />
Antibiotics may be required for a week<br />
postoperatively<br />
Nursing staff should be informed how<br />
to use the stay sutures<br />
7
Nursing staff are informed about the<br />
correct length <strong>of</strong> the suction tube in<br />
order to avoid distal tracheal trauma<br />
and granulations distal to the tip <strong>of</strong> the<br />
<strong>tracheostomy</strong> tube<br />
The child should have a <strong>tracheostomy</strong><br />
box for his/her sole use at the bedside<br />
that contains an introducer/obturator,<br />
spare <strong>tracheostomy</strong> tube <strong>of</strong> same type<br />
and size, <strong>tracheostomy</strong> tube one size<br />
smaller, appropriately sized suction<br />
catheters, spare tapes, spare nonadherent<br />
dressings, curved roundended<br />
scissors and lubricant jelly. A<br />
Swedish nose used for humidification,<br />
and speaking valves may also be<br />
included<br />
A small artery clip or appropriately<br />
sized tracheal dilator should be<br />
available at the bedside<br />
Resuscitation steps<br />
In the event <strong>of</strong> finding an unresponsive<br />
tracheotomised child the following steps<br />
should be followed<br />
Attempt to arouse the child while<br />
calling for help<br />
Attempt to suction the airway<br />
If there is difficulty suctioning or the<br />
<strong>tracheostomy</strong> tube is blocked, change<br />
the <strong>tracheostomy</strong> tube immediately and<br />
attempt suctioning again<br />
If this fails, the smaller size <strong>tracheostomy</strong><br />
tube is inserted<br />
If this fails a tracheal suction tube is<br />
passed down the lumen <strong>of</strong> the smaller<br />
tube and an attempt is made to guide<br />
the <strong>tracheostomy</strong> tube over the suction<br />
tube (Seldinger technique)<br />
If still unsuccessful, a flexible<br />
endoscope with a tube first threaded<br />
over it may be used by experienced<br />
staff to insert the <strong>tracheostomy</strong> tube<br />
under direct vision<br />
Concurrently with the above steps, any<br />
other possible means <strong>of</strong> ventilating the<br />
child are employed i.e. bag & mask,<br />
endotracheal tube intubation etc.; the<br />
possibility <strong>of</strong> doing this depends on the<br />
underlying pathology<br />
Only experienced personnel should use<br />
<strong>tracheostomy</strong> dilators or an artery clip<br />
to dilate the tracheal stoma if it has<br />
started to close down<br />
Check whether the child is breathing<br />
after reinserting the <strong>tracheostomy</strong> tube;<br />
a self-inflating bag ventilation device<br />
may be required to provide rescue<br />
breaths<br />
First tube change<br />
The first tube change should take place one<br />
week following <strong>tracheostomy</strong>. Essential<br />
equipment includes suctioning, supplementary<br />
oxygen, appropriate <strong>tracheostomy</strong><br />
tube with tapes already attached, nonadherent<br />
dressing, 0.9% sterile saline<br />
solution, small sterile pot, water-based<br />
lubricant and gauze swabs.<br />
The child is kept starved for several hours<br />
to decrease the risk <strong>of</strong> aspiration. Wrap a<br />
younger child in a small sheet or blanket.<br />
A shoulder bolster is placed to extend the<br />
neck. The assistant swaddles the baby<br />
allowing exposure above the shoulders.<br />
The <strong>tracheostomy</strong> is suctioned if required<br />
prior to tube change.<br />
The new <strong>tracheostomy</strong> tube is lubricated at<br />
the outside bend <strong>of</strong> the tube with a tiny<br />
amount <strong>of</strong> water-based lubricant. The stay<br />
sutures are left in position but freed from<br />
the chest wall in case they need to be used<br />
to apply traction to. Once everything is<br />
ready the old tube is removed and replaced<br />
with the new tube.<br />
The assistant holds the new tube in<br />
position while ventilation is observed.<br />
While the assistant holds the tube in place<br />
the tapes are secured. The stay sutures are<br />
then removed.<br />
8
Follow-up and aftercare<br />
A child with a <strong>tracheostomy</strong> requires<br />
regular microlaryngoscopy and bronchoscopy<br />
to exclude granuloma formation or<br />
suprastomal collapse and to follow the<br />
progress <strong>of</strong> the underlying pathology that<br />
led to the <strong>tracheostomy</strong>. The frequency <strong>of</strong><br />
microlaryngoscopy and bronchoscopy<br />
depends on the underlying aetiology.<br />
Corrective surgery can be planned working<br />
towards the ultimate goal <strong>of</strong> decannulation.<br />
As the child grows the <strong>tracheostomy</strong> tube<br />
may need to be upsized or the length<br />
adjusted.<br />
Late complications<br />
Tracheal granulomas<br />
Accidental decannulation and blockage<br />
Suprastomal collapse<br />
Tracheomalacia<br />
Speech and language development<br />
delay<br />
Persistent tracheocutaneous fistula following<br />
successful decannulation<br />
Decannulation<br />
Prior to considering decannulation the<br />
initial reason for the <strong>tracheostomy</strong> should<br />
have been resolved or been effectively<br />
managed. Microlaryngoscopy and bronchoscopy<br />
should be undertaken a<br />
maximum <strong>of</strong> 6 weeks prior to planned<br />
decannulation to check the status <strong>of</strong> the<br />
trachea and in particular to look for<br />
suprastomal collapse or granulomas that<br />
may need treating prior to decannulation.<br />
The child should be well at the time <strong>of</strong><br />
decannulation; ideally it should be<br />
undertaken during seasons when infections<br />
are less frequent. The child should be<br />
admitted to the hospital for observation<br />
during any decannulation regime in case<br />
emergency reinsertion <strong>of</strong> the tube is<br />
required.<br />
Decannulation protocol<br />
The following steps should ensure safe<br />
decannulation<br />
Decannulation occurs over several days<br />
Pulse oximetry is undertaken during<br />
this time<br />
The <strong>tracheostomy</strong> tube is gradually<br />
downsized to size 3; if the child weighs<br />
Author<br />
Hasnaa Ismail-Koch BM, DLO, DM,<br />
FRCS (ORL-HNS)<br />
Consultant Otolaryngologist (Locum)<br />
Southampton General Hospital<br />
Hampshire<br />
United Kingdom<br />
hasnaa@doctors.org.uk<br />
Author and <strong>Paediatric</strong> Section Editor<br />
Nico Jonas MBChB, FCORL, MMed<br />
<strong>Paediatric</strong> Otolaryngologist<br />
Addenbrooke’s Hospital<br />
Cambridge<br />
United Kingdom<br />
nico.jonas@gmail.com<br />
THE OPEN ACCESS ATLAS OF<br />
OTOLARYNGOLOGY, HEAD &<br />
NECK OPERATIVE SURGERY<br />
www.entdev.uct.ac.za<br />
The Open Access Atlas <strong>of</strong> Otolaryngology, Head &<br />
Neck Operative Surgery by Johan Fagan (Editor)<br />
johannes.fagan@uct.ac.za is licensed under a Creative<br />
Commons Attribution - Non-Commercial 3.0 Unported<br />
License<br />
Editor<br />
Johan Fagan MBChB, FCORL, MMed<br />
Pr<strong>of</strong>essor and Chairman<br />
Division <strong>of</strong> Otolaryngology<br />
<strong>University</strong> <strong>of</strong> <strong>Cape</strong> <strong>Town</strong><br />
<strong>Cape</strong> <strong>Town</strong><br />
South Africa<br />
johannes.fagan@uct.ac.za<br />
10