Operating Instructions Blu-ray Disc Player DMP-BD60 ... - Panasonic
Operating Instructions Blu-ray Disc Player DMP-BD60 ... - Panasonic
Operating Instructions Blu-ray Disc Player DMP-BD60 ... - Panasonic

Create successful ePaper yourself
Turn your PDF publications into a flip-book with our unique Google optimized e-Paper software.
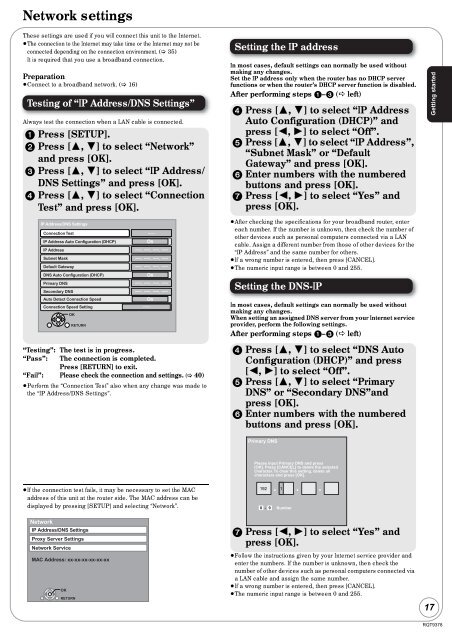
Network settings<br />
These settings are used if you will connect this unit to the Internet.<br />
≥The connection to the Internet may take time or the Internet may not be<br />
connected depending on the connection environment. (� 35)<br />
It is required that you use a broadband connection.<br />
Preparation<br />
≥Connect to a broadband network. (� 16)<br />
Testing of “IP Address/DNS Settings”<br />
Always test the connection when a LAN cable is connected.<br />
1 Press [SETUP].<br />
2 Press [3, 4] to select “Network”<br />
and press [OK].<br />
3 Press [3, 4] to select “IP Address/<br />
DNS Settings” and press [OK].<br />
4 Press [3, 4] to select “Connection<br />
Test” and press [OK].<br />
IP Address/DNS Settings<br />
Connection Test<br />
IP Address Auto Configuration (DHCP)<br />
IP Address<br />
Subnet Mask<br />
Default Gateway<br />
DNS Auto Configuration (DHCP)<br />
Primary DNS<br />
Secondary DNS<br />
Auto Detect Connection Speed<br />
Connection Speed Setting<br />
OK<br />
RETURN<br />
����<br />
On<br />
�������������������<br />
�������������������<br />
�������������������<br />
�������������������<br />
�������������������<br />
�������������������<br />
On<br />
�������������������<br />
�������������������<br />
�������������������<br />
�������������������<br />
On<br />
����<br />
“Testing”: The test is in progress.<br />
“Pass”: The connection is completed.<br />
Press [RETURN] to exit.<br />
“Fail”: Please check the connection and settings. (� 40)<br />
≥Perform the “Connection Test” also when any change was made to<br />
the “IP Address/DNS Settings”.<br />
≥If the connection test fails, it may be necessary to set the MAC<br />
address of this unit at the router side. The MAC address can be<br />
displayed by pressing [SETUP] and selecting “Network”.<br />
Network<br />
IP Address/DNS Settings<br />
Proxy Server Settings<br />
Network Service<br />
MAC Address: xx-xx-xx-xx-xx-xx<br />
OK<br />
RETURN<br />
Setting the IP address<br />
In most cases, default settings can normally be used without<br />
making any changes.<br />
Set the IP address only when the router has no DHCP server<br />
functions or when the router’s DHCP server function is disabled.<br />
After performing steps 1–3 (� left)<br />
4 Press [3, 4] to select “IP Address<br />
Auto Configuration (DHCP)” and<br />
press [2, 1] to select “Off”.<br />
5 Press [3, 4] to select “IP Address”,<br />
“Subnet Mask” or “Default<br />
Gateway” and press [OK].<br />
6 Enter numbers with the numbered<br />
buttons and press [OK].<br />
7 Press [2, 1] to select “Yes” and<br />
press [OK].<br />
≥After checking the specifications for your broadband router, enter<br />
each number. If the number is unknown, then check the number of<br />
other devices such as personal computers connected via a LAN<br />
cable. Assign a different number from those of other devices for the<br />
“IP Address” and the same number for others.<br />
≥If a wrong number is entered, then press [CANCEL].<br />
≥The numeric input range is between 0 and 255.<br />
Setting the DNS-IP<br />
In most cases, default settings can normally be used without<br />
making any changes.<br />
When setting an assigned DNS server from your Internet service<br />
provider, perform the following settings.<br />
After performing steps 1–3 (� left)<br />
4 Press [3, 4] to select “DNS Auto<br />
Configuration (DHCP)” and press<br />
[2, 1] to select “Off”.<br />
5 Press [3, 4] to select “Primary<br />
DNS” or “Secondary DNS”and<br />
press [OK].<br />
6 Enter numbers with the numbered<br />
buttons and press [OK].<br />
Primary DNS<br />
Please input Primary DNS and press<br />
[OK]. Press [CANCEL] to delete the selected<br />
character. To clear this setting, delete all<br />
characters and press [OK].<br />
192 . 1 . .<br />
0 - 9<br />
Number<br />
7 Press [2, 1] to select “Yes” and<br />
press [OK].<br />
≥Follow the instructions given by your Internet service provider and<br />
enter the numbers. If the number is unknown, then check the<br />
number of other devices such as personal computers connected via<br />
a LAN cable and assign the same number.<br />
≥If a wrong number is entered, then press [CANCEL].<br />
≥The numeric input range is between 0 and 255.<br />
Getting started<br />
17<br />
RQT9378