C Band LNB Focal Length & Skew Settings - Dish TV Technologies
C Band LNB Focal Length & Skew Settings - Dish TV Technologies
C Band LNB Focal Length & Skew Settings - Dish TV Technologies

You also want an ePaper? Increase the reach of your titles
YUMPU automatically turns print PDFs into web optimized ePapers that Google loves.
C-<strong>Band</strong> <strong>LNB</strong> <strong>Focal</strong> Depth (f/D)<br />
And <strong>Skew</strong> <strong>Settings</strong><br />
Mounting the <strong>LNB</strong><br />
The dish is basically just a reflector that focuses the energy into a small tube called the <strong>LNB</strong>. Inside the <strong>LNB</strong> is two small antenna,<br />
one mounted vertical and the other horizontal. Knowing this will allow you to see how important it is to properly mount the <strong>LNB</strong>.<br />
Do not assume that because all the supports holding the scalar ring are the same length that centering is automatic. Make sure<br />
that all the supports are the same distance from the edge of the dish to the scalar ring. Each measurement should be within 1mm<br />
of each other. You need to be sure that the scalar ring (the supporting ring for the <strong>LNB</strong>, it comes with the <strong>LNB</strong>) is parallel to the<br />
bottom of the dish and that it is perfectly centered in the dish. If all this isn’t done, then you will have imperfect reception. Having<br />
the focal point off by as little as 13mm can cause a fifty percent loss in signal strength!<br />
You can measure down from the scalar ring to the centre of the dish on three points around the scalar ring to check if it is parallel<br />
to the dish surface.
<strong>Focal</strong> Depth ( f/D )<br />
<strong>Focal</strong> Depth ( f/D ) (for the more technical DIY)<br />
The f/D ratio is the focal distance of the dish (f), divided by the diameter (D). When dealing<br />
with most prime focus antennas, the number should come out between .28 and .42. If you<br />
notice, most of those numbers are also on scale on the side of the <strong>LNB</strong>. You simply set the<br />
top edge of the scalar ring even with the line that corresponds to your correct f/D setting. What<br />
this adjustment actually does is determines how wide of an angle the <strong>LNB</strong> can "see".<br />
To calculate the focal distance, you need to measure the diameter (D) and the depth (d) of the<br />
dish. Measurements should be in like units (you can't use feet for the diameter and inches for<br />
depth). For this example, let's say we have a dish that is 120 inches in diameter (D) and 18<br />
inches deep (d). <strong>Focal</strong> distance (f) equals the diameter squared (D x D) divided by 16 times<br />
the depth (16 x d) or:<br />
D x D = 120 x 120 = 14400<br />
16 x d = 16 x 18 = 288<br />
D x D/16 x d = 14400/288 = 50<br />
Therefore focal distance f = 50 inches<br />
After you have calculated the focal distance (f), you can use that figure to calculate the f/D<br />
ratio of your dish. In this case, using the same diameter of (D) = 120; and the calculated focal<br />
distance (f) = 50<br />
f / D = 50 / 120 = .416<br />
f /D = .416<br />
And round up to give a setting of .42.<br />
<strong>Focal</strong> Depth ( f/D ) the easy way<br />
Our 2.4m and 1.8m solid petal dishes have a focal depth that need the <strong>LNB</strong> to be mounted at 38 (markings on the side of the <strong>LNB</strong>).<br />
Fine tune the <strong>LNB</strong> position in and out after everything is running. Some <strong>LNB</strong>s do not have these markings. We have shown how to<br />
configure this in the sections below.<br />
This C <strong>Band</strong> <strong>LNB</strong> has the f/D markings on the side. The red arrow points to 38.<br />
The measurement of the f/D is taken on the topside of the scalar ring against the <strong>LNB</strong> marking.<br />
The scalar ring is the ring that the <strong>LNB</strong> mounts in.
If you are using the Dual Local Oscillator C <strong>Band</strong> <strong>LNB</strong> then the correct setting is shown below.<br />
Note: The measurement from the front of the <strong>LNB</strong> to the back of the scalar ring is 45mm.<br />
This corresponds to 38 on an <strong>LNB</strong> with markings.<br />
If you are using the C/Ku <strong>Band</strong> <strong>LNB</strong> then the correct setting is shown below.<br />
Again the measurement is from the front of the <strong>LNB</strong> to the back of the scalar ring.<br />
50mm is the measurement for this <strong>LNB</strong>. Note that the C <strong>Band</strong> output of the C/Ku <strong>Band</strong> <strong>LNB</strong>, is the lower connection.
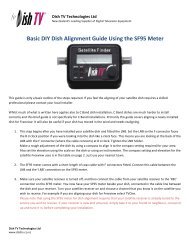
Zeroing the Polarity (skew) Setting:<br />
As with the f/D setting, the skew setting is fine tuned later. However you need an approximate starting point. First you<br />
start at ‘zero’ and then adjust it for your longitude and latitude. The pictures below give you the ‘zero’ point.<br />
This is a standard C <strong>Band</strong> <strong>LNB</strong> with skew markings.<br />
This is what you would see if you were looking into the front of the dish. The 'zero'mark should start at horizontal.<br />
Mount the <strong>LNB</strong> into the scalar ring with the 'zero'mark horizontal and facing the right like it is in the picture.<br />
This is the Dual Local Oscillator C <strong>Band</strong> <strong>LNB</strong>. This <strong>LNB</strong> has no markings to indicate skew. Use this picture to help you<br />
identify the ‘zero’ mark. Start with your <strong>LNB</strong> at this point.
This is the C/Ku <strong>Band</strong> <strong>LNB</strong>. Once again there is no mark to indicate skew.<br />
Use this picture to set your <strong>LNB</strong> to ‘zero’. You will be adjusting it to the correct setting and then fine tuning it shortly so<br />
do not waste time trying to find the perfect ‘zero’. It isn’t that critical.<br />
Adjusting the Polarity (skew) Setting:<br />
You have just set the ‘zero’ for the skew setting. Now this is just the initial setting. To know where to adjust the <strong>LNB</strong> to<br />
from here you need to download and read our ‘satellite positions and compass settings’ tables at the very end of<br />
this guide. They make up the last four pages of this guide. Choose the nearest major city to you and use this for your<br />
adjustments. This will let you receive the satellite and then you can adjust it further from there.<br />
On the guide you will see the calculations for Polarity (skew) adjustments. Use the calculations in the orange called<br />
HPT CW. Turn the <strong>LNB</strong> the appropriate amount of degrees. This will be very small in some instances.<br />
A slightly more technical version:<br />
Adjusting the skew like this will put the antenna inside the <strong>LNB</strong> in the correct position to receive from that satellite.<br />
You do not need to worry about choosing between the vertical or horizontal adjustments as the antenna in the <strong>LNB</strong><br />
are exactly 90deg apart, which means if you align the vertical adjustment (for example) then the horizontal adjust is<br />
automatically correct. And vice versa. You only need to do one adjustment and the zero mark should point to the<br />
calculated degree.<br />
An example: Suppose you live in Christchurch and you wish to receive from the satellite Panamsat 8 (PAS 8). For<br />
Christchurch the adjustment you need to make for polarity is this: Turn the <strong>LNB</strong> clockwise 6.71 deg. Now obviously<br />
you can't get it exact but try to guess about 6.5 deg.<br />
Using the C <strong>Band</strong> <strong>LNB</strong> with the skew markings on it, you know ‘zero’ degrees is with the ‘zero’ mark horizontal and to<br />
the right. Therefore 90deg is with the 'zero'straight down, 45deg is half way between that - do some division and you<br />
should get it close. For polarity/skew an educated guess is usually a good enough start. Then after you get the<br />
satellite you can adjust it to peak the signal levels.
Satellite Positions and Compass <strong>Settings</strong> from Auckland, NZ<br />
Table Key:<br />
Compass Use compass to point dish in this direction<br />
Elevation The up and down angle to set the dish. Use an inclinometer or markings on dish.<br />
Degrees of Vertical Polarisation Tilt in Clock Wise direction<br />
VPT CW<br />
VPT<br />
Degrees of Vertical Polarisation Tilt in Counter Clock Wise direction<br />
CCW<br />
HPT CW Degrees of Horizontal Polarisation Tilt in Clock Wise direction – see DIY Guide<br />
HPT<br />
Degrees of Horizontal Polarisation Tilt in Counter Clock Wise direction<br />
CCW<br />
If Polarity degree is shown as negative, turn anti clockwise<br />
Satellite Name Compass Elevation<br />
VPT VPT HPT HPT<br />
CW CCW CW CCW<br />
NSS5 177W 354.2 46.7 78.66 -101.34 -11.34 168.66<br />
IntelSat 701 180E 349.3 47.2 82.57 -97.43 -7.43 172.57<br />
GE23 or AMC23 174E 339.2 47.6 90.62 -89.38 0.62 -179.38<br />
Intelsat5 (was PAS2) 169E 330.9 47.2 97.32 -82.68 7.32 -172.68<br />
Intelsat8 (was PAS8) 166E 326.0 46.7 101.24 -78.76 11.24 -168.76<br />
OptusD1 160E 316.6 45.0 108.64 -71.36 18.64 -161.36<br />
OptusC1 156E 310.7 43.4 113.16 -66.84 23.16 -156.84<br />
JCSat2 154E 307.9 42.4 115.28 -64.72 25.28 -154.72<br />
OptusD2 152E 305.2 41.5 117.30 -62.70 27.30 -152.70<br />
Measat 2 148E 300.1 39.3 121.05 -58.95 31.05 -148.95<br />
Telstar18 / Apstar5 138E 288.8 33.0 128.76 -51.24 38.76 -141.24<br />
Apstar 6 134E 284.9 30.2 131.24 -48.76 41.24 -138.76<br />
AsiaSat 4 122E 274.6 21.2 136.97 -43.03 46.97 -133.03<br />
Palapa C2 113E 267.9 14.1 139.88 -40.12 49.88 -130.12<br />
AsiaSat 3S 105.5E 262.9 8.2 141.58 -38.42 51.58 -128.42<br />
AsiaSat 2 100.5E 259.7 4.2 142.40 -37.60 52.40 -127.60<br />
NSS6<br />
95.0E Below the horizon<br />
Calculated from Auckland 36.51S Lat 174.46E Long
Satellite Positions and Compass <strong>Settings</strong> from Hamilton, NZ<br />
Table Key:<br />
Compass Use compass to point dish in this direction<br />
Elevation The up and down angle to set the dish. Use an inclinometer or markings on dish.<br />
Degrees of Vertical Polarisation Tilt in Clock Wise direction<br />
VPT CW<br />
VPT<br />
Degrees of Vertical Polarisation Tilt in Counter Clock Wise direction<br />
CCW<br />
HPT CW Degrees of Horizontal Polarisation Tilt in Clock Wise direction – see DIY Guide<br />
HPT<br />
Degrees of Horizontal Polarisation Tilt in Counter Clock Wise direction<br />
CCW<br />
If Polarity degree is shown as negative, turn anti clockwise<br />
Satellite Name Compass Elevation<br />
VPT VPT HPT HPT<br />
CW CCW CW CCW<br />
NSS5 177W 352.5 45.5 80.19 -99.81 -9.81 170.19<br />
IntelSat 701 180E 347.7 45.9 83.96 -96.04 -6.04 173.96<br />
GE23 or AMC23 174E 337.9 46.2 91.68 -88.32 1.68 -178.32<br />
Intelsat5 (was PAS2) 169E 329.9 45.7 98.06 -81.94 8.06 -171.94<br />
Intelsat8 (was PAS8) 166E 325.1 45.1 101.78 -78.22 11.78 -168.22<br />
OptusD1 160E 316.0 43.4 108.81 -71.19 18.81 -161.19<br />
OptusC1 156E 310.3 41.8 113.10 -66.90 23.10 -156.90<br />
JCSat2 154E 307.6 40.9 115.12 -64.88 25.12 -154.88<br />
OptusD2 152E 305.8 40.8 117.04 -62.96 27.04 -152.96<br />
Measat 2 148E 300.0 37.8 120.62 -59.38 30.62 -149.38<br />
Telstar18 / Apstar5 138E 288.8 31.6 128.03 -51.97 38.03 -141.97<br />
Apstar 6 134E 284.9 28.8 130.42 -49.58 40.42 -139.58<br />
AsiaSat 4 122E 274.5 20.0 135.98 -44.02 45.98 -134.02<br />
Palapa C2 113E 267.8 13.2 138.81 -41.19 48.81 -131.19<br />
AsiaSat 3S 105.5E 262.8 7.3 140.46 -39.54 50.46 -129.54<br />
AsiaSat 2 100.5E 259.4 3.28 141.24 -38.76 51.24 -128.76<br />
NSS6<br />
95.0E Below the horizon<br />
Calculated from Hamilton 37.77S Lat 175.3E Long
Satellite Positions and Compass <strong>Settings</strong> from Wellington, NZ<br />
Table Key:<br />
Compass Use compass to point dish in this direction<br />
Elevation The up and down angle to set the dish. Use an inclinometer or markings on dish.<br />
Degrees of Vertical Polarisation Tilt in Clock Wise direction<br />
VPT CW<br />
VPT<br />
Degrees of Vertical Polarisation Tilt in Counter Clock Wise direction<br />
CCW<br />
HPT CW Degrees of Horizontal Polarisation Tilt in Clock Wise direction – see DIY Guide<br />
HPT<br />
Degrees of Horizontal Polarisation Tilt in Counter Clock Wise direction<br />
CCW<br />
If Polarity degree is shown as negative, turn anti clockwise<br />
Satellite Name Compass Elevation<br />
VPT VPT HPT HPT<br />
CW CCW CW CCW<br />
NSS5 177W 350.5 41.62 80.36 -99.64 -9.64 170.36<br />
IntelSat 701 180E 348.4 42.1 83.70 -96.30 -6.30 173.70<br />
GE23 or AMC23 174E 339.3 42.4 90.53 -89.47 0.53 -179.47<br />
Intelsat5 (was PAS2) 169E 331.7 42.1 96.21 -83.79 6.21 -173.79<br />
Intelsat8 (was PAS8) 166E 327.3 41.6 99.55 -80.45 9.55 -170.45<br />
OptusD1 160E 318.6 40.2 105.94 -74.06 15.94 -164.06<br />
OptusC1 156E 313.1 38.8 109.90 -70.10 19.90 -160.10<br />
JCSat2 154E 310.5 38.0 111.79 -68.21 21.79 -158.21<br />
OptusD2 152E 307.9 37.2 113.60 -66.40 23.60 -156.40<br />
Measat 2 148E 302.9 35.3 117.00 -63.00 27.00 -153.00<br />
Telstar18 / Apstar5 138E 291.7 29.7 124.20 -55.80 34.20 -145.80<br />
Apstar 6 134E 287.7 27.2 126.58 -53.42 36.58 -143.42<br />
AsiaSat 4 122E 276.8 19.1 132.20 -47.80 42.20 -137.80<br />
Palapa C2 113E 269.7 12.6 135.13 -44.87 45.13 -134.87<br />
AsiaSat 3S 105.5E 264.2 7.05 136.86 -43.14 46.86 -133.14<br />
AsiaSat 2 100.5E 260.7 3.33 137.70 -42.30 47.70 -132.30<br />
NSS6<br />
95.0E Below the horizon<br />
Calculated from Wellington 41.17S Lat 174.46E Long
Satellite Positions and Compass <strong>Settings</strong> from Christchurch, NZ<br />
Table Key:<br />
Compass Use compass to point dish in this direction<br />
Elevation The up and down angle to set the dish. Use an inclinometer or markings on dish.<br />
Degrees of Vertical Polarisation Tilt in Clock Wise direction<br />
VPT CW<br />
VPT<br />
Degrees of Vertical Polarisation Tilt in Counter Clock Wise direction<br />
CCW<br />
HPT CW Degrees of Horizontal Polarisation Tilt in Clock Wise direction – see DIY Guide<br />
HPT<br />
Degrees of Horizontal Polarisation Tilt in Counter Clock Wise direction<br />
CCW<br />
If Polarity degree is shown as negative, turn anti clockwise<br />
Satellite Name Compass Elevation<br />
VPT VPT HPT HPT<br />
CW CCW CW CCW<br />
NSS5 177W 354.8 38.9 78.93 -101.07 -11.07 168.93<br />
IntelSat 701 180E 351.0 39.4 81.99 -98.01 -8.01 171.99<br />
GE23 or AMC23 174E 342.4 40.0 88.27 -91.73 -1.73 178.27<br />
Intelsat5 (was PAS2) 169E 335.1 39.9 93.57 -86.43 3.57 -176.43<br />
Intelsat8 (was PAS8) 166E 330.8 39.6 96.71 -83.29 6.71 -173.29<br />
OptusD1 160E 322.3 38.5 102.80 -77.20 12.80 -167.20<br />
OptusC1 156E 316.8 37.4 106.64 -73.36 16.64 -163.36<br />
JCSat2 154E 314.2 36.7 108.46 -71.52 18.48 -161.52<br />
OptusD2 152E 311.6 36.0 110.26 -69.74 20.26 -159.74<br />
Measat 2 148E 306.6 34.3 113.63 -66.37 23.63 -156.37<br />
Telstar18 / Apstar5 138E 295.1 29.3 120.91 -59.09 30.91 -149.09<br />
Apstar 6 134E 290.9 27.0 123.35 -56.65 33.35 -146.65<br />
AsiaSat 4 122E 279.6 19.4 129.24 -50.76 39.24 -140.76<br />
Palapa C2 113E 272.1 13.3 132.38 -47.62 42.38 -137.62<br />
AsiaSat 3S 105.5E 266.3 8.00 134.28 -45.72 44.28 -135.72<br />
AsiaSat 2 100.5E 262.7 4.42 135.22 -44.78 45.22 -134.78<br />
NSS6 95.0E 258.7 0.46 135.98 -44.02 45.98 -134.02<br />
Calculated from Christchurch 43.32S Lat 172.37E Long