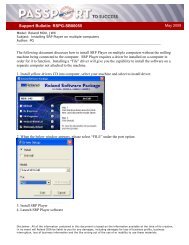
EGX-20 Application Guide - Support
EGX-20 Application Guide - Support
EGX-20 Application Guide - Support

You also want an ePaper? Increase the reach of your titles
YUMPU automatically turns print PDFs into web optimized ePapers that Google loves.
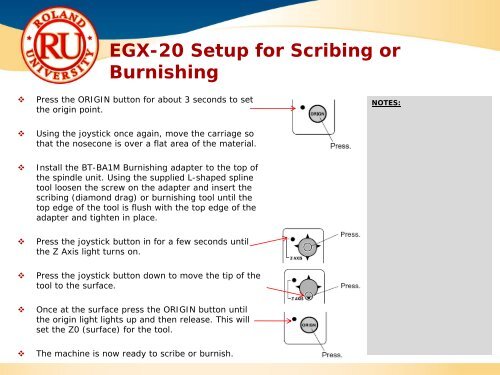
<strong>EGX</strong>-<strong>20</strong> Setup for Scribing or<br />
Burnishing<br />
<br />
Press the ORIGIN button for about 3 seconds to set<br />
the origin point.<br />
NOTES:<br />
<br />
Using the joystick once again, move the carriage so<br />
that the nosecone is over a flat area of the material.<br />
<br />
Install the BT-BA1M Burnishing adapter to the top of<br />
the spindle unit. Using the supplied L-shaped spline<br />
tool loosen the screw on the adapter and insert the<br />
scribing (diamond drag) or burnishing tool until the<br />
top edge of the tool is flush with the top edge of the<br />
adapter and tighten in place.<br />
<br />
Press the joystick button in for a few seconds until<br />
the Z Axis light turns on.<br />
<br />
Press the joystick button down to move the tip of the<br />
tool to the surface.<br />
<br />
Once at the surface press the ORIGIN button until<br />
the origin light lights up and then release. This will<br />
set the Z0 (surface) for the tool.<br />
<br />
The machine is now ready to scribe or burnish.