Series Lever Grease Gun - Groz Engineering Tools
Series Lever Grease Gun - Groz Engineering Tools
Series Lever Grease Gun - Groz Engineering Tools

You also want an ePaper? Increase the reach of your titles
YUMPU automatically turns print PDFs into web optimized ePapers that Google loves.
SERVICE INSTRUCTIONS MANUAL<br />
FOR LEVER & PISTOL GREASE GUNS<br />
IMPORTANT INFORMATION<br />
This service instruction sheet contains important warnings and other information. READ & KEEP FOR REFERENCE<br />
This manual is a general instruction sheet for <strong>Grease</strong> <strong>Gun</strong>s. It covers a variety of grease gun types and models. However, each <strong>Grease</strong> <strong>Gun</strong> may have<br />
features specific to it. Product packaging / distributor catalogue must be referred to for determining features / configurations specific to your <strong>Grease</strong><br />
<strong>Gun</strong>.<br />
The information in this manual has been carefully checked and is believed to be entirely reliable and consistent with the product described. However,<br />
no responsibility is assumed for inaccuracies, or for liability arising out of the application and use of the equipment described.<br />
Should the equipment be used in a manner not specified, the protection provided by the equipment may be impaired and the warranty voided.<br />
GENERAL SAFETY INFORMATION<br />
Always wear safety glasses when using a grease gun. Keep work area clean & remove excess grease from tools, hands & clothing<br />
after use. Do not use grease gun hose for other applications or at pressure levels above rated pressures.<br />
CAUTION<br />
Excess grease, if left on floors, tools or equipment can create surfaces that become slippery.<br />
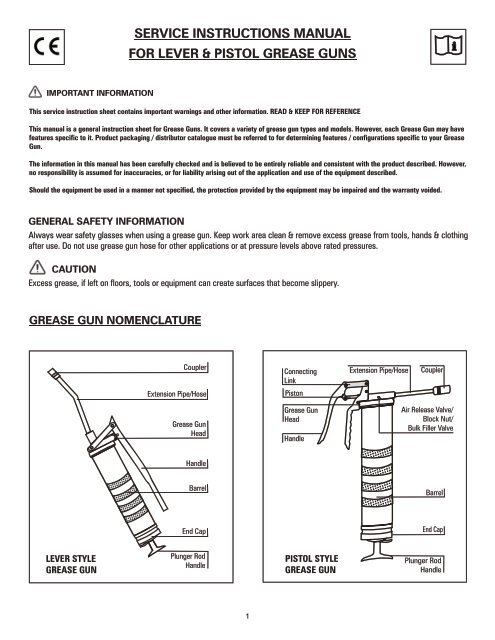
GREASE GUN NOMENCLATURE<br />
Coupler<br />
Connecting<br />
Link<br />
Extension Pipe/Hose<br />
Coupler<br />
Extension Pipe/Hose<br />
Piston<br />
<strong>Grease</strong> <strong>Gun</strong><br />
Head<br />
<strong>Grease</strong> <strong>Gun</strong><br />
Head<br />
Handle<br />
Air Release Valve/<br />
Block Nut/<br />
Bulk Filler Valve<br />
Handle<br />
Barrel<br />
Barrel<br />
End Cap<br />
End Cap<br />
LEVER STYLE<br />
GREASE GUN<br />
Plunger Rod<br />
Handle<br />
PISTOL STYLE<br />
GREASE GUN<br />
Plunger Rod<br />
Handle<br />
1
GREASE GUN LOADING<br />
<strong>Grease</strong> guns have multiple loading options:<br />
1. Cartridge Loading: Paper or plastic cartridge<br />
2. Bulk Loading<br />
3. Suction Loading<br />
4. Filler Pump Loading (only on <strong>Grease</strong> <strong>Gun</strong> models fitted with bulk loader valve<br />
CAUTION<br />
<strong>Grease</strong> or an empty cartridge in<br />
barrel is under pressure from the<br />
internal spring, use caution when<br />
removing either end of the barrel<br />
Follow the steps below for the appropriate loading option<br />
Cartridge<br />
Loading<br />
Bulk<br />
Loading<br />
Suction<br />
Loading<br />
Filler Pump<br />
Loading<br />
1. Unscrew <strong>Grease</strong> <strong>Gun</strong> Head from the Barrel counter-clockwise<br />
2. Pull back the Plunger Rod Handle all the way back & lock it<br />
with the End Cap<br />
2. Insert the open end of the<br />
Barrel into the <strong>Grease</strong><br />
bucket to about 2”(50 mm)<br />
deep.<br />
2. Pull back the Plunger Rod<br />
Handle all the way back &<br />
lock it with the End Cap.<br />
Screw back the <strong>Grease</strong> <strong>Gun</strong><br />
Head tightly onto the Barrel<br />
3. Remove the plastic cap<br />
from the open end of the<br />
<strong>Grease</strong> Cartridge & fully<br />
insert into the empty<br />
<strong>Grease</strong> <strong>Gun</strong> Barrel. Make<br />
sure the rim of the<br />
Cartridge is seated on the<br />
rim of the Barrel<br />
3. Scoop out clean <strong>Grease</strong><br />
from the Bulk <strong>Grease</strong><br />
Container into the empty<br />
<strong>Grease</strong> <strong>Gun</strong> Barrel.<br />
3. Now, slowly pull back the<br />
Plunger Rod Handle all the<br />
way back, to draw in<br />
grease into the empty<br />
Barrel. Lock the Plunger<br />
Rod with the End Cap<br />
3. Check compatibility of<br />
Bulk Filler Valve on your<br />
grease gun with your<br />
Filler Pump, to make sure<br />
they are compatible. Wipe<br />
the Bulk Filler Nipple clean<br />
of any dirt before starting.<br />
4. Remove the metal Pull tab<br />
seal from the <strong>Grease</strong><br />
Cartridge<br />
4. Once the Barrel is full,<br />
shake the Barrel to allow<br />
grease to settle down. Fill<br />
in more grease if additional<br />
space is created in the<br />
Barrel, to completely fill it<br />
4. Shake the <strong>Grease</strong> <strong>Gun</strong><br />
Barrel to allow the <strong>Grease</strong><br />
to settle down<br />
4. Insert the Bulk Filler<br />
Valve onto the Female<br />
Loader Valve of the <strong>Grease</strong><br />
Filler Pump. Start operating<br />
the Filler Pump, keeping<br />
your hand on the <strong>Grease</strong><br />
<strong>Gun</strong>, lightly pushing it<br />
down onto the Filler Pump.<br />
Once the <strong>Grease</strong> <strong>Gun</strong><br />
Barrel is filled, pumping<br />
would get very hard. Stop<br />
at this time.<br />
2
Cartridge Loading Bulk Loading Suction Loading Filler Pump Loading<br />
5. Screw back the <strong>Grease</strong> gun Head onto the Barrel, making sure to tighten only half-way,<br />
leaving 2-3 turns before the Head is fully tight<br />
5. Disengage the <strong>Grease</strong> Filler<br />
Valve from the Female<br />
Loader Valve of <strong>Grease</strong><br />
Filler Pump. Unscrew<br />
<strong>Grease</strong> <strong>Gun</strong> Head from the<br />
Barrel by a few turns, such<br />
that it is about 2-3 turns<br />
loose<br />
6. Disconnect the Plunger Rod from the End Cap<br />
7. Force the Plunger Rod in & out a few times in order to compress the grease and force out trapped air in the grease to come<br />
out from the loose connection between the <strong>Grease</strong> <strong>Gun</strong> Barrel and the <strong>Grease</strong> <strong>Gun</strong> Head<br />
8. Hand tighten the <strong>Grease</strong> gun Head fully onto the Barrel<br />
9. Start operating the <strong>Grease</strong> <strong>Gun</strong> Handle till grease starts flowing out continuously. (Note that the first discharge of grease<br />
may have some air bubbles). If grease is accompanied with air bubbles, repeat steps 5, 6, 7 & 8 to Prime** the <strong>Grease</strong> <strong>Gun</strong><br />
10. Once all air bubbles are removed, fully tighten the <strong>Grease</strong> <strong>Gun</strong> Head onto the Barrel.<br />
(Note that when the <strong>Grease</strong> <strong>Gun</strong> is in continuous use, pressing the Air Release Valve* helps<br />
force out trapped air).<br />
Now, connect <strong>Grease</strong> <strong>Gun</strong> extension and Coupler onto the <strong>Grease</strong> <strong>Gun</strong> Outlet using a thread<br />
sealant such as Teflon, to make a seal-proof connection. (DO NOT over tighten as this may<br />
fracture the <strong>Grease</strong> <strong>Gun</strong> Outlet)<br />
Air Release Valve<br />
11. Start operating the grease gun. <strong>Grease</strong> will begin to flow out from the coupler. Keep running it, till a bubble free clear stream<br />
of grease flows out. If this does not happen, then there is still some trapped air in the grease. Repeat steps 5, 6, 7 & 8 to<br />
Prime* the <strong>Grease</strong> <strong>Gun</strong><br />
*On <strong>Grease</strong> <strong>Gun</strong> models fitted with Air Release Valve<br />
** PRIMING GREASE GUNS<br />
A common occurrence with all grease equipment is trapped air pockets in grease. Trapped air causes zero or reduced grease<br />
discharge. Removing Air Pockets from <strong>Grease</strong> is referred to as Priming or Air Bleeding.<br />
It is highly recommended to prime the <strong>Grease</strong> gun, before it's used for the first time. Also, anytime in operation, if grease stops<br />
coming out, the most probable cause is trapped air in grease. Refer to steps 5-9 for Priming of <strong>Grease</strong> <strong>Gun</strong>.<br />
If the <strong>Grease</strong> <strong>Gun</strong> has been in regular use, Priming can be done without having to remove the <strong>Grease</strong> <strong>Gun</strong> Extension & Coupler<br />
from the <strong>Grease</strong> <strong>Gun</strong> Head.<br />
3
GREASING A GREASE FITTING / GREASE NIPPLE<br />
The grease coupler provided at the end of the grease gun extension has a jaw type construction. The coupler jaws will snap on to<br />
a grease fitting and maintain a tight fit.<br />
When connecting the coupler to the grease fitting, press the coupler straight onto the grease fitting to form a snug fit. Start<br />
operating the grease gun with the coupler as square to the grease fitting as possible.<br />
Once greasing is completed, slightly tilt the coupler, twist and pull back. The tilt and twist action will allow easy removal of the<br />
coupler from the grease fitting.<br />
WARNING<br />
Never try to dis-engage the coupler by pulling it out straight<br />
TROUBLESHOOTING<br />
To remove,<br />
Tilt, Twist<br />
& Pull<br />
Problem Cause Remedy<br />
1. <strong>Grease</strong> gun pumps little or no grease<br />
2. Excessive <strong>Grease</strong> leaks out from<br />
the back side of the <strong>Grease</strong> <strong>Gun</strong> -<br />
around the Plunger Rod<br />
3. <strong>Grease</strong> leaks from the connection<br />
between the <strong>Grease</strong> <strong>Gun</strong> Head & the<br />
Extension / Extension & Coupler<br />
4. <strong>Grease</strong> leaks from the Coupler body<br />
joint or from in-between the Coupler<br />
Jaws & <strong>Grease</strong> Nipple<br />
a. Trapped air pockets in grease<br />
b. Thick <strong>Grease</strong> or Frozen <strong>Grease</strong><br />
c. Blocked <strong>Grease</strong> <strong>Gun</strong> Extension<br />
d. Blocked <strong>Grease</strong> <strong>Gun</strong> Head<br />
a. Damaged <strong>Grease</strong> <strong>Gun</strong> Rubber<br />
Follower<br />
a. Loose Connection<br />
a. Damaged <strong>Grease</strong> Coupler<br />
a. Prime <strong>Grease</strong> <strong>Gun</strong><br />
b. Use a lower viscosity <strong>Grease</strong> /<br />
add some oil to grease to make it<br />
more viscous /<br />
heat the <strong>Grease</strong> <strong>Gun</strong> Barrel to<br />
unfreeze the grease<br />
c. Remove <strong>Grease</strong> <strong>Gun</strong> Extension. If<br />
<strong>Grease</strong> gun pumps grease without<br />
the extension, then the problem is<br />
with the extension, which should<br />
be cleaned / replaced<br />
d. Dis-assemble the <strong>Grease</strong> <strong>Gun</strong> Head<br />
to check for any contaminants<br />
blocking the passage of grease.<br />
Clean & Re-assemble the <strong>Grease</strong><br />
<strong>Gun</strong> Head<br />
a. Change Follower<br />
a. Tighten the connection using Teflon<br />
or any other Thread Sealant<br />
a. Change Coupler<br />
4<br />
F1490, Rev A