Creatix 802.11g Adapter CTX405 V.1/V.2 User Manual
Creatix 802.11g Adapter CTX405 V.1/V.2 User Manual
Creatix 802.11g Adapter CTX405 V.1/V.2 User Manual

You also want an ePaper? Increase the reach of your titles
YUMPU automatically turns print PDFs into web optimized ePapers that Google loves.
<strong>Creatix</strong> <strong>802.11g</strong> <strong>Adapter</strong><br />
<strong>CTX405</strong> <strong>V.1</strong>/<strong>V.2</strong><br />
<strong>User</strong> <strong>Manual</strong><br />
1
Safety instructions for <strong>Creatix</strong> <strong>802.11g</strong> <strong>Adapter</strong><br />
This equipment has been designed and tested in accordance with the requirements of Standard<br />
EN60950.<br />
Extracts from these requirements according Standard EN60950: 2000<br />
�� The <strong>Creatix</strong> <strong>802.11g</strong> <strong>Adapter</strong> was evaluated for use in maximum ambient temperature of 40 °C.<br />
�� The <strong>Creatix</strong> <strong>802.11g</strong> <strong>Adapter</strong> may only be used in countries where the modem is certified.<br />
Regulatory Statements<br />
FCC Certification<br />
The United States Federal Communication Commission and the Canadian Department of<br />
Communication have established certain rules governing the use of electronic equipment.<br />
Part 15, Class B<br />
This device complies with Part 15 of the FCC Rules.<br />
Operation is subject to the following two conditions:<br />
(1) This device must not cause harmful interference, and<br />
(2) This device must accept any interference received, including interference that may cause<br />
undesired operation. This equipment has been tested and found to comply with the limits for a Class B<br />
digital device, pursuant to Part 15 of the FCC Rules. These limits are designed to provide reasonable<br />
protection against harmful interference in a residential installation. This equipment generates, uses<br />
and can radiate radio frequency energy and, if not installed and used in accordance with the<br />
instructions, may cause harmful interference to radio communications. However, there is no guarantee<br />
that interference will not occur in a particular installation. If this equipment does cause harmful<br />
interference to radio or on, the user is encouraged to try to correct the interference by one or more of<br />
the following measures:<br />
- Reorient or relocate the receiving antenna.<br />
- Increase the separation between the equipment and receiver.<br />
- Connect the equipment into an outlet on a circuit different from that to which the receiver is<br />
connected.<br />
- Consult the dealer or an experienced radio/TV technician for help.<br />
Caution:<br />
1. This equipment complies with FCC radiation exposure limits set forth for an uncontrolled<br />
environment. This equipment should be installed and operated with minimum distance 20 cm<br />
between the radiator and your body.<br />
2. This transmitter must not be co-located or operating in conjunction with any other antenna or<br />
transmitter.<br />
3. Changes or modifications made to this equipment not expressly approved by <strong>Creatix</strong> Polymedia<br />
GmbH may void the FCC authorization to operate this equipment.<br />
2
Table of Contents<br />
Safety Instructions .................................................................. 2<br />
Regulatory Statement .................................................................. 2<br />
Introduction .................................................................. 6<br />
Options<br />
- Peer to Peer<br />
- Access Point .................................................................. 6<br />
Installation Windows XP .................................................................. 8<br />
Installation Windows 2000 .................................................................. 11<br />
Configuration Windows Utility .................................................................. 13<br />
Configuration Driver Utility .................................................................. 14<br />
Uninstall .................................................................. 19<br />
5
INTRODUCTION<br />
The <strong>Creatix</strong> <strong>802.11g</strong> <strong>Adapter</strong> is a powerful 32-bit PCI Card that plugs quickly and easily into your<br />
Desktop PC for wireless network applications without wires or cables. Based on the IEEE <strong>802.11g</strong><br />
standard, it offers a transferring date rate up to 54Mbps in a wireless LAN environment. Once<br />
connected with other networked PC’s, it allows you to share hard disk drives, DVD drives, CD drives,<br />
printers and the likes.<br />
The <strong>Creatix</strong> <strong>802.11g</strong> <strong>Adapter</strong> allows you to take full advantage of your PC’s mobility with access to<br />
real-time information and online services anytime and anywhere. Plus, with the network installation<br />
simplicity and flexibility, you can eliminate the need to pull cable through walls and ceilings.<br />
FEATURES:<br />
- Compliant with IEEE <strong>802.11g</strong> standard for 2.4GHz Wireless LAN<br />
- Compliant with PCI Standard<br />
- Capable of up to 128-Bit WEP Encryption Protocol<br />
- Up to 54 Mbps High-Speed Transfer Rate<br />
- Easy to install and configure<br />
OPTIONS:<br />
The Peer-to-Peer (ad-hoc mode) Network<br />
This network installation lets you set a small wireless workgroup easily and quickly. Equipped with<br />
wireless PCI or wireless PC Cards, you can share files and printers between each PC and laptop.<br />
6
Or you can use one computer as an Internet Server to connect to a wired global network and share<br />
files and information with other PCs via a wireless LAN.<br />
The Access Point Network (infrastructure mode)<br />
The network installation allows you to share files, printers and Internet access much more<br />
conveniently. With wireless PCI Cards, you can connect wireless LAN to a wired global network via an<br />
Access Point.<br />
7
INSTALLATION<br />
Windows XP<br />
Step-by-step installation of the <strong>Creatix</strong> <strong>802.11g</strong> <strong>Adapter</strong><br />
�� Power off your PC, unplug the power cord and open the cover. Install the <strong>Creatix</strong> Wireless LAN<br />
PCI Card in an available PCI slot, close the cover and plug back the power cord.<br />
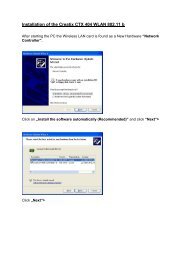
�� The Windows will auto-detect the <strong>Creatix</strong> Wireless LAN PCI Card and a “Found New Hardware<br />
Wizard” window will show up. Select “Install from a list or specific (Advanced)” to install the<br />
driver.<br />
�� Insert the Product CD-ROM into the appropriate drive. Click on “Next>” to install the driver.<br />
8
�� The wizard will find “<strong>Creatix</strong> <strong>802.11g</strong> <strong>Adapter</strong>” and start copying corresponding files into the<br />
system. Click on “Next>” to continue.<br />
�� Click “Finish” to complete the installation.<br />
9
�� Right click “My Computer”, select “Properties”, go to the “Hardware” tab and click the “Device<br />
Manager” button to see if any exclamation mark appears next to the “Network <strong>Adapter</strong>/<strong>Creatix</strong><br />
<strong>802.11g</strong> <strong>Adapter</strong>”. If not, your <strong>Creatix</strong> <strong>802.11g</strong> <strong>Adapter</strong> is working well.<br />
Windows 2000<br />
Step-by-step installation of the <strong>Creatix</strong> <strong>802.11g</strong> <strong>Adapter</strong><br />
�� Power off your PC, unplug the power cord and open the cover. Install the <strong>Creatix</strong> Wireless LAN<br />
PCI Card in an available PCI slot, close the cover and plug back the power cord.<br />
�� The Windows will auto-detect the <strong>Creatix</strong> <strong>802.11g</strong> <strong>Adapter</strong> and a “Found New Hardware Wizard”<br />
window will show up. Select “Search for a suitable driver for my device” to install the driver.<br />
10
�� Specify the location where the wizard should search for a suitable driver. Click on “Next>”.<br />
�� Insert the Product CD-ROM into the appropriate drive. Click on “OK” to install the driver.<br />
11
�� The window will appear the message about the <strong>Creatix</strong> <strong>802.11g</strong> <strong>Adapter</strong> has not passed<br />
Windows Logo testing to verify its compatibility with Windows XP. Click on the “Yes” button to<br />
continue installing.<br />
�� Click “Finish” to complete the installation.<br />
12
CONFIGURATION<br />
Windows XP Utility<br />
After installing the <strong>Creatix</strong> <strong>802.11g</strong> <strong>Adapter</strong>, the Windows XP will display a “Wireless Network<br />
Connection # ” message.<br />
Click on the message and the “Automatic Wireless Network Configuration” will then appear<br />
automatically. You may click on “Connect” button to connect to an available wireless infrastructure<br />
network (Access Point). You may also click the “Advanced” button to make advanced configuration<br />
for the <strong>Creatix</strong> Wireless LAN PCI Card, shown as below.<br />
13
CONFIGURATION<br />
Driver Utility<br />
To use the WLAN utility under Windows XP, you need to disable the “Automatic Wireless Network<br />
Configuration” first. Steps are described as follows:<br />
�� Right click the “Network Connections” icon. Select “Properties”.<br />
�� Go to the “Wireless Networks” tab.<br />
�� Uncheck the “Use Windows to configure my wireless network settings” check box and click<br />
the “OK” button (see the picture above).<br />
NOTE: You have to choose one way to configure <strong>Creatix</strong> <strong>802.11g</strong> <strong>Adapter</strong> either of using the<br />
driver utility by unmark “Use Windows to configure my wireless network settings” or using<br />
Windows XP “Automatic Wireless Network Configuration first by checking “Use Windows to<br />
configure my wireless network settings”.<br />
�� Double-Click on the green (or red if not connected) Icon in the task bar to open the wireless<br />
settings<br />
14
Status<br />
�� The utility will come up with the status window. Here you can check your current TX-rate, the<br />
current channel, the link quality and the signal strength. Also you can enable or disable radio.<br />
Use the rescan button to refresh the available WLAN`s.<br />
Configuration<br />
�� Here you can setup different profiles. Each profile has to contain a valid Network Name. The<br />
Network Type has to be configured either as Access Point or as Peer-to-Peer.<br />
NOTE: Be sure that the Network Name matches the Network Name given by your Access Point.<br />
15
Encryption<br />
Disabled<br />
Here you have 3 options to use the encryption; disabled, 64bit, 128bit. Default setting is disabled.<br />
NOTE: It is strongly recommended to use 128bit encryption to protect your network.<br />
64bit Encryption<br />
If 64bit encryption is enabled, you have the option to create the keys manually (alphanumeric or<br />
hexadecimal) or to create the key with Passphrase.<br />
16
128bit encryption (recommended option)<br />
If 128bit encryption is enabled, you have the option to create the keys manually (alphanumeric or<br />
hexadecimal) or to create the key with Passphrase.<br />
IBSS<br />
Here you can select your favorite channel in Peer-to-Peer mode. The Access Point will provide the<br />
Access Point mode channel.<br />
17
Domain<br />
Here you can select your country. Depending on your selection, the available channels may change.<br />
About<br />
Here you can see versions and corresponding date.<br />
18
UNINSTALL<br />
Go to the Control Panel < System – Hardware – Device Manager><br />
Click with the right mouse button to the <strong>Creatix</strong> <strong>802.11g</strong> <strong>Adapter</strong> and click uninstall.<br />
19
Go into the hidden directory \ Windows \ Inf<br />
Check all “oem.inf“ files (they can be opened by a double click) to find the oem.inf file<br />
“PRISMA00.INF”<br />
Delete this file.<br />
After deleting the file shut down your PC to remove the card or restart to install a new update for the<br />
driver.<br />
20