GB125 Concentric Vent - Buderus
GB125 Concentric Vent - Buderus
GB125 Concentric Vent - Buderus

You also want an ePaper? Increase the reach of your titles
YUMPU automatically turns print PDFs into web optimized ePapers that Google loves.
Applications manual<br />
<strong>GB125</strong> <strong>Concentric</strong> <strong>Vent</strong><br />
Design Manual<br />
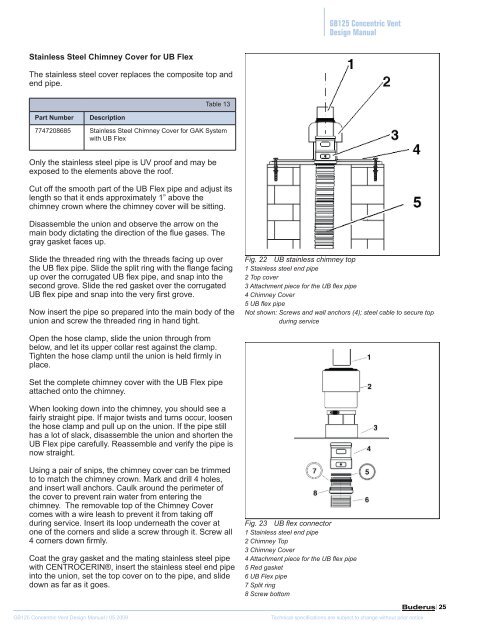
Stainless Steel Chimney Cover for UB Flex<br />
The stainless steel cover replaces the composite top and<br />
end pipe.<br />
Table 13<br />
Part Number<br />
Description<br />
7747208685 Stainless Steel Chimney Cover for GAK System<br />
with UB Flex<br />
Only the stainless steel pipe is UV proof and may be<br />
exposed to the elements above the roof.<br />
Cut off the smooth part of the UB Flex pipe and adjust its<br />
length so that it ends approximately 1” above the<br />
chimney crown where the chimney cover will be sitting.<br />
Disassemble the union and observe the arrow on the<br />
main body dictating the direction of the flue gases. The<br />
gray gasket faces up.<br />
Slide the threaded ring with the threads facing up over<br />
the UB flex pipe. Slide the split ring with the flange facing<br />
up over the corrugated UB flex pipe, and snap into the<br />
second grove. Slide the red gasket over the corrugated<br />
UB flex pipe and snap into the very first grove.<br />
Now insert the pipe so prepared into the main body of the<br />
union and screw the threaded ring in hand tight.<br />
Fig. 22 UB stainless chimney top<br />
1 Stainless steel end pipe<br />
2 Top cover<br />
3 Attachment piece for the UB flex pipe<br />
4 Chimney Cover<br />
5 UB flex pipe<br />
Not shown: Screws and wall anchors (4); steel cable to secure top<br />
during service<br />
Open the hose clamp, slide the union through from<br />
below, and let its upper collar rest against the clamp.<br />
Tighten the hose clamp until the union is held firmly in<br />
place.<br />
Set the complete chimney cover with the UB Flex pipe<br />
attached onto the chimney.<br />
When looking down into the chimney, you should see a<br />
fairly straight pipe. If major twists and turns occur, loosen<br />
the hose clamp and pull up on the union. If the pipe still<br />
has a lot of slack, disassemble the union and shorten the<br />
UB Flex pipe carefully. Reassemble and verify the pipe is<br />
now straight.<br />
Using a pair of snips, the chimney cover can be trimmed<br />
to to match the chimney crown. Mark and drill 4 holes,<br />
and insert wall anchors. Caulk around the perimeter of<br />
the cover to prevent rain water from entering the<br />
chimney. The removable top of the Chimney Cover<br />
comes with a wire leash to prevent it from taking off<br />
during service. Insert its loop underneath the cover at<br />
one of the corners and slide a screw through it. Screw all<br />
4 corners down firmly.<br />
Coat the gray gasket and the mating stainless steel pipe<br />
with CENTROCERIN®, insert the stainless steel end pipe<br />
into the union, set the top cover on to the pipe, and slide<br />
down as far as it goes.<br />
<strong>GB125</strong> <strong>Concentric</strong> <strong>Vent</strong> Design Manual | 05.2009<br />
Fig. 23 UB flex connector<br />
1 Stainless steel end pipe<br />
2 Chimney Top<br />
3 Chimney Cover<br />
4 Attachment piece for the UB flex pipe<br />
5 Red gasket<br />
6 UB Flex pipe<br />
7 Split ring<br />
8 Screw bottom<br />
Technical specifications are subject to change without prior notice<br />
| 25