Alesis SR18 Reference Manual - RevD - Just Music
Alesis SR18 Reference Manual - RevD - Just Music
Alesis SR18 Reference Manual - RevD - Just Music

Create successful ePaper yourself
Turn your PDF publications into a flip-book with our unique Google optimized e-Paper software.
TABLE OF CONTENTS<br />
INTRODUCTION 5<br />
WELCOME TO THE <strong>SR18</strong> DRUM MACHINE! 5<br />
GROUND RULES 5<br />
CONNECTION DIAGRAM 8<br />
TOP PANEL PHYSICAL LAYOUT 9<br />
GENERAL CONTROLS 9<br />
NAVIGATION BUTTONS 10<br />
MODE BUTTONS 10<br />
SETUP BUTTONS 11<br />
TRANSPORT CONTROL BUTTONS 11<br />
REAR PANEL PHYSICAL LAYOUT 12<br />
DISPLAY LAYOUT 13<br />
BASICS 14<br />
HOW TO COMMUNICATE WITH THE <strong>SR18</strong> 14<br />
10 STEPS TO INSTANT GRATIFICATION (SETUP<br />
AND CHECKOUT) 15<br />
THE INSTRUMENT LAYERS 16<br />
PLAYBACK / RECORD BASICS 16<br />
RECORDING PATTERNS 21<br />
STEPS TO RECORDING A PATTERN 21<br />
PRACTICE MODE 21<br />
RECORDING OTHER PARTS (PERCUSSION AND<br />
BASS) 21<br />
PATTERN PLAY MODE 22<br />
PLAYING PATTERN SEQUENCES WITH THE PADS 22<br />
RECORDING PATTERN SEQUENCES INTO A<br />
SONG 22<br />
ASSIGNING PATTERNS TO THE PADS 22<br />
SELECTING, EDITING AND CREATING DRUM SETS 23<br />
SELECTING A DRUM SET 23<br />
CREATING AND EDITING DRUM SETS 23<br />
EFFECTS 29<br />
SAVING YOUR DRUM SETS 29<br />
RECORD SETUP 30<br />
PAGE 1: SELECT THE QUANTIZATION VALUE 30<br />
PAGE 2: GATE 31<br />
PAGE 3: SELECT THE SWING VALUE 31<br />
PAGE 4: ENABLE CLICK AND SET RHYTHM 31<br />
PAGE 5: SET CLICK VOLUME 31<br />
PAGE 6: VELOCITY SENSITIVITY 32<br />
PAGE 7: BEAT VALUE 32<br />
PAGE 8: NOTE VALUE 32<br />
PAGE 9: PATTERN LENGTH 33<br />
PAGE 10: OFFSET A PATTERN OR DRUM PART 33<br />
PAGE 11: NAME THE PATTERN 33<br />
EDITING PATTERNS – ERASE FUNCTIONS 34<br />
ERASING DRUM EVENTS WHILE RECORDING 34<br />
ERASING AN ENTIRE PATTERN 34<br />
ERASE ALL EVENTS PLAYED BY A PARTICULAR<br />
DRUM PAD 34<br />
ERASE ALL INSTRUMENT EVENTS IN SUB-<br />
PATTERN 34<br />
PATTERN STEP EDITING (STEP EDIT MODE) 36<br />
ADDING A NEW DRUM TO A STEP 37<br />
ERASE A DRUM SOUND FROM A STEP 37<br />
CHANGE A DRUM SOUND'S VOLUME IN A GIVEN<br />
STEP 37<br />
EXIT STEP EDIT MODE 37<br />
SONG MODE 38<br />
PLAYING SONGS 38<br />
RECORDING A SONG IN REAL-TIME 39<br />
MANUAL SONG CREATION (SONG STEP EDIT<br />
MODE) 40<br />
SETTING SONG TEMPO 42<br />
INSERTING A TEMPO CHANGE IN A SONG 42<br />
CONTROLLING PLAYBACK POSITION 43<br />
LOOP A PATTERN INDEFINITELY 43<br />
START FROM THE MIDDLE OF A SONG 43<br />
ERASING AN ENTIRE SONG 44<br />
SAVING YOUR SONG 44<br />
APPEND A SONG 44<br />
NAME A SONG (NAME) 44<br />
SYSTEM SETUP 45<br />
Page 1 / MIDI CHANNEL 45<br />
Page 2 / RECEIVE MIDI NOTES 45<br />
Page 3 / TRANSMIT MIDI NOTES 46<br />
Page 4 / ASSIGN MIDI NOTE NUMBERS TO DRUM<br />
PADS 46<br />
Page 5 / ACCEPT EXTERNAL CLOCK VALUE 47<br />
Page 6 / SEND CLOCK VALUE TO OTHER<br />
DEVICES 47<br />
Page 7 / MERGE MIDI IN WITH MIDI OUT 48<br />
Page 8 / SELECT DRUM SETS VIA MIDI PROGRAM<br />
CHANGES 48<br />
Page 9 / TEMPO SELECTION 49<br />
Page 10 / MAP DRUM NOTES 49<br />
PAGE 11 / MANUAL DRUMSET OVERRIDE 51<br />
Page 12 / LEDs 51<br />
Page 13 / BACKLIGHT BRIGHTNESS 51<br />
Page 14 / BATTERY LEVEL 51<br />
Page 15 / LOW BATTERY WARNING 52<br />
Page 16 / CHECK AVAILABLE MEMORY 52<br />
Page 17 / SEND SONG AND PATTERN DATA TO<br />
MIDI SYS EX STORAGE DEVICE 52<br />
SENDING MIDI SYSEX SONG AND PATTERN<br />
DATA TO THE <strong>SR18</strong> 53<br />
APPLICATIONS 54<br />
MIDI SYNC APPLICATIONS 54<br />
STRATEGIES FOR ASSEMBLING PATTERNS AND<br />
SONGS 55<br />
UNDERSTANDING RHYTHMIC NOTATION 56<br />
MIDI IMPLEMENTATION CHART 57<br />
KEY FEATURES 58<br />
TECHNICAL SPECIFICATIONS 58<br />
EDITING PATTERNS – COPY/SAVE FUNCTIONS 35<br />
SAVING A PATTERN 35<br />
COPYING A PATTERN 35<br />
APPENDING A PATTERN 35<br />
EDITING PATTERNS – TRANSPOSITION 36
INTRODUCTION<br />
WELCOME TO THE <strong>SR18</strong> DRUM MACHINE!<br />
The <strong>SR18</strong> includes high-fidelity drum, percussion and bass sounds, and is easy to operate. You<br />
can easily switch among the different instrument layers in real-time. As you strike the 12 pads<br />
(each of which can be assigned to any of the available sounds), the <strong>SR18</strong>'s on-board sequencer<br />
records exactly when you triggered the sounds and the dynamics of your playing. You can play<br />
back your sequences and edit them in various ways.<br />
Data can be saved so that it is retained in memory even if the power is turned off. If the memory<br />
fills up with drum Patterns and Songs, this data can be saved permanently to MIDI System<br />
Exclusive storage devices.<br />
The <strong>SR18</strong> also includes a library of Preset Patterns prepared by professional drummers and<br />
musicians for those who want to start creating Songs in the fastest and easiest way possible.<br />
GROUND RULES<br />
The <strong>SR18</strong> consists of two main elements:<br />
• The drum sounds themselves, recorded in high-resolution multi-sample stereo format. For<br />
additional realism, many sounds use advanced "dynamic articulation" techniques so that<br />
these sounds, when hit loudly, have a different timbre than when they're hit softly.<br />
• An internal sequencer to control and trigger the sounds.<br />
The Pattern/Song Recording Method<br />
When recording with a drum machine, it's often easier to divide a song into shorter<br />
individual Patterns and work on these rather than record an entire song. A typical<br />
Pattern might be 8,16, or 32 beats long, and correspond to a verse, chorus, bridge,<br />
instrumental, intro, etc. While recording these Patterns, the <strong>SR18</strong> will be in Pattern<br />
Mode. The <strong>SR18</strong> holds 100 Preset (i.e., can't be edited) Patterns and 100 userprogrammable<br />
Patterns, each of which can be from 1 to 128 beats long.<br />
After perfecting these Patterns, Song Mode offers two ways to create a song:<br />
• Program a list of Patterns, in the order in which they are to be played.<br />
• Select Patterns in real time, and the <strong>SR18</strong> will remember your performance.<br />
The <strong>SR18</strong> stores up to 100 User-programmable Songs.<br />
Breaking a song into Patterns saves time since elements of a song often repeat.<br />
Example: The second verse might have the same drum pattern as the first verse.<br />
Rather than record the same Pattern twice, simply record one Pattern, then list it twice<br />
when assembling a Song. This also saves memory (thus leaving room for more<br />
Patterns and Songs) since listing a Song step takes up much less memory than<br />
recording a Pattern.<br />
Tip: To hear a demo song, hold<br />
[PATTERN / SONG] and press<br />
[PLAY].<br />
5
The Two Types of Patterns<br />
The <strong>SR18</strong> introduces exciting new Song construction techniques. The <strong>SR18</strong> excels at<br />
live performance—something usually not associated with drum machines. The key to<br />
using these advanced features is to understand the different types of available<br />
Patterns.<br />
• Preset Patterns provide a variety of rock, jazz, pop, and other rhythms<br />
programmed by professional drummers.<br />
• User Patterns are Patterns you can program, edit, and save. The<br />
PRESET/USER button selects between these two master banks of Presets. It is<br />
important to note that the only way to modify a Preset Pattern is to copy it to a<br />
User Pattern, where it can be edited.<br />
The Four Types of Sub-Patterns<br />
There are 100 of each type of Pattern, numbered 00-99. However, each numbered<br />
Pattern actually contains four different "Sub-Patterns":<br />
• A pair of independent Main Patterns (A and B, selected by their respective<br />
buttons).<br />
• A pair of associated Fill Patterns (A Fill and B Fill, selected by pressing the FILL<br />
button when either A or B is selected). The Fills primarily provide transitional<br />
Patterns between Main Patterns, which makes for more realistic drum parts. The<br />
associated Fill Patterns share the same length, Drum Set, and name as their<br />
Main Patterns (e.g., if A is 16 beats, A Fill is 16 beats). Otherwise, they are<br />
independent.<br />
The reason for pairing the two different A and B Patterns together is simply so that you<br />
can switch back and forth between them rapidly in live performance or while<br />
improvising. Note that a Pattern’s A, B and FILL Sub-Patterns have equal lengths and<br />
use the same Drum Set (collection of drum, percussion and bass sounds, as well as<br />
effects parameters).<br />
Note that even though there are "only" 100 Patterns, the A and B variations double<br />
that to 200 Patterns, and the Fills double that again to 400 Patterns. Added to the<br />
Preset Patterns, 800 total Patterns are available.<br />
How "Looping" Simplifies Recording<br />
To simplify recording, a Pattern will "loop" over and over again.<br />
Example: Suppose you want to record an 8-beat pattern. While recording, the pattern<br />
will record through all 8 beats, then immediately jump back to the beginning and<br />
continue recording through all 8 beats again. The <strong>SR18</strong> will remain in record mode,<br />
and continue to loop, until you press STOP or switch over to Pattern Play mode. You<br />
will hear any previously-played parts as you record new parts. You can also erase<br />
drum hits while the pattern is looping to correct for errors.<br />
6
What's a Voice?<br />
Each of the 12 large pads triggers a voice. A voice is a sound-generating element with<br />
several variable parameters: sound assignment, tuning, volume, output assignment<br />
(the voice's audio output can go to either one of two sets of stereo outputs, and<br />
furthermore, to anywhere within the stereo field of the chosen set of outputs), MIDI<br />
note number, etc.<br />
Each pad is velocity-sensitive: the harder you hit the pad, the louder the sound<br />
assigned to the pad will play. Thanks to the dynamic articulation techniques mentioned<br />
earlier, the timbre will often change as well, just like the way that "real" drum,<br />
percussion and bass instruments produce sound when played with different amounts<br />
of force.<br />
There are eight levels of pad volume resolution, from soft to loud. However, when<br />
using the <strong>SR18</strong> as a drum sound expander and triggering sounds via MIDI, they<br />
respond to all 127 MIDI volume levels.<br />
7
CONNECTION DIAGRAM<br />
As you hook up<br />
the <strong>SR18</strong>, the<br />
volume control on<br />
your power amp<br />
and the <strong>SR18</strong><br />
should be all the<br />
way down, and<br />
power to both<br />
units should be<br />
off.<br />
1. Plug ¼” TS cables from the MAIN OUTPUTS to an amplifier, mixer, or speaker system. For mono<br />
sound, you can connect only one output.<br />
2. Alternatively, you can connect a pair of ¼” TRS headphones to the PHONES OUTPUT to practice<br />
quietly.<br />
3. Connect your instrument to the INSTRUMENT INPUT.<br />
4. Connect a MIDI device, such as a sampler or sound module, to the MIDI OUT of the <strong>SR18</strong>.<br />
5. Connect a MIDI device, such as a percussion controller, to the MIDI IN of the <strong>SR18</strong>.<br />
6. If you have ¼” TS footswitches, connect them to the START / STOP and COUNT / A / B / FILL<br />
jacks.<br />
7. Plug the included power adapter (12V DC 500mA) into the adapter jack and the adapter into a<br />
power source. Alternatively, you may choose to power the unit by inserting 6 AA batteries into the<br />
bottom compartment.<br />
8. Press the POWER switch to turn on the unit.<br />
9. Tap the pads to hear sounds. You can switch among the three different sound categories for the<br />
pads by pressing the corresponding button (DRUMS, PERC, BASS).<br />
10. Adjust the volume control on the rear panel to a suitable listening level.<br />
Note that you may also connect the stereo Aux output to a speaker system or amplifier, using a ¼” TRS cable. The<br />
SR-18 can be setup to output sounds through the Main or Aux connections (Main by default). See “Creating and<br />
Editing Drum Sets / Page 12: Output” for more information.<br />
8
TOP PANEL PHYSICAL LAYOUT<br />
GENERAL CONTROLS<br />
1. LCD – The display helps you keep track of system parameters and settings as you use the <strong>SR18</strong>.<br />
2. PADS – The 12 pads are used to trigger sounds on the <strong>SR18</strong>. The pads can address 3 different<br />
types of sounds: drums, percussion and bass. To select which sounds are controlled by the pads,<br />
press one of the three Pad Play buttons (DRUM, PERC, BASS). In addition, the pads can be used<br />
to trigger entire Patterns while in Pattern Play Mode.<br />
3. PAD PLAY BUTTONS – These 3 buttons select which sounds are triggered when you hit the<br />
pads. Press the corresponding button to control the following sounds with the pads:<br />
BASS – Selects the Bass sounds associated with the current Drum Set. In addition, you can hold<br />
down this button and use the INC / DEC buttons or the VALUE dial to transpose the bass sounds<br />
up or down an octave.<br />
DRUMS – Selects the Drum sounds associated with the current Drum Set.<br />
PERC – Selects the Percussion sounds associated with the current Drum Set.<br />
4. ROLL – While programming Patterns, hold down this button and press a pad to create a roll. The<br />
roll will last for as long as the pad is being held down. This lets you play a series of drum hits<br />
without having to repeatedly press the pads, and is typically used to create steady 16th note hi-hat<br />
parts, quarter note kick drum parts, snare rolls, etc. The timing of the roll is specified by the<br />
Quantization and Swing settings in the Record Setup menu.<br />
5. TAP TEMPO – You can use this button to tap in a tempo. The <strong>SR18</strong> will average the time<br />
between successive taps and will derive a tempo. You can also change the tempo by holding<br />
down the TAP TEMPO button and using the VALUE dial or the INC / DEC buttons.<br />
6. TEMPO LED – This LED will blink at a rate equal to the tempo displayed on the screen’s bottom<br />
right corner.<br />
9
7. REC LED – This LED will light when the <strong>SR18</strong> is recording. It will blink when you are required to<br />
confirm or cancel an action.<br />
8. A & B – Each Pattern consists of two Main sub-patterns – A & B. You can select each of the two<br />
sub-patterns by pressing its corresponding button. These sub-patterns allow you to program<br />
variation in your Patterns (i.e. sub-pattern A is the verse, sub-pattern B is the chorus).<br />
9. FILL – Each Pattern also includes two Fills associated with each of the two sub-patterns. The Fills<br />
are used to transition from one sub-pattern to another (i.e. transition from verse to chorus).<br />
10. ERASE – This button allows you to erase Patterns or Songs. Hold this button down and the<br />
screen will prompt you to verify that you want to erase the selected element. To erase the part,<br />
press the REC button while the ERASE button is being held down. In addition, ERASE allows you<br />
to erase specific events in real-time as you record your patterns. Simply hold down the ERASE<br />
button as the Pattern plays and press the pad corresponding to the sound you wish to erase. Any<br />
events assigned to the pad will be erased from the moment the pad is pressed until either the pad<br />
or the ERASE button is released.<br />
11. SAVE / COPY – This button accesses various save / copy / append functions.<br />
12. MUTE – This button allows you to mute a selected instrument layer. Hold down the button and<br />
press the DRUM, PERC or BASS to mute the corresponding instrument layer. To un-mute the<br />
layer, press the corresponding button again while MUTE is being held down.<br />
NAVIGATION BUTTONS<br />
13. INC / DEC – These buttons are used to increment and decrement through values and settings on<br />
the <strong>SR18</strong>.<br />
14. VALUE DIAL – This dial can also be used to increment and decrement values and settings.<br />
15. NUMBER BUTTONS – Alternatively, you may use the number buttons to input values directly.<br />
16. PAGE UP / DOWN – These two buttons are used to go between pages of options when browsing<br />
menus and settings.<br />
MODE BUTTONS<br />
17. PATTERN / SONG – This button toggles between the two different modes on the <strong>SR18</strong>. In<br />
Pattern Mode, you can play, record and edit individual patterns. Patterns are short (i.e. 8-beat, 16-<br />
beat, etc) rhythm sequences which are assembled together to create Songs. A Song is a<br />
sequence of Patterns. In Song Mode, you can perform or program your Patterns to create a Song.<br />
The currently-selected mode will be indicated on the display.<br />
18. PRESET / USER – This button toggles between Preset and User Patterns. The selected mode<br />
will be indicated in the upper right corner of the display.<br />
Preset Patterns provide a variety of rock, jazz, pop and other rhythms programmed by professional<br />
drummers and cannot be overwritten or edited (the only way a Preset Pattern can be edited is to<br />
copy it to a User Pattern).<br />
User Patterns are Patterns you can program, edit and save as you wish.<br />
19. STEP EDIT – Pressing this button enters Step Edit Mode for Pattern or Song editing, depending<br />
on which of the two modes is selected. This mode allows you to “step” through your Pattern or<br />
Song sequence to correct any mistakes. The display will indicate STEP EDIT while in Step Edit<br />
Mode, and the current step will be displayed on the top line. To move through the steps of the<br />
sequence, use the PAGE UP / DOWN buttons.<br />
20. PTN PLAY – This button enables Pattern Play Mode. In this mode, you can play pre-selected<br />
Patterns in a sequence, using the pads to trigger the Patterns in real-time. See “Playing Patterns<br />
With the Pads” section.<br />
10
SETUP BUTTONS<br />
21. SYSTEM SETUP – Pressing this button calls up various system settings and preferences, such as<br />
MIDI options, note assignments, clocking, as well as display brightness and others. The display<br />
will indicate SYSTEM and SETUP when you are in System Setup. You can move between the<br />
different pages of settings with the PAGE UP / DOWN buttons and change the settings on the<br />
selected page with the VALUE dial or the INC / DEC buttons. To save your settings so they are<br />
recalled the next time you boot up the <strong>SR18</strong>, press the SAVE button while in this menu and then<br />
press REC to confirm the save. To exit System Setup, press the SYSTEM SETUP button again.<br />
22. RECORD SETUP – Pressing this button calls up various recording settings, such as Quantization,<br />
Swing, Pattern Length, Time Signature, etc. The display will indicate RECORD and SETUP while<br />
you are in Record Setup Mode. You can move between the different pages of settings with the<br />
PAGE UP / DOWN buttons and change the settings on the selected page with the VALUE dial or<br />
the INC / DEC buttons. To exit Record Setup, press the Record Setup button again.<br />
23. DRUM SET – This button calls up the Drum Set Mode options, where you can select different<br />
drum/percussion sounds, bass sounds, change individual pad sounds and modify parameters such<br />
as Volume, Tuning, Panning, etc. The display will indicate DRUM SET while you are in Drum Set<br />
Mode. You can use the PAGE UP / DOWN buttons to move between the different pages of<br />
settings and you can use the VALUE dial or INC / DEC buttons to change the settings on the<br />
selected page. When you modify or customize a Drum Set, you will need to make sure that you<br />
save it (press the SAVE button, then press REC to confirm) in order to be able to access it later.<br />
To exit Drum Set Mode, press the Drum Set button again.<br />
24. EFFECTS – This button calls up the Effects menu, where you can select the effects which are<br />
stored and recalled with every Drum Set. These effects include Reverb, EQ / Compression and<br />
feature ready-to-use presets. To move between the different pages in the Effects Menu, use the<br />
PAGE UP / DOWN buttons. You can use the VALUE dial or INC / DEC buttons to enable and<br />
disable the selected effect or to change the displayed settings.<br />
TRANSPORT CONTROL BUTTONS<br />
25. PLAY – If the <strong>SR18</strong> is stopped, pressing PLAY will play the sequence from the current position. If<br />
the <strong>SR18</strong> is playing, pressing PLAY will pause the sequence. You can continue playing the<br />
sequence from the position where it was paused by pressing PLAY again. In addition, you may<br />
use the PAGE UP and PAGE DOWN buttons while the unit is playing to advance to the next<br />
Pattern (if one is pending), or start playing from the beginning of the current Pattern (and cancel<br />
any pending Pattern), respectively.<br />
26. STOP – Press this button to stop the current sequence and go back to the start of the Pattern or<br />
Song. Quickly pressing STOP twice sends a MIDI Panic message to the internal voices of the<br />
<strong>SR18</strong> and to external devices connected via MIDI. A Panic message effectively stops all sounds<br />
which may be playing. This is useful in situations where a certain sound may be stuck and will not<br />
turn off.<br />
27. REC – Press and hold this button before pressing PLAY to initiate recording. The REC button also<br />
functions as an ENTER command, when prompted for action by the display (for example, when<br />
erasing songs).<br />
11
REAR PANEL PHYSICAL LAYOUT<br />
12<br />
3<br />
VOLUME<br />
AUX L/R MAIN RIGHT MAIN LEFT PHONES INSTRUMENT OUT / THRU IN START COUNT/A/B/FILL<br />
STOP<br />
ON<br />
8 9<br />
6 4 5 7<br />
OUTPUTS INPUT<br />
MIDI FOOTSWITCHES POWER<br />
OFF<br />
10 11 1 2<br />
1. DC IN – The supplied power adapter should be connected to a live outlet to power the unit.<br />
Alternatively, the unit may be powered with 6 AA batteries inserted in the bottom<br />
compartment. (Please refer to illustration in compartment for proper battery insertion).<br />
2. ON/OFF SWITCH – This switch turns the unit on and off.<br />
3. VOLUME – This knob controls the overall volume of the <strong>SR18</strong>.<br />
4. ¼” TS RIGHT / LEFT OUTPUTS – These ¼” connections will output the audio from the<br />
<strong>SR18</strong>. Connect these outputs to an amplifier or a speaker system. For mono sound, you<br />
can connect only one output.<br />
5. PHONES – Connect headphones to this output for quiet practicing.<br />
6. AUX L / R – The <strong>SR18</strong> can also output instrument layers through this auxiliary connection.<br />
For example, this allows you to output your drum and percussion tracks on separate<br />
channels, which can be useful in a recording / tracking situation.<br />
7. INSTRUMENT – Connect your instruments (guitar, bass, etc.) to this ¼” input. The input<br />
signal will be mixed with the audio from the unit.<br />
8. MIDI OUT / THRU – Use a five-pin MIDI cable to connect the MIDI OUT of the <strong>SR18</strong> to the<br />
MIDI IN of an external MIDI device.<br />
9. MIDI IN – Use a five-pin MIDI cable to connect the MIDI OUT of an external device to the<br />
MIDI IN of the <strong>SR18</strong>.<br />
10. START / STOP FOOTSWITCH – Connect a ¼” TS footswitch to this input to remotely start<br />
and stop playback on the <strong>SR18</strong>.<br />
11. COUNT / A / B / FILL – Connect a ¼” TS footswitch to this input to remotely control pattern<br />
playback on the <strong>SR18</strong>.<br />
12. KENSINGTON LOCK – The <strong>SR18</strong> may be secured to a table or surface, using this<br />
Kensington Lock slot.<br />
12
DISPLAY LAYOUT<br />
1<br />
2<br />
3<br />
10<br />
9<br />
8<br />
The LCD is divided into several "windows." Each window contains information that helps you<br />
monitor the <strong>SR18</strong>'s status, and/or indicates what type of data should be entered.<br />
1. Name, "dialog" box, real time Song/Pattern readout, beat counter. - This is the most<br />
commonly-used area of the display. It shows Pattern and Song names, the beat counter if a<br />
Pattern or Song is playing, and the Pattern (including A/B/Fill/Preset or User designators) that is<br />
currently playing in Song mode. When acting as a "dialog box," it lists parameters and the value<br />
to be edited (e.g., MIDI channel and the channel number).<br />
2. Pattern/Song readout (also Drum Set edit and drum pad readout) - This shows the<br />
selected Song or Pattern number; with Patterns, the A/B/Fill/Preset or User designators are also<br />
shown. In operations that require selecting a drum pad, this window displays the drum pad<br />
number.<br />
3. Drumset Edited indicator - If you have edited a Drum Set to which a particular Pattern was<br />
assigned, the display also shows DRUMSET EDITED. This is a reminder that you need to save<br />
your changes if you would like to be able to recall them at a later time.<br />
4. Page number and tempo display - When stopped or running, this shows the current tempo.<br />
For functions that have multiple "pages" of parameters (Record Setup, System Setup, etc), this<br />
portion of the display shows the currently selected page number.<br />
5. Pattern Play indicator - This segment is lit when in Pattern Play Mode.<br />
6. Bass and Octave Transposition indicators – BASS indicates that the pads are controlling<br />
bass sounds, while the OCTAVE indicators (+1/-1) let you know whether the sounds are<br />
transposed up or down an octave (no indicator will be present when there is no transposition).<br />
7. Swing - Shows the current swing rhythm, expressed as a<br />
percentage (or OFF if swing is off).<br />
8. Drums / Percussion indicator – These indicators let you know<br />
which Pad Play Mode is currently selected (i.e. which sounds the<br />
pads are controlling, or which instrument layer you are currently<br />
editing).<br />
9. Quantize - Shows the current quantization setting in standard<br />
music notation (or OFF if quantization is off).<br />
10. Selected function - Shows which function is currently<br />
selected: Drum Set, System Setup, Record Setup, etc.<br />
7<br />
6 5<br />
4<br />
Throughout the text, button<br />
names are shown in<br />
UPPER CASE and words<br />
that appear on the display<br />
are shown in BOLD. When<br />
referring to a numbered<br />
step in a set of steps, the<br />
step number will be in<br />
parenthesis—for example,<br />
step (4)—to prevent<br />
confusion with Song steps<br />
or step edit mode.<br />
13
BASICS<br />
HOW TO COMMUNICATE WITH THE <strong>SR18</strong><br />
• The Cursor<br />
When the <strong>SR18</strong> wants you to enter a number in the "Dialog" box, the display will show the<br />
previously-entered number (or the default number), and the first digit will have a small underline<br />
called the cursor. If the cursor is not present, the number is there for reference only. You are<br />
expected to enter something only if the cursor is present.<br />
• The INC / DEC Buttons<br />
The two small buttons with the up arrow and down arrow symbols (next to the number keys) are<br />
called the INC / DEC buttons respectively.<br />
Pressing the INC button once increases the value of the entire number indicated by the cursor (not<br />
just a single digit) by one. Pressing the DEC button once decreases the value of the entire number<br />
indicated by the cursor (not just a single digit) by one.<br />
Example: If the display shows 00 and you want to enter 01, tap the INC button once.<br />
These buttons, as well as the PAGE buttons, also have a "scroll" feature. If you press and hold a<br />
button, after a short pause the display will either increment or decrement at a rapid rate.<br />
• The VALUE dial<br />
In addition to the INC / DEC buttons, you may also use the large VALUE dial to quickly increment<br />
and decrement through values and settings. Turn the dial clockwise to increment through the<br />
available values, or turn the dial counter-clockwise to decrement.<br />
• The NUMBER buttons<br />
The number buttons (0-9) can also be used to directly input values into the <strong>SR18</strong>. Please note<br />
that when using the number buttons it is important to enter leading zeros, if necessary. If a value<br />
to be edited is a two-digit number, you must enter a two-digit number. If the number is a three-digit<br />
number, you must enter a three-digit number. If necessary, enter a leading 0 (i.e., a zero at the<br />
beginning of the number) to fill out the required number of digits.<br />
Example: The beat length is a three-digit number. To enter a beat length of 16, enter 016.<br />
• Automatic Revert<br />
This feature may confuse you at first, but save you from potential problems as you become more<br />
familiar with the machine. If all the required digits of a number aren't entered within two seconds,<br />
the display will revert back to the previous number, with the cursor under the first digit of the<br />
previous number. This is handy because if you start to enter a new number, but then change your<br />
mind halfway through, you don't have to key in (or remember) the original number again—just wait<br />
two seconds, and the display will revert to the original setting.<br />
• Buttons that Toggle<br />
Some buttons (SYSTEM SETUP, RECORD SETUP, PATTERN/SONG, PRESET/USER,<br />
EFFECTS) "toggle" between two states. Each button press sets the switch to its alternate state.<br />
Example: Press the PATTERN/SONG button once to change from Pattern to Song; press<br />
again to change from Song to Pattern.<br />
Example: Press RECORD SETUP to call up the Record Setup menu; press RECORD<br />
SETUP again to exit the Record Setup menu.<br />
14
10 STEPS TO INSTANT GRATIFICATION (SETUP AND CHECKOUT)<br />
1. Connect the Main outputs (either left or right for a mono monitoring system, or both for<br />
stereo) to a musical instrument amplifier, PA, or plug headphones into the headphone<br />
output on the back of the <strong>SR18</strong>. The amp and <strong>SR18</strong> volume control (on back) should be all<br />
the way down (counter-clockwise).<br />
2. Leave the MIDI OUT jack (rear panel) disconnected for now.<br />
3. Plug the <strong>SR18</strong>'s AC adapter into the wall. The smaller plug inserts in the 12V DC Power<br />
jack on the back.<br />
4. Turn on the rear panel ON/OFF switch, and then turn on the amplifier.<br />
5. The LCD will illuminate. The upper right of the<br />
display should say PATTERN and not SONG;<br />
if it shows SONG, press the<br />
PATTERN/SONG button so the display<br />
shows PATTERN.<br />
6. Start hitting the pads. Adjust the volume<br />
control for a comfortable listening level, and<br />
check out the sounds.<br />
7. Try pressing one of the Pad Play Mode buttons (DRUMS, PERC, BASS) to access the<br />
different instrument layers and play the pads.<br />
8. To hear the built-in demo, hold down the PATTERN/SONG button and press PLAY. To stop<br />
the demo, press STOP. If you want to play along with the demo, feel free to bash away on<br />
the pads.<br />
9. To hear a Preset Pattern, stop the <strong>SR18</strong> and<br />
press the PRESET / USER button to select<br />
Preset Patterns (the display should show<br />
PRESET). Then, press PLAY to hear the<br />
Preset Pattern.<br />
10. Try the following:<br />
• While in Preset Patterns, enter a twodigit<br />
number between 00-99 using the<br />
number keys, then press PLAY.<br />
• Press the INC button to select the next higher-numbered Preset Pattern. It will play at<br />
the end of the current Pattern.<br />
• Press the DEC button to select the next lower-numbered Preset Pattern.<br />
• Press the B button to select the B variation of the selected Pattern.<br />
• Press the A button to select the A variation of the selected Pattern.<br />
• Press FILL briefly while a Main (A or B) Pattern is playing. Note how the Main Pattern<br />
switches from either A to B or B to A after the Fill has played.<br />
• Press FILL and hold it down until after the Fill has played. If the FILL button is held<br />
down past the next downbeat, the Fill's associated Main Pattern (A or B) continues to<br />
play rather than switch from A to B or B to A.<br />
• Hold down TAP TEMPO and use the VALUE dial (or INC / DEC buttons) to change the<br />
tempo.<br />
15
THE INSTRUMENT LAYERS<br />
The <strong>SR18</strong> allows you to play three different kinds of sounds with the pads. These sounds are<br />
available in three different Play Modes or Banks. These are DRUM, PERC and BASS and are<br />
accessible by pressing the corresponding button on the top panel.<br />
DRUM – This Pad Play mode allows you to play up to twelve Drum sounds with the<br />
pads<br />
PERC – This Pad Play mode allows you to play up to twelve Percussion sounds with<br />
the pads.<br />
BASS – This Pad Play mode allows you to play up to 3 Octaves of a key-mapped<br />
bass sample(s) on the pads. To transpose the bass sounds, press and hold the<br />
BASS button and then use the INC / DEC buttons or VALUE dial to transpose up or<br />
down an octave.<br />
PLAYBACK / RECORD BASICS<br />
• Using the Transport Controls<br />
To stop playback and go back to the beginning of the current Pattern or Song, press<br />
the STOP button.<br />
Press PLAY to play the Pattern or Song from the current location. Press PLAY again<br />
while a Pattern or Song is playing to pause it. Press PLAY to continue playing the<br />
Pattern or Song from the location where it was paused.<br />
• Preset and User Patterns<br />
There are two types of Patterns in the <strong>SR18</strong>.<br />
• Preset Patterns provide a variety of styles, and other rhythms that feature drums,<br />
percussion and an accompanying bassline. Note that the only way to modify a<br />
Preset Pattern is to copy it to a User Pattern, where it can be edited.<br />
• User Patterns are Patterns you can program, edit, and save.<br />
The PRESET / USER button selects between these two banks of Patterns.<br />
• Playing Patterns<br />
1. To play Patterns, the <strong>SR18</strong> needs to be in Pattern Mode. To do this press the<br />
PATTERN / SONG button, which toggles between the two modes. The display<br />
will show PATTERN in the upper right corner when the <strong>SR18</strong> is in Pattern Mode.<br />
2. Select a Pattern you wish to play with the INC / DEC buttons or the VALUE dial.<br />
3. To play the selected Pattern, press the PLAY button.<br />
16
• Selecting the Next Pattern to be Played<br />
While a Pattern is playing, you can select to go to another pattern in several ways:<br />
1. Use the INC / DEC buttons or VALUE dial to select the next Pattern. The newlyselected<br />
Pattern will play back as soon as the current Pattern plays through its<br />
entire length. The display shows the Pattern to be played next.<br />
2. Enter the two-digit Pattern number with the number buttons. If an A Pattern is<br />
currently playing, the new Pattern number will play the A variation. If a B Pattern<br />
is currently playing, the new Pattern number will play the B variation. You can<br />
also enter a two-digit Pattern number followed by A or B or PRESET / USER to<br />
call up an A or B or Preset or User Pattern, regardless of the Pattern that is<br />
currently playing.<br />
• Selecting Individual Patterns<br />
1. Make sure the <strong>SR18</strong> is in Pattern Mode.<br />
2. Enter a two-digit Pattern number (remember to enter a leading 0 if necessary).<br />
3. Press the A button to select the A Main Pattern, or B to select the B Main<br />
Pattern. To select a Fill Pattern, first select the desired Main Pattern (A or B) then<br />
press the Fill Button.<br />
4. Press PRESET/USER to select either a Preset or User Pattern.<br />
5. When a Main Pattern reaches its end, it will loop back to the beginning and<br />
continue playing from that point unless you select a new Pattern, selected a Fill<br />
Pattern initially, or stop the Pattern.<br />
If you select a User Pattern that contains no data, the display says EMPTY PATTERN.<br />
If you select a User Pattern that contains data but has not yet been named, the display<br />
says NO NAME.<br />
Notes<br />
• If you change your mind or select the wrong Pattern, you can select a new<br />
Pattern number at any time before the next Pattern begins.<br />
• If you press STOP before the next Pattern begins playing, the <strong>SR18</strong> will stop and<br />
remain on the currently selected Pattern.<br />
• To immediately jump to the next Pattern in the sequence, press the PAGE UP<br />
button.<br />
• To immediately return and begin playing from the start of the current Pattern,<br />
press PAGE DOWN.<br />
17
• Changing Pattern Tempo<br />
The tempo range extends from 30 to 300 beats per minute. Tempo can be changed<br />
while the <strong>SR18</strong> is stopped or running. There are two ways to set tempo.<br />
1. Before playing a Pattern, tap the TAP TEMPO button several times at the desired<br />
tempo. The <strong>SR18</strong> will average the time between taps and derive a tempo; the<br />
display will update the tempo with each tap. If a footswitch is plugged into the<br />
Count/A/B/Fill jack, tapping the footswitch at the desired rate is equivalent to<br />
tapping the TAP TEMPO button.<br />
2. Hold down the TAP TEMPO button and turn the VALUE dial to select a new<br />
tempo. Alternatively, you can use the INC / DEC buttons while holding down<br />
TAP TEMPO to increase or decrease by 1 BPM, or hold down to scroll through<br />
the tempo values.<br />
Note that you can customize how the <strong>SR18</strong> deals with tempo. In the System Setup<br />
pages (page 9), you can specify whether the <strong>SR18</strong> will follow the tempo associated<br />
with each Pattern or whether the unit will follow a global tempo setting, ignoring any<br />
tempo data associated with the Patterns.<br />
• Selecting Fill Patterns<br />
Fill Patterns are the key to creating expressive drum parts. However, Fill is a<br />
sophisticated feature that requires some explanation.<br />
• Fills are always the same length, and use the same Drum Set, as the associated<br />
Main Pattern. This lets you "drop in" a Fill at any time. As soon as you press the<br />
FILL button, the Fill takes over from the Main Pattern and starts playing until the<br />
end of the Fill.<br />
• Fills are transitional Patterns.<br />
Example: Suppose an 8-beat A Main Pattern is playing and you press the<br />
FILL button on beat 4. The A Fill Pattern will play the last 4 beats and then<br />
automatically transition into the B Main Pattern.<br />
• Conversely, if B Main is playing and you press Fill, after B Fill has played, the<br />
<strong>SR18</strong> will transition to the A Main Pattern. You can select the Fill at any time<br />
while the Main Pattern is playing. However, Fills do not have to be transitional<br />
Patterns. If you press the FILL button (or footswitch) before the Fill has finished<br />
playing and hold it down until after the Fill has played (i.e., past the downbeat of<br />
the next Pattern), the <strong>SR18</strong> will return to the original Main Pattern.<br />
Example: Suppose an 8-beat A Main Pattern is playing and you press the<br />
FILL button on beat 4 but hold it down past beat 8. The A Fill Pattern will<br />
play the last 4 beats, then the <strong>SR18</strong> will return to the A Main Pattern.<br />
18
• Fills cannot start on the downbeat since a Fill, by definition, starts at some point<br />
into the Main Pattern. However, anything you record on the Fill downbeat will<br />
play on the first downbeat following the Fill (i.e., the downbeat of the next<br />
Pattern). To show why this is a useful feature, consider that when coming out of<br />
a fill, you'll often want to hit something like a cymbal crash on the downbeat of<br />
the next Pattern yet not have that crash repeat every time the Pattern plays. This<br />
way of handling Fills lets the downbeat cymbal crash be part of the Fill instead of<br />
the Main Pattern.<br />
• A footswitch plugged into the Count/A/B/Fill jack duplicates the FILL button<br />
function when playing Patterns in Perform mode.<br />
• Using the Start/Stop Footswitch<br />
Background This way of handling Patterns explains the logic behind<br />
having A, B, and Fill Patterns. In typical pop tunes, A would be the verse<br />
and B the chorus. A Fill provides the Fill that transitions from verse to<br />
chorus, and B Fill provides the Fill that transitions from chorus to verse.<br />
Thus, one of the numbered Patterns may be all you need to put together a<br />
tune. This structure makes it possible to put together songs in minutes<br />
using the Preset Patterns. It also makes it easy to play drum parts live. For<br />
example, if there's a solo happening over the A Main Pattern, you can keep<br />
the Pattern repeating until the solo is about to end, at which point you select<br />
the Fill that leads out of the A Main Pattern.<br />
When the <strong>SR18</strong> is stopped, pressing a footswitch plugged into the Start/Stop<br />
footswitch jack is equivalent to pressing PLAY. When the <strong>SR18</strong> is running, pressing<br />
the footswitch is equivalent to pressing STOP.<br />
• The ROLL Button<br />
• Using Roll<br />
Background The rear panel Start/Stop footswitch jack accepts a<br />
momentary, normally open or normally closed footswitch (available at most<br />
music stores) for remote or foot control of the stop and start functions. The<br />
<strong>SR18</strong> checks the footswitch on power-up to determine whether it is<br />
normally open or normally closed, so make sure the footswitch is plugged in<br />
(and you're not pressing it down) when you turn on power.<br />
While playing and recording Patterns, the Roll button is used to create a series of<br />
notes at the desired quantization rate, as described in the section 'RECORD SETUP'.<br />
Rolls can be played live and can be recorded into a Pattern during real time playing.<br />
The Roll function triggers a drum sound at the current swing value and quantization<br />
rate (e.g., eighth notes, 16th notes, etc.; if quantization is off, though, this function is<br />
inactive). This lets you play a series of drum hits without having to repeatedly press<br />
the pads, and is typically used to create steady 16th note hi-hat parts, quarter note<br />
kick drum parts, snare rolls, etc.<br />
Press a pad on the first beat of what will be a series of hits and hold it down.<br />
Immediately after pressing the pad, press and hold the ROLL button. The drum will be<br />
retriggered at the current quantization rate for as long as the pad and ROLL button are<br />
held down. All hits will be at the same volume as the first pad hit.<br />
19
• The MUTE Button<br />
The MUTE button can be used to mute the different instrument layers while the <strong>SR18</strong><br />
is playing.<br />
To Mute Parts:<br />
1. Play a Pattern.<br />
2. Press and hold the MUTE button<br />
3. Press one of the Instrument buttons (DRUM, PERC or BASS.) That particular<br />
instrument sound will be muted.<br />
4. To un-mute the instrument layer, press the corresponding button (DRUM, PERC,<br />
BASS) while holding down MUTE.<br />
• Playing Songs<br />
1. To play a Song, press the PATTERN / SONG button until SONG is displayed in<br />
the upper corner of the screen.<br />
2. Select the Song you want to play with the INC / DEC buttons or the VALUE dial.<br />
3. After you select the Song press the PLAY button.<br />
4. To stop playback, press the STOP button.<br />
20
RECORDING PATTERNS<br />
Note: An empty Pattern defaults to an 8 beat length (2 Bars), with 16th note quantization and<br />
swing off (50%). If you need to change the length, it is best (though not essential) to do so before<br />
recording. Other parameters can be changed while you're recording.<br />
STEPS TO RECORDING A PATTERN<br />
1. First, begin by selecting User Patterns (the display should indicate PATTERN and USER).<br />
2. Next, select an empty User Pattern with the INC / DEC buttons or the VALUE dial (the<br />
display should show EMPTY PATT).<br />
3. Press the RECORD and PLAY buttons simultaneously. The <strong>SR18</strong> will begin recording.<br />
4. Play the sounds on the pads. As you record, the display will show the current beat number.<br />
5. The Pattern will "loop" during the record process so that you can overdub different drums on<br />
different passes.<br />
6. To stop recording, press STOP.<br />
7. Press PLAY to audition the Pattern from the beginning.<br />
When recording your pattern it’s a good idea to locate the drum set that you want to use for the<br />
pattern ahead of time. You can change this later. For instructions on selecting a Drum Set, see<br />
the section 'SELECTING, EDITING AND CREATING DRUM SETS'. Note that a Drum Set is a<br />
collection of sounds such as the Drums, Percussion and Bass sound. Therefore, if you would like<br />
to change the Bass sound in a Pattern, for example, you will need to modify the Drum Set to<br />
contain a different bass instrument.<br />
Note: Instead of playing on the pads, you can also record remotely by sending MIDI notes to the<br />
<strong>SR18</strong>. Make sure that MIDI device you are playing has settings that correspond to <strong>SR18</strong>’s<br />
sounds (MIDI Channel and note numbers.)<br />
Note: When sending MIDI data into the drums when the <strong>SR18</strong> is not recording (i.e., the <strong>SR18</strong><br />
serves as a drum sound expander module), the drum sounds respond to 127 different levels of<br />
dynamics. However, if MIDI is used as a trigger during the recording process, the Pattern will<br />
"quantize" the incoming level to the nearest of eight levels—the same eight levels produced by<br />
tapping the pads at various levels.<br />
PRACTICE MODE<br />
If you want to practice your beat with a metronome (the <strong>SR18</strong> only plays the metronome when<br />
recording) you can use Practice Mode. While in Pattern Mode (User Patterns should be selected),<br />
press the REC button and you will hear the metronome sound, but the <strong>SR18</strong> will not record what<br />
you play on the pads.<br />
RECORDING OTHER PARTS (PERCUSSION AND BASS)<br />
After recording your Drum part (or if you want to start with a different part) you may want to add<br />
more instruments to your Pattern’s arrangements.<br />
To record a Percussion or Bass line to your Pattern:<br />
1. Press the PERC or BASS button and play the sounds on the pads in the same manner as<br />
the DRUM mode. The BASS mode will have a pitched sample that will play across the pads<br />
(the notes corresponding to each pad are indicated in the upper right corner of the pad).<br />
2. Press the REC and PLAY buttons. The Pattern will start recording. Play your bass or<br />
percussion part.<br />
3. Press STOP when completed.<br />
21
PATTERN PLAY MODE<br />
Pattern Play mode allows you to play sequences of Patterns by triggering Patterns<br />
with the pads. To enter Pattern Play Mode, press the PTN PLAY button.<br />
PLAYING PATTERN SEQUENCES WITH THE PADS<br />
1. Press the PTN PLAY button.<br />
2. Press a pad and the Pattern associated with the<br />
pad will begin playing. As the Pattern reaches its<br />
end, it will continue to loop from the beginning.<br />
3. Now press a different pad. The Pattern associated<br />
with the pad will begin playing as soon as the<br />
previously selected Pattern reaches its end.<br />
RECORDING PATTERN SEQUENCES INTO A SONG<br />
1. Press the PATTERN / SONG button to get into Song Mode (the display should indicate<br />
SONG in the upper right corner).<br />
2. Press the PTN PLAY button.<br />
3. Press REC and PLAY simultaneously to begin recording.<br />
4. Press the pads to trigger the sequence of Patterns you wish to record. You can also trigger<br />
the A, B or FILL parts of the selected pattern.<br />
5. Press STOP when you are finished.<br />
Note that you can only record a Pattern Play sequence into an empty Song. Make<br />
sure that you select an empty Song or erase an existing song prior to recording.<br />
To listen to the sequence you just recorded in Pattern Play Mode:<br />
1. Press the PATTERN / SONG button to get into Song Mode (the display should<br />
indicate SONG in the upper right corner).<br />
2. Press PLAY to play the recorded sequence.<br />
ASSIGNING PATTERNS TO THE PADS<br />
1. Press the PTN PLAY button to get into Pattern<br />
Play Mode.<br />
2. Press the PAGE UP button. The display will show<br />
the last pad which was pressed and the pattern<br />
number to which it is assigned.<br />
3. Press the pad you wish to modify. The pad<br />
number will be displayed on the top line.<br />
4. Use the INC / DEC buttons, the VALUE dial or the<br />
number buttons to choose the Pattern assignment<br />
for the selected pad. The assigned Pattern will be<br />
displayed on the bottom line.<br />
5. You can also press A or B to choose whether the selected pattern’s A or B part will be<br />
played when the pattern is triggered.<br />
6. Press another pad to select it and then adjust the Pattern assignment in a similar fashion.<br />
7. After you have assigned the pads press the PTN PLAY button to exit the assignment mode.<br />
22
SELECTING, EDITING AND CREATING DRUM SETS<br />
What is a Drum Set?<br />
The <strong>SR18</strong> features different “sets” of sounds which you can use in your Patterns and Songs. A<br />
Drum Set is a collection of settings that affect the Drums, Percussion and Bass sounds within the<br />
set as well as the mix parameters and effects setup. The <strong>SR18</strong> includes 100 Preset and 100<br />
User Drum Sets. Note that edited Preset Drum Sets may only be saved in a User Drum Set<br />
location. Each Drum Set includes the following:<br />
• DRUM / PERCUSSION SOUNDS – These are the drum and percussion sounds which are<br />
loaded when the Drum Set is recalled.<br />
• BASS SOUNDS – This is the Bass sound which is loaded when the Drum Set is recalled.<br />
• PAD PARAMETERS – These are the pad and parameter settings associated with the Drum<br />
Set. These settings include volume, panning, tuning, filter, etc.<br />
• EFFECTS SETTINGS – These are the effects settings which will be recalled the next time<br />
that the Drum Set is selected and include Reverb, EQ, and Compression.<br />
SELECTING A DRUM SET<br />
1. Press the DRUM SET button.<br />
2. The currently selected Drum Set’s name is<br />
displayed on the top line and the set number is<br />
shown on the bottom line. To select the drum and<br />
percussion sounds to be used with this set, press<br />
the DRUMS or PERC button. To select the Bass<br />
sounds to be used with this set, press the BASS<br />
button.<br />
3. Enter the desired Drum Set number (from 00 to 99) with the number buttons, INC/DEC<br />
buttons or the VALUE dial. (With the number buttons, enter a leading zero if necessary).<br />
Note: User Patterns will remember the selected Drum Set assignments. Preset Patterns have fixed Drum<br />
Set assignments; if you exit from the Preset Pattern, the <strong>SR18</strong> will forget any assignment you made.<br />
CREATING AND EDITING DRUM SETS<br />
The <strong>SR18</strong>'s 12 pads can be assigned to various drum sounds, with different levels, tuning,<br />
panning, triggering mode, output jack assignment, etc. Each set of pad parameters is given a<br />
number and collectively called a Drum Set. Drum Set assignments have their own dedicated<br />
memory and can be thought of as equivalent to the "programs" or "patches" found in<br />
synthesizers. Note that A and B User Pattern share Drum Set assignment.<br />
General instructions for Drum Set creation are:<br />
1. Press the DRUM SET button.<br />
2. Use the PAGE (UP and DOWN) buttons to select different<br />
"pages" of functions; the display's lower right window shows<br />
the page number. The Drum Set pages are described below.<br />
Note that if you edit a<br />
Drum Set, any Pattern<br />
using that Drum Set<br />
will be affected.<br />
3. Select the instrument layer which you would like to edit (drums, percussion, bass) by<br />
pressing the corresponding button.<br />
4. Adjust values on pages, if necessary, as described for each page.<br />
5. After making all needed changes, save the Drum Set if desired (see ‘Saving Your Drum<br />
Sets’ section), then press DRUM SET again to exit.<br />
Note: To select sounds for the Perc or Bass section of the kit, press the corresponding button for these<br />
sections and then edit the parameters the same way you would for the Drums.<br />
23
• PAGE 2: INSTRUMENT LAYER VOLUME<br />
This page allows you to adjust the volume of each<br />
instrument layer (drums, percussion, bass).<br />
Adjusting this level will affect all the sounds in the<br />
selected layer.<br />
To adjust the volume of an instrument layer:<br />
1. Select the instrument layer which you would<br />
like to edit by pressing DRUM, PERC or<br />
BASS.<br />
2. Adjust the overall volume with the INC / DEC buttons, the VALUE dial or the number<br />
buttons (99 = MAXIMUM VOLUME, 0 = OFF)<br />
• PAGE 3: ASSIGNING SOUNDS TO PADS<br />
You can assign any of the <strong>SR18</strong>'s sounds to any of<br />
the pads, or to more than one pad. Each individual<br />
Drum Set can have its own drum sound<br />
assignment. However, please note that Bass<br />
sounds can only be selected as a group (i.e. you<br />
cannot assign different Bass sounds to different<br />
pads).<br />
To assign a sound to a pad:<br />
1. Select the instrument layer which you would like to edit by pressing DRUM, PERC or<br />
BASS. (Note that Bass sounds can only be modified as a group).<br />
2. Press the pad (the display will show the pad number in the upper right corner and the<br />
name of the sound assigned to the pad on the top line).<br />
3. Enter the desired sound number with the number buttons, the INC / DEC buttons or<br />
the VALUE dial. When using the number buttons, enter a leading zero if necessary.<br />
• PAGE 4: PAD VOLUME<br />
Each pad’s volume can be adjusted on this page.<br />
To change a pad’s volume:<br />
1. Select the sound set which you would like to<br />
edit by pressing DRUM or PERC. Note that<br />
this parameter is not available for Bass<br />
sounds. The volume of the Bass sounds can<br />
only be adjusted as a group (see “Instrument<br />
Layer Volume” above).<br />
2. Press the pad (the display will show the<br />
selected pad number in the upper right corner<br />
and the volume setting for the pad on the top<br />
line).<br />
3. Enter the desired volume, from 00 (off) to 99 (maximum volume), with the number<br />
keypad, INC / DEC buttons or VALUE dial.<br />
24
• PAGE 5: PANNING<br />
Each pad can also be assigned to one of seven positions within the stereo spectrum.<br />
To change a pad’s panning position:<br />
1. Select the sound set which you would like to<br />
edit by pressing DRUM, PERC or BASS.<br />
Please note that the Panning setting will<br />
affect all Bass sounds similarly. In other<br />
words, changing one Bass pad’s Panning<br />
setting will affect all the other Bass sounds in<br />
the Drum Set.<br />
2. Press the pad (the display will show the pad<br />
number and the pad’s panning position on the<br />
top line).<br />
3. Enter the desired pan position, from full left to full right, using the number keypad,<br />
INC/DEC buttons or VALUE dial. The seven available pan positions correspond to the<br />
number buttons shown in parenthesis: hard left (1), soft left (2), left of center (3),<br />
center (4), right of center (5), soft right (6), and hard right (7). The display will show <br />
when panning position is center.<br />
Background The <strong>SR18</strong> has two pairs of stereo outputs. Drum sounds can be<br />
assigned to either pair of outputs (see page 11 of the Drum Set menus), and be placed<br />
anywhere within the stereo field of the assigned outputs via the pan function.<br />
• PAGE 6: TUNING<br />
Each pad’s tuning can be adjusted in increments of +/- 1 semitone (+/- 12 semitones<br />
maximum).<br />
To change a pad’s tuning:<br />
1. Select the sound set which you would like to<br />
edit by pressing DRUM, PERC or BASS.<br />
Please note that Bass sounds cannot be<br />
transposed individually, only as a group. In<br />
other words, transposing one Bass note will<br />
transpose all other Bass sounds by the same<br />
value.<br />
2. Press the pad (the display will show the<br />
selected pad number in the upper right<br />
corner).<br />
3. Enter the desired tuning with the INC/DEC buttons or the VALUE dial. The range is<br />
from +12 (most sharp) to 0 (normal pitch) to -12 (most flat).<br />
25
• PAGE 7: ATTACK ENVELOPE (BASS ONLY)<br />
The attack envelope (bass only) affects how the bass sound will play after you hit the pad.<br />
Attack determines the amount of time it takes for the bass sound to “fade in” after it has<br />
been triggered. With longer attack times, it takes longer for the sound to reach full volume<br />
after it has been triggered.<br />
Note that the Attack setting cannot be set individually per pad. In other words, changing the<br />
Attack setting will affect the Attack setting for all pads in the Bass group.<br />
To change the Bass attack envelope:<br />
1. Select the Bass group by pressing BASS.<br />
2. Enter the desired Attack setting for the sound,<br />
using the number buttons, INC/DEC buttons,<br />
or VALUE dial.<br />
• PAGE 8: DECAY ENVELOPE<br />
The Decay envelope is available for all Pad Play Modes (Drums, Perc, Bass) and affects the<br />
amount of time before the sound stops ringing out. This allows you to get the effect of a<br />
deep drum sound that will decay over a specific period, or with a short decay time, a short<br />
staccato hit.<br />
To change a pad’s decay envelope:<br />
1. Select the sound set which you would like to<br />
edit by pressing DRUM, PERC or BASS.<br />
2. Press the pad (the display will show the pad<br />
number).<br />
3. Enter the desired Decay amount for the<br />
sound, using the number keypad, INC/DEC<br />
buttons, or VALUE dial.<br />
Note: Setting the decay envelope to 0 allows you to sustain the selected sample for as<br />
long as the corresponding pad is held down.<br />
• PAGE 9: RELEASE ENVELOPE (BASS ONLY)<br />
The Release envelope parameter (bass only) describes the amount of time that it takes for<br />
the bass sound to “fade out” after you release the pad.<br />
Note that the Release setting cannot be set individually per pad. In other words, changing<br />
the Release setting will affect all pads.<br />
To change a Bass pad’s Release envelope:<br />
1. Press the pad (the display will show the pad<br />
number).<br />
2. Enter the desired Release amount for the<br />
sound, using the number keypad, INC/DEC<br />
buttons, or VALUE dial.<br />
26
• PAGE 10: FILTER<br />
Pad Filter allows you to make changes to the tonal characteristics of a sound by removing<br />
the higher frequencies from the sound. This allows you to make a particular drum sound<br />
darker, with more pronounced bass. The higher the value the more high frequencies will be<br />
allowed to pass through. The lower values will cut off the higher frequencies of the sound in<br />
a more pronounced fashion, resulting in a more muted sound.<br />
To change the filter setting associated with a given pad:<br />
1. Select the sound set which you would like to<br />
edit by pressing DRUM, PERC or BASS.<br />
2. Press the pad (the display will show the pad<br />
number).<br />
3. Enter the desired filter amount, using the<br />
number keypad, INC/DEC buttons or the<br />
VALUE dial. (Remember that lower values<br />
will result in a duller, more muted sound.)<br />
• PAGE 11: TRIGGERING MODE (ASN MODE)<br />
Background Each mode affects triggering in a different way:<br />
Multi: When hitting a pad repeatedly, each hit will cause the sound to go through its entire<br />
decay. This is useful with cymbals, since early strikes will continue to decay as you play<br />
later strikes.<br />
Single: When hitting a pad repeatedly, a new hit will automatically terminate any sound that<br />
is still decaying. This is useful with many percussion sounds (such as tambourine, agogo,<br />
etc.).<br />
Group 1 through 8: Pads assigned to a particular group (1 through 8) will cut each other off<br />
if a group pad is struck while another pad assigned to the same group continues to sound.<br />
The classic use of this is with hi-hats; a closed hi-hat will cut off an open hi-hat, and hitting<br />
an open hi-hat sound will cut off a closed hi-hat.<br />
The <strong>SR18</strong> can play up to 32 voices at a time, so it's possible to run out of voices if you play<br />
a flurry of notes and have lots of pads in the Multi assign mode. If 16 sounds are playing<br />
and you ask the <strong>SR18</strong> to play another one, the sound that's closest to finishing its decay<br />
cycle will be "stolen" so that the most recent sound can be played. In practice, it's difficult<br />
(and usually not artistically desirable!) to create drum parts so complex that voice-stealing<br />
becomes a problem. However, if this is a problem, try assigning all the toms to a group so<br />
that they only require one voice at a time.<br />
The display shows ASN MODE (short for Assignment Mode), the currently selected pad<br />
number, and the mode assigned to that pad.<br />
To change the mode associated with a given pad:<br />
1. Select the sound set which you would like to<br />
edit by pressing DRUM, PERC or BASS.<br />
2. Press the pad (the display will show the pad<br />
number in the upper right corner).<br />
3. Enter the desired mode with the INC/DEC<br />
buttons, the number keypad (buttons 1-4) or<br />
the VALUE dial.<br />
27
• PAGE 12: OUTPUT<br />
Background The <strong>SR18</strong> includes two independent stereo output pairs (Main and Aux). You can<br />
direct any pad to either output pair, and pan the sound within the selected output's stereo field (see<br />
page 4 of the Drum Set menus). This allows several output assignment options:<br />
Mono: Plug into one of the output pair jacks; the <strong>SR18</strong> is smart enough to know that plugging in<br />
one plug means you must want mono. Any pan settings are ignored. Do not plug into both outputs,<br />
or stereo will be activated.<br />
Stereo with Fixed Placement: Plug the left Main output into the left channel of your amp (or mixer),<br />
and the right Main output into the right channel. The default voice mix for the preset Drum Sets<br />
pans the drums between the Main output jacks in a way that works well for most applications.<br />
Stereo with Variable Placement: Plug the left Main output into the left channel of your amp (or<br />
mixer), and the right Main output into the right channel. With the User Drum Sets, you can pan the<br />
drums between the Main output jacks as desired.<br />
Separate Percussion/Drum Outputs: Standard drum kit sounds can be spread in stereo and<br />
assigned to the Main outputs, with percussion sounds spread in stereo and assigned to the Aux<br />
outputs. Run the outputs to a mixing console or computer audio interface, and you can treat the<br />
drum kit and percussion sounds as two sub-mixes. This technique might also be useful if you're<br />
recording the part on your DAW or disk recorder; feed the drums to two tracks, and the percussion<br />
to two other tracks. Adjust the balance between the two in the mix, or fade the percussion in and<br />
out independently of the trap drum sounds. Or, process the two groups individually.<br />
By default, pad sounds are output through the Main connections on the rear of the unit.<br />
However, you also have the option of outputting individual pads through the Aux connection.<br />
Please note that the Bass sounds can only be output as a group; in other words, all Bass<br />
sounds will either be output through the Main or Aux connections.<br />
To change a pad’s output assignment:<br />
1. Select the sound set which you would like to<br />
edit by pressing DRUM, PERC or BASS.<br />
2. Press the pad (the display will show the pad<br />
number).<br />
3. Use the INC/DEC buttons, Value Dial or<br />
number buttons (1 chooses the Main output<br />
pair, 2 selects the Aux output pair).<br />
• PAGE 13: DRUM SET NAME<br />
On this page you can assign a name to your Drum Set. Please note that only User Drum<br />
Sets can be named, renamed and saved. If you wish to edit and rename one of the Preset<br />
Drum Sets, copy it to a User location first.<br />
To name the selected Drum Set:<br />
1. You will see the cursor underneath the letter<br />
which is currently selected. Use the INC /<br />
DEC buttons or the VALUE dial to change the<br />
letter above the cursor.<br />
2. Use the PAGE UP / PAGE DOWN buttons to<br />
move the cursor. PAGE UP moves the<br />
cursor forward, while PAGE DOWN moves<br />
the cursor backwards (or goes back to the<br />
previous menu page if the first letter is<br />
selected).<br />
28
EFFECTS<br />
The Effects settings are stored per kit. Each Kit can have separate Reverb, Compression / EQ settings<br />
that are specific to that kit. To change Effects settings, press the EFFECTS button while you are in<br />
Pattern Mode. Effect settings can only be changed on User Patterns. In order for the Effects settings to<br />
be remembered you must save the Drum Set after you make your settings.<br />
Note: All the Effects are sent (bussed) out the Main outputs. If you have a sound that is selected to go<br />
out the Aux output, no effects will be applied to that sound.<br />
The Effects selection and settings are similar to the Record Setup and Drum Set modes. After you press<br />
the EFFECTS button, you will be taken to the first page. To move between the different pages and<br />
parameters, use the PAGE UP / DOWN buttons. The current parameter value can be changed with INC<br />
/ DEC buttons, the number keypad, or the VALUE dial. Note that you can turn Effects on and off on a<br />
per pad basis.<br />
• Page 1 / Reverb Type<br />
There are several Reverb types you can choose on this page.<br />
You can select the Reverb type for the selected Drum Set by<br />
pressing the INC/DEC buttons or using the VALUE dial.<br />
• Page 2 / Reverb Send Amount<br />
You can determine the send amount by pressing the<br />
INC/DEC buttons or use the Value Dial. This affects how<br />
much “wet” signal is mixed with the original “dry” signal. The<br />
more “wet” the signal is, the more reverb effect you will hear.<br />
Press a pad to select it, then choose how much Reverb you<br />
would like to apply to the corresponding sound.<br />
• Page 3 / EQ and Compression Type<br />
There are several types of EQ and Compression curves.<br />
These settings will affect the sound of your drumset to<br />
accentuate certain frequencies as well as loudness settings.<br />
You can select EQ and Compression curves with the INC /<br />
DEC buttons or the VALUE dial.<br />
Note: For EQ and Compression there is no send parameter.<br />
• Page 4 / EQ and Compression ON / OFF<br />
This page allows you to enable and disable the EQ from the<br />
signal chain. Press a pad to select it and use the INC / DEC<br />
buttons or the VALUE dial to select whether you would like to<br />
enable EQ and Compression.<br />
REVERB<br />
TYPES<br />
COMPRESSION<br />
AND EQ TYPES<br />
Off<br />
Off<br />
AmbBrite Master 1<br />
BdSpring Radio 1<br />
BigGate Radio 2<br />
CloseMic<br />
FxGate<br />
HugeSpac<br />
LgSpacy<br />
Md80sRm<br />
MdHardRm<br />
MdSoftRm<br />
MetalCav<br />
RmSmlDrk<br />
RoomGate<br />
SeaWolf<br />
Slapper<br />
SmBathRm<br />
SmPlate<br />
SmlBrite<br />
Studio<br />
Warehous<br />
WoodRM<br />
WrmStudo<br />
SoftHype<br />
Bright<br />
Country<br />
Crunch<br />
Dance<br />
Hip Hop<br />
Jazz<br />
Lo Boost<br />
Roc1<br />
Roc2<br />
Roc3<br />
SAVING YOUR DRUM SETS<br />
After changing parameter settings it is important to save the<br />
Drumset otherwise your settings will not be retained.<br />
1. To save your set, press and hold the SAVE / COPY<br />
button. The display shows SAVE SET?, the currently<br />
selected Drum Set number (location), and a two-digit<br />
number that's the same as the currently selected Drum<br />
Set. You will notice the REC LED begin to blink.<br />
2. To save the Drum Set to the current location, press<br />
REC.<br />
3. To save the Drum Set to a different location, enter the new Drum Set number with the INC/DEC<br />
buttons, number buttons (allowable range is 00-99), or the DATA dial.<br />
4. Finally, press REC to save to the selected location.<br />
If you were editing a Preset Drum Set and want to save it, you will be given the option to save it to a<br />
User Drum Set since you cannot overwrite a Preset Drum Set. This technique can also copy one Drum<br />
Set to a different Drum Set. Also, remember that if you change Patterns before saving your Drum Set, all<br />
of your edits will be lost.<br />
29
RECORD SETUP<br />
Several parameters, such as quantization, swing, metronome options, Pattern length, are often<br />
adjusted prior to recording a Pattern, General instructions are:<br />
1. Press the RECORD SETUP button.<br />
2. Use the PAGE buttons to select different "pages" of functions; the display's lower right<br />
window shows the page number. These pages are described below.<br />
3. Adjust values on pages, if necessary, as described for each page.<br />
4. After making all needed changes, press RECORD SETUP again to exit, or choose another<br />
page.<br />
PAGE 1: SELECT THE QUANTIZATION VALUE (QUANTIZE SELECT)<br />
Background As you record a Pattern, quantization shifts all drum events to the nearest selected<br />
rhythmic value to eliminate small timing errors. For example, with a quantization value of 1/16, all<br />
drum events you play will be shifted to the nearest 16th note.<br />
Quantization shifts your playing to the specified beat<br />
while you play, so choose the desired value before<br />
playing out your rhythms. Remember that you can also<br />
change quantization while recording if, for example, you<br />
want to record snare with eighth note quantization but<br />
high-hats with 16th note quantization.<br />
The note icon displays the quantization value in<br />
standard rhythmic notation. See the chart below.<br />
Enter the desired quantization value with the INC/DEC buttons, VALUE dial, or number buttons (1<br />
= quarter note, 2 = quarter note triplet, 3 = 8th note, 4 = 8th note triplet, 5 = 16th note, 6 = 16th<br />
note triplet, 7 = 32nd note, 8 = 32nd note triplet, 9 and 0 = Off, equivalent to 1/384th note<br />
resolution).<br />
Tip: Quantization is most effective<br />
when used sparingly. If you're<br />
recording a drum part, quantize the<br />
kick and snare, but try recording the<br />
hi-hat in real time (or quantize the hihat,<br />
and record the snare in real<br />
time). Another trick is to combine<br />
both quantized and non-quantized<br />
parts. Example: hand claps often<br />
sound too mechanical when<br />
quantized—when humans clap<br />
hands, you end up with a bunch of<br />
different sounds happening within a<br />
few milliseconds of each other. A<br />
good way to simulate this effect (yet<br />
still have a rock-solid rhythm) is to<br />
record a quantized hand claps part,<br />
then turn off quantization and try to<br />
double the part. Sometimes what<br />
you overdub will be right on the beat,<br />
but sometimes it will be off by just<br />
enough to add that human touch.<br />
KEYPAD<br />
1<br />
2<br />
3<br />
4<br />
5<br />
6<br />
7<br />
8<br />
NOTE VALUE DISPLAY<br />
= 1/4<br />
= 1/6<br />
= 1/8<br />
= 1/12<br />
= 1/16<br />
= 1/24<br />
= 1/32<br />
= 1/48<br />
=<br />
=<br />
=<br />
=<br />
=<br />
=<br />
=<br />
=<br />
3<br />
3<br />
3<br />
3<br />
=<br />
=<br />
=<br />
=<br />
=<br />
=<br />
=<br />
=<br />
NOTE NAME<br />
QUARTER NOTE<br />
QUARTER NOTE TRIPLET<br />
EIGHTH NOTE<br />
EIGHTH NOTE TRIPLET<br />
16th NOTE<br />
16th NOTE TRIPLET<br />
32nd NOTE<br />
32nd NOTE TRIPLET<br />
Note: The quantize value also sets<br />
the step length in Step Edit mode.<br />
9, 0<br />
=<br />
1/384<br />
=<br />
off<br />
=<br />
384th NOTE<br />
30
PAGE 2: GATE<br />
When entering Bass parts in Step Edit Mode, the Gate<br />
parameter specifies the duration of notes, as a<br />
percentage of the quantization value.<br />
For example, if you have selected a gate time of 99<br />
(which is equivalent to 100% of the quantization value)<br />
and a quantization value of ¼ note, the bass notes will<br />
be ¼ note in duration.<br />
PAGE 3: SELECT THE SWING VALUE (SWING SELECT)<br />
Background: Swing affects the timing of pairs of equal-value notes. Each note normally defaults<br />
to taking up 50% of the total duration of both notes; adding swing lengthens the first note of the<br />
pair, and to keep the total duration of both notes the same, shortens the second note of the pair.<br />
This imparts the kind of feel found in most shuffles and jazz tunes, as well as a laid-back, rhythm<br />
and groove often found in hip-hop, R’n’B and pop music. For example, with Swing set to 62%, the<br />
first note of the pair takes up 62% of the total duration of the pair of notes, while the second note<br />
takes up 38% of the total duration.<br />
Swing shifts notes as specified while you record, so<br />
choose the desired value before playing out your<br />
rhythms.<br />
Enter the desired swing percentage with the INC/DEC<br />
buttons, VALUE dial or number buttons (1 = 54%, 2 =<br />
58%, 3 = 62%, 4-0 = Swing Off).<br />
PAGE 4: ENABLE CLICK AND SET RHYTHM (CLICK SELECT)<br />
The metronome is designed to help you keep track of<br />
time while recording. On this page, you can enable or<br />
disable the metronome, as well as select the rhythm of<br />
the click.<br />
Enter the click value with the INC/DEC or number<br />
buttons (1 = quarter note, 2 = quarter note triplet, 3 = 8th<br />
note, 4 = 8th note triplet, 5 = 16th note, 6 = 16th note<br />
triplet, 7-0 = Click Off).<br />
Note that the click is audible only when recording.<br />
PAGE 5: SET CLICK VOLUME (CLICK VOL)<br />
This page allows you to adjust the volume of the<br />
metronome.<br />
The display shows CLICK VOL and a two-digit number<br />
representing click volume (00 = inaudible, 99 =<br />
maximum volume). Enter the desired click level with the<br />
INC/DEC, number buttons, or by turning the VALUE dial.<br />
31
PAGE 6: VELOCITY SENSITIVITY<br />
Velocity Sensitivity describes how the pads will output sound<br />
depending on the applied velocity (i.e. how hard the pads<br />
are struck). This feature allows players with a heavier or<br />
lighter touch to customize the pad response to<br />
accommodate their particular playing style.<br />
To select the desired dynamic response, use the INC/DEC<br />
buttons, the VALUE dial or the number buttons (1 = Fixed 1,<br />
2 = Fixed 2, 3 = Fixed 3, 4 = Fixed 4, 5 = Fixed 5, 6 = Fixed<br />
6, 7 = Fixed 7, 8 = Fixed 8, 9 = Soft, and 0 = Loud). Note<br />
that the Medium setting can be selected only with the<br />
INC/DEC buttons or VALUE dial.<br />
Refer to the chart on the right for information on response curves. As you can see, soft response<br />
weights the response toward softer sounds; with medium response, the level is directly proportional to<br />
how hard you tap the pad; loud response weights the response toward louder sounds.<br />
Fixed volume plays back the associated drum sound at<br />
one of eight possible volume levels. With Fixed Volume 1,<br />
all drums assume the level of the softest possible tap,<br />
regardless of how hard you tap the pads. With Fixed<br />
Volume 8, all drums assume the level of the loudest<br />
possible tap, regardless of how hard you tap the pads.<br />
Fixed Volumes 2-7 provide the levels between the softest<br />
and loudest extremes, with lower numbers giving softer<br />
levels.<br />
PAGE 7: BEAT VALUE<br />
When recording sequences in Pattern Mode, this is the<br />
upper value or the amount of beats in the meter setting of<br />
the selected Pattern; for instance the 2 of a 2/4 time<br />
signature.<br />
Enter the value with the INC/DEC, number buttons or the<br />
VALUE dial.<br />
Press REC to accept the change. Go to another page or<br />
press RECORD SETUP again to cancel.<br />
louder<br />
<br />
VOLUME<br />
<br />
softer<br />
softer TAP FORCE <br />
harder<br />
PAGE 8: NOTE VALUE<br />
When recording sequences in Pattern Mode, this is the<br />
lower note value of the meter setting of the selected Pattern;<br />
for instance the 4 of a 2/4 time signature.<br />
Enter the value with the INC/DEC, number buttons or the<br />
VALUE dial.<br />
Press REC to accept the change. Go to another page<br />
or press RECORD SETUP again to cancel.<br />
32
PAGE 9: PATTERN LENGTH<br />
This page allows you to specify the length of the selected<br />
Pattern in steps. For example, 2 steps of a 4/4 time<br />
signature equal 2 bars of 4/4.<br />
Use the INC / DEC buttons, the number buttons, or the<br />
VALUE dial to select the desired step length for the Pattern.<br />
Press REC (ENTER) to accept this change, or press the<br />
PAGE or RECORD SETUP buttons to cancel.<br />
PAGE 10: OFFSET A PATTERN OR DRUM PART<br />
Offset shifts the selected Pattern or individual drum parts<br />
ahead of or behind the beat in 1/384th note increments to<br />
allow for altering the "feel" of a sequence. Note that this only<br />
affects already-recorded parts.<br />
Hint: 96 sub-beats equal ¼ note<br />
The <strong>SR18</strong> should be in Pattern mode and stopped. The<br />
display says OFFSET, which will be 00 (no offset).<br />
1. Press the pad to be offset (as confirmed by the display). If you don't select a pad, offset affects the<br />
entire Pattern.<br />
2. Enter the two-digit offset value with the INC/DEC buttons, VALUE dial, or number buttons. Positive<br />
numbers shift events ahead of the beat (lead), negative numbers shift events behind the beat (lag).<br />
The default is positive numbers; to enter a negative number with the number buttons, press DEC<br />
first. Example: To offset a part 1/16th note later, enter -24 as the offset value since 24 sub-beats<br />
equals a 1/16th note.<br />
3. Press REC to enter this number into the <strong>SR18</strong>. The display will show OFFSET DONE and will<br />
reset the offset counter back to 00.<br />
Note: The display counter resets after you exit the function. Therefore, it does not keep track of<br />
the total amount of offset, but only changes in offset.<br />
Note: Drums offset to before the first beat "wrap around" to the end of the Pattern; drums offset<br />
past the end of the last beat "wrap around" to the beginning of the Pattern.<br />
PAGE 11: NAME THE PATTERN (NAME)<br />
This page allows you to name the currently selected Pattern.<br />
The display shows NAME and the current name (or NO<br />
NAME if the Pattern has not yet been named). To name, use<br />
the PAGE UP/DOWN buttons to select the character to be<br />
changed; select the desired character with the INC/DEC<br />
buttons or VALUE dial. Lower case and upper case letters,<br />
numbers, punctuation, and various special-purpose<br />
characters are available. You can also enter numbers with<br />
the number buttons.<br />
33
EDITING PATTERNS – ERASE FUNCTIONS<br />
ERASING DRUM EVENTS WHILE RECORDING<br />
While the <strong>SR18</strong> is recording, you can erase any individual drum event or series of events in real time to<br />
fix up errors. Erasure occurs only on those beats that coincide with the current quantization and swing<br />
values; turn quantization off to erase a drum wherever it occurs.<br />
1. The <strong>SR18</strong> should be in Record Mode.<br />
2. Press and hold ERASE.<br />
3. While holding down ERASE, press the pad corresponding to the sound to be erased just before the first<br />
event to be erased, and release just after the last event to be erased. To erase a single event, tap the pad<br />
on that single event.<br />
ERASING AN ENTIRE PATTERN<br />
If you erase both Main and Fill Patterns associated with a numbered Pattern, or you erase a Main or Fill<br />
Pattern and the other is empty, the Drum Set assignment (but not its Drum Set parameters), name, and<br />
length will revert to the default settings (i.e., the Drum Set with the same number as the Pattern, EMPTY<br />
PATTERN as the name, and a length of 8 beats). However, as long as either a Main or Fill Pattern<br />
contains previously-programmed data, the numbered Pattern will remember the Drum Set assignment,<br />
name, and length.<br />
1. The <strong>SR18</strong> must be in Pattern mode and stopped to allow erasing<br />
a Pattern.<br />
2. Enter the two-digit Pattern number to be erased with the number<br />
or INC/DEC buttons.<br />
3. Press and hold the ERASE button. The display says PATTERN<br />
ERASE?.<br />
4. While continuing to hold the ERASE button, press REC (ENTER).<br />
The display says PATTERN ERASED, followed by FILL<br />
ERASE?.<br />
5. While continuing to hold the ERASE button, press REC (ENTER)<br />
again. The display will read FILL ERASED.<br />
6. Release both buttons.<br />
Tip: To retain the Drum Set assignment, length, and name when you erase a<br />
Pattern, hold ERASE and tap each drum pad. This erases the drum events<br />
assigned to that pad, but retains all other Pattern parameters.<br />
ERASE ALL EVENTS PLAYED BY A PARTICULAR DRUM PAD<br />
This erases all events in a Pattern played by a specific pad. The<br />
Drum Set's parameters will not be affected.<br />
1. The <strong>SR18</strong> should be in Pattern mode and stopped.<br />
2. Press and hold ERASE.<br />
3. While holding down ERASE, tap a pad to erase all events played<br />
by that pad. The display shows the drum pad number whose<br />
events were erased. You can continue to erase more drum<br />
sounds while ERASE is held down.<br />
ERASE ALL INSTRUMENT EVENTS IN SUB-PATTERN<br />
This operation allows you to erase all instrument events (for example, all Drum events) in the selected<br />
sub-pattern. The Drum Set's parameters will not be affected.<br />
1. The <strong>SR18</strong> should be in Pattern mode and stopped.<br />
2. Press and hold ERASE.<br />
3. While holding down ERASE, press and hold the button<br />
corresponding to the layer which you would like to erase<br />
(DRUMS, BASS, PERC).<br />
4. While holding down the 2 buttons, press REC (ENTER) to erase<br />
all instrument events in the selected sub-pattern.<br />
34
EDITING PATTERNS – COPY/SAVE FUNCTIONS<br />
SAVING A PATTERN<br />
The following operation will save the selected Pattern, including all sub-patterns (A, B and FILL) to a<br />
specific location, overwriting any data which may already exist. Please note that you need to save your<br />
Patterns if you wish to access them after you power-cycle the unit.<br />
1. The <strong>SR18</strong> should be in Pattern mode and stopped.<br />
2. Select the Pattern you wish to save.<br />
3. Press and hold the SAVE / COPY button, and keep<br />
holding it down until step (6). The display says SAVE<br />
TO PATT.<br />
4. Enter the destination Pattern number with the INC /<br />
DEC buttons, number buttons or the VALUE dial.<br />
5. Press REC (ENTER). The display says SAVE DONE.<br />
6. Release the SAVE / COPY and REC (ENTER)<br />
buttons.<br />
COPYING A PATTERN<br />
The following operation will copy only the selected sub-pattern (A, B, or FILL) to another destination. If<br />
the current Pattern is shorter than the destination, the part will be copied to the beginning, leaving the<br />
remainder blank. Copying a sub-pattern longer than the destination Pattern will automatically lengthen<br />
the destination Pattern (128 Beat maximum).<br />
1. The <strong>SR18</strong> should be in Pattern mode and stopped.<br />
2. First, select a Pattern.<br />
3. Then select A, B or FILL sub-pattern to be copied by<br />
pressing the corresponding button.<br />
4. Press and hold the SAVE / COPY button, and keep<br />
holding it down until step (6).<br />
5. While holding the SAVE / COPY button, press PAGE<br />
UP. The display says COPY TO PATT.<br />
6. Enter the destination Pattern number into which the<br />
current sub-pattern will be copied with the INC / DEC<br />
buttons, number buttons or the VALUE dial.<br />
7. Now select which sub-pattern you would like to copy<br />
the data into by pressing A, B or FILL.<br />
8. Press REC (ENTER). The display says COPY DONE.<br />
9. Release the SAVE / COPY and REC (ENTER) buttons.<br />
APPENDING A PATTERN<br />
This operation adds the current Pattern, including all sub-patterns (A, B and FILL) to the end of a<br />
selected Pattern. Note that Patterns can only be appended to Patterns of the same time signature (i.e. a<br />
3 / 4 Pattern can only be appended to another 3 / 4 Pattern).<br />
1. The <strong>SR18</strong> should be in Pattern mode and stopped.<br />
2. Select the Pattern you would like to append.<br />
3. Press and hold the SAVE / COPY button, and keep<br />
holding it down until step (6).<br />
4. While holding the SAVE / COPY button, press PAGE<br />
UP twice. The display should say APPND TO PATT.<br />
5. Enter the destination Pattern number where you would<br />
like to append the original Pattern with the INC/DEC<br />
buttons, number buttons or the VALUE dial.<br />
6. Press REC (ENTER). The display says APPEND DONE.<br />
7. Release the COPY and REC (ENTER) buttons.<br />
35
EDITING PATTERNS – TRANSPOSITION<br />
Each Pattern on the <strong>SR18</strong> has a Pattern Transposition setting (0 by default). This setting allows<br />
you to quickly transpose the selected Pattern’s Bass content. The Pattern Transposition setting<br />
will be stored along with all other Pattern parameters once the Pattern is saved into memory (See<br />
“Editing Patterns – Save/Copy Functions” section for information on saving Pattern data).<br />
To change Pattern Transposition:<br />
1. The <strong>SR18</strong> should be in Pattern mode.<br />
2. Press and hold BASS.<br />
3. While holding down BASS, press the PAGE UP<br />
button.<br />
4. The screen will display PATTRANS on the top line,<br />
along with the current transposition setting on the<br />
bottom line.<br />
5. Use the VALUE dial or INC / DEC buttons to select<br />
the transposition in semitones (-12 to +12<br />
semitone range).<br />
Please note: Pattern Transposition affects all sub-patterns contained in the selected Pattern.<br />
Please note: Pattern data needs to be saved to memory for the Pattern Transposition setting to be<br />
recalled the next time you load the Pattern.<br />
PATTERN STEP EDITING (STEP EDIT MODE)<br />
Step editing is an approach of entering notes and other values for a Pattern in a non-realtime<br />
method.<br />
Step mode provides detailed Pattern editing. (Note that "step" does not refer to Song steps, but to<br />
the steps in a Pattern that hold drum events.) You can move through a Pattern one step at a time,<br />
stop at each event as desired, and delete the event, add an event, or change an event's volume.<br />
While occasionally somewhat tedious, Step Edit mode allows editing drum parts to your exact<br />
specifications.<br />
Each step (also called a sub-beat) is 1/96th of a beat in duration, so at maximum resolution it<br />
takes 96 steps to "move through" a quarter note. To save time, you can step through the Pattern<br />
at various note values, as set by the quantization value (which is why it's preferable to select the<br />
quantization rate at which the Pattern was recorded). Example: A 16th note consists of 24 sub<br />
beats, so setting the quantization value to 1/16 lets you step through the Pattern 24 sub-beats at<br />
a time. The following chart relates the number of sub-beats to note/quantization values.<br />
NOTE VALUE NOTE NAME SUB-BEATS<br />
1/4 QUARTER NOTE 96<br />
1/6 QUARTER NOTE TRIPLET 64<br />
1/8 EIGHTH NOTE 48<br />
1/12 EIGHTH NOTE TRIPLET 32<br />
1/16 16th NOTE 24<br />
1/24 16th NOTE TRIPLET 16<br />
1/32 32nd NOTE 12<br />
1/48 32nd NOTE TRIPLET 8<br />
36
First, you will need to make sure that you are in Pattern Mode (PATTERN should be displayed in<br />
the upper right corner of the screen). To enter Pattern Step Edit Mode, press the STEP EDIT<br />
button.<br />
BEAT SUB-BEAT PAD NUMBER<br />
The display now shows the beat and sub-beat. If<br />
a drum event exists on this beat/sub-beat, the<br />
display will also show the drum pad that played<br />
the event and the event volume. If more than<br />
one drum event occurs on the same sub-beat,<br />
the PAGE UP/DOWN buttons step forward or<br />
backward respectively through each drum one<br />
at a time.<br />
If no drum event exists on this beat/sub-beat,<br />
the display will show no pad number, and<br />
EMPTY in place of volume data.<br />
EVENT VOLUME<br />
To navigate through the steps at the current quantization rate, use the PAGE UP button to move<br />
forward or PAGE DOWN to move backward. If a drum exists between those beats that fall on the<br />
current quantization value, the drum will sound as you go past it, but the display will not stop on<br />
that drum. If swing is on, step mode will step in "swinged" increments.<br />
ADDING A NEW DRUM TO A STEP<br />
While in Pattern Step Edit Mode, use the PAGE buttons to select the step where the drum is to be<br />
added. Press the pad that corresponds to the sound you want to add. That drum, along with its<br />
volume (how hard the pad was hit), will be recorded into the displayed step.<br />
If you play a pad and there is already a drum event played by that pad on the displayed step, you<br />
will edit the volume rather than add another event. This is true even if there are several events on<br />
the displayed beat, and an event other than the one to be edited is showing.<br />
ERASE A DRUM SOUND FROM A STEP<br />
While in Pattern Step Edit Mode, use the PAGE buttons to locate the step containing the drum to<br />
be erased. While holding down the ERASE button, press REC (ENTER). The drum that was<br />
being displayed will be erased.<br />
CHANGE A DRUM SOUND'S VOLUME IN A GIVEN STEP<br />
Use the PAGE buttons to select the step containing the drum whose volume needs to be<br />
changed. Either press a number button from 1-8 (1=softest, 8=loudest), use the INC / DEC<br />
buttons or VALUE dial, or tap the displayed drum pad at the desired level. If you play a pad to<br />
change the level and there are several events on the same step, the display need not show the<br />
specific drum whose volume you want to edit.<br />
EXIT STEP EDIT MODE<br />
To exit step mode, press STOP, RECORD SETUP, or PLAY (the latter will begin playing the<br />
Pattern from the beginning).<br />
37
SONG MODE<br />
After creating the Patterns that make up a Song, it's time to string those Patterns together to create a<br />
complete Song. You can use Preset Patterns, User Patterns, or a combination of both to create your<br />
Song.<br />
There are three ways to create Songs:<br />
• In real time. As the <strong>SR18</strong> plays in Song Mode (when the REC button is pushed), you can select<br />
the sequences of Patterns and Fills in real time; the <strong>SR18</strong> will remember the sequence of Patterns<br />
and Fills you select.<br />
• <strong>Manual</strong>ly. Select Song mode and program a list of Patterns and Fills in the order in which the<br />
Patterns are to be played. You can specify the beat and sub-beat on which the Fill takes over from<br />
the associated main Pattern.<br />
• A combination of real time and manual recording. Create a Song in real time, then edit it manually<br />
to insert extra Song steps, delete Song steps, change tempo, etc.<br />
The <strong>SR18</strong> holds up to 100 Songs (numbered 00-99), and each Song can contain up to 254 steps. Each<br />
step holds either a Pattern number or Fill. Each Song remembers the tempo at which it was last played.<br />
PLAYING SONGS<br />
1. To play a Song, press the PATTERN / SONG button. When in Song Mode, the display will<br />
indicate SONG in the upper right corner of the screen.<br />
2. Select the Song you wish to play with the number keypad, INC / DEC buttons or the VALUE dial.<br />
3. After you select the Song, press the PLAY button. Note that the <strong>SR18</strong> will not attempt to play<br />
blank songs (i.e. if the display shows EMPTY SONG). The screen will change as shown to the<br />
right:<br />
• The step number will be displayed on the top line<br />
of the display, on the left.<br />
• The current beat will be displayed on the right.<br />
• The pattern assigned to the current step will be<br />
displayed on the bottom line.<br />
• A, B or FILL and PRESET / USER will be<br />
displayed as well, depending on which subpattern<br />
is selected for the step.<br />
38
RECORDING A SONG IN REAL-TIME<br />
To record a sequence of Patterns in real-time, follow the steps below:<br />
1. Switch to Pattern Mode (the display should say PATTERN) and select the first Pattern<br />
which you would like to use in your Song. Remember to specify A, B or FILL subpattern<br />
as well.<br />
2. Press the PATTERN / SONG button again to<br />
switch back to Song Mode (the display should<br />
show SONG).<br />
3. Press the REC button to enable Record<br />
Mode (the REC LED will illuminate). Now<br />
press the PLAY button to begin recording the<br />
Song. The Pattern which you selected above<br />
will begin to play and you will see the screen<br />
shown on the right.<br />
4. To select the Pattern which should be played<br />
next, use the INC / DEC buttons.<br />
Alternatively, you can use the VALUE dial or<br />
you can enter the Pattern number with the<br />
number keys. You can also specify which<br />
sub-pattern should be played by pressing the<br />
A, B or FILL button. The screen will change<br />
to display NEXT and the cued Pattern number<br />
on the bottom line. The Pattern will begin<br />
playing as soon as the current Pattern plays<br />
through its end, and will be entered as the<br />
next Song step.<br />
5. Continue to select the rest of the Patterns for<br />
your Song.<br />
6. When finished, press STOP.<br />
NOTES:<br />
If you enter a new Pattern number (Preset or User, A or B) while the first Pattern is playing,<br />
the new Pattern will begin playing after the first Pattern has finished and be stored as<br />
another Song step in the Song. If you let the original Pattern keep playing, it will add a new<br />
Song step with its Pattern number every time it repeats. In addition to selecting different<br />
Patterns, you can press FILL at any time. The <strong>SR18</strong> will remember where you pressed FILL.<br />
As in Pattern mode, pressing FILL will automatically transition to the B Pattern if the A<br />
Pattern is currently playing (and vice versa), or will continue playing the same Pattern if the<br />
FILL button is held past the end of the Fill.<br />
A Fill can transition into any Pattern number, A or B, by specifying the Pattern before the end<br />
of the Fill and releasing FILL before the Fill has finished playing. If you hold FILL past the<br />
end of the Fill, the associated Main Pattern will continue playing and any Pattern you may<br />
have previously specified for the next Step will be forgotten. When recording a Song, the<br />
Count/A/B/Fill footswitch duplicates the FILL button function.<br />
IMPORTANT:<br />
If you have already recorded material in a Song, pressing REC and PLAY will not allow<br />
recording until after the last Song step. However, you can overdub Fills at any time, and<br />
these will be recorded in the Song where played. Under these conditions, holding FILL past<br />
the downbeat doesn't make any difference; the Patterns used in Song steps are not altered.<br />
39
MANUAL SONG CREATION (SONG STEP EDIT MODE)<br />
Another way to sequence your Song is to use Step Edit Mode. In this mode, you can manually<br />
enter Pattern numbers for each step of the Song.<br />
1. Select Song mode (the display should indicate SONG in the upper right corner) and select a<br />
desired Song number with the number keypad, INC / DEC buttons or the VALUE dial. For<br />
the purposes of this example, let’s assume that you are starting a fresh Song (the display<br />
should say EMPTY SONG).<br />
2. Press the STEP EDIT button to enter Step Edit<br />
Mode. The REC led will illuminate and you will see<br />
the screen shown on the right.<br />
3. Now use the number keypad, INC / DEC buttons,<br />
or the VALUE dial to select the first Pattern for the<br />
Song. If desired, choose between the A/B<br />
variations and Preset/User options.<br />
You will see the screen on the right, where the<br />
second line indicates the Pattern which you have<br />
selected for the first step (step 00).<br />
4. Press the PAGE UP button to go to the next Song<br />
step.<br />
5. Enter the Pattern for the next step.<br />
6. Continue in a similar fashion until you have entered<br />
all the Patterns for the Song.<br />
You can always change the Pattern associated<br />
with a particular step by navigating to the step with<br />
the PAGE UP / DOWN buttons and entering a new<br />
Pattern.<br />
Adding a Fill to Your Song<br />
1. With the <strong>SR18</strong> in Step Edit Mode, use the PAGE UP / DOWN buttons to select the<br />
step where the Fill is to be added.<br />
2. Press and hold the FILL button.<br />
3. Enter the number of beats and sub-beats after the start of the current step in which the<br />
Fill is to start playing with the number buttons and INC/DEC buttons respectively.<br />
It is not necessary to press PLAY; the step will remember where the Fill is to occur. As<br />
the Song plays the step where the Fill occurs, the display will show FILL when the Fill<br />
begins playing.<br />
40
Removing a Fill from Your Song<br />
While in Record mode, there are two ways to remove a Fill from a Song:<br />
• When the Fill step appears, press the A button for an A Pattern or press the B button<br />
for a B Pattern and the Fill will be removed.<br />
• When the Fill step appears, press and hold the FILL button and press ERASE.<br />
Inserting a New Step Between Two Existing Song Steps<br />
1. The <strong>SR18</strong> should be in Step Edit Mode.<br />
2. Use the PAGE UP / DOWN buttons to<br />
select the step number that the inserted<br />
step should occupy. For example, to<br />
insert a step after step 04, select step<br />
05.<br />
3. Press and hold SAVE / COPY, and<br />
keep holding it down until step (6). You<br />
should see the screen shown on the<br />
right.<br />
4. Enter the two-digit Pattern number to be<br />
inserted.<br />
5. Press REC (ENTER). The new step is inserted, and all subsequent steps are<br />
automatically renumbered to reflect the addition of the inserted step (e.g., what used to<br />
be step 05 is now step 06, what used to be step 06 is now step 07, etc.).<br />
6. Release the SAVE / COPY and REC (ENTER) buttons.<br />
Deleting a Step<br />
1. The <strong>SR18</strong> should be in Step Edit Mode.<br />
2. Use the PAGE UP / DOWN buttons to select the step number to be deleted.<br />
3. Press and hold ERASE. You will see<br />
the screen shown on the right.<br />
4. While continuing to hold ERASE, press<br />
REC (ENTER). The step is deleted, and<br />
all subsequent steps are automatically<br />
re-numbered to reflect the deletion of<br />
the inserted step (e.g., what used to be<br />
step 06 is now step 05, what used to be<br />
step 07 is now step 06, etc.).<br />
5. Release the ERASE and REC (ENTER)<br />
buttons.<br />
Replacing a Step<br />
1. The <strong>SR18</strong> should be in Step Edit Mode.<br />
2. Use the PAGE UP / DOWN buttons to select the step number to be replaced.<br />
3. Enter the new Pattern number (with appropriate A or B, Fill, or User/Preset options).<br />
41
SETTING SONG TEMPO<br />
There are two ways to set tempo:<br />
Method 1<br />
1. Press STOP if the Song is playing.<br />
2. Press the TAP TEMPO button several times at the desired tempo. The LD32 will<br />
average the time between taps and derive a tempo.<br />
Note: If a footswitch is plugged into the Count/A/B/Fill jack, tapping the footswitch at<br />
the desired rate is equivalent to pressing the TAP TEMPO button.<br />
Method 2<br />
1. Alternatively, you can press and hold the TAP TEMPO button and use the INC / DEC<br />
buttons or VALUE dial to select a new tempo.<br />
INSERTING A TEMPO CHANGE IN A SONG<br />
This option allows you to insert a tempo change at a selected Song step.<br />
1. Press STOP if the song is playing.<br />
2. Press the STEP EDIT button to enter Song<br />
Step Edit mode.<br />
3. Press and hold TAP TEMPO and press<br />
PAGE UP to enter the Tempo Event Edit<br />
Mode:<br />
4. A tempo change can be inserted at any beat<br />
of the Song Step. While holding TAP<br />
TEMPO, use the PAGE buttons to select the<br />
beat within the step.<br />
5. While holding TAP TEMPO use the INC /<br />
DEC buttons, number keypad or the VALUE<br />
dial to set the tempo.<br />
6. Release the TAP TEMPO button to return to<br />
the previous page.<br />
Note: If you would like to erase an existing Tempo Change event, navigate to the beat<br />
where the event occurs while holding TAP TEMPO and press ERASE.<br />
42
CONTROLLING PLAYBACK POSITION<br />
• If you press STOP while a song is playing, the next time you press PLAY the Song will start<br />
from the beginning.<br />
• If you press PLAY while a song is playing, the song will pause. Press PLAY again to<br />
resume playback.<br />
• Press PAGE UP while a song is playing to advance playback to the next Song step.<br />
• Press PAGE DOWN while a song is playing to restart playback from the current Song step.<br />
LOOP A PATTERN INDEFINITELY<br />
In Song Perform mode, pressing and holding FILL until the end of a song step will cause that step<br />
to repeat. A footswitch plugged into the Count/A/B/Fill jack will perform the same function.<br />
For example, you can use this feature if a soloist decides to take another few bars.<br />
Another use is if two Songs share the same tempo. Follow the first Song with a blank Pattern,<br />
then append the second Song. Between Songs, hold down the footswitch on the blank Pattern<br />
song step, then release to start the second Song.<br />
START FROM THE MIDDLE OF A SONG<br />
You need not start a Song from the beginning each time; in Record mode, a Song can start at<br />
any Song step.<br />
1. Make sure the <strong>SR18</strong> is in Record mode (Press the REC button), even if you don't plan to<br />
record anything.<br />
2. Use the INC/DEC buttons to select the Song step at which you want the <strong>SR18</strong> to start<br />
playing.<br />
3. Press PLAY. The <strong>SR18</strong> will start playing at the downbeat of the selected Song step.<br />
4. If you don't want to extend the Song length, use the normal Playback mode before reaching<br />
the end of the Song (press REC again so the REC LED is no longer illuminated). If you do<br />
want to extend the Song length, remain in Record mode.<br />
43
ERASING AN ENTIRE SONG<br />
1. The <strong>SR18</strong> should be in Song Mode.<br />
2. Use the number buttons, INC / DEC buttons or the<br />
VALUE dial to select the Song to be erased.<br />
3. Press and hold the ERASE button. You will see the<br />
screen shown on the right.<br />
4. While holding down the ERASE button, press REC<br />
(ENTER). The display says SONG ERASED and<br />
erasure is complete.<br />
5. Release the ERASE and REC (ENTER) buttons.<br />
SAVING YOUR SONG<br />
When you are finished putting together your Song, you will need to save it to permanent memory.<br />
Please note that all Song data will be lost if you turn off the <strong>SR18</strong> before saving your Song.<br />
1. The <strong>SR18</strong> should be in Song Mode.<br />
2. Use the INC / DEC buttons, the number keypad or the<br />
VALUE dial to select the Song which you would like to<br />
save.<br />
3. Press and hold the SAVE / COPY button.<br />
4. Press REC (ENTER) to save the song. The display<br />
will show SAVE DONE.<br />
5. Release the SAVE / COPY button.<br />
APPEND A SONG<br />
You can use this feature to append all content from the selected Song to the end of another<br />
Song. Appending a Song to an empty destination will create an identical copy of the Song. Note<br />
that you can double the Song sequence by appending a Song to itself.<br />
1. The <strong>SR18</strong> should be in Song Mode.<br />
2. Select the Song to be copied to itself with the number buttons, INC / DEC buttons or the VALUE<br />
dial.<br />
3. Press and hold the SAVE / COPY button.<br />
4. While holding the SAVE / COPY button, press the<br />
PAGE UP button. You will see the screen shown on<br />
the right.<br />
5. While continuing to hold the SAVE / COPY button,<br />
enter the same Song number as the one selected in<br />
step (2).<br />
6. Press REC (ENTER) to copy the song to itself.<br />
7. Release the SAVE / COPY and REC (ENTER) buttons.<br />
NAME A SONG (NAME)<br />
1. Press RECORD SETUP. If the Song has been named, the name will show on the top line. If the<br />
Song has not been named, the display says NO NAME.<br />
2. Enter the name using the PAGE UP/DOWN buttons to select the character to be changed<br />
(selected character is indicated by a cursor underneath it), and the INC/DEC buttons or Value Dial<br />
to select the desired character. Lower case and upper case letters, numbers, punctuation, and<br />
various special-purpose characters are available. You can also enter numbers with the number<br />
buttons.<br />
44
SYSTEM SETUP<br />
This Mode accesses important System functions. General instructions are:<br />
1. Press the SYSTEM SETUP button.<br />
2. Use the Page (up and down) buttons to select different "pages" of functions; the display's<br />
lower right window shows the page number. The pages are described below.<br />
3. Adjust values on pages, if necessary, as described for each page.<br />
4. After making all needed changes, press SYSTEM SETUP again to exit, or choose another<br />
page.<br />
Note: All the parameters on the following pages remain as set, even if you turn off power, until the<br />
parameters are changed again.<br />
Page 1 / MIDI CHANNEL (MIDI CH)<br />
When controlling the <strong>SR18</strong> with external MIDI devices, such as MIDI drum pads and keyboards,<br />
you can specify MIDI Channel settings for each instrument layer on this page.<br />
The <strong>SR18</strong> can receive MIDI data on any 1 of 16 MIDI Channels or an all 16 Channels<br />
simultaneously (Omni Mode).<br />
1. To change which channel an instrument layer is<br />
receiving MIDI data on, first select the instrument<br />
layer by pressing DRUMS, PERC or BASS.<br />
2. Select the desired MIDI channel for the instrument<br />
layer, using the number buttons, INC / DEC<br />
buttons or the VALUE dial. (With the number<br />
buttons, enter a leading zero if necessary; 00<br />
selects Omni mode.)<br />
Tip: When several instruments are being driven by MIDI, it is a good idea to assign<br />
different MIDI Channels (not Omni) for each instrument in the mix. This ensures that the<br />
instrument will receive only the data intended for it.<br />
Page 2 / RECEIVE MIDI NOTES (DRUM IN, PERC IN, BASS IN)<br />
The display shows DRUM IN, PERC IN or BASS<br />
(depending on which mode is currently selected). This<br />
page features two different MIDI input velocity curves<br />
(ON V1 and ON V2). To have the <strong>SR18</strong> receive note<br />
messages at its MIDI input, use the INC/DEC buttons to<br />
select ON V1 or ON V2. Select OFF to have the <strong>SR18</strong><br />
ignore note messages. ON V1 is a normal linear velocity<br />
curve, and will not affect MIDI velocity data being sent<br />
by the controller. For keyboards that do not provide a full<br />
range of velocity, ON V2 will allow the drums to be<br />
played at full volume without having to send full<br />
velocity from the MIDI controller.<br />
Background Select ON V1 or ON V2 if you're using the <strong>SR18</strong> as an expander module, or<br />
want to play real time drum controllers into the <strong>SR18</strong> as it plays a Pattern or Song. Select<br />
OFF if you're using the <strong>SR18</strong> as a drum machine slaved to a sequencer; when OFF, the<br />
<strong>SR18</strong> follows the sequencer timing data but not note data (you don't want it to play other<br />
parts). Note that in this scenario Clock In (page 5 of the System Setup menus) must be set<br />
to ON.<br />
45
Page 3 / TRANSMIT MIDI NOTES (DRUM OUT, PERC OUT, BASS OUT)<br />
The <strong>SR18</strong> can output MIDI data from pad hits and Pattern or Song sequences through the MIDI<br />
OUT connection on the rear panel. This allows you to send data into a sequencer for recording,<br />
or to drive other sound modules from the <strong>SR18</strong>.<br />
1. To change an instrument layer’s MIDI OUT<br />
properties, first select DRUMS, PERC or BASS.<br />
2. To have the <strong>SR18</strong> output MIDI note data from pad<br />
hits or when playing a Pattern/Song, use the<br />
INC/DEC buttons or the VALUE dial to select ON.<br />
Select OFF if you don't want the <strong>SR18</strong> to transmit<br />
note data.<br />
Tip: If the <strong>SR18</strong> is acting as a drum machine and provides the master clock to a MIDI<br />
system, select OFF so that other devices don't respond to the MIDI note data.<br />
Page 4 / ASSIGN MIDI NOTE NUMBERS TO DRUM PADS (NOTE)<br />
This page allows you to specify which MIDI Note Number is associated with a given pad. This<br />
number describes both the MIDI Note which will trigger the pad when controlling the <strong>SR18</strong><br />
externally, as well as the MIDI Note which will be sent out to other MIDI devices when the<br />
associated pad is struck.<br />
The display shows the note number/name in the upper<br />
left, and the drum pad number in the upper right window.<br />
1. First, select which instrument layer you wish to edit<br />
by pressing DRUMS, PERC or BASS.<br />
2. Press the drum pad to be assigned to a MIDI Note,<br />
as confirmed by the Drum Pad Number display.<br />
3. Enter the note number/name with the number<br />
buttons, INC/DEC buttons or the VALUE dial.<br />
Note: MIDI Note assignments are "global" and affect every Pattern. MIDI note<br />
assignments are not individually selectable for each Pattern.<br />
The default note assignments for each instrument layer are shown below.<br />
Note: The Bass part cannot have MIDI Note numbers assigned. These are preset to<br />
start at MIDI Note number C2 (048)<br />
DRUMS PERC BASS<br />
PAD MIDI NOTE # KEY NAME PAD MIDI NOTE # KEY NAME PAD MIDI NOTE # KEY NAME<br />
PAD 1 036 C1 PAD 1 060 C3 PAD 1 048 C2<br />
PAD 2 038 D1 PAD 2 061 C#3 PAD 2 049 C#2<br />
PAD 3 037 C#1 PAD 3 063 D#3 PAD 3 050 D2<br />
PAD 4 042 F#1 PAD 4 064 E3 PAD 4 051 D#2<br />
PAD 5 044 G#1 PAD 5 062 D3 PAD 5 052 E2<br />
PAD 6 046 A#1 PAD 6 075 D#4 PAD 6 053 F2<br />
PAD 7 048 C2 PAD 7 067 G3 PAD 7 054 F#2<br />
PAD 8 047 B1 PAD 8 068 G#3 PAD 8 055 G2<br />
PAD 9 041 F1 PAD 9 065 F3 PAD 9 056 G#2<br />
PAD 10 049 C#2 PAD 10 066 F#3 PAD 10 057 A2<br />
PAD 11 051 D#2 PAD 11 069 A3 PAD 11 058 A#2<br />
PAD 12 053 F2 PAD 12 080 G#4 PAD 12 059 B2<br />
46
Page 5 / ACCEPT EXTERNAL CLOCK VALUE (CLOCK IN)<br />
Playback and tempo on the <strong>SR18</strong> can be controlled by external devices through MIDI Clock if:<br />
• The external device (sequencer, drum machine, etc.) generates MIDI timing signals.<br />
• These signals go from the external device's MIDI OUT to the <strong>SR18</strong>'s MIDI IN.<br />
• CLOCK IN is ON.<br />
To have the <strong>SR18</strong> recognize clock (timing) messages<br />
present at its MIDI input, use the INC/DEC buttons or<br />
VALUE dial to select ON (if no clock messages are<br />
present, the <strong>SR18</strong> will follow its internal clock tempo).<br />
Select OFF to have the <strong>SR18</strong> ignore clock messages<br />
and follow its internal clock tempo regardless of what<br />
timing data appears at the MIDI IN.<br />
Tip: When using the <strong>SR18</strong> as an expander module, set CLOCK IN to OFF so that<br />
timing signals don't start playing a Pattern.<br />
Page 6 / SEND CLOCK VALUE TO OTHER DEVICES (CLOCKOUT)<br />
The <strong>SR18</strong> can generate MIDI Clock timing signals to which other devices can synchronize if:<br />
• The external device (sequencer, drum machine, etc.) can respond to MIDI timing signals.<br />
• These signals go from the <strong>SR18</strong>'s MIDI OUT to the external device's MIDI IN.<br />
• CLOCKOUT is ON.<br />
To have the <strong>SR18</strong> generate timing data at its MIDI out,<br />
use the INC/DEC buttons or the VALUE dial to select<br />
ON.<br />
Select OFF to inhibit MIDI timing signals from appearing<br />
at the MIDI out jack.<br />
Tip: When slaving the <strong>SR18</strong> to other devices,<br />
CLOCKOUT should be OFF and CLOCK IN<br />
should be ON.<br />
47
Page 7 / MERGE MIDI IN WITH MIDI OUT (MIDITHRU)<br />
To have the <strong>SR18</strong> merge data appearing at the MIDI IN<br />
with the timing and/or note data transmitted through the<br />
MIDI OUT, you can enable MIDITHRU.<br />
Use the INC/DEC buttons or VALUE dial to select ON.<br />
Select OFF to have the <strong>SR18</strong> MIDI OUT transmit <strong>SR18</strong><br />
timing and note data only.<br />
Example: Turning MIDI OUT to MIDI THRU can be handy for some system applications.<br />
Assume a MIDI keyboard connects to the MIDI IN on the <strong>SR18</strong> and the unit serves as the<br />
master clock for a sequencer (the MIDI OUT from the <strong>SR18</strong> is connected to the sequencer’s<br />
MIDI IN). With MIDITHRU set to ON, the keyboard note data will be passed through the<br />
<strong>SR18</strong> and appear at the sequencers MIDI IN.<br />
Other <strong>SR18</strong> settings should be DRUM IN set to OFF (so the <strong>SR18</strong> doesn't respond to your<br />
keyboard playing) and CLOCKOUT set to ON so that the <strong>SR18</strong> clock drives the sequencer.<br />
DRUMOUT should also be OFF so that the sequencer doesn't record the <strong>SR18</strong> drum notes.<br />
Plugging the sequencer MIDI OUT to the keyboard MIDI IN plays back the sequenced notes<br />
through the keyboard.<br />
Technically speaking, MIDI timing data (as provided by a master unit such as a sequencer)<br />
received at the <strong>SR18</strong>'s MIDI IN is not sent to the MIDI OUT. However, this will appear to be<br />
the case since the <strong>SR18</strong> will generate its own timing data in response to the timing data<br />
received at its MIDI IN, if CLOCK IN and CLOCK OUT are both ON.<br />
Page 8 / SELECT DRUM SETS VIA MIDI PROGRAM CHANGES (PRG CHNG)<br />
A Program Change is a message sent to devices which<br />
causes them to switch to a new program, or bank of<br />
sounds. Drum Set selection on the <strong>SR18</strong> can be<br />
controlled externally at any time (even during playback)<br />
through the use of Program Change messages.<br />
To have the <strong>SR18</strong> receive Program Change messages,<br />
use the INC/DEC buttons or VALUE dial to select ON.<br />
Select OFF to have the <strong>SR18</strong> ignore Program Change<br />
messages.<br />
Program Change (PC) 00 selects User Drum Set 00; PC 01 selects User Drum Set 01; PC 02<br />
selects User Drum Set 02; etc. However, be aware that some devices number Program Changes<br />
as 1-128, others as 0-127, and some as banks of programs.<br />
Tip: If the device generating Program Changes follows a non-standard protocol, it's a good idea to<br />
make up a conversion chart which shows which Program Changes call up which Drum Sets.<br />
Please note that in order to access User kits, you will need to send a Bank Select message along<br />
with the Program Change. Refer to the table below for information on how to access different<br />
kits.<br />
BANK MSB BANK LSB PROG CHANGE SELECTION<br />
0 0 00-99 PRESET DRUM KITS<br />
0 1 00-99 USER DRUM KITS<br />
0 0 00-99 PRESET PERC KITS<br />
0 1 00-99 USER PERC KITS<br />
0 0 00-99 PRESET BASS KITS<br />
0 1 00-99 USER BASS KITS<br />
48
Page 9 / TEMPO SELECTION (TEMPO)<br />
This function describes how the <strong>SR18</strong> will use tempo data when playing back Patterns.<br />
If you choose GLOBAL, the <strong>SR18</strong> will use a global<br />
tempo setting and will ignore any tempo data associated<br />
with a Pattern.<br />
If you choose PERPAT, the <strong>SR18</strong> will use the tempo<br />
data stored with each Pattern. For example, if Pattern<br />
01’s tempo is set to 90 and Pattern 02’s tempo is set to<br />
120, the <strong>SR18</strong> will increase the tempo when switching<br />
from Pattern 01 to Pattern 02.<br />
Page 10 / MAP DRUM NOTES (NOTE MAP)<br />
Within each Pattern, MIDI notes can either be mapped<br />
to 12 different sounds in NORMAL mode, or they can be<br />
mapped to any of five drumset groups (User Drumsets<br />
00-09, 10-19, 20-29, 30-39, etc ) in MULTI-DRUMSET<br />
mode.<br />
Any of these drumset groups can cover MIDI notes 000<br />
through 119. This makes the <strong>SR18</strong> ideal for use as a<br />
drum sound module, triggered by either an electronic<br />
drum kit or set of electronic drum pads, or by notes from<br />
a sequencer.<br />
Note that while in this mode, you cannot record notes into a Pattern via MIDI. It is assumed that<br />
you will be using the <strong>SR18</strong> strictly as a drum sound expander module.<br />
The chart on the following page shows which drum pads of which drum sets are triggered by<br />
which MIDI notes. The logic to this assignment is that there are 12 drum pads per octave of<br />
notes, so pad 1 always starts on a C note (MIDI notes 000, 012, 024, 036, 048, 060, 072, 084,<br />
096, and 108). Remember that these drum assignments must be saved as Drum Sets in order to<br />
retain the note map assignments.<br />
49
Drum note map in MULTI-DRUMSET mode.<br />
NOTE: In this chart, Pad and MIDI note number values for drumset 00 also apply to drumsets 10,<br />
20, 30, and 40; values for drumset 01 also apply to drumsets 11, 21, 31 and 41, etc.<br />
DRUM<br />
SET<br />
PAD<br />
#<br />
MIDI<br />
NOTE<br />
DRUM<br />
SET<br />
PAD<br />
#<br />
MIDI<br />
NOTE<br />
DRUM<br />
SET<br />
PAD<br />
#<br />
MIDI<br />
NOTE<br />
00 1 000 03 5 040 06 9 080<br />
00 2 001 03 6 041 06 10 081<br />
00 3 002 03 7 042 06 11 082<br />
00 4 003 03 8 043 06 12 083<br />
00 5 004 03 9 044 07 1 084<br />
00 6 005 03 10 045 07 2 085<br />
00 7 006 03 11 046 07 3 086<br />
00 8 007 03 12 047 07 4 087<br />
00 9 008 04 1 048 07 5 088<br />
00 10 009 04 2 049 07 6 089<br />
00 11 010 04 3 050 07 7 090<br />
00 12 011 04 4 051 07 8 091<br />
01 1 012 04 5 052 07 9 092<br />
01 2 013 04 6 053 07 10 093<br />
01 3 014 04 7 054 07 11 094<br />
01 4 015 04 8 055 07 12 095<br />
01 5 016 04 9 056 08 1 096<br />
01 6 017 04 10 057 08 2 097<br />
01 7 018 04 11 058 08 3 098<br />
01 8 019 04 12 059 08 4 099<br />
01 9 020 05 1 060 08 5 100<br />
01 10 021 05 2 061 08 6 101<br />
01 11 022 05 3 062 08 7 102<br />
01 12 023 05 4 063 08 8 103<br />
02 1 024 05 5 064 08 9 104<br />
02 2 025 05 6 065 08 10 105<br />
02 3 026 05 7 066 08 11 106<br />
02 4 027 05 8 067 08 12 107<br />
02 5 028 05 9 068 09 1 108<br />
02 6 029 05 10 069 09 2 109<br />
02 7 030 05 11 070 09 3 110<br />
02 8 031 05 12 071 09 4 111<br />
02 9 032 06 1 072 09 5 112<br />
02 10 033 06 2 073 09 6 113<br />
02 11 034 06 3 074 09 7 114<br />
02 12 035 06 4 075 09 8 115<br />
03 1 036 06 5 076 09 9 116<br />
03 2 037 06 6 077 09 10 117<br />
03 3 038 06 7 078 09 11 118<br />
03 4 039 06 8 079 09 12 119<br />
50
PAGE 11 / MANUAL DRUMSET OVERRIDE (SET MODE)<br />
Each Pattern has an associated, assigned Drum Set. However, you can tell the <strong>SR18</strong> to ignore<br />
these stored assignments, and retain the currently selected Drum Set regardless of whether or<br />
not you change Patterns. This is useful if you want to hear how a Pattern would sound with a<br />
different Drum Set (just set one up manually) as opposed to the one stored with the Pattern.<br />
Use the INC/DEC buttons or the VALUE dial to select<br />
PATT (each Pattern uses its assigned Drum Set) or<br />
MANUAL (the <strong>SR18</strong> will retain the currently selected<br />
drum assignments regardless of which Pattern is<br />
chosen).<br />
Note: If changing Patterns doesn't call up<br />
different Drum Sets, this parameter is<br />
probably set to MANUAL instead of PATT.<br />
Page 12 / LEDs (LEDS OFF)<br />
On this page you can specify whether the LEDs on the<br />
<strong>SR18</strong> will be lit, or turned off to preserve battery life.<br />
Use the INC / DEC buttons or the VALUE dial and select<br />
OFF to turn off the LEDs.<br />
Select ON to turn on the LEDs.<br />
Page 13 / BACKLIGHT BRIGHTNESS (BACKLITE)<br />
On this page, you can adjust the brightness of the<br />
display. Note that lower brightness settings will help<br />
preserve battery life.<br />
Use the INC / DEC buttons or the VALUE dial to adjust<br />
the brightness setting (OFF, 1-9 or FULL for maximum<br />
brightness).<br />
Page 14 / BATTERY LEVEL (BATT LVL)<br />
This page indicates the remaining battery charge.<br />
51
Page 15 / LOW BATTERY WARNING (LO BATT)<br />
On this page you can specify the threshold the battery<br />
should reach before warning of low battery. This<br />
warning will let you know when it is time to replace the<br />
batteries or plug in the power adapter.<br />
Use the number buttons, INC / DEC buttons or the<br />
VALUE dial to select a percentage of the full battery<br />
charge.<br />
Page 16 / CHECK AVAILABLE MEMORY (MEM FREE)<br />
This page shows the approximate amount of free<br />
memory available (expressed as a percentage of the<br />
total amount).<br />
It is important to check memory from time to time<br />
because the <strong>SR18</strong> always requires some free memory<br />
for proper operation. If the available memory falls below<br />
15% or so, immediately save the <strong>SR18</strong>'s data as<br />
described below.<br />
Some operations may not be possible even if a small amount of memory is left. This is because<br />
the <strong>SR18</strong> duplicates a Pattern before it is modified (length change, offset change, etc.). If you try<br />
to alter a Pattern that takes up more memory than is available, the display will tell you that there<br />
is no more memory left.<br />
Immediately save the <strong>SR18</strong>'s data, and determine whether you can erase any unwanted Patterns<br />
or Songs to free up some memory.<br />
Page 17 / SEND SONG AND PATTERN DATA TO MIDI SYS EX STORAGE DEVICE (SEND<br />
OUT MIDI?)<br />
This page allows you to convert the <strong>SR18</strong>'s Pattern and Song information into MIDI system<br />
exclusive data and send this data through the MIDI out. This data can be transferred to software<br />
and hardware devices which support MIDI SysEx<br />
storage.<br />
There are two main reasons to save your work:<br />
• Although the <strong>SR18</strong> can typically store many<br />
events, eventually it will run out of memory. You<br />
can save the memory contents, fill up the memory<br />
with new Patterns and Songs, and re-load the old<br />
data when needed.<br />
• It is vitally important to back up what's in the <strong>SR18</strong>'s memory! A mechanical problem (surge<br />
on the power line, a quick zap of static electricity) or operator error could alter the data in<br />
memory. Save your data whenever you've done enough work on something that you<br />
wouldn't want to lose that work. If possible, make two backups, and store the second<br />
backup in a different physical location from the primary backup.<br />
While on this page, press REC (ENTER) to send <strong>SR18</strong> Pattern and Song data as SysEx data.<br />
The display will say SENDING MIDI… to confirm that data is being sent.<br />
Note: Typically, the MIDI OUT would connect to another <strong>SR18</strong>'s MIDI IN or a system<br />
exclusive data storage device such as MIDI sequencer.<br />
52
SENDING MIDI SYSEX SONG AND PATTERN DATA TO THE <strong>SR18</strong><br />
If you wish to load Pattern and Song data back into the <strong>SR18</strong>, please follow the instructions<br />
below. Please note that this operation will erase any Song and Pattern data which exists on the<br />
<strong>SR18</strong>!<br />
1. Connect a 5-pin MIDI cable from your MIDI SysEx device to the <strong>SR18</strong>’s MIDI IN.<br />
2. Turn off the <strong>SR18</strong>.<br />
3. Hold down the SAVE / COPY button.<br />
4. Turn on the <strong>SR18</strong> while holding down the<br />
SAVE / COPY button.<br />
5. After a few seconds, you should see the<br />
screen displayed on the right. The <strong>SR18</strong> is<br />
ready to receive data.<br />
6. Now transfer the MIDI system exclusive data<br />
into the <strong>SR18</strong>. Refer to your MIDI SysEx<br />
device’s documentation for information on<br />
transferring MIDI SysEx.<br />
7. Once the transfer is complete, turn off the<br />
<strong>SR18</strong> and then turn it back on.<br />
53
APPLICATIONS<br />
MIDI SYNC APPLICATIONS<br />
<strong>SR18</strong> As MIDI Timing Master<br />
The <strong>SR18</strong> can control several other slave MIDI drum machines or sequencers by turning on MIDI<br />
Clock Out, which sends <strong>SR18</strong> timing information down the MIDI line.<br />
1. Turn on MIDI Clock Out (page 6 of the Record Setup menus).<br />
2. Program the slave units to not follow their internal clocks, but to accept external MIDI Clock<br />
and Start/Stop data. Refer to each device's manual to find out how to do this. Enable the<br />
slave's Song Position Pointer if it is available.<br />
3. Press PLAY on the <strong>SR18</strong>. The slave units should start at the same time, and progress at the<br />
same tempo. If the slaves respond to Song Position Pointer, you can start an <strong>SR18</strong> Song at<br />
any point, and after a few seconds the slaves will catch up and synchronize from that point<br />
on.<br />
The diagram on the right shows a<br />
<strong>SR18</strong> serving as the MIDI system<br />
master clock, with a sampler<br />
device set as a slave. To slave the<br />
sampler (or any external device<br />
accepting MIDI in) use a 5-pin<br />
MIDI cable to connect the MIDI<br />
OUT of the <strong>SR18</strong> to the MIDI IN of<br />
the device.<br />
<strong>SR18</strong> As MIDI Timing Slave<br />
The <strong>SR18</strong> can be controlled by external devices through MIDI Clock. This allows you to sync<br />
playback and tempo on the <strong>SR18</strong> to your external MIDI device.<br />
1. Turn on MIDI Clock In on the <strong>SR18</strong> (page 5 of the Record Setup menus).<br />
2. Program the master unit to send MIDI Clock. Refer to each device's manual to find out how<br />
to do this.<br />
3. Press PLAY on the master clock device. The <strong>SR18</strong> should start at the same time, and<br />
progress at the same tempo.<br />
The diagram on the right shows a<br />
<strong>SR18</strong> serving as a MIDI system<br />
slave, with a synth workstation<br />
device set as the master clock<br />
source. To slave the <strong>SR18</strong>, use a<br />
5-pin MIDI cable to connect the<br />
MIDI OUT of the master clock<br />
device to the MIDI IN of the <strong>SR18</strong>.<br />
54
STRATEGIES FOR ASSEMBLING PATTERNS AND SONGS<br />
Ideally, you should be able to translate your inspirations into tangible form with a minimum<br />
amount of effort. The following tips and techniques help speed up the process of creating<br />
Patterns and Songs.<br />
Create Fills Quickly with the Copy Function<br />
Many times a Fill will simply be a variation on another Pattern, but with a few minor<br />
differences to add variety or serve different musical purposes. To save time, use the<br />
Copy function to copy the main Pattern to the Fill, and then add variations to the Fill in<br />
real time or with Step Edit mode.<br />
Assemble Short Patterns into Longer Patterns with the Copy Function<br />
It's less time-consuming to work with short Patterns, since you don't have to wait for<br />
the entire Pattern to cycle through before overdubbing or "spot erasing" events. After<br />
assembling several short Patterns, use the copy function to append Patterns into a<br />
longer Pattern. Example: Create four eight-beat Patterns, then use the copy function to<br />
combine these into a single 32-beat Pattern.<br />
Save Memory Through Song Steps<br />
Whenever possible, repeat Patterns using Song steps rather than program long<br />
Patterns. Example: Suppose you have a 16-measure figure where the first three<br />
groups of four measures are identical, and the final group of four measures provides<br />
some sort of variation. Recording this as one 16-measure Pattern will take up more<br />
memory than recording two Patterns (one of the first group of four measures and one<br />
of the last group of four measures), and while in Song mode repeating the first group<br />
three times followed by the last group once.<br />
Odd Time Signatures<br />
For time signatures based on quarter notes, changing the number of beats in a Pattern<br />
can also change the time signature. Example: Programming a Pattern seven beats<br />
long will yield a measure of 7/4. Programming a Pattern 14 beats long will yield two<br />
measures of 7/4. Time signatures such as 2/4, 3/4, 5/4, 9/4, and so on are easy to<br />
implement.<br />
For time signatures based on eighth notes, it's easiest to double the tempo so that<br />
each beat lasts an eighth note instead of a quarter note. However, you will have to<br />
take this into account when quantizing and setting the metronome—if the display says<br />
a quarter note, it will be read as an eighth note.<br />
Plan carefully when mixing different time signatures within the same piece. If some<br />
Patterns use a time signature based on quarter notes and others on eighth notes, you<br />
will need to double the tempo for the quarter note-based Patterns to match up with the<br />
eighth-note based Patterns.<br />
55
UNDERSTANDING RHYTHMIC NOTATION<br />
Measures A piece of music is divided into smaller units called measures (also<br />
called bars), and each measure is divided into beats. In the <strong>SR18</strong>, each beat is<br />
further sub-divided into 96 sub-beats.<br />
Rhythmic Values for Notes With a measure written in a 4/4 time signature,<br />
there are 4 beats per measure, and each beat represents a quarter (1/4) note.<br />
Thus, there are 4 quarter notes per measure of 4/4 music. With a 3/4 time<br />
signature the "numerator" indicates that there are 3 beats per measure, while the<br />
"denominator" indicates that each of these beats is a quarter note (1/4).<br />
There are two eighth notes per quarter note. Thus, there are eight eighth notes<br />
per measure of 4/4 music.<br />
There are four 16th notes per quarter note. Thus, there are sixteen 16th notes<br />
per measure of 4/4 music.<br />
There are eight 32nd notes per quarter note. Thus, there are thirty-two 32nd<br />
notes per measure of 4/4 music.<br />
There are also notes that span a greater number of beats than quarter notes. A<br />
half note equals two quarter notes. Therefore, there are two half notes per<br />
measure of 4/4 music. A whole note equals four quarter notes, so there is one<br />
whole note per measure of 4/4 music. (We keep referring these notes in 4/4 time<br />
because that is the most commonly used time signature in contemporary<br />
Western music.)<br />
Triplets The above notes divide measures by factors of two. However, there are<br />
some cases where you want to divide a beat into thirds, giving three notes per<br />
beat. Dividing a quarter note by three results in eighth-note triplets. The reason<br />
why we use the term eighth-note triplets is because the eighth note is closest to<br />
the actual rhythmic value. Dividing an eighth note by three results in 16th-note<br />
triplets. Dividing a 16th note by three results in 32nd note triplets.<br />
Rests You can also specify where notes should not be played; this is indicated<br />
by a rest, which can be the same length as any of the rhythmic values used for<br />
notes.<br />
Time Signatures 4/4 (and to a lesser extent 3/4) are the most common time<br />
signatures in our culture, but they are by no means the only ones. In jazz, both<br />
5/4 (where each measure consists of five quarter notes) and 7/4 (where each<br />
measure consists of seven quarter notes) are often used. In practice, complex<br />
time signatures are played like a combination of simpler time signatures; for<br />
example, some 7/4 compositions would have you count each measure not as 1,<br />
2, 3, 4, 5, 6, 7 but as 1, 2, 3, 4, 1, 2, 3. It's often easier to think of 7/4 as one bar<br />
of 4/4 followed by one bar of 3/4 (or the other way around, depending on the<br />
phrasing), since, as we mentioned, 4/4 and 3/4 are extremely common time<br />
signatures.<br />
56
MIDI IMPLEMENTATION CHART<br />
Function Transmitted Recognized Remarks<br />
Basic<br />
Default<br />
1-16<br />
X<br />
Channel<br />
Changed<br />
1-16<br />
X<br />
Note Number:<br />
True Voice<br />
0-127<br />
0-127<br />
X<br />
X<br />
Velocity<br />
Note On<br />
Note Off<br />
1-127<br />
0<br />
X<br />
X<br />
After Touch<br />
Ch’s<br />
X<br />
X<br />
X<br />
X<br />
Pitch Bend O O*<br />
Program<br />
Change True #<br />
0-127 X<br />
System Exclusive O O RESTORE MIDI Mode only<br />
System<br />
Common<br />
Song Pos<br />
Song Sel<br />
Tune<br />
0<br />
0<br />
X<br />
X<br />
X<br />
X<br />
MIDI out only<br />
System<br />
Clock<br />
O<br />
O<br />
Realtime<br />
Commands<br />
X<br />
X<br />
Local On/Off<br />
X<br />
X<br />
Aux<br />
Active Sense<br />
X<br />
X<br />
Messages<br />
Reset<br />
X<br />
X<br />
GM On<br />
X<br />
X<br />
Notes:<br />
* Available for Bass sounds only<br />
O:YES<br />
X:NO<br />
57
KEY FEATURES<br />
• Professional drum machine so you can record and play back your own beats<br />
• 12 natural feeling, velocity-sensitive drum pads<br />
• Large 32MB sound set, with percussion bank and bass synth sounds<br />
• Dynamic Articulation stereo samples with reverb and ambience for realistic playing<br />
• 100 Preset / 100 User drum kits with a large collection of sounds assignable to any pad<br />
• 32 voice polyphony<br />
• Built-in Effects – Reverb, EQ and Compression<br />
• Built-in rhythm patterns to complement your playing<br />
• Large LCD display with easy-to-navigate interface<br />
• Instrument input for connecting a guitar or bass<br />
• MIDI output to play external MIDI devices<br />
• MIDI input for using the <strong>SR18</strong> as a drum expander module<br />
• 2 Footswitch inputs for controlling Start/Stop and Count/A/B/Fill<br />
• High-quality 24-bit stereo, aux L/R and headphone outputs<br />
• AC or battery powered (batteries not included)<br />
• Lightweight, durable enclosure<br />
TECHNICAL SPECIFICATIONS<br />
Audio Outputs:<br />
1 TRS ¼” (aux)<br />
2 TS ¼” (main)<br />
1 TRS ¼” (phones)<br />
Pads:<br />
12 velocity sensitive (w/Dynamic Articulation)<br />
Sample/DAC Bit Resolution 16 / 24<br />
Sounds: 500<br />
Sounds Accessible via Pads 12<br />
Sounds Accessible via MIDI 120<br />
Polyphony<br />
32 voice<br />
Panning<br />
7-position user programmable<br />
Velocity Response<br />
8 loudness levels via pads, 127 via MIDI<br />
Timing Resolution<br />
96 ppq<br />
Time Signature Range 1-128 beats per pattern<br />
Tempo Range<br />
30-300 BPM<br />
Notes/Patterns/Songs 150,000 / 200 (100 user, 100 preset) / 100<br />
Kits<br />
100 user, 100 preset<br />
MIDI Prog Change Response Kit<br />
Sync<br />
MIDI Clock with Song Position Pointer<br />
Footswitch Jacks/Functions Start / Stop<br />
Count / A / B / Fill<br />
Instrument Input TS 1/4”<br />
Other Features<br />
Step Editing, Stereo Samples, Reverb and Compressor / EQ effects.<br />
Power<br />
12 VAC External Transformer, UL and CSA Approved<br />
6 AA batteries (not included)<br />
7-51-0250-D<br />
58
www.alesis.com
![203280_d_man.pdf [23,41 MB] - Just Music](https://img.yumpu.com/23736901/1/184x260/203280-d-manpdf-2341-mb-just-music.jpg?quality=85)


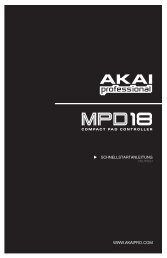
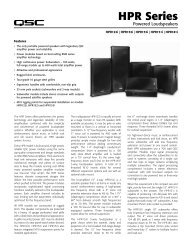
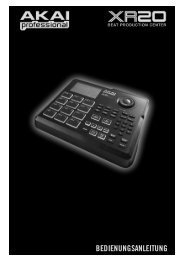

![244712_d_man.pdf [266,60 kB] - Just Music](https://img.yumpu.com/23736779/1/190x133/244712-d-manpdf-26660-kb-just-music.jpg?quality=85)