QRS Using the SIMS Home Page.pdf - EiS Kent
QRS Using the SIMS Home Page.pdf - EiS Kent
QRS Using the SIMS Home Page.pdf - EiS Kent

You also want an ePaper? Increase the reach of your titles
YUMPU automatically turns print PDFs into web optimized ePapers that Google loves.
Quick Reference Sheet<br />
<strong>Using</strong> <strong>the</strong> <strong>SIMS</strong> <strong>Home</strong> <strong>Page</strong><br />
Introduction<br />
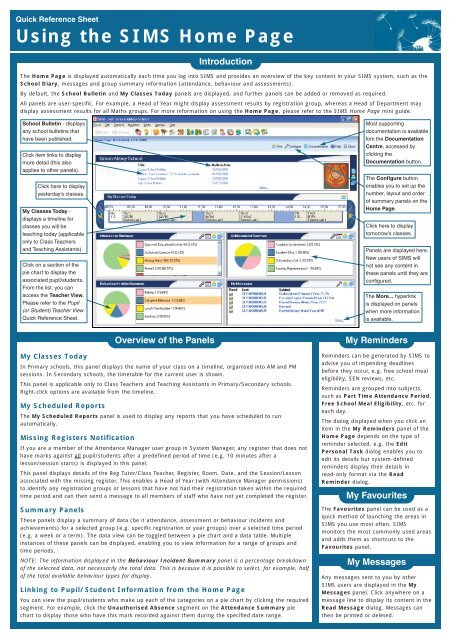
The <strong>Home</strong> <strong>Page</strong> is displayed automatically each time you log into <strong>SIMS</strong> and provides an overview of <strong>the</strong> key content in your <strong>SIMS</strong> system, such as <strong>the</strong><br />
School Diary, messages and group summary information (attendance, behaviour and assessments).<br />
By default, <strong>the</strong> School Bulletin and My Classes Today panels are displayed, and fur<strong>the</strong>r panels can be added or removed as required.<br />
All panels are user-specific. For example, a Head of Year might display assessment results by registration group, whereas a Head of Department may<br />
display assessment results for all Maths groups. For more information on using <strong>the</strong> <strong>Home</strong> <strong>Page</strong>, please refer to <strong>the</strong> <strong>SIMS</strong> <strong>Home</strong> <strong>Page</strong> mini guide.<br />
School Bulletin - displays<br />
any school bulletins that<br />
have been published.<br />
Click item links to display<br />
more detail (this also<br />
applies to o<strong>the</strong>r panels).<br />
Click here to display<br />
yesterday’s classes.<br />
My Classes Today -<br />
displays a timeline for<br />
classes you will be<br />
teaching today (applicable<br />
only to Class Teachers<br />
and Teaching Assistants).<br />
Click on a section of <strong>the</strong><br />
pie chart to display <strong>the</strong><br />
associated pupil/students.<br />
From <strong>the</strong> list, you can<br />
access <strong>the</strong> Teacher View.<br />
Please refer to <strong>the</strong> Pupil<br />
(or Student) Teacher View<br />
Quick Reference Sheet.<br />
Most supporting<br />
documentation is available<br />
fom <strong>the</strong> Documentation<br />
Centre, accessed by<br />
clicking <strong>the</strong><br />
Documentation button.<br />
The Configure button<br />
enables you to set up <strong>the</strong><br />
number, layout and order<br />
of summary panels on <strong>the</strong><br />
<strong>Home</strong> <strong>Page</strong>.<br />
Click here to display<br />
tomorrow’s classes.<br />
Panels are displayed here.<br />
New users of <strong>SIMS</strong> will<br />
not see any content in<br />
<strong>the</strong>se panels until <strong>the</strong>y are<br />
configured.<br />
The More... hyperlink<br />
is displayed on panels<br />
when more information<br />
is available.<br />
My Classes Today<br />
Overview of <strong>the</strong> Panels<br />
In Primary schools, this panel displays <strong>the</strong> name of your class on a timeline, organised into AM and PM<br />
sessions. In Secondary schools, <strong>the</strong> timetable for <strong>the</strong> current user is shown.<br />
This panel is applicable only to Class Teachers and Teaching Assistants in Primary/Secondary schools.<br />
Right-click options are available from <strong>the</strong> timeline.<br />
My Scheduled Reports<br />
The My Scheduled Reports panel is used to display any reports that you have scheduled to run<br />
automatically.<br />
Missing Registers Notification<br />
If you are a member of <strong>the</strong> Attendance Manager user group in System Manager, any register that does not<br />
have marks against all pupil/students after a predefined period of time (e.g. 10 minutes after a<br />
lesson/session starts) is displayed in this panel.<br />
This panel displays details of <strong>the</strong> Reg Tutor/Class Teacher, Register, Room, Date, and <strong>the</strong> Session/Lesson<br />
associated with <strong>the</strong> missing register. This enables a Head of Year (with Attendance Manager permissions)<br />
to identify any registration groups or lessons that have not had <strong>the</strong>ir registration taken within <strong>the</strong> required<br />
time period and can <strong>the</strong>n send a message to all members of staff who have not yet completed <strong>the</strong> register.<br />
Summary Panels<br />
These panels display a summary of data (be it attendance, assessment or behaviour incidents and<br />
achievements) for a selected group (e.g. specific registration or year groups) over a selected time period<br />
(e.g. a week or a term). The data view can be toggled between a pie chart and a data table. Multiple<br />
instances of <strong>the</strong>se panels can be displayed, enabling you to view information for a range of groups and<br />
time periods.<br />
NOTE: The information displayed in <strong>the</strong> Behaviour Incident Summary panel is a percentage breakdown<br />
of <strong>the</strong> selected data, not necessarily <strong>the</strong> total data. This is because it is possible to select, for example, half<br />
of <strong>the</strong> total available behaviour types for display.<br />
Linking to Pupil/Student Information from <strong>the</strong> <strong>Home</strong> <strong>Page</strong><br />
You can view <strong>the</strong> pupil/students who make up each of <strong>the</strong> categories on a pie chart by clicking <strong>the</strong> required<br />
segment. For example, click <strong>the</strong> Unauthorised Absence segment on <strong>the</strong> Attendance Summary pie<br />
chart to display those who have this mark recorded against <strong>the</strong>m during <strong>the</strong> specified date range.<br />
My Reminders<br />
Reminders can be generated by <strong>SIMS</strong> to<br />
advise you of impending deadlines<br />
before <strong>the</strong>y occur, e.g. free school meal<br />
eligibility, SEN reviews, etc.<br />
Reminders are grouped into subjects,<br />
such as Part Time Attendance Period,<br />
Free School Meal Eligibility, etc. for<br />
each day.<br />
The dialog displayed when you click an<br />
item in <strong>the</strong> My Reminders panel of <strong>the</strong><br />
<strong>Home</strong> <strong>Page</strong> depends on <strong>the</strong> type of<br />
reminder selected, e.g. <strong>the</strong> Edit<br />
Personal Task dialog enables you to<br />
edit its details but system-defined<br />
reminders display <strong>the</strong>ir details in<br />
read-only format via <strong>the</strong> Read<br />
Reminder dialog.<br />
My Favourites<br />
The Favourites panel can be used as a<br />
quick method of launching <strong>the</strong> areas in<br />
<strong>SIMS</strong> you use most often. <strong>SIMS</strong><br />
monitors <strong>the</strong> most commonly used areas<br />
and adds <strong>the</strong>m as shortcuts to <strong>the</strong><br />
Favourites panel.<br />
My Messages<br />
Any messages sent to you by o<strong>the</strong>r<br />
<strong>SIMS</strong> users are displayed in <strong>the</strong> My<br />
Messages panel. Click anywhere on a<br />
message line to display its content in <strong>the</strong><br />
Read Message dialog. Messages can<br />
<strong>the</strong>n be printed or deleted.
Quick Reference Sheet<br />
<strong>Using</strong> <strong>the</strong> <strong>SIMS</strong> <strong>Home</strong> <strong>Page</strong><br />
Configuring <strong>the</strong> <strong>Home</strong> <strong>Page</strong><br />
The <strong>Home</strong> <strong>Page</strong> can be<br />
configured to display information<br />
according to user preferences.<br />
Except for <strong>the</strong> School Bulletin<br />
and My Classes Today panels,<br />
<strong>the</strong> information on <strong>the</strong> <strong>Home</strong><br />
<strong>Page</strong> is arranged as a grid.<br />
The content of <strong>the</strong> grid can be<br />
configured. For example, a Head<br />
of Year may wish to display<br />
behaviour incident information<br />
by registration group, whereas a<br />
Head Teacher may wish to<br />
display it by year group.<br />
Add or remove <strong>the</strong> School<br />
Bulletin or My Classes<br />
Today panels here.<br />
Select <strong>the</strong> single-use or<br />
multi-use panels here.<br />
Configuring <strong>the</strong> Panel Grid<br />
1. Click <strong>the</strong> Configure button at <strong>the</strong> top of <strong>the</strong> <strong>Home</strong> <strong>Page</strong> to display<br />
<strong>the</strong> Configure <strong>Home</strong> <strong>Page</strong> dialog.<br />
2. To adjust <strong>the</strong> grid size or orientation, click <strong>the</strong> up or down arrows<br />
adjacent to <strong>the</strong> Rows and Columns fields.<br />
3. To effect <strong>the</strong> change, click <strong>the</strong> Configure Layout button.<br />
Configure Layout button<br />
Reducing <strong>the</strong> number of panels to less than <strong>the</strong> number of panels that<br />
have been selected for display, causes a message asking if you wish to<br />
remove <strong>the</strong>se panels. Click <strong>the</strong> Yes button to confirm.<br />
4. To save <strong>the</strong> changes, click <strong>the</strong> OK button and <strong>the</strong> Yes button to<br />
confirm <strong>the</strong> changes.<br />
Adding Panels to <strong>the</strong> <strong>Home</strong> <strong>Page</strong><br />
1. Click and drag <strong>the</strong> required panel name in one of <strong>the</strong> left-hand panels<br />
into <strong>the</strong> required position on <strong>the</strong> Grid in <strong>the</strong> right-hand panel. For<br />
multi-use panels, repeat this as many times as necessary.<br />
2. Repeat step 1 until all required panels are displayed in <strong>the</strong> Grid.<br />
3. Click <strong>the</strong> OK button to save <strong>the</strong> changes and return to <strong>the</strong> <strong>Home</strong><br />
<strong>Page</strong>.<br />
Removing Panels from <strong>the</strong> <strong>Home</strong> <strong>Page</strong><br />
1. Click <strong>the</strong> required panel name in <strong>the</strong> Grid <strong>the</strong>n click <strong>the</strong> Remove<br />
Panel button.<br />
2. Repeat step 1 until only <strong>the</strong> required panels are displayed in <strong>the</strong> Grid<br />
<strong>the</strong>n click <strong>the</strong> OK button.<br />
3. To remove all panels, click <strong>the</strong> Remove All button.<br />
Increasing <strong>the</strong> Size of Panels on <strong>the</strong> <strong>Home</strong> <strong>Page</strong><br />
Many of <strong>the</strong> panels on <strong>the</strong> <strong>Home</strong> <strong>Page</strong> can be maximised so that <strong>the</strong>y are<br />
displayed as a separate page, providing a larger viewing area.<br />
1. Click <strong>the</strong> Maximise button in <strong>the</strong> top right-hand corner of a panel to<br />
enlarge <strong>the</strong> panel to a full screen display.<br />
Maximise button<br />
2. Click <strong>the</strong> Restore button on <strong>the</strong> named page tab to minimise <strong>the</strong><br />
page back to a panel.<br />
Restore button<br />
Returning to <strong>the</strong> <strong>Home</strong> <strong>Page</strong> Defaults<br />
The preset panels and panel order can be returned to at any point by<br />
clicking <strong>the</strong> Default Setting button on <strong>the</strong> Configure <strong>Home</strong> <strong>Page</strong> dialog<br />
<strong>the</strong>n clicking <strong>the</strong> OK button.<br />
Changing <strong>the</strong> Panel Order<br />
With <strong>the</strong> exception of School Bulletin and My Classes Today, panels<br />
can be re-arranged, enabling you to position those deemed <strong>the</strong> most<br />
important, or most used, at <strong>the</strong> top of <strong>the</strong> <strong>Home</strong> <strong>Page</strong>.<br />
Click and drag <strong>the</strong> panel you want to move into <strong>the</strong> new Grid location,<br />
causing <strong>the</strong> panels to swap position. Repeat as necessary <strong>the</strong>n click <strong>the</strong><br />
OK button. This can also be achieved on <strong>the</strong> <strong>Home</strong> <strong>Page</strong> by clicking <strong>the</strong><br />
title bar of a panel and dragging to <strong>the</strong> new location.<br />
Changing <strong>the</strong> Panel Label<br />
1. Panel labels can be edited by right-clicking anywhere on <strong>the</strong> required<br />
panel and selecting Customise Text to display <strong>the</strong> Edit Control Text<br />
dialog.<br />
2. Enter <strong>the</strong> new panel label in <strong>the</strong> Text field <strong>the</strong>n click <strong>the</strong> OK button.<br />
3. To revert to <strong>the</strong> default value, delete <strong>the</strong> text from <strong>the</strong> Text field and<br />
click <strong>the</strong> OK button.<br />
Setting Panel Refresh Rates<br />
The panels on <strong>the</strong> <strong>Home</strong> <strong>Page</strong> refresh automatically, updating <strong>the</strong><br />
information after a set period of time. Each panel refreshes individually,<br />
and this is indicated by a rotating Refresh icon.<br />
Refresh icon<br />
Many of <strong>the</strong> panels refresh at a fixed rate of every 30 minutes. The<br />
refresh rate of <strong>the</strong> My Messages and School Diary panels can be set<br />
manually.<br />
1. Click <strong>the</strong> Configure button on <strong>the</strong> required panel to display <strong>the</strong><br />
Configure Refresh Frequency dialog.<br />
2. Enter <strong>the</strong> required refresh frequency, <strong>the</strong>n click <strong>the</strong> OK button to<br />
confirm <strong>the</strong> setting.<br />
The amended refresh setting comes into effect immediately.<br />
WARNING: Careful consideration should be given when adding<br />
panels to <strong>the</strong> <strong>Home</strong> <strong>Page</strong>. A number of <strong>the</strong>se panels have frequent<br />
refresh rates, so a large number of panels displaying on several<br />
workstations could lead to performance issues. All areas of <strong>SIMS</strong> may<br />
show a reduction in performance as a consequence.<br />
This guide is based on <strong>the</strong> version of <strong>the</strong> software (7.116) in<br />
use at <strong>the</strong> time of publication.<br />
© Capita Business Services Ltd 2009. All rights reserved.<br />
No part of this publication may be reproduced, photocopied,<br />
stored on a retrieval system, translated or transmitted without<br />
<strong>the</strong> express written consent of <strong>the</strong> publisher.<br />
Capita Children’s Services, Franklin Court,<br />
Priory Business Park, Stannard Way, Bedford, MK44 3JZ<br />
Tel: 01234 838080 http://www.sims.co.uk<br />
The Grid shows <strong>the</strong> panels<br />
currently set to display on <strong>the</strong><br />
<strong>Home</strong> <strong>Page</strong>. Drag additional<br />
panels into <strong>the</strong> Grid to add <strong>the</strong>m.<br />
Adjust <strong>the</strong> size of <strong>the</strong> Grid here,<br />
enabling you to amend <strong>the</strong> layout of<br />
<strong>the</strong> panels on <strong>the</strong> <strong>Home</strong> <strong>Page</strong>.<br />
<strong>Home</strong> <strong>Page</strong> Tips<br />
• Your <strong>Home</strong> <strong>Page</strong> panel<br />
configuration from <strong>the</strong> previous<br />
version of <strong>SIMS</strong> will be<br />
retained until you change it.<br />
• Changes to your <strong>Home</strong> <strong>Page</strong><br />
panel configuration do not<br />
affect <strong>the</strong> <strong>Home</strong> <strong>Page</strong> display<br />
for o<strong>the</strong>r users.<br />
• Panels can be removed by<br />
clicking and dragging <strong>the</strong>m out<br />
of <strong>the</strong> Grid.