QRS SIMS Photo Importer.pdf - EiS Kent
QRS SIMS Photo Importer.pdf - EiS Kent
QRS SIMS Photo Importer.pdf - EiS Kent
- No tags were found...

Create successful ePaper yourself
Turn your PDF publications into a flip-book with our unique Google optimized e-Paper software.
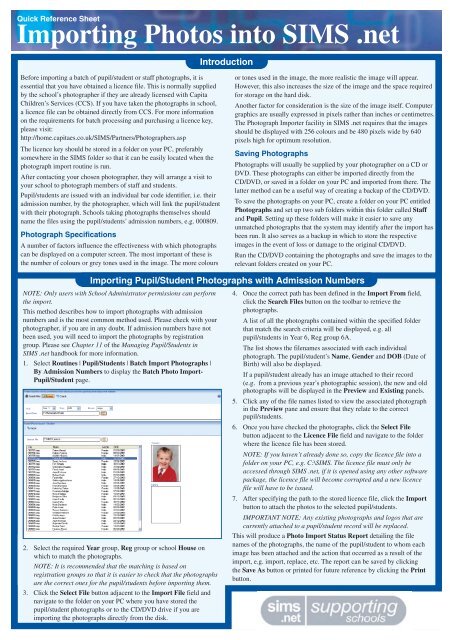
Quick Reference SheetImporting <strong>Photo</strong>s into <strong>SIMS</strong> .netIntroductionBefore importing a batch of pupil/student or staff photographs, it isessential that you have obtained a licence file. This is normally suppliedby the school’s photographer if they are already licensed with CapitaChildren’s Services (CCS). If you have taken the photographs in school,a licence file can be obtained directly from CCS. For more informationon the requirements for batch processing and purchasing a licence key,please visit:http://home.capitaes.co.uk/<strong>SIMS</strong>/Partners/<strong>Photo</strong>graphers.aspThe licence key should be stored in a folder on your PC, preferablysomewhere in the <strong>SIMS</strong> folder so that it can be easily located when thephotograph import routine is run.After contacting your chosen photographer, they will arrange a visit toyour school to photograph members of staff and students.Pupil/students are issued with an individual bar code identifier, i.e. theiradmission number, by the photographer, which will link the pupil/studentwith their photograph. Schools taking photographs themselves shouldname the files using the pupil/students’ admission numbers, e.g. 000809.<strong>Photo</strong>graph SpecificationsA number of factors influence the effectiveness with which photographscan be displayed on a computer screen. The most important of these isthe number of colours or grey tones used in the image. The more coloursor tones used in the image, the more realistic the image will appear.However, this also increases the size of the image and the space requiredfor storage on the hard disk.Another factor for consideration is the size of the image itself. Computergraphics are usually expressed in pixels rather than inches or centimetres.The <strong>Photo</strong>graph <strong>Importer</strong> facility in <strong>SIMS</strong> .net requires that the imagesshould be displayed with 256 colours and be 480 pixels wide by 640pixels high for optimum resolution.Saving <strong>Photo</strong>graphs<strong>Photo</strong>graphs will usually be supplied by your photographer on a CD orDVD. These photographs can either be imported directly from theCD/DVD, or saved in a folder on your PC and imported from there. Thelatter method can be a useful way of creating a backup of the CD/DVD.To save the photographs on your PC, create a folder on your PC entitled<strong>Photo</strong>graphs and set up two sub folders within this folder called Staffand Pupil. Setting up these folders will make it easier to save anyunmatched photographs that the system may identify after the import hasbeen run. It also serves as a backup in which to store the respectiveimages in the event of loss or damage to the original CD/DVD.Run the CD/DVD containing the photographs and save the images to therelevant folders created on your PC.Importing Pupil/Student <strong>Photo</strong>graphs with Admission NumbersNOTE: Only users with School Administrator permissions can performthe import.This method describes how to import photographs with admissionnumbers and is the most common method used. Please check with yourphotographer, if you are in any doubt. If admission numbers have notbeen used, you will need to import the photographs by registrationgroup. Please see Chapter 11 of the Managing Pupil/Students in<strong>SIMS</strong> .net handbook for more information.1. Select Routines | Pupil/Students | Batch Import <strong>Photo</strong>graphs |By Admission Numbers to display the Batch <strong>Photo</strong> Import-Pupil/Student page.2. Select the required Year group, Reg group or school House onwhich to match the photographs.NOTE: It is recommended that the matching is based onregistration groups so that it is easier to check that the photographsare the correct ones for the pupil/students before importing them.3. Click the Select File button adjacent to the Import File field andnavigate to the folder on your PC where you have stored thepupil/student photographs or to the CD/DVD drive if you areimporting the photographs directly from the disk.4. Once the correct path has been defined in the Import From field,click the Search Files button on the toolbar to retrieve thephotographs.A list of all the photographs contained within the specified folderthat match the search criteria will be displayed, e.g. allpupil/students in Year 6, Reg group 6A.The list shows the filenames associated with each individualphotograph. The pupil/student’s Name, Gender and DOB (Date ofBirth) will also be displayed.If a pupil/student already has an image attached to their record(e.g. from a previous year’s photographic session), the new and oldphotographs will be displayed in the Preview and Existing panels.5. Click any of the file names listed to view the associated photographin the Preview pane and ensure that they relate to the correctpupil/students.6. Once you have checked the photographs, click the Select Filebutton adjacent to the Licence File field and navigate to the folderwhere the licence file has been stored.NOTE: If you haven’t already done so, copy the licence file into afolder on your PC, e.g. C:\<strong>SIMS</strong>. The licence file must only beaccessed through <strong>SIMS</strong> .net, if it is opened using any other softwarepackage, the licence file will become corrupted and a new licencefile will have to be issued.7. After specifying the path to the stored licence file, click the Importbutton to attach the photos to the selected pupil/students.IMPORTANT NOTE: Any existing photographs and logos that arecurrently attached to a pupil/student record will be replaced.This will produce a <strong>Photo</strong> Import Status Report detailing the filenames of the photographs, the name of the pupil/student to whom eachimage has been attached and the action that occurred as a result of theimport, e.g. import, replace, etc. The report can be saved by clickingthe Save As button or printed for future reference by clicking the Printbutton.
Quick Reference SheetImporting <strong>Photo</strong>s into <strong>SIMS</strong> .netAfter running the import, there may be some unmatchedphotographs that cannot be successfully matched to the relevantpupil/students. These are denoted by No Match Found in the <strong>Photo</strong>Import Status Report and can be stored in a folder on your PC sothat the images can be matched to the relevant pupil/students at alater date.1. Click the Select File button and navigate to a suitable TargetDirectory.Select File button2. Click the Copy to Target Folder button to save the unmatchedphotographs to the location you have specified.NOTE: This action will overwrite any existing files with thesame filenames.Copy to Target Folder button3. Once the images have been copied to the folder of your choice,click the Close button to exit the report.Storing Unmatched <strong>Photo</strong>graphsAttaching Individual <strong>Photo</strong>graphsto Pupil/StudentsFor various reasons, it may not be possible to associate someimages with pupil/students at the time of the batch import. Theseimages can be saved to a folder on your PC as described in theprevious section, Storing Unmatched <strong>Photo</strong>graphs, and attachedto specific pupil/students individually at a later date.1. Select Focus | Pupil/Students | Pupil/Student Details toopen the Find Student browser.2. After searching for the required pupil/student, click the SelectFile button adjacent to the <strong>Photo</strong>graph area and navigate tothe location where the pupil/student images have been stored.3. Highlight the image you want to attach to the selectedpupil/student and click the Open button to display the imagein the <strong>Photo</strong>graphs panel.4. If an existing photograph is incorrect or no longer required,click the Delete button.Delete button5. Click the Save button on the toolbar to associate thephotograph with the selected pupil/student or detach, asapplicable.Where to Get More HelpNeed additional help? Online help is available by selecting Help |Contents from the <strong>SIMS</strong> .net Menu Bar. The associated handbooksare available by clicking the appropriate title in the Documentationshortcuts panel in <strong>SIMS</strong> .net. Additional information is availablefrom SupportNet, http://support.capitaes.co.uk.Attaching <strong>Photo</strong>graphs to StaffMembers and AgentsStaff and agent photographs can be attached individually in thesame way as pupil/student photographs. Where admission numbersare used to identify pupil/student photographs, initials are usuallyused to identify the photographs for staff members and agents. Thefile names assigned to each photograph must be unique to ensureattachment to the correct individual.1. Select Focus | Person | Staff to open the Find Staff browser orselect Focus | Person | Agents to open the Find Agent browser.2. Search for and then select the required staff member or agent.3. Click the Select Files button adjacent to the <strong>Photo</strong>graph areaand navigate to the location of the stored photograph.4. Highlight the required file name and click the Open button toattach the photograph to the staff member or agent.5. Click the Save button to attach the photograph to the staffmember or agent.This guide is based on the software version (7.93) in use at the time of publication.For details of the changes to the software,please refer to the associated handbook and online help file.For further copies of this, or other Quick Reference Sheets,please email publications@capita.co.uk.For information on available training courses,please contact Capita Professional Services on 01234 838080or email profserv@capita.co.uk.© Capita Business Services Ltd 2007. All rights reserved.No part of this publication may be reproduced, photocopied, stored on a retrieval system,translated or transmitted without the express written consent of the publisher.Capita Education Services, Franklin Court, Priory Business Park,Stannard Way, Bedford, MK44 3JZTel: 01234 838080 http://www.sims.co.uk