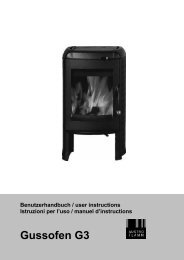
Dovre 700 Cleanburn Cast Iron Stove - Stoves Online
Dovre 700 Cleanburn Cast Iron Stove - Stoves Online
Dovre 700 Cleanburn Cast Iron Stove - Stoves Online

You also want an ePaper? Increase the reach of your titles
YUMPU automatically turns print PDFs into web optimized ePapers that Google loves.
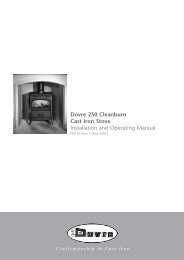
<strong>Dovre</strong> <strong>700</strong> <strong>Cleanburn</strong><br />
<strong>Cast</strong> <strong>Iron</strong> <strong>Stove</strong><br />
Installation and Operating Manual<br />
PM154 Issue 1 (May 2005)<br />
Craftsmanship in <strong>Cast</strong> <strong>Iron</strong>
<strong>Dovre</strong> <strong>700</strong> <strong>Cleanburn</strong> <strong>Cast</strong> <strong>Iron</strong> <strong>Stove</strong><br />
Installation and Operating Manual<br />
These instructions should be read carefully and saved by the user for future reference.<br />
Contents<br />
Introduction to your <strong>Dovre</strong> <strong>Stove</strong> 2<br />
Unpacking your <strong>Dovre</strong> <strong>700</strong> 3<br />
Getting the best from your <strong>Dovre</strong> <strong>700</strong> 3<br />
Location for Installation 3<br />
Assembly 4<br />
Door Adjustment 4<br />
Installation 5<br />
Operation 5<br />
Cleaning & Maintenance 6<br />
Troubleshooting 6<br />
Introduction to you new <strong>Dovre</strong> <strong>700</strong>5:<br />
We would like to thank you for purchasing a <strong>Dovre</strong> stove and trust that<br />
it will provide you with many years of useful service.<br />
At <strong>Dovre</strong> we have been producing cast iron stoves for over 60 years<br />
and we strive to ensure that our products meet with the highest level<br />
of performance, efficiency, safety and quality. So much so that we<br />
guarantee all <strong>Dovre</strong> body castings for 5 years.<br />
Owning a stove might be a new experience for you. Therefore, to<br />
ensure that you get the best performance from your new <strong>Dovre</strong>, do<br />
please take a little time to read through this manual.<br />
Before commencing with the installation it is important that these<br />
instructions are read and fully understood.<br />
The DOVRE <strong>700</strong> is a specially designed stove for burning wood only<br />
and has been tested and approved by the U.S. Environmental<br />
Protection Agency (EPA) in accordance with their stringent woodstove<br />
emission limits. It is essential that the wood used is well seasoned (min<br />
2 years) and has a maximum moisture content of 20%. If unseasoned<br />
wood is used, heat outputs will not be obtained and serious damage<br />
will occur in the chimney and flueways. The DOVRE <strong>700</strong> incorporates a<br />
high technology combustion system to provide high efficiencies and<br />
low atmospheric pollution<br />
The dimensions of your new stove are illustrated in Fig.1. Be careful to<br />
ensure that your fireplace is going to accept the appliance and that it<br />
complies with current Building Regulations.<br />
WE RECOMMEND THAT YOUR DOVRE IS FITTED BY AN<br />
EXPERIENCED INSTALLER ACCUSTOMED TO THE<br />
INSTALLATION OF SOLID FUEL BURNING APPLIANCES.<br />
If you are unsure about any aspect of the installation or operation<br />
procedures, your <strong>Dovre</strong> dealer will be pleased to help.<br />
It is important that the installation is carried out in compliance with<br />
current Building Regulations.<br />
Fig 1-STOVE DIMENSIONS<br />
Width Height Depth Weight Heat output Flue diameter<br />
710mm 705mm 520mm 180kg 11kW 150mm<br />
SAFETY<br />
A fireguard is not provided with this stove. However, it is<br />
recommended that one compliant with BS 6539 or BS<br />
6778 is fitted, particularly if the stove is to be used in the<br />
presence of young children, the elderly and infirm.<br />
2
Unpacking your <strong>Dovre</strong> <strong>700</strong><br />
If your <strong>Dovre</strong> <strong>700</strong> is finished in enamel, care should be taken to avoid<br />
knocks as the enamel surface could “chip”.<br />
Care should be taken not to break the glass whilst handling the<br />
appliance.<br />
Your <strong>Dovre</strong> <strong>700</strong> is constructed from high-grade quality cast iron and is<br />
therefore not light in weight. We recommend that 2 people are<br />
available to handle the stove.<br />
Assembly<br />
As the <strong>Dovre</strong> <strong>700</strong> is constructed from heavy cast iron, it is advisable for<br />
two people to assemble and position the appliance.<br />
• Open the stove door and remove all loose parts within.<br />
• To assist with lifting, remove the side panels by lifting and<br />
disengaging from the bottom and top pins. See Fig 2.<br />
Before taking your <strong>Dovre</strong> to its installation location, remove the stove<br />
from its outer packing and timber pallet. Stand the stove in the upright<br />
position, protecting carpets or other floor coverings with rigid<br />
cardboard. The stove carton is ideal for this purpose.<br />
Locate the small green quality control slip and retain for future<br />
reference.<br />
Getting the best from your <strong>Dovre</strong> <strong>700</strong><br />
There are 3 golden rules to follow<br />
1. USE GOOD FUEL - NEVER BURN UNSEASONED OR DAMP WOOD<br />
2. YOU MUST HAVE A GOOD CHIMNEY DRAUGHT - NEVER<br />
USE YOUR DOVRE STOVE WITH A POOR CHIMNEY<br />
3. AVOID OPERATING THE STOVE FOR LONG PERIODS ON<br />
CONTINUOUS LOW TEMPERATURE<br />
Location for Installation<br />
The location in which your stove is to be installed will of course<br />
depend on the chimney available. If you do not have a chimney, there<br />
are a number of prefabricated flue systems available and your <strong>Dovre</strong><br />
Dealer will be pleased to offer guidance on the subject.<br />
Fig 2<br />
• Carefully lift the appliance from the wood pallet, taking care not to<br />
slide or tilt the unit, and place in position on the hearth.<br />
• Refit the side panels by firstly engaging in the top pins and then<br />
positioning on the bottom pins.<br />
• For a top flue connection, attach the circular cast iron collar to the<br />
aperture located at the top of the appliance, using the nuts, bolts<br />
and washers supplied. Use a small amount of fire cement to ensure<br />
an air tight seal before fixing. For a rear flue connection, adopt the<br />
same procedure using the rear aperture. Fit the cast iron circular<br />
cover plate to the unused aperture again using a small amount of<br />
fire cement as a seal. The cover plate is attached using the fixing<br />
bar and nuts and bolts supplied. See Fig 3.<br />
Building Regulations must be observed when considering the location<br />
of your <strong>Dovre</strong>. More precise information can be found later in this<br />
manual but it is important to ensure that a suitable hearth, complying<br />
with Building Regulations, is available.<br />
NEVER ALLOW A MECHANICAL AIR EXTRACTOR TO BE USED IN THE<br />
ROOM OR ADJOINING ROOMS AS THIS COULD CAUSE THE<br />
APPLIANCE TO EMIT SMOKE INTO THE ROOM.<br />
Fig3<br />
• Fit the front ash lip using the two 8mm x 30mm hex headed bolts<br />
supplied. See Fig 4.<br />
3<br />
Fig 4
Door Adjustment<br />
The door of the <strong>Dovre</strong> <strong>700</strong> is fully adjustable to ensure air tightness<br />
and correct alignment. To make adjustments, use the following<br />
procedure. (See Fig 5).<br />
Loosen the two hex headed screws located on the right outside front<br />
of the firebox. To achieve a tighter door seal, the adjustable hinge<br />
plate may be moved forward or backward from the top and/or<br />
bottom. Horizontal adjustment can be made firstly by loosening the<br />
two hex headed screws on the hinge plate followed by adjusting the<br />
set screws. Tightening the top screw will raise the door if it sags and<br />
does not latch smoothly. Loosening the top screw will lower the<br />
opposite edge if the door is too high. Adjusting both set screws will<br />
re-position the door to the left or right for correct alignment.<br />
Fig 6<br />
Fig 6a<br />
After adjustments have been made, tighten the two hex headed screws<br />
on the hinge plate, taking care not to over tighten.<br />
The door latch may be adjusted in a similar manner.<br />
ACCESS FOR SWEEPING CHIMNEY<br />
The chimney should be checked and swept at least once a year and it<br />
is important to allow provision for gaining access to the chimney. On<br />
masonry chimneys, a standard soot door, obtainable from your <strong>Dovre</strong><br />
dealer can be used. On other factory made chimneys, it is important to<br />
ensure an access cleaning door is provided. It is advisable to ensure<br />
that the connecting flue pipe to the chimney has an access door fitted.<br />
This will allow access to inside the appliance between the top<br />
secondary air distribution unit and top plate. An access door close to<br />
the appliance will also facilitate the use of a vacuum cleaner to ensure<br />
clean appliance maintenance. (See Fig 6a).<br />
THE CHIMNEY<br />
The chimney must be in good condition and free from cracks and<br />
blockages. If the existing chimney is unlined, it is advisable to install a<br />
flue liner suitable for use with solid fuel appliances, with an internal<br />
diameter between 175mm (7”) and 200mm (8”). Your <strong>Dovre</strong> dealer<br />
can advise further on this subject.<br />
The chimney is responsible for ensuring the flue gases and smoke are<br />
taken away from the appliance.<br />
Fig 5<br />
Installation<br />
HEARTH REQUIREMENT<br />
The positioning of the appliance and the size and type of hearth are<br />
governed by Building Regulations. The Building Regulations state that<br />
the hearth must extend at least 300mm (12”) to the front of the<br />
appliance and 15mm (6”) to the sides. If in doubt, expert advice<br />
should be sought from your local building inspector.<br />
CONNECTION TO THE CHIMNEY<br />
If an existing masonry chimney is installed, the appliance should be<br />
connected to the chimney using 150mm diameter 316 grade 1mm<br />
stainless steel or good quality vitreous enamel flue pipe. It is important<br />
to ensure that the connection to the chimney is carried out in such a<br />
way that any soot or ash is allowed to fall unhindered back into the<br />
appliance or flue T- section. (See Fig 6).<br />
IF THE APPLIANCE EMITS SMOKE INTO YOUR ROOM, IT IS NOT<br />
THE FAULT OF THE APPLIANCE. THERE WILL EITHER BE A<br />
STRUCTURAL OR DESIGN FAULT IN THE CHIMNEY OR A LACK<br />
OF VENTILATION IN THE ROOM.<br />
If an existing chimney is not available, it is possible to install a<br />
pre-fabricated factory chimney system. Your <strong>Dovre</strong> dealer will provide<br />
further information. It is important to ensure that the chimney<br />
structure and design comply with Current Building Regulations for<br />
solid fuel appliances.<br />
THE MINIMUM DRAUGHT REQUIREMENT FOR THE DOVRE<br />
<strong>700</strong>CBW IS .06" WATER GAUGE.<br />
Too much draught will cause excessive heat outputs and fuel<br />
consumption. Inadequate draught may cause smoke emission to the<br />
room and poor combustion resulting in a build up of tar and creosote<br />
deposits on the glass and inside walls of the appliance and the<br />
chimney.<br />
4
Operation<br />
The most important factor for avoiding problems with any woodstove<br />
is to avoid the formation of tar and creosote build up. Your <strong>Dovre</strong> <strong>700</strong><br />
incorporates advanced technology and it's design will ensure that,<br />
provided it is used correctly and that attention has been paid to the<br />
chimney installation, these problems will not occur.<br />
IF UNSEASONED WOOD IS USED YOUR APPLIANCE MAY NOT<br />
FUNCTION CORRECTLY<br />
HOW TAR IS FORMED<br />
A build up of tar within the stove and/or chimney is caused by burning<br />
wood at very low temperatures i.e. burnt slowly. The condition is much<br />
worse if the wood is not seasoned properly and contains a high<br />
moisture content. If the fire is burned at low temperature, the chimney<br />
will be cold. Cold chimneys do not work and difficulty occurs with the<br />
cold chimney trying to expel the flue gases and smoke. As a result, the<br />
gases condense on the walls of the chimney and these gases become<br />
creosote or tar.Creosote build up is dangerous and most chimney fires<br />
are caused as a result.<br />
IT IS ESSENTIAL TO USE WELL SEASONED WOOD AT ALL TIMES.<br />
LIGHTING THE STOVE<br />
Ensure the ash grate is in the closed position (slide to the right) and<br />
that the air control lever is in the fully open position. (See Figs 7 & 8).<br />
ADDING FUEL<br />
Your wood should ideally be 450mm - 490mm (18”-19”) in length<br />
with a diameter of between 50mm and 100mm (2” and 4”).<br />
It is good practice, before adding fuel, to separate the ashes from the<br />
hot wood embers. To do this, use a fireplace scraper tool to push the<br />
ashes to the rear of the stove and pull the hot embers of wood to the<br />
front of the stove close to the air inlet. This will help to ensure a faster<br />
response with the combustion.<br />
When adding fuel, load two or three logs of the dimensions given<br />
above, close the door and fully open the air control. (See Fig 8).<br />
ADJUSTING HEAT OUTPUT<br />
Once the fire has been well established, you can reduce the heat<br />
output by pushing the air control lever (Fig 8) to the left. Start by<br />
moving the lever about 6mm at a time. With experience, you will soon<br />
find the best position most suited to your own installation. The air<br />
settings will vary on different installations, depending on the type of<br />
wood being used and the draught the chimney is able to produce.<br />
During the first few hours of use, your stove may give off an<br />
unpleasant odour as the high temperature paint is cured. This is<br />
normal, so don't be alarmed as the condition only occurs during the<br />
first period of use.<br />
ASH REMOVAL<br />
Open the ash grate by sliding to the left. (See Fig 7). Use a fireplace<br />
scraper tool to work the desired amount of ash through the grate into<br />
the ashpan.<br />
When removing ashes from a hot fire bed, try to ensure that some of<br />
the hot embers remain in the stove as this will facilitate re-lighting.<br />
Fig 7<br />
NEVER LET THE ASHPAN OVERFILL. There should always be a good<br />
air space between the top of the ashpan and the underside of the<br />
grate. Failure to do this will cause premature deterioration of the grate<br />
and will make it difficult to empty the ashpan.<br />
To remove the ashpan, open the ashpit door by turning the lever to<br />
the left (See Fig 9) and carefully remove the ashpan using the handle<br />
provided. Ashes must be disposed of carefully and it is a good idea to<br />
purchase an ash carrying box for this purpose. Your <strong>Dovre</strong> dealer will<br />
normally be able to supply a suitable ashpan carrier box.<br />
After replacing the empty ashpan in the ashpit compartment, ensure<br />
the ashpit door is fully closed by turning the lever to the right.<br />
(See Fig 9).<br />
Fig 8<br />
Lay a few firelighters (or old newspaper) on the base of the stove.<br />
Spread a good quantity of kindling wood, preferably to cover the<br />
whole base of the stove. Light the fire and close the door. For the first<br />
few minutes, it is advisable not to close the door completely. Leave the<br />
door 10mm or 20mm ( 3 ⁄8”- 3 ⁄4”) from the fully closed position until the<br />
fire is blazing brightly, then close the door fully. It is important to heat<br />
up the chimney quickly, to ensure that a good hot fire bed is<br />
established before adding further fuel.<br />
Fig 9<br />
5
MANAGING YOUR WOOD SUPPLIES<br />
If you are buying wood from a log merchant, try to ensure that the<br />
wood has been seasoned for at least 2 years. 3 years is even better.<br />
Store your wood under cover to protect from rain but ideally, the<br />
wood should be stored in a place where the wind can be allowed to<br />
freely ventilate the stack.<br />
Try to obtain hardwoods such as oak, elm, beech or ash. These woods<br />
will provide more calorific value per cubic metre than softwoods.<br />
NEVER BURN COAL, CHEMICALS OR PAINTED WOOD ON YOUR<br />
DOVRE <strong>700</strong>.<br />
Cleaning & Maintenance<br />
DOOR GASKETS<br />
The fibre door gasket around the inside edge of the door provides an<br />
air tight seal. Check this regularly and remove any ash or wood<br />
particles gently with a soft brush. Replace the gasket once a year.<br />
STOVE BODY<br />
To clean, use a soft brush. The stove body can be repainted or touched<br />
up using Stovax Thermolac stove paint.<br />
GLASS<br />
You may notice a build up of deposits on your glass particularly if the<br />
stove has been used for long periods at low temperature. A hot brisk<br />
fire will normally cure this problem but if the problem persists, check<br />
the quality of your wood and/or chimney. It is always recommended to<br />
run your stove hard, after an overnight burn. From time to time, the<br />
glass can be cleaned using Stovax Glass Cleaner. Never use water or<br />
abrasive pads to clean the glass-especially whilst the glass is hot.<br />
Trouble Shooting<br />
SMOKE EMISSION<br />
If smoking occurs when the stove door is opened, it is a sign that the<br />
flue draught is inadequate. Mostly this condition is caused by burning<br />
unseasoned wood and it usually indicates that the combustion<br />
temperature is too low. To overcome a weak draught, ensure your<br />
wood is dry and build a hot fire, leaving the air control lever in the<br />
fully open position. If the problem persists, arrange for your chimney<br />
to be expertly checked for design or construction faults. In some<br />
instances, down draught conditions will exist and it may be necessary<br />
to fit an anti down draught device to the top of the chimney.<br />
FIRE DOESN’T BURN OVERNIGHT<br />
This is usually caused by either,<br />
•WOOD WHICH IS TOO SMALL IN DIAMETER<br />
•THE USE OF SOFTWOODS<br />
•EXCESSIVE CHIMNEY DRAUGHTS<br />
•DOOR GASKET SEAL WORN OUT<br />
Use only hardwood logs approximately 10mm (4”) in diameter and<br />
close the air control to the fully closed position.<br />
As chimney draughts vary with different installations it will be<br />
necessary to experiment with the position of the air control when set<br />
for overnight burning. The normal time on a full load of hardwood is<br />
approximately 8 hours.<br />
NOTE: If the appliance is operated for overnight burning, the glass will<br />
not stay clean.<br />
ANNUAL MAINTENANCE<br />
At the end of the heating season, thoroughly clean the inside of the<br />
stove and adjoining flue pipe.<br />
Arrange for your chimney sweep to inspect and clean the chimney.<br />
6
Five Year Warranty<br />
If the castings on this appliance should prove to be defective within<br />
five years of the purchase date, the faulty castings will be replaced free<br />
of charge, subject to the following conditions:<br />
1) The purchaser shall complete the registration card enclosed and<br />
return it within seven days of purchase. Failure to return the<br />
registration card could result in delays in processing any claims.<br />
2) The appliance shall have been installed in compliance with the<br />
installation instructions and correct Building Regulations.<br />
3) The appliance shall not have been used for the burning of<br />
unseasoned wood and/or prohibited fuels.<br />
4) This warranty only applies to the appliance body castings and does<br />
not include renewable components including grates, ashpans, and<br />
glass, seals, baffle plates and chips on enamel castings.<br />
5) This warranty does not cover site visits and any claims should be<br />
notified to your dealer.<br />
This warranty does not affect your Statutory Rights.<br />
7
United Kingdom and Eire distributors for <strong>Dovre</strong>:<br />
Stovax Limited, Falcon Road, Sowton Industrial Estate, Exeter, Devon, England, EX2 7LF.<br />
Telephone: (01392) 474011 Fax: (01392) 219932<br />
E-mail: dovre@stovax.com Internet: www.dovre.co.uk