Encore®
Encore®
Encore®

You also want an ePaper? Increase the reach of your titles
YUMPU automatically turns print PDFs into web optimized ePapers that Google loves.
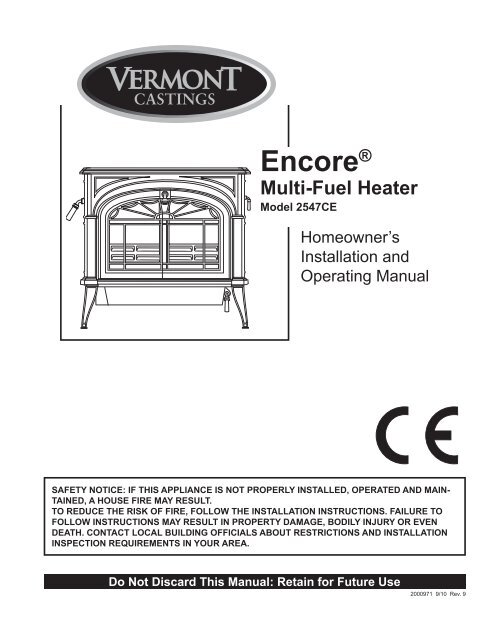
Encore ®Multi-Fuel HeaterModel 2547CEHomeowner’sInstallation andOperating Manual0971EncoreMulti-Fuelcover9/02Safety Notice: If this appliance is not properly installed, operated and maintained,a house fire may result.To reduce the risk of fire, follow the installation instructions. Failure tofollow instructions may result in property damage, bodily injury or evendeath. Contact local building officials about restrictions and installationinspection requirements in your area.Do Not Discard This Manual: Retain for Future Use2000971 9/10 Rev. 9
Encore ® Multi-Fuel HeaterCongratulations on your choice of a Vermont Castings Encore Multi-Fuel Heater. With this purchase you have madea commitment to make the hearth a place of warmth, beauty, and comfort in your home. At MHSC, we share that joyand appreciation for the hearth. You may be assured that your cast-iron Vermont Castings stove has been made withthe utmost care and will provide you with many years of service.At Vermont Castings, we are equally committed to your satisfaction as a customer. That is why we maintain an exclusivenetwork of the finest dealers in the industry. Our dealers are chosen for their expertise and dedication to customerservice. They are factory-trained and knowledgeable about every Vermont Castings product. Feel free to contactyour Authorized Vermont Castings Dealer anytime you have a particular question about your stove or its performance.This manual contains valuable instructions on the installation and operation of your Vermont Castings stove. It alsocontains useful information on maintenance and assembly of this product. We urge you to read the manual thoroughlyand to keep it as a reference.Sincerely,All of us at MHSCWelcomeThe Encore Multi-Fuel 2547CE is designed for burningwood and most smokeless solid fuels.Consult a professional, solid fuel service person toinstall your stove, or to advise you on the installationshould you wish to install it yourself.Please read the entire manual before you install anduse your new room heater. Failure to follow instructionsmay result in property damage, bodily injury, or death.Table of ContentsSpecifications.................................. 3Installation....................................... 4Assembly.......................................11Operation...................................... 12Draft Management........................ 17Maintenance................................. 19Replacement Parts....................... 23Warranty........................................ 272000971
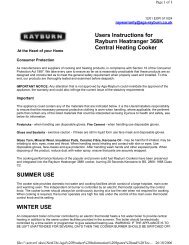
Encore ® Multi-Fuel HeaterSpecificationsEncore Multi-Fuel, Model 2547CEWood Smokeless Fuel 2Nominal heat output 12.3 kW 1 7.7 kW 1(42,000 BTU/hr) (26,270 BTU/hr)Minimum flue draught 12 Pa 12Pa(0.048” WG) (0.048”WG)Mean flue gas temp 291°C (556°F) 267°C (513°F)Efficiency (space heating) 71.6% 66.7%Fuel size/typeup to 510 mm (20”) Smokeless coalFlue mass gas flow 12.0 g/s 10.4 g/sCO Emissions (@ 13% O 2) 7900 ppm 3200 ppmArea Heated...............................129 sq. m (1400 sq.ft.)Loading....................................................... Front or topChimney connector:for 8” flue collar........................ 203 mm (8”) diameterfor 6” flue collar........................ 152 mm (6”) diameterChimney flue size:for 8” flue collar........................203 mm (8”) minimumfor 6” flue collar........................152 mm (6”) minimumFlue exit position........................ Reversible, top or rearPrimary air.... Manually set, thermostatically maintainedAsh handling system......................Removable ash panGlass panel.......................... High-temperature ceramicWeight................................................. 159 kg (350 lbs.)Width (leg-to-leg)..................................... 685 mm (27”)Depth (leg-to-leg)..................................... 380 mm (15”)Height to top of flue collar, 152 or 203 mm (6” or 8”)Top exit.............................................. 640 mm (25¹⁄₄”)Rear exit............................................ 675 mm (26¹⁄₂”)1. This value can vary depending on how the stoveis operated, the type and moisture content of the fuelused, as well as the design, construction and climaticlocation of your home. Figures shown are based onnominal fuel consumption obtained under laboratoryconditions and on average efficiencies.2. This stove is approved for use with processed coalfuels generally known as smokeless. Ask your dealerwhich fuels are acceptable in your area.457 mm (18")Drawings Not to Scale543 mm(21")83 mm(3")610 mm(24")657 mm(25")470 mm(18")187 mm(7")686 mm (27")686 mm (27")686 mm (27")51 mm(2")641 mm(25")Top exitflue collarheight572 mm (22")394 mm(15")381 mm(15")127 mm(5")73 mm (2")133 mm(5")600 mm(23")0971Fig. 1 Encore MF dimensions.Encore MF 2547dimensions9/022000971
Encore ® Multi-Fuel HeaterInstallationSafety NOTICE: IF YOUR ENCORE IS NOT PROP-ERLY INSTALLED, A HOUSE FIRE MAY RESULT.TO REDUCE THE RISK OF FIRE, FOLLOW THEINSTALLATION INSTRUCTIONS. CONTACT LOCALBUILDING OR FIRE OFFICIALS ABOUT RESTRIC-TIONS AND INSTALLATION INSPECTION REQUIRE-MENTS IN YOUR AREA.Before you begin an installation, be sure that:• Your stove and chimney connector will be farenough from combustible material to meet all clearancerequirements.• The hearth is large enough and is constructed properlyto meet all requirements.• You have all necessary permits from local authorities.Your local building official is the final authority for approvingyour installation as safe and determining that itmeets local and state codes.The metal label permanently attached to the back of everyVermont Castings stove indicates that the stove hasbeen tested to current standards. The test standardsare UL 1482 and Ul 737 for the US and EN13240:2001+ A2:2004 for Europe. Clearance and installation informationalso is printed on the label. When the stove isinstalled according to the information both on the labeland in this manual, local authorities in most cases willaccept the label as evidence that the installation meetscodes and can be approved.However, codes vary in different countries. Beforestarting the installation, review your plans with the localbuilding authority. You local dealer can provide any additionalinformation needed.Important: Failure to follow these installationinstructions may result in adangerous situation, including a chimneyor house fire. Follow all instructionsexactly, and do not allow makeshift compromisesto endanger property and personalsafety.Outside AirIn some modern, super-insulated homes, there isinadequate air for combustion because of insufficientair infiltration into the building. Such air enters a homethrough unsealed cracks and openings. Exhaust fansfor kitchen or bath can compete with the stove for availableair and compound the problem.When poor draft is caused by a low infiltration rate,opening a ground floor window on the windward sideof the house and in the vicinity of the stove will usuallyalleviate the problem.Another solution is to install a permanent outside airsupply to the stove and/or room. In fact, bringing airfor combustion from outside the home directly to theair inlet of the stove is required for new construction insome areas.Pressure variations within the house do not affect astove equipped with an outside air supply, and improvedstove performance often results. An Outside AirAdapter Kit for the Encore Multi-Fuel is available fromyour local Vermont Castings dealer.Chimney HeightAltitude affects chimney performance. When using a152 mm (6”) flue collar on the Encore Multi-Fuel, referto Figure 2 for suggested chimney heights at variousaltitudes. Chimney height should be measured from theflue collar to the top of the chimney. The recommendedminimum chimney height is 4.9 m (16’).Height30252015ST4910 2000 4000 6000 8000 10000 12000AltitudeFig. 2 Chimney height requirements for Encore MF whenequipped with a 152 mm (6”) chimney.ST491Defiantchimney height11/2/00 djt2000971
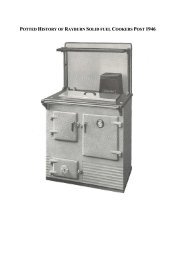
Encore ® Multi-Fuel HeaterA tile-linedmasonrychimneyST2412000971What Kind of Chimney to UseYou must connect the Encore Multi-Fuel to a code-approvedmasonry chimney with a flue liner, to a relinedmasonry chimney that meets local codes, or to aprefabricated metal chimney. (Fig. 3) The chimney andchimney connector must be in good condition and keptclean.If you use an existing masonry chimney, it must beinspected to ensure it is in a safe condition beforethe stove is installed. Your local professional chimneysweep, building inspector, or fire department official willbe able to inspect the chimney or provide a referral tosomeone who can.A prefabricated doublewallinsulated chimneyFig. 3 Approved chimney types.Masonry ChimneysST241chimney types12/13/99 djtAn inspection of the chimney must confirm that it hasa lining. Do not use an unlined chimney. The chimneyshould have no cracks, loose mortar, other signs ofdeterioration, and blockage. Repair any defects beforethe chimney is used with your stove.Unused openings in an existing masonry chimney mustbe sealed with masonry to the thickness of the chimneywall, and the chimney liner should be repaired. Openingssealed with pie plates or wallpaper are a hazardand should be sealed with mortar or refractory cement.In the event of a chimney fire, flames and smoke maybe forced out of these unused thimbles.The chimney should be thoroughly cleaned before use.A newly-built masonry chimney must conform to thestandards of your local building code or, in the absenceof a local code, to a recognized national code. Masonrychimneys must be lined, either with code-approvedmasonry or pre-cast refractory tiles, stainless steelpipe, or a code-approved, “poured-in-place” liner. Thechimney’s clean-out door must seal tightly.Prefabricated ChimneysThese should be an internal diameter of 150 mm (6”)and be of the twin wall insulated construction that hasbeen approved for solid fuel use (e.g. Rite Vent ICS ofICID Lite Chimney Systems). Diameters over 200 mm(8”) are not recommended due to the large cross-sectioncausing excessive cooling of the flue gases.DO NOT CONNECT THIS UNIT TO A CHIMNEY FLUESERVING ANOTHER APPLIANCE.Chimney SizeAn Encore Multi-Fuel with an 203 mm (8”) flue collar issized for venting into a masonry chimney with a nominalflue size of 8” x 8” (203 x 203 mm) or 8” x 12” (203 x305 mm), and into a round flue with nominal flue size of8” (203 mm). An Encore Multi-Fuel with a 6” (152 mm)flue collar is approved for venting into a masonry chimneywith a nominal flue size of 8” x 8” (203 x 203 mm),and into a round flue with nominal flue of 6” (152 mm).NOTE: When installed with a 6” flue collar, theEncore Multi-Fuel is not recommended for use withthe front doors open.Whatever the flue collar size, an Encore Multi-Fuelmay be vented into larger chimneys as well. However,chimneys with liners larger than 203 x 305 mm(8” x 12”) may experience rapid cooling of smoke andreduction in draft, especially if the chimneys are locatedoutside the home. These large chimneys may need tobe insulated or have their flues relined for proper stoveperformance.Accessories to help make the connection betweenstainless steel chimney liners and your Encore Multi-Fuel are available through your local dealer.Chimney Connector GuidelinesA chimney connector is the double-wall or single-wallpipe that connects the stove to the chimney. The chimneyitself is the masonry or prefabricated structure thatencloses the flue. Chimney connectors are used only toconnect the stove to the chimney, as in Figure 6.Connecting Flue PipesConnector pipes should meet the requirements of thebuilding regulations. This can be achieved by the useconnecting fluepipes included in the following categories:a) Vitreous enamelled steel pipe complying with BS6999: 1989 (1996);b) Pipes made from stainless steel as descirbed in BSEN 1008-1:1995 grades 1.4401, 1.4404, 1.4432 or1.4436 with flue wall thickness of at least 1 mm;c) Mild steel fluepipes complying with BS 1449: Part 1:1991, with a flue wall thickness of at least 3 mm;d) Cast iron fluepipes complying with BS 41: 1973(1998).
Encore ® Multi-Fuel HeaterFlue Pipes with a spigot and socket joint should befitted with the socket facing upwards, to contain condensatesand moisture within the flue. Joints should bemade gas tight using proprietary jointing accessories,or, where appropriate, by packing joint with noncombustiblerope and fire cement.Double-wall connectors must be tested and listed foruse with solid-fuel burning appliances. Single-wall connectorsshould be made of 24 gauge or heavier steel.Do not use galvanized connector; it cannot withstandthe high temperatures that can be reached by smokeand exhaust gases, and may release toxic fumes underhigh heat. The connector may be 152 mm (6”) or 203mm (8”) in diameter.If possible, do not pass the chimney connector througha combustible wall or ceiling. If passage through a combustiblewall is unavoidable, refer to the section on WallPass-Throughs. Do not pass the connector through anattic, a closet or similar concealed space. The wholeconnector should be exposed and accessible for inspectionand cleaning.The recommended maximum length of a horizontalstovepipe run is 152 mm (6”).In cathedral ceiling installations, extend the prefabricatedchimney downward to within 2.4 m (8’) of the stove.Wear gloves and protective eyewear when drilling,cutting or joining sections of chimney connector.Double-wall Chimney ConnectorsInformation on assembling and installing double-wallconnectors is provided by the manufacturer of thedouble-wall pipe. Follow the manufacturer’s instructionsexactly as you assemble the connector and attach it tothe stove and chimney. Using chimneys and connectorsfrom the same manufacturer makes the assembly andinstallation straightforward.NOTE: For installations using double-wall connectors,minimum clearances must conform to the listed clearancesin the clearance chart on Page 13.If the Encore Multi-Fuel is equipped with the 203 mm(8”) flue collar, an oval-to-round adapter will be needed.Your local dealer can help you select the right connector.Single-wall Chimney Connectors• Begin assembly at the flue collar of the stove. Insertthe first crimped end into the stove’s flue collar. Keepeach crimped end pointing toward the stove. (Fig. 5)Using the holes in the flue collar as guides, drill 3 mm(1/8”) holes in the bottom of the first section of chimneyconnector and secure it to the flue collar with three #10x 1/2” sheet metal screws.• Secure each joint between sections of chimney connector,including telescoping joints, with at least threesheet metal screws. Thepre-drilled holes in the topof each section of chimneyconnector serve as guideswhen you drill 3 mm (1/8”)holes in the bottom of thenext section.• Secure the chimneyconnector to the chimney.Instructions for various installationsfollow.• Be sure the installedstove and chimney connectorare correct distancesfrom nearby combustible materials.Fig. 4 the crimped endof the connector pointstoward stove.ST242Chimney connector12/13/99 djtNOTE: Special slip pipes and thimble sleeves that formtelescoping joints between sections of chimney connectorare available to simplify installations. They ofteneliminate the need to cut individual connector sections.Consult your local dealer about these special pieces.Securing the Single-wall Connector to aPrefabricated ChimneyFollow the installation instructions of the chimneymanufacturer exactly as you install the chimney. Themanufacturer of the chimney will supply the accessoriesto support the chimney, either from the roof of thehouse, at the ceiling of the room where the stove isinstalled, or from an exterior wall.Special adapters are available from your local dealerto make the connection between the prefabricatedchimney and the chimney connector. The top of suchadapters attaches directly to the chimney or to thechimney’s ceiling support package, while the bottom ofthe adapter is screwed to the chimney connector.These adapters are designed so the top end will fitoutside the inner wall of the chimney, and the bottomend will fit inside the first section of chimney connector.When assembled in this way, any soot or creosote fallingfrom the inner walls of the chimney will stay insidethe chimney connector.Securing the Single-wall Connector to aMasonry ChimneyBoth freestanding masonry chimneys and fireplace masonrychimneys may be used for your installation.Freestanding InstallationsIf the chimney connector must pass through a combustiblewall to reach the chimney, follow the recommendationsin the Wall Pass-Through section that follows.The opening through the chimney wall to the flue(the “breech”) must be lined with either a ceramic ormetal cylinder, called the “thimble”, which is cemented2000971
ST243a45 degreeEncore ® Multi-Fuel HeaterElbowSlip PipeStandardConnectorOval toRound AdapterChimneyFlueFlue LinerThimbleFlue CollarST492Without a thimble, a suitable length of chimney connectorcan be extended through the breech to the innerface of the flue liner, and cemented securely in place.Additional pieces of connector are then attached withsheet metal screws.Fireplace InstallationsThe chimney connector may be connected to thechimney above the fireplace opening or through thefireplace.Above the FireplaceThe Encore Multi-Fuel may be connected to a chimneyabove a fireplace opening. (Fig. 7) In such installations,the stove is positioned on the hearth in front ofthe fireplace and the chimney connector rises from thestove top and then angles ninety degrees back into thechimney. The chimney liner should extend to the pointat which the chimney connector enters the chimney.Fig. 5 An exploded view of the chimney connection in a freestandingmasonry installation.ST492securely in place. Most Defiant chimney breeches incorporatethimbles, but the fit must freestanding be snug and the joint betweenthe thimble and the chimney installation wall must be cemented11/00firmly.A special piece called the “thimble sleeve,” slightlysmaller in diameter than standard connectors and mostthimbles, will facilitate the removal of the chimney connectorsystem for inspection and cleaning. Thimblesleeves should be available from your local dealer.To install a thimble sleeve, slide it into the breech untilit is flush with the inner flue wall. Do not extend it intothe actual flue passage, as this could interfere with thedraft.The thimble sleeve should protrude 25-51 mm (1-2”)into the room. (Fig. 6) Use furnace cement and thingasketing to seal the sleeve in place in the thimble.Secure the chimney connector to the outer end of thesleeve with sheet metal screws.2000971Thimble SleeveChimney Connector45° ElbowMaximumThimbleFlueST243aFig. 6 The thimble, made of either ceramic or metal, must becemented securely in place.* Check theseclearancesChimney ConnectorShield**MantelSeal theDamperST244aFig. 7 Chimney connector enters chimney above the fireplaceopening.If the chimney connector ST244a from your installation entersthe chimney above a fireplace,Intrepid MFfollow all the guidelinesfplc over mantelmentioned above for freestanding 2/01 installations. In addition,give special consideration to the following points:• Check the clearance between the stove and thechimney connector, and any combustible trim or themantel. Use the necessary combination of mantel,trim, and connector heat shields to achieve the requiredclearances.• Check the clearance between the chimney connectorand the ceiling. If no heat shields are used, theclearance should be at least 24” (610 mm). To find outhow much this clearance may be reduced with heatshields, see the clearance chart on Page 14.
Encore ® Multi-Fuel Heater• The fireplace damper must be sealed to preventroom air from escaping up the flue. However, it mustbe possible to reopen the damper to inspect or cleanthe chimney.Through the FireplaceIf your fireplace opening height is at least 26¹⁄₂"(675mm), you may install an Encore Multi-Fuel throughthe opening using a “positive connection” kit, availablefrom your local dealer. These positive connection kitsensure a tight fit between the stove flue collar and thechimney flue. (Fig. 8)Fireplace installations, whether connected to the flueabove or through the fireplace opening, have specialclearance requirements to adjacent trim and the mantel.Floor protection requirements also apply to fireplaceinstallations. Refer to “Floor Protection” section.Always adhere to local building codes when installing awall pass-through. Figure 9 shows one recommendedmethod.All combustible material in the wall must be removedaround the single-wall connector to provide clearancethat is three times the pipe diameter. Any material usedto enclose the opening must be noncombustible.Figure 9 shows another method of passing a connectorthrough a wall. All combustible material in the wall is cutaway to provide the required clearance that is 3x theconnector diameter. The resulting space must remainempty. A flush-mounted sheet metal cover may be usedon one side only. If covers must be used on both sides,each cover must be mounted on noncombustible spacersat least 25 mm (1”) clear of the wall.DO NOT CONNECT AN ENCORE MULTI-FUEL TOANY AIR DISTRIBUTION SYSTEM.Flexible ConnectorTMantel ShieldFireplace AdapterKit “Positive Connection”ST494Fig. 9 A hollow wall pass-through method.ST245Wall Pass-Throughsfireplaceflex connectorWhenever possible, design your installation so the connectordoes not pass through a combustible wall. If you12/99are considering a wall pass-through in your installation,check with your building inspector before you begin.Also, check with the chimney connector manufacturerfor any specific requirements. Some manufacturersmake chimney components that may be used as wallpass-throughs. If using one of these, make sure it hasbeen tested and listed for use as a wall pass-through.ST245Fig. 8 In this installation, the chimney connector enters thefirepalce opening and then connects to the chimney.HearthsST494steelThis appliance must be wall installed pass thru on to hearth thatmeets the requirements 11/00 of Part J of the Building Regulations2000 (Combustion Appliances and Fuel StorageSystems). This can be achieved by ensuring that thehearth is constructed and sized in accordance with theguidelines included in section 2 of approved document‘J’. The size and clearances of the hearth are as follows:The constructed hearth should be constructed in accordancewith the recommendations in document J,and should be of minimum width 840 mm and minimumdepth 840 mm (if a free standing hearth b) above) ora minimum projection of 150 mm from the jamb (if arecessed hearth a) above).Unless the stove hearth is completely noncombustible,the bottom heat shield should be installed to provideradiant protection for framing which may be below thehearth. (Fig. 11)2000971
Encore ® Multi-Fuel HeaterCostructional HearthDimensions as belowAt least 150 mmor to a suitableheat resistant wallApplianceDoorsApplianceDoorsAt least150 mmPerimeter should beclearly marked e.g.edge of superimposedhearthWood framing requires protectionfrom radiant heatHearth SurfaceFree of CombustibleMaterialAt least300 mma) Fireplace recess b) Free standingFig. 10 Noncombustible hearth surface dimensions.Fig. 11 Combustible supporting timbers may lie beneathfireplace hearths, reqireimg additional floor protection.ST247eFloor Protection for Fireplace InstallationsDo not assume that your fireplace hearth is completelynoncombustible.ST247Rear exit floor dgrmMany fireplace hearths do not meet the “completely12/14/99 djtnoncombustible” requirement because the brick orconcrete in front of the fireplace opening is supportedby heavy wood framing. (Fig. 11) Because heat passesthrough brick or concrete readily, it can easily passthrough to the wood. As a result, such fireplace hearthscan be a fire hazard and are considered a combustiblefloor.Keep in mind, also, that many raised hearths will extendless than the required clearance from the front of theheater when it is installed. In such cases, sufficientfloor protection as described above must be added infront of the hearth to satisfy the minimum floor protectorrequirement from the front of the stove: 406 mm (16”)from the front.Hearth rugs do not satisfy the requirements for floorprotection.Perimeter should beclearly marked e.g.edge of superimposedhearthST912Keep the Stove a Safe Distancefrom Surrounding MaterialsBoth a stove and its chimney connector radiate heat inall directions when operating, and dangerous overheatingof nearby combustible materials can occur if theyare too close to the heat. A safe installation requiresthat adequate clearance be maintained between thehot stove and its connector and nearby combustibles.Clearance is the distance between either your stove(measured from the bottom edge of the stove’s topplate) or chimney connector, and nearby walls, floors,the ceiling, and any other fixed combustible surface.Your stove has special clearance requirements thathave been established after careful research and testingto both US and European standards. These clearancerequirements must be strictly observed.In addition, furnishings and other combustible materialsmust be kept away from the stove as well. In general, adistance of 1219 mm (48”) must be maintained betweenthe stove and moveable combustible items such as dryingclothes, furniture, newspapers, firewood, etc. Keepingthose clearance areas empty assures that nearbysurfaces and objects will not overheat.Safe Ways to Reduce ClearancesClearancesAs with any solid fuel heating stove, extremely highsurface temperatures can occur, particularly in theevent of uncontrolled operation, e.g. if the doorsare inadvertently left open. It is crucial that sufficientclearances are allowed to any combustiblesurfaces, e.g. wooden mantels or lintels, and totimber framed (studded) walls even if they are facedwith noncombustible board. Detailed informationon fireplace and hearth construction is provided2000971
Encore ® Multi-Fuel Heaterin section 2 of Document J, all installations mustcomply with these requirements or with the relevantNational or local building standards.Clearances to timber framed (studded) walls are includedbelow. There are no specific minimum clearancesto solid noncombustible surfaces (e.g. the sides andrear of Inglenook fire openings constructed from solidmasonry) other than to allow safe access to the controlsof the stove. For this reason minimum side clearancesof 125 mm, and a minimum rear clearance of 50 mmare recommended.Summary of ClearancesMinimum recommended side clearances to noncombustiblesurfaces 125 mm (5”).Minimum recommended rear clearance to noncombustiblesurfaces 50 mm (2”).NOTE: The minimum thickness of solid noncombustiblematerials is specified in section 2 of Document ‘J’,in relation to the clearance of the appliance from thesurface. As a general rule, the thickness of solid noncombustiblematerial forming the recess of a fireplace isa minimum of 200 mm.Minimum rear clearance from combustible walls(e.g. timber framed or studded walls) 840 mm (33”)measured from the rear edge of the stove top. (Fig.12, B)AFig. 12 Minimum clearances.ST486astove top. (Fig. 12,DefiantA)EUClearanceDiagrams1220 mm (48”).10/06Connecting Flue Pipe - ClearancesBST486aMinimum side clearance from combustible walls610 mm (24”) measured from the side edge of theMinimum distance from stove to movable combustiblematerials (e.g. furniture, drying clothes, etc.)Single wall connecting fluepipes can reach extremelyhigh temperatures; therefore, clearances from the connectingfluepipe (chimney connector) must comply withthe requirements of Part J of Building Regulations 2000(Combustion Appliances and Fuel Storage Systems).This can be achieved by following the recommendationsof Approved Document ‘J’. These are as shown inFigure 13.at least3 x DDat least 3 x DDat least1.5 x Dat least1.5 x Dat least3 x DFluepipeat least1.5 x Dat least1.5 x DElevationWithoutShieldat least 1.5x DFig. 13 Connecting fluepipe clearances.ElevationWith ShieldPlan WithoutShieldAir space of at least 12 mmbetween noncombustible shieldand combustible materialPlan WithShieldST91110 2000971
Encore ® Multi-Fuel HeaterAssemblySet Up Your StoveCast iron stoves are heavy, and it will take two to fourpeople to move your Encore MF into position.Wash the protective coating of oil from the griddle withsoap and water. Dry the griddle thoroughly and apply alight coating of vegetable oil to season the surface andhelp prevent rust.Remove all packing materials from inside the stove.Install the Optional Bottom Heat Shield1. Remove the four 10-24 x 1/2” hex head bolts fromthe corners of the ash drop on the stove bottom.2. Screw the four 32 mm (1¹⁄₄") spacers into the holesfrom which you removed the bolts, finger-tight.3. Align the bottom heat shield against the spacers withthe stepped side toward the rear of the stove.4. Secure the shield with the four hex head bolts previouslyremoved from the stove bottom.5. Tighten securely.SpacersST634Fig. 15 Use spacers and screws to position the ashdoor heatshield.ST634Attach the Primary Encore Air Thermostat HandleThe primary air ashdoor thermostat shield handle is the smaller of thetwo black handles. 2/01Secure the handle to the stub onthe right side of the stove with an 8-32 x 2” slot headmachine screw.ST6352000971Adjust the Leg LevellersLift the stove slightly so there is no weight on the legwhile making the adjustment.Reverse the Flue Collar (If Necessary)ST633Reverse the flue collar by Encore removing the two screws thatattach it to the back of the Bottom stove. Heat Be Shield sure the gasketaround the flue collar opening2/01is in position when youscrew the collar back onto the stove.Install the Ash Door Heat ShieldST633Fig. 14 Use four spacers to attach the bottom heat shield.1. Remove the two Phillips pan head screws from theash door.2. Insert the screws through the ash door heat shield(from the painted side), place the 8 mm (5/16”)spacers over the screws, and carefully thread themback into the original holes. The curved lip should beupward, under the ashlip of the stove.3. Tighten securely.Fig. 16 Attach thermostat handle.Attach the Damper HandleUse the 1/4” -20 x 3” screw ST635 to attach the damper handleto the damper stub on the Encore left side.Install thermostatAssemble the Removable Insert HandlehandleThe white removable 2/01insert handle opensand closes the frontdoors. Remove aftereach use so it won’tget hot, and store it inthe handle holder installedbehind the rightfront leg. AssembleST540the handle by passingthe 86 mm (3³⁄₈")Fig. 17 Assemble the frontdoor handle.screw through theceramic shaft and intothe bright metal nub. Tighten carefully until snug.ST540Assemblyhandle11/0011
Encore ® Multi-Fuel Heater The Encore Multi-Fuel ControlsTwo controls regulate the performance of the Encore:a primary air control supplies oxygen for the fire, anda damper directs air flow within the stove or directly upthe vent.Symbols cast into the stove are reminders of the correctdirections for opening and closing the controls.OperationLow HeatA Damper Directs Air FlowWithin the StoveThe damper handle on the left side of the stove opensand closes the damper to direct air flow within thestove.The damper is open when the handle points to the backof the stove, enabling smoke to pass directly into thechimney. The damper must be open when starting orreviving a fire, and whenever the griddle or doors areopened.Damper HandleGriddle HandleDoor HandleAir ControlLeverHigh HeatST63712AndironsAshdoorHandleST633A Single Air Control RegulatesEncoreHeat Output and Burn Timecontrols2/01Door HandleHolder (Behindleg)ST636Fig. 18 The Encore controls are conveniently located andeasy to operate.The primary air control lever, located on the right sideof the stove, controls the amount of incoming air forstarting, maintaining, and reviving a fire.More air entering the stove makes the fire burn hotterand faster, while less air prolongs the burn at a lowerheat level. High and low settings appear in Figure 19.For the greatest air supply and maximum heat output(but the shortest burn time), move the lever toward thefront of the stove. For a fire that will last longer with lessheat, move the lever toward the rear of the stove.Fig. 19 The handle may be positioned anywhere between thetwo extremes for different heat levels.The damper is closed when the handle points forward.Exhaust gases are directed around the rear baffle beforepassing up the chimney.Damper PositionsOpen(Updraft Mode)Closed(Bypass Mode)ST637encoreAir control2/01When closing the damper, be sure to pull firmlyenough to snap it into the locked position.ST638Fig. 20 The damper is either open or closed. There are nointermediate positions.ST638Encore2000971damper control2/01
Encore ® Multi-Fuel Heater2000971Two Ways to Add FuelThe Encore’s griddle lifts for convenient top-loading offuel, and is the easiest way to regularly add fuel.In addition, however, the front doors open for adding anoccasional log to a fire. The Encore is not approvedin Europe for operation with the front doors open.To open the front doors, insert the handle into the doorlatch stub and turn it to the left and up. (Fig. 22)Handle ST639Fig. 21 The Encore’s hinged griddle makes it easy to top-loadwood.Clockwise toOPENCounterclockwiseto CLOSEST544door open11/00ST544Fig. 22 To open the front doors, turn the handle clockwise.To close them, always close the left door first. Turn thehandle in the right door to the left and up (to the openposition) and close it. Finally, push on the door as youturn the handle to the right and down. The doors willdraw in slightly, and the handle should offer some resistanceas you turn it to the closed position.To reduce the risk of breaking the glass, avoid strikingthe glass or slamming the doors.When not using the door handle, store it in the holderbehind the right front leg of the stove.This stove is designed to operate efficiently withthe fire doors (front doors and griddle) closed. Thefirebox and ash doors should be kept closed at alltimes except when refuelling or removing ashes.Infrared Reflective Glass Panelsfor Clear Fire ViewingThe inner surfaces of the infrared reflective glasspanels are kept at a higher temperature than the outersurface. This design, along with a preheated ‘airwash,’makes clear fire viewing possible at most levels ofoperation.Burn Only High-Quality FuelThe Encore is designed to burn natural wood andsmokeless coal.You’ll enjoy the best results when burning wood thathas been adequately air-dried. Avoid burning “green”wood that has not been properly seasoned, or cordwooddried more than two years. Do not burn constructionmaterials; they often contain chemicals andmetals that can damage the iron over time. The woodshould be 457-508 mm (18-20”) in length.The best hardwood fuels include oak, maple, beech,ash, and hickory that has been split, stacked, and airdriedoutside under cover for at least one year.If hardwood is not available, you can burn softwoodslike include tamarack, yellow pine, white pine, Easternred cedar, fir, and redwood. These too should be properlydried.Store wood under cover to keep it dry. The longer it isstored, the better heating and fire viewing performanceyou will enjoy. Even for short-term storage, however,keep all fuels a safe distance from the heater and keepit out of the areas around the heater used for refuelingand ash removal.A Surface Thermometer is a ValuableGuide to OperationAn optional surface thermometer lets you know when toadjust the air control and when to refuel.Fig. 23 Take temperature readings with the thermometerlocated in the middle of the griddle.ST523For example, when the thermometer registers at least230° C (450° F) after start-up you know the stove ishot enough to begin catalytic combustion and it maybe time to close the damper. Note that the stove willwarm up much sooner than the chimney, though; awarm chimney is the key to easy, effective stove operation.Please review the draft management information13
Encore ® Multi-Fuel Heateron Page 17 to see how the size, type, and location ofyour chimney will affect your stove operation. Whenthermometer readings drop below 175° C (350° F) it’stime to adjust the air control for a higher burn rate or toreload the stove. A temperature reading over 385° C(750° F) is a sign to cut back on the air supply to slowthe burn rate.Use the following temperature ranges as a guide tooperation:• Readings in the 175°-260° C (350-500° F) rangeindicate low to medium heat output.• 260°-315° C (500-600° F) readings indicate mediumheat output.• Readings of 315°-400° C (600-750° F) indicate highheat output. Operating your Encore continuously atgriddle temperatures of 385° C (750° F) or highermay damage the cast iron or enamel finish.14Use the Air Control Settingsthat Work Best for YouNo single air control setting will fit every situation. Eachinstallation will differ depending on the quality of thefuel, the amount of heat desired, and how long you wishthe fire to burn; outdoor air temperature and pressurealso affect draft.The control setting also depends on your particularinstallation’s “draft,” or the force that moves air from thestove up through the chimney. Draft is affected by suchthings as the length, type, and location of the chimney,local geography, nearby obstructions, and other factors.Refer to Page 23 for details on how the installation affectsperformance.Too much draft may cause excessive temperatures inthe Encore, and could even damage the combustor.On the other hand, too little draft can cause backpuffinginto the room and/or the “plugging” of the chimney orcombustor.How do you know if your draft is excessively high orlow? Symptoms of too much draft include an uncontrollableburn or a glowing-red stove part. A sign of inadequatedraft is smoke leaking into the room through thestove or chimney connector joints, low heat, and dirtyglass.In some newer homes that are well-insulated andweather-tight, poor draft may result from insufficient airin the house. In such instances, an open window nearthe stove on the windward side of the house will providethe fresh air needed.In some areas provisions for outside combustion airare required. Refer to section 2 of Document J whichrequires an outside air vent for appliances with poweroutputs over 5 kW. Always refer to national and localcodes to determine your specific requirements.Your Encore will accept a duct to deliver outside air forcombustion.When first using the stove, keep track of the air controlsettings. You will quickly find that a specific setting willgive you a fixed amount of heat. It may take a week ortwo to determine the amount of heat and the length ofburn you should expect from various settings.Most installations do not require a large amount ofcombustion air, especially if adequate draft is available.Do not for any reason attempt to increase the firingof your heater by altering the air control adjustmentrange outlined in these directions.Use the following air control settings as a starting pointto help determine the best settings for your installation.Each is described as a fraction of the total distance thelever may be moved from right to left.Encore Control SettingsBurn Rate Primary Air ControlLow From far right to 1/3the distance to leftMediumFrom 1/3 to 2/3 the distanceto leftHighFrom 2/3 the distanceto left to far leftConditioning Your StoveCast iron is extremely strong, but it can be broken witha sharp blow from a hammer or from the thermal shockof rapid and extreme temperature change.The cast plates expand and contract with changes intemperature. When you first begin using your Encore,minimize thermal stress by allowing the plates to adjustgradually during three or four initial break-in fires followingSteps 1-3 below.Starting and Maintaining a FireBurn wood or coal directly on the grate. Do not elevatethe fuel.The damper must be open when starting a fire orwhen refueling.Do not use chemicals or fluids to start the fire. Donot burn garbage or flammable fluids such as gasoline,naptha, or engine oil.1. Open the stove damper, and open the primary aircontrol fully.2. Place several sheets of crumpled newspaper in thestove. Place on the paper six or eight pieces of drykindling split to a finger-width size, and on the kindlinglay two or three larger sticks of split dry woodapproximately 25-51 mm (1-2”) in diameter.Never use gasoline-type lantern fuel, kerosene, charcoallighter fluid, or similar liquids to start or “freshen2000971
Encore ® Multi-Fuel HeaterFig. 24 Start fire with newspaper and dry kindling.ST263up” a fire. Keep all such liquids well away from theEncore while it is in use.3. Light the newspaper ST263 and close the door. Graduallybuild up the fire starting by adding a firea few 76-127 mm (3-5”)diameter splits.12/99If this is one of the first few “breakin”fires, let the fire burn brightly, and then let it dieout.During the break-in fires, don’t let the stove get hotterthan 260° C (500° F) as measured on an optionalstove-top thermometer. Adjust the air control lever asnecessary to control the fire.Some odor from the stove’s hot metal, the paint, andthe cement is normal for the first few fires.NOTE: Some chimneys need to be “primed,” orwarmed up, before they will draw sufficiently to starta fire. To correct this situation, roll up a couple piecesof newspaper, place them on top of the kindling andtoward the back of the stove, light them, and closethe doors. This will encourage smoke to rise rapidly,encouraging a good draft.Once the draft is established, open the front door andlight the rest of the fuel from the bottom. Do not light themain bed of fuel until the chimney begins drawing, andrepeat the procedure as often as necessary if the initialattempt is unsuccessful.ST264Fig. 25 Add larger pieces of wood as the fire begins to burnwell.4. If your Encore has been broken-in previously usingSteps 1-3, continue to build the fire gradually. Addlarger wood with ST264 a diameter of 76-102 mm (3-4”). Ifgood fire200097112/99burning wood, continue adding split logs of this sizeto the briskly-burning fire until there is a glowingember bed at least 76 mm (3”) deep. If burning coal,begin adding small amount directly on the kindling toestablish a burning coal pile.5. Close the damper when the griddle temperaturereaches 230° C (450° F).6. Adjust the air control for your desired heat output.Refuel While the Embers Are Still HotAlways wear stove gloves to protect your hands fromhot surfaces while refueling. The following guidelineswill help you achieve the best results.De-ash the stove by stirring the fuel bed to allow ashto fall through the grate. It is important that plenty of airis able to circulate through the charcoal bed. Do notbreak, pound or compress the charcoal into very smallpieces. Larger pieces of charcoal allow more air tocirculate under the wood and result in the fire revivingmore quickly.ST264aFig. 26 Add full-size logs when the kindling has burned downto a bed of embers.When burning coal it is important to de-ash the coalbedto maintain steady heat output. Use the slicer/pokersupplied with the Encore ST264a to stir and break up the coalpile removing as muchadd woodash asfirepossible.Add fuel while the 11/00 stove still has plenty of glowingembers to rekindle the fire. Include a few small piecesof wood in the new fuel load to help the stove quicklyregain operating temperature.Use this sequence as a guide to successful refueling:1. Open the damper.NOTE: Door handles can be hot. A glove has been includedwith your stove.We recommend using this glovewhenver operating door or damper controls and especiallywhen operating the top griddle.2. De-ash the stove as described above. Open thefront doors and check the level of ash in the ashpan. Empty the pan if necessary and replace it in thestove. Close the front doors.3. Open the griddle, load the wood (smaller piecesfirst), and close the griddle. When burning coal, it is15
Encore ® Multi-Fuel Heaterrecommended only to add briquettes to the level ofthe front grate.4. Close the damper.5. When the surface temperature reaches 230° C(450° F), adjust the air control for the amount of heatyou desire.NOTE: If the remaining coal bed is relatively thick andif wood fuel is well seasoned, it is possible to add freshfuel (smaller pieces first), close the door and damper,and reset the primary air thermostat for the desired heatoutput.Caution: The Encore Multi-Fuel will be hot whilein operation. Keep children, clothing and furnitureaway. Contact may cause skin burns.DO NOT OVERFIRE THIS HEATER. Overfiringmay cause a house fire, or can result in permanentdamage to the stove. If an exterior part ofthe Endore MF glows, you are overfiring.Ash DisposalYou should remove ash before it reaches the top of theash pan. Check the level at least once a day. Every fewdays, clear any ash from the outer edges of the firebox.Most of the ash will fall through the grate. Slice or stirthe ash with a shovel or poker so that it falls through thegrate slots.IMPORTANT: Check the level of ash in the ash panbefore reloading the stove. If the ash level is close tothe top edge of the pan, empty the pan according to thisprocedure:• Open the damper.• Open the griddle or front doors, and use a shovel orpoker to stir excess ash through the ash slots in thegrate down into the ash pan.• Close the griddle or doors, and unlatch the ash door.It will pivot, swinging the ash pan out of the stove.• Slide the cover onto the pan, making sure it is securelyclosed. (Fig. 28)• Remove the ash pan, making sure to keep it level.• To keep the cover from sliding off and to keep ashfrom falling on the floor, do not tilt the ash pan forward.If the stove is in operation, close the ash door whiledisposing of the ash.• Properly dispose of the ash in a metal container witha tight-fitting lid. Store the container outdoors awayfrom all combustible material.OpenCloseST545Fig. 27 Turn the handle to the ash pan compartment clockwiseto open and counterclockwise to close.• Return the ash ST545 pan to its original position in thestove, and close ashdoor and latch the ash door.• Do not operate 11/00 the stove with the ash door open.This will result in over-firing, and could cause damageto the stove, void the warranty, or even lead to ahouse fire.Empty the ash pan regularly, typically every one tothree days. The frequency will vary depending on howyou operate your Encore: ash will accumulate faster athigher heat outputs.Remove ash frequently and place it outdoors in ametal container with a tight-fitting lid. Place the closedcontainer of ash on a noncombustible floor or on theground, well away from all combustible materials, pendingfinal disposal. If the ash is disposed of by burial insoil or otherwise locally dispersed, it should be kept inthe closed container until all cinders have thoroughlycooled.You can use wood ash as a garden fertilizer.CAUTION: Never use your household or shop vacuumcleaner to remove ash from the stove; always removeand dispose of the ash properly.ST566RemoveAshpan12/00ST566Fig. 28 Be sure the cover is securely attached before removingthe ash pan.162000971
A stove is part of a system, which includes the chimney,the operator, the fuel, and the home. The other parts ofthe system will affect how well the stove works. Whenthere is a good match between all the parts, the systemworks well.Wood stove or insert operation depends on natural(unforced) draft. Natural draft occurs when the smokeis hotter (and therefore lighter) than the outdoor air atthe top of the chimney. The bigger the temperaturedifference, the stronger the draft. As the smoke risesfrom the chimney it provides suction or ‘draw’ that pullsair into the stove for combustion. A slow, lazy fire withthe stove’s air inlets fully open indicates a weak draft.A brisk fire, supported only by air entering the stovethrough the normal inlets, indicates a good draft. Thestove’s air inlets are passive; they regulate how muchair can enter the stove, but they don’t move air into it.Depending on the features of your installation - steel ormasonry chimney, inside or outside the house, matchedto the stove’s outlet or oversized - your system maywarm up quickly, or it may take a while to warm up andoperate well. With an ‘airtight’ stove or insert, one whichrestricts the amount of air getting into the firebox, thechimney must keep the smoke warm all the way to theoutdoors. Some chimneys do this better than others.Here’s a list of features and their effects.Masonry ChimneyMasonry is a traditional material for chimneys, but itcan perform poorly when it serves an ‘airtight’ stove.Masonry is a very effective ‘heat sink’ - it absorbs a lotof heat. It can cool the smoke enough to diminish draft.The bigger the chimney, the longer it takes to warm up.It’s often very difficult to warm up an outdoor masonrychimney, especially an oversized one, and keep it warmenough to maintain an adequate draft.Steel ChimneyMost factory-made steel chimneys have a layer ofinsulation around the inner flue. This insulation keepsthe smoke warm. The insulation is less dense than masonry,so a steel chimney warms up more quickly thana masonry chimney. Steel doesn’t have the good looksof masonry, but it performs much better.Indoor / Outdoor locationBecause the chimney must keep the smoke warm, it’sbest to locate it inside the house. This uses the houseas insulation for the flue and allows some heat releaseinto the home. An indoor chimney won’t lose its heatto the outdoors, so it takes less heat from the stove toheat it up and keep it warm.Draft ManagementEncore ® Multi-Fuel HeaterFlue SizingThe inside size of a chimney for an ‘airtight’ stoveshould match the size of the stove’s flue outlet. Whena chimney serves an airtight, more is not better; in fact,it can be a disadvantage. Hot gases lose heat throughexpansion; if we vent a stove with a 152 mm 96”) fluecollar {181 sq cm (28 sq. in.) area} into a 254 x 254 mm(10” x 10”) flue, the gases expand to over three timestheir original size. This cools the gases, which weakensdraft strength. If an oversized flue is also outsidethe house, the heat it absorbs gets transferred to theoutdoor air and the flue usually stays cool.It’s common for a masonry flue, especially one servinga fireplace, to be oversized for the stove. It can takequite a while to warm up such a flue, and the resultscan be disappointing. The best solution to an oversizedflue is an insulated steel chimney liner, the same diameteras the stove or insert’s flue outlet; the liner keepsthe smoke warm, and the result is a stronger draft. Anuninsulated liner is a second choice - the liner keepsthe smoke restricted to its original size, but the smokestill must warm up the air around the liner. This makesthe warm-up process take longer.Pipe & Chimney LayoutEvery turn the smoke must take as it travels to thechimney top will slow it down. The ideal pipe and chimneylayout is straight up from the stove, to a completelystraight chimney. If you’re starting from scratch, use thislayout if possible. If the stovepipe must elbow to enter achimney, locate the thimble about midway between thestove top and the ceiling. This achieves several goals:it lets the smoke speed up before it must turn, it leavessome pipe in the room for heat transfer, and it gives youlong-term flexibility for installing a different stove withoutrelocating the thimble.There should be no more than 2.4 m (8’) of single-wallstove pipe between the stove and a chimney; longerruns can cool the smoke enough to cause draft andcreosote problems. Use double-wall stove pipe for longruns.Single ventingEach ‘airtight’ stove requires its own flue. If an airtightstove is vented to a flue that also serves an open fireplace,or a leakier stove, it’s easier for the chimney draftto pull air in through those channels than it is to pull airthrough the airtight, and performance suffers. Imaginea vacuum cleaner with a hole in the hose to see the effecthere. In some cases the other appliance can evencause a negative draft through the airtight, and result ina dangerous draft reversal.200097117
Encore ® Multi-Fuel Heater18CreosoteCreosote is a by-product of slow wood-burning. It’s anorganic tar that can condense in the flue if it’s dense inthe smoke, and slow-moving, and cools off to less than143° C (290° F). Condensed creosote is volatile, andcan generate chimney fires if it gets hot enough. All thefeatures that affect chimney draft also affect creosotecondensation - so use whatever combination of installationfeatures and operational steps will encourage gooddraft and minimize creosote production.Because letting the smoke cool off and slow down isone of the keys to creosote production, it makes senseto line a chimney to match the stove’s outlet size, forsafety reasons as well as performance. Consult a qualifiedinstaller and check local and national codes forrecommended chimney size.FuelEven the best stove installation will not perform wellwith poor fuel. The best wood fuel is hardwood that hasair-dried 12-18 months. Softwood burns, but not as longas hardwood. Fairly ‘green’ wood has a good amount ofmoisture in it; it will burn, but some of the heat potentialis used to drive the remaining moisture off the wood.This reduces the amount that reaches your home andcan contribute to a creosote problem. There are moisturemeters available for firewood; you can also judgeyour wood by its appearance and weight. If you get itgreen, lift a piece and get a sense of its weight; it canlose a third or more of its weight as it dries. Also look atthe ends of a log; as it dries it shrinks and often cracks.The more weathered and cracked a piece is, the drier itis.Dry wood burns readily with a good chimney draft. Butwith modern stoves, especially catalytic ones, the woodcan be too dry. While extra-dry wood has little creosotein it, the remainder can ‘gas out’ from the wood quicklyand densely enough to overload the catalytic burner.If you hear a rumbling or roaring noise, like a propanetorch, from the stove, that is a sign the catalyst is seriouslyoverfiring. The catalyst is a platinum film on aceramic base; the metal can get to higher temperaturesthan the ceramic can take, and overfiring the catalystcan break it. Dry wood can also burn out faster thanyou want. If your dry wood burns out too quickly oroverloads the catalyst you can mix in greener wood toslow the fire down.Back-puffingBack-puffing results when the fire produces volatilegases faster than the chimney draft pulls them out ofthe firebox. The gases back up in the firebox till they’redense enough and hot enough to ignite. If your stoveback-puffs, you should open the damper to let thesmoke rise to the flue more quickly, let more air into thefirebox, and avoid big loads of firewood. You shouldalways see lively, dancing flames in the firebox; a lazy,smoky fire is inefficient, can lead to back-puffing, andcan contribute to creosote buildup in the chimney.Draft TestingAn easy way to test your chimney draft is to close thestove’s damper, wait a few minutes to let the airflowstabilize, then see whether you can vary the strengthof the fire by swinging the air control open and closed.Results are not always instant; you may need to waita few minutes for a change in the air control setting tohave an effect on the fire. If there’s no change, then thedraft isn’t strong enough yet to let you close the damper,and you’ll need to open it for a while longer and managethe fire with the air inlet until the draft strengthens. If youkeep track of your burning habits and relate them to theireffects on the stove’s operation, you’ll be rewarded withgood performance and a safe system.In many cases, local or national codes require theinstallation of permanently open air vents, particularlywith larger appliances (i.e. above 5 kW). Refer to thesecodes to determine specific requirements for yourinstallation.Negative PressureGood draft also depends on a supply of air to the stove;a chimney can’t pull in more air than is available to it.Sluggish draft results when a house is tight enough toprevent the ready flow of air to the stove, or by competitionbetween the stove and other equipment that sendsindoor air outside - especially power-driven equipmentlike range hoods, clothes dryers, etc. If the chimneydraws well with all other equipment turned off (orsealed, in the case of fireplaces and/or other stoves),then you simply need to be careful with timing the useof the other gear. If you need to crack a nearby windowor door to enable the chimney to pull well, that’s a signthat you should install an outside-air intake to bringcombustion air directly to the stove. For most of ourstoves we carry adapters to attach to the stove to connectan air duct for outdoor combustion air.ConclusionWood-burning is an art rather than a science. Once thestove and chimney system are in place, you can onlyvary your technique, mostly your timing, to achievegood results. If you keep track of your burning habitsand relate them to their effects on the stove’s operation,you’ll be rewarded with good performance and a safesystem.2000971
Below you will find important information on generalcare, inspection and maintenance of your VermontCastings stove. Should it become necessary, use onlyreplacement parts recommended by your authorizeddealerKeep Your Stove Looking Newand Working Its BestLet the fire in the stove go out and allow the stove tocool completely before beginning any maintenanceprocedure.Care of the Cast Iron SurfaceAn occasional dusting with a dry rag will keep the paintedcast iron of your Encore looking new.The stove’s paint can be touched up as needed. First,mask the areas, such as enamelled parts, glass, orhandles, around the spot to be painted.Clean the spotwith a wire brush. Remove the griddle and set it aside.Then, touch up the stove with Vermont Castings’ hightemperature stove paint. Apply the paint sparingly; twolight coats of paint are better than a single heavy one.Care of the Porcelain Enamel SurfaceUse a dry or slightly damp rag or soft brush to removespills or stains. For difficult jobs that require a cleaningagent, use only a kitchen appliance cleaner or polishrecommended for use on enamel surfaces.Cleaning the GlassMost of the carbon deposits on the glass will burn offduring hot fires.However, the ash residue that accumulates on theglass surface should be removed regularly to preventetching. To clean the glass, follow this procedure:• Be sure the glass is completely cool.• Clean the glass with water or a cleaner made especiallyfor this purpose. Do not use abrasive cleaners.• Rinse the glass thoroughly.• Dry the glass completely.Replace Broken Glass ImmediatelyDo not operate your stove if the glass in the doors isdamaged.If you need to replace the glass, use only the high temperatureceramic glass supplied by Vermont Castings.Do not use substitutes. Be sure to specify left or rightglass; the panels are not interchangeable.MaintenanceEncore ® Multi-Fuel HeaterRemoving the GlassThe left door is slightly different from the right in thatone of its retainer clips is located under the door manifold.1. Remove the right and left door assemblies by raisingthe door until the lower hinge pin clears its drilling;then, angle the door bottom slightly outward andpull down to release the upper hinge pin. Place thedoors face down on a padded work surface.2. Remove the screws that hold the retainer clips inplace, and remove the clips. On the right door, removethe Phillips head machine screw that securesthe door manifold to the upper right of the door (as itfaces you). Swing the door manifold out of your wayand remove the clip beneath it as well.3. Carefully lift the broken glass panel from the door.RetainerClips (4)Glass PanelGasketInstalling the ST640a GlassEncoredoor glass3/01ST640aFig. 29 An exploded view of the glass assembly for the leftdoor.Check the gasket around the window; it should be softand resilient so the glass will seal properly against thedoor. Replace the gasket if it has hardened or if it iscompressed.1. Center the first pane of glass on the gasket. Be sureto place the glass so the infrared reflective coating ison the exterior side.2. Secure the glass on both doors with the retainerclips except the one that belongs under the manifoldof the right door, but leave the screws a little loose.Position the remaining clip under the right doormanifold, and swing the manifold back into positionon the door. Make sure the screw passing throughthe end of the manifold nearest the center of thedoor also passes through the retainer clip.200097119
Encore ® Multi-Fuel Heater3. Replace the doors on the stove. Remove the griddleso you can reach in through the opening to positionthe manifold. Move the door manifold as highas possible without actually touching the upper airmanifold, and as far toward the center of the stoveas possible without hitting the door manifold on theother door. Tighten all screws.4. Open and close the doors to check that the doormanifold does not interfere with either of the othermanifolds. Adjust as necessary.20ST641Check the Operationof the Primary Air ShutterThe primary air shutter is located at the back of the ashdrop and is visible from the back of the stove. (Fig. 30)The shutter must open and close freely when you movethe thermostat lever. If it does not, remove any obstruction.If you need assistance, consult your local VermontCastings Authorized Dealer.Fig. 30 The primary air shutter must move freely.Primary AirShutterDo not change the adjustment of the cable in an attemptto gain increased firing. The air shutter controlsST641how much air can enter the stove, but chimney draftis the force that pulls Encore air into the stove. If changing thethermostat handle air position shutter does not lead to changes inthe fire’s intensity, 3/01 it is probably due to weak chimneydraft (in the case of a weak fire you can’t increase) oran air leak in the stove (in the case of a fire you can’tdecrease).Adjust the Damper as NeededThe tension on the Encore’s damper is adjustable tocompensate for compression of the gasket that sealsthe damper to the upper fireback. To adjust the damper:1. Remove the griddle. Loosen the lock nut at the centerof the damper.2. Turn the pressure screw approximately one half turnclockwise.3. Tighten the lock nut. Keep the pressure screw fromturning as you tighten the nut. Re-test the damper.DamperFig. 31 Adjusting the damper.Lock NutPressure AdjustingScrewST642Tighten the Damper Handle as NeededST642Encoredamper adjust3/01How to Adjust the Door LatchesA handle on the left side of the stove controls thedamper. The handle attaches to the damper rod with aset screw. Periodically check the set screw and tightenas necessary.The Encore’s front doors, as well as its ash pan door,should close securely to prevent accidental openingand to keep air from leaking into the stove. Onadequately adjusted doors, the handles should resistslightly as they are turned to the closed position and thedoors themselves should be drawn slightly toward thestove.Over time, the gasket around the doors will compressand the latch may need adjustment.To adjust the handle on the front doors, open thedoor on which the handle is mounted and rotate thehandle one full turn counterclockwise. Since this handleis threaded into the front door, a complete revolution willadjust it enough so that the doors close securely.To adjust the latch on the ash pan door, loosen thesmall lock nut, rotate the striker screw a half-turn, andre-tighten the small lock. Hold the striker screw to keepit from turning as you tighten the lock nut. Make repeatedsmall adjustments until the setting is right.2000971
Encore ® Multi-Fuel HeaterPawlSmallLocking NutStriker ScrewLarge LockingNutST560Set ScrewHandle StubST531Fig. 32 Turn the door latch striker screw in or out to tighten orloosen the door latch. ST531Door PawlReplace the Stove Gaskets as Needed11/00Your Encore uses rope-type fiberglass gaskets to makea tight seal between some parts. With use, particularlyon those parts that move, gaskets can become brittleand compressed and can begin to lose their effectiveness.These will need periodic replacement.All of the gaskets are made of fiberglass. The sizes ofreplaceable gasket are listed below, along with theirapplications.Gasket Diameter ...And the Parts it Seals5/16” The griddle to the stove top(wire reinforced gasket)3/8” The ash door to the front ofthe ash drop3/16” The outer glass panes to thedoors5/16” The damper to theupper fireback; the front doorsto the stove front; and thedoors to each other.If you need to change a gasket, first obtain an appropriatereplacement from your Vermont Castings’ AuthorizedDealer.Wait until the fire is out and the stove has cooled. Besure to follow the standard safety procedure for workingwith dusty materials: Wear safety goggles and a dustmask.The procedure for replacing gaskets is the same regardlessof the gasket location. Follow these steps:1. Remove the existing gasket by grasping an end andpulling firmly.2. Use a wire brush or the tip of a screwdriver to cleanthe channel of any remaining cement or bits of gasket.(Fig. 33) Remove stubborn deposits of cement with acold chisel if necessary.Fig. 33 Remove gasket then ST560 clean channel with wire brush.Removegasketgasket by laying it out in the channel. Allow an extra11/30/00 djt3. Determine the correct length of the appropriate-sized25-51 mm (1-2”), and mark the spot to be cut. (Fig. 34)4. Remove the gasket from the channel, place it on awood cutting surface, and cut it at the marked spot witha utility knife. Twist the ends slightly to keep the gasketfrom unraveling.ST561Fig. 34 Lay a bead of gasket cement then press gasket inplace.5. Lay an unbroken 3 mm (1/8”) bead of gasket cementin the newly-cleaned channel.6. Starting at one end, press the gasket into the channel.(Fig. 34) Ensure a good joint where the gasketmeets before trimming any excess. Do not overlap thegasket ends or leave ends with ragged edges.7. Press the gasketed part firmly against its normalmating surface to seat the gasket evenly in its channel.Close and latch the door to do this, or tap other partswith the rubber mallet (or hammer/block of wood).8. Clean any excess cement from around the channel,then let the cement that holds the new gasket drythoroughly.Adjust the Door If NecessaryThe stove’s door(s) may need adjustment after youhave regasketed it. Initially, it may require looseningto accommodate the new gasket; after a few weeks, itmay need tightening to compensate for compression ofthe new gasket. The directions for adjusting the doorsare on Page 20.200097121
Encore ® Multi-Fuel HeaterPermanent Encore Multi-Fuel GasketsOther gaskets form seals between non-moving parts,but these are not subject to the same wear and deteriorationas gaskets on moving parts. It is unlikely thatyou will ever need to replace these gaskets unless theinvolved parts are disassembled and then put backtogether. If this is the case, the job should be done onlyby a qualified service technician.5/16” diameter gasket seals the following parts:• The flue collar to the stove back• The lower fireback to the sidesThe Chimney SystemCreosoteYour Encore is designed to reduce creosote build-upsignificantly. However, regular chimney inspection andmaintenance must still be performed. For safety, goodstove performance, and to protect your chimney andchimney connector, inspect your chimney and chimneyconnector on a regular schedule. Clean the system ifnecessary. Failure to keep the chimney and connectorsystem clean can result in a serious chimney fire.When wood is burned slowly, it produces tar, organicvapors and moisture that combine to form creosote.The creosote vapors condense in the relatively coolchimney flue of a slow-burning fire. As a result, creosoteresidue accumulates on the flue lining. Whenignited, this creosote makes an extremely hot fire withinthe flue system that can damage the chimney andoverheat adjacent combustible material. If a significantlayer of creosote has accumulated —3 mm (1/8”) ormore — it should be removed to reduce the risk of achimney fire.If you do experience a chimney fire, act promptlyto:• Close the damper and thermostat lever.• Get everyone out of the house.• Call the Fire Department.You should inspect the system every two weeks duringthe heating season as part of a regular maintenanceschedule. To inspect the chimney, let the stove coolcompletely. Then, using a strong light, sight up throughthe flue collar into the chimney flue. If it is not possibleto inspect the flue system in this fashion, the stove mustbe disconnected to provide better viewing access.Clean the chimney using a brush the same size andshape as the flue liner. Flexible fiberglass rods are usedto run the brush up and down the liner, causing anydeposits to fall to the bottom of the chimney where theycan be removed through the clean-out door.Clean the chimney connector by disconnecting the sections,taking them outside, and removing any depositswith a stiff wire brush. Reinstall the connector sectionsafter cleaning, being sure to secure the joints betweenindividual sections with sheet metal screws.If you cannot inspect or clean the chimney yourself,contact your local Vermont Castings’ Dealer or a professionalchimney sweep.Annual MaintenanceEvery Spring, at the end of the heating season, performa thorough cleaning, inspection and repair:Thoroughly clean the chimney and chimney connector.• Inspect the chimney for damage and deterioration.Replace weak sections of prefabricated chimney.Have a mason make repairs to a masonry chimney.• Inspect the chimney connector and replace anydamaged sections.• Check gasketing for wear or compression, and replaceif necessary.• Inspect and clean the catalytic element, and vacuumout the ash at the bottom of the back plate after removingthe lower fireback. Lightly clean the refractoryassembly that houses the element but be carefulnot to damage the refractory material, which is veryfragile.• Check door and damper handles for tightness. Adjustif needed.• Check heat shield screws. Tighten as necessary.• Clean dust from the inner sides of bottom, rear andconnector heat shields.• Remove ashes from the ash pan and replace withmoisture absorbing material (such as cat litter) tokeep the stove interior dry.• Touch up the paint on black stoves.222000971
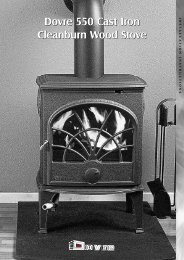
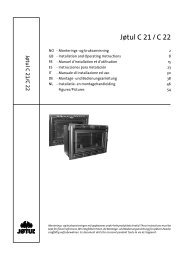
Encore ® Multi-Fuel Heater1274658101211313621310141592527661116266120191817219232229 313233303424595328655752645654553633383539374850414940456043425264 515857MHSC reserves the right to make changes in design, materials, specifications, prices and discontinue colors and products at any time, withoutnotice.Encore Multi-Fuel HeaterModel 2547CE460971Encore MF parts9/02item Description part Number item Description part Number1. Secondary Air Cover Plate 16017712. Flue Collar (8”) See Chart Pg. 283. Back See Chart Pg. 28444. Left Griddle Quad (Pre-2010) 13018074a. Left Griddle Quad 3000511847630971200097123
Encore ® Multi-Fuel HeaterEncore Multi-Fuel HeaterModel 2547CE (continued)item Description part Number item Description part Number5. Right Griddle Quad (Pre-2010) 13018325a. Right Griddle Quad 300051196. Griddle 13007977. Griddle Handle Assembly 300027758. Top See Chart Pg. 289. Wedge (2) 130181010. Upper Fireback 1 130863911. Flue Deflector 140908312. Damper 1 130863113. Damper Tabs (2) 1 160148814. Damper Rod 160085115. Combustion Throat Hood 130862516. Lower Fireback 130864617. Damper Handle Screw 120129418. Damper Handle 160062019. Handle Insert 3000271420. Steel Handle Stub 3000272021. Left Side See Chart Pg. 2822. Left Air Plate (Inner Side) 130862123. Left Firebrick 160188524. Right Air Plate (Inner Side) 130862225. Right Side See Chart Pg. 2826. Right Firebrick 160188427. Thermostat Handle Assembly 3000271628. Thermostat Assembly 500547029. Bottom Grate 130743430. Front Grate 130864031. Primary Air Tube Cover Plate 130860932. Primary Air Frame 130741133. Primary Air Regulatory System 500033734. Bottom 130863835. Ashlip See Chart Pg. 2836. Leg See Chart Pg. 2837. Leg Leveler 120174538. Ashdrop 130860339. Pawl Assembly Short Adjustment 3000236240. Ashdoor 130860741. Ashdoor Handle (wood) 160066342. Ashdoor Hinge Pin 120860843. Cotter Pin, Ashdoor 3000174944. Ashdoor Hinge Support 130860545. Ashpan 160102546. Ashpan Bracket 160103947. Ashpan Cover 160102748. Airwash Manifold 130861549. Front See Chart Pg. 2850. Left Door Air Manifold 130740351. Left Door See Chart Pg. 2852. Door Hinge Strip 130863453. Right Door Air Manifold 130740454. Door Handle Assy w/Set Screw 3000272155. Right Door See Chart Pg. 2856. Door Gasket 120358857. Gasket, Fiberglass 3/16” 120355658. Left Door Glass 2 140863059. Right Door Glass 2 140862960. Door Latch 140862861. Spacer 120177962. Damper Ramp 1 130181163. Slicer/Poker 500570864. Long Hinge PIns (4) 160045765. SS, SOC 7/16-20 x 1, Cup Pt. Blk 120033466. Rear Insulation 300040641. Included in #5008649 upper fireback assembly.2. Not interchangeable due to a heat-reflective coatingon the room side of the panels.242000971
Encore ® Multi-Fuel HeaterEncore Multi-Fuel HeaterModel 2547CE (continued)Shell Enamel Parts - Encore Multi-Fuel Model 2547CEPart Name Classic Green Moonlight Sand Red BlueTop 1308618 2318618 2378618 1328618 2328618 1338618Left Side 1308623 2318623 2378623 1328623 2328623 1338623Right Side 1308619 2318619 2378619 1328619 2328619 1338619Flue Collar 1304280 2314280 2374280 1324280 2324280 1334280Front 1308635 2318635 2378635 1328635 2328635 1338635Ashlip 1307406 2317406 2377406 1327406 2327406 1337406Left DoorSubassembly 5008648 30001150 30001345 30001146 30001144 30001148Left Door Only 1308637 2318637 2378637 1328637 2328637 1338637Right DoorSubassembly 5008647 30001149 30001344 30001145 30001143 30001147Right Door Only 1308636 2318636 2378636 1328636 2328636 1338636Single Leg 1307427 2317427 2377427 1327427 2327427 1337427Back 1308620 2318620 2378620 1328620 2328620 1338620200097125
Encore ® Multi-Fuel Heater262000971
Encore ® Multi-Fuel HeaterWarrantyLimited 3 Year WarrantyMHSC warrants that this woodburning stove will be free ofdefects in material and workmanship for a period of threeyears from the date you receive it, except that the catalyst,thermostat assembly, handles, glass door panels, cement,and gasketing shall be warranted as described below.MHSC will repair or replace, at its option, any part found to bedefective upon inspection by a MHSC Authorized Dealer. Thecustomer must return the defective part or the stove, with shippingprepaid, to the Authorized Dealer or pay for any AuthorizedDealer in-home travel fees or service charges for in-home repairwork. It is the dealer’s option whether the repair work will bedone in the customer’s home or in the dealer’s shop. If, uponinspection, the damage is found to be the fault of the manufacturer,repairs will be authorized at no charge to the customer forparts and/or labor.Any woodburning stove or part thereof that is repaired orreplaced during the limited warranty period will be warrantedunder the terms of the limited warranty for a period not toexceed the remaining term of the original limited warranty or six(6) months, whichever is longer.Limited 1 Year WarrantyThe following parts of the woodburning stove are warranted tobe free of defects in material and workmanship for a period ofone year from the date you receive it: The thermostat assembly,handles, glass door panels, cement, and gasketing. Any ofthese items found to be defective will be repaired or replaced atno charge, upon the return of the part with postage prepaid to aMHSC Authorized Dealer.Any part repaired or replaced during the limited warranty periodwill be warranted under the terms of the limited warranty for aperiod not to exceed the remaining term of the original limitedwarranty or six (6) months, whichever is longer.Exclusions & Limitations1. This product must be installed or serviced by a qualified installer,preferably NFI or WETT (Canada) certified, as prescribed by the localjurisdiction. It must be installed and operated at all times in accordancewith the Installation and Operating instructions furnished with theproduct. Any alteration, willful abuse, accident, or misuse of the productshall nullify this warranty.2. This warranty is transferable; however, proof of original retailpurchase is required.3. This warranty does not cover misuse of the this stove.Misuse includes overfiring which will result if the stove is usedin such a manner as to cause one or more of the plates toglow red. Overfiring can be identified later by warped platesand areas where the paint pigment has burned off. Overfiringin enamel fireplaces is identified by bubbling, cracking, chippingand discoloration of the porcelain enamel finish. MHSCoffers no warranty on chipping of enamel surfaces. Inspect yourwoodburning stove prior to accepting it for any damage to theenamel.4. This warranty does not cover misuse of the stove as describedin the Owner’s Guide, nor does it cover any stove whichhas been modified unless authorized by a MHSC representativein writing. This warranty does not cover damage to the stovecaused by burning salt saturated wood, chemically treatedwood, or any fuel not recommended in the Owner’s Guide.5. This warranty does not cover a stove repaired by someoneother than a MHSC Authorized Dealer.6. Damage to the unit while in transit is not covered by thiswarranty but is subject to a claim against the common carrier.Contact MHSC Authorized Dealer from whom you purchasedyour stove or MHSC if the purchase was direct. (Do not operatethe stove as this may negate the ability to process the claimwith the carrier.)7. Claims are not valid where the installation does not conformto local building and fire codes or, in their absence, to the recommendationsin our Owner’s Guide.8. The salt air environment of coastal areas, or a high-humidityenvironment, can be corrosive to the porcelain enamel finish.These conditions can cause rusting of the cast iron beneath theporcelain enamel finish, which will cause the porcelain enamelfinish to flake off. This warranty does not cover damage causedby a salt air or high-humidity environment.9. MHSC shall have no obligation to enhance or update any unitonce manufactured.IN NO EVENT SHALL MHSC BE LIABLE FOR INCIDENTALAND CONSEQUENTIAL DAMAGES. ALL IMPLIED WAR-RANTIES, INCLUDING THE IMPLIED WARRANTIES OFMERCHANTABILITY AND FITNESS, ARE LIMITED TO THEDURATION OF THIS WRITTEN WARRANTY. THIS WAR-RANTY SUPERCEDES ALL OTHER ORAL OR WRITTENWARRANTIES.Some states do not allow the exclusion or limitations of incidentialand consequential damages or limitations on how long animplied warranty lasts, so the above limitations may not apply toyou. This warranty gives you specific rights and you may haveother rights which vary from state to state.How to Obtain ServiceIf a defect is noted within the warranty period, the customershould contact a MHSC Authorized Dealer or MHSC if the purchasewas direct with the following information:1. Name, address, and telephone number of the purchaser.2. Date of purchase.3. Serial number from the label on the back.4. Nature of the defect or damage.5. Any relevant information or circumstances, e.g., installation,mode of operation when defect was noted.A warranty claim will then start in process. MHSC reserves theright to withhold final approval of a warranty claim pending avisual inspection of the defect by authorized representatives.200097127
MHSC149 Cleveland Drive • Paris, Kentucky 40361www.mhsc.com