Product manual (part 1 of 2), procedures - Technology
Product manual (part 1 of 2), procedures - Technology
Product manual (part 1 of 2), procedures - Technology

You also want an ePaper? Increase the reach of your titles
YUMPU automatically turns print PDFs into web optimized ePapers that Google loves.
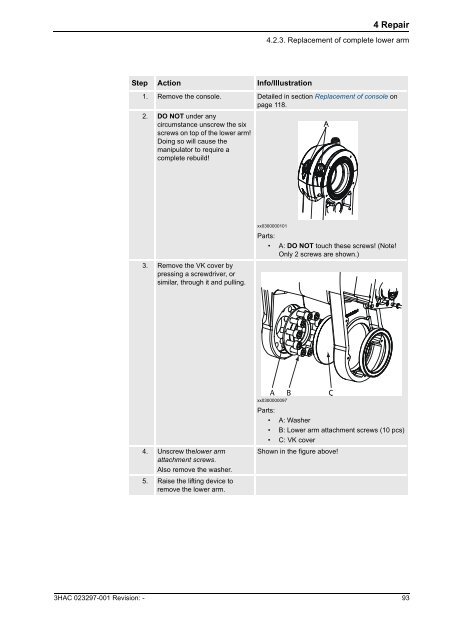
4 Repair<br />
4.2.3. Replacement <strong>of</strong> complete lower arm<br />
Step Action Info/Illustration<br />
1. Remove the console. Detailed in section Replacement <strong>of</strong> console on<br />
page 118.<br />
2. DO NOT under any<br />
circumstance unscrew the six<br />
screws on top <strong>of</strong> the lower arm!<br />
Doing so will cause the<br />
manipulator to require a<br />
complete rebuild!<br />
3. Remove the VK cover by<br />
pressing a screwdriver, or<br />
similar, through it and pulling.<br />
xx0300000101<br />
Parts:<br />
• A: DO NOT touch these screws! (Note!<br />
Only 2 screws are shown.)<br />
4. Unscrew thelower arm<br />
attachment screws.<br />
Also remove the washer.<br />
5. Raise the lifting device to<br />
remove the lower arm.<br />
xx0300000097<br />
Parts:<br />
• A: Washer<br />
• B: Lower arm attachment screws (10 pcs)<br />
• C: VK cover<br />
Shown in the figure above!<br />
3HAC 023297-001 Revision: -<br />
93