Import Lines from a DXF File.pdf - Hypack
Import Lines from a DXF File.pdf - Hypack
Import Lines from a DXF File.pdf - Hypack

You also want an ePaper? Increase the reach of your titles
YUMPU automatically turns print PDFs into web optimized ePapers that Google loves.
<strong>Import</strong> <strong>Lines</strong> <strong>from</strong> a <strong>DXF</strong> <strong>File</strong><br />
By Roy Goyette<br />
If you have already used another program to create planned lines in <strong>DXF</strong> format, there’s no<br />
need to recreate your line files in HYPACK®. HYPACK®, has long had the ability to export<br />
planned lines <strong>from</strong> a <strong>DXF</strong>, but we still get several calls about it every month so I thought a<br />
refresher might be in order.<br />
First, some things you need to know before you begin to use this feature of HYPACK®.<br />
For 2 D <strong>Lines</strong>:<br />
• <strong>DXF</strong> file must be created with planned lines on its own designated layer.<br />
• You are only allowed 2 waypoints per line.<br />
For 3D <strong>Lines</strong>:<br />
For 3D <strong>Lines</strong> we also have some rules to follow.<br />
• You must have a <strong>DXF</strong> file with Planned <strong>Lines</strong> (2D or 3D polylines) on a distinct layer.<br />
• The Centerline (3D), Left Toe Line, Left Top of Slope, Right Toe Line, Right Top of Bank<br />
must each be on a distinct layer.<br />
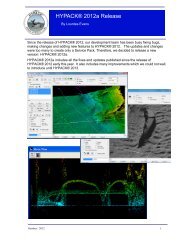
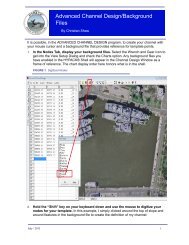
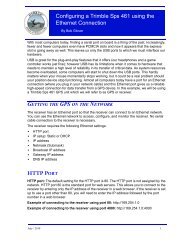
FIGURE 1. Example of a <strong>DXF</strong> file with Planned <strong>Lines</strong>, Loaded as a Background <strong>File</strong> in the<br />
HYPACK® Shell<br />
1. Load the <strong>DXF</strong> file into HYPACK® as a background file.<br />
a. Right-click on the Background files folder and select ADD FILE AND COPY-<strong>DXF</strong><br />
FILES.<br />
b. Select your <strong>DXF</strong> file and click [Open]. This will copy the file to your project file and<br />
display it in the current project.<br />
Now that we have a <strong>DXF</strong> file with planned line information to work with we’re ready to begin<br />
the export.<br />
February / 2011 1
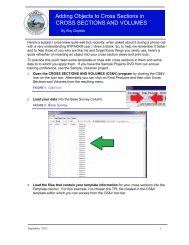
2. Launch the <strong>DXF</strong> TO LNW program. In the Background<br />
<strong>File</strong>s list, right-click on the <strong>DXF</strong> file that contains your<br />
planned line information and select the ‘Export to LNW’<br />
choice. The <strong>DXF</strong> TO LNW dialog will open listing all the<br />
layers found in the <strong>DXF</strong> file.<br />
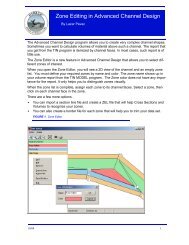
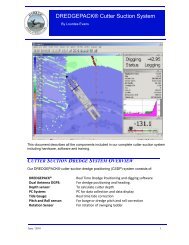
3. Tell HYPACK® which layer contains the planned<br />
lines. In our example, CAD user who created the <strong>DXF</strong><br />
file was nice to us and named the layer ‘Planned <strong>Lines</strong>’.<br />
a. Right-click on the Planned <strong>Lines</strong> layer in the<br />
listing. The layer name will be highlighted and a popup<br />
menu will appear.<br />
b. Select ‘Planned <strong>Lines</strong>’ to identify the highlighted<br />
layer. In this case, it is Planned <strong>Lines</strong>.<br />
FIGURE 2. Identifying the Planned Line Layer in <strong>DXF</strong> TO LNW<br />
Note: If this were a 3D file, you need to identify the<br />
layer for each channel line in the same<br />
manner.<br />
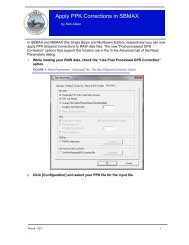
4. Set the export options.<br />
• Starting chainage will default to 0. If yours is<br />
different, simply type the starting chainage in the<br />
correct field.<br />
• Naming Scheme you have three choices, use<br />
the drop down to make a selection.<br />
• Export Format: Indicate what the export result<br />
will be. Is it just Planned <strong>Lines</strong>? Is it Planned<br />
lines with a Template? Or is it just Channel<br />
<strong>Lines</strong>?<br />
In our example, it’s simply Planned <strong>Lines</strong> so we<br />
select ‘Planned <strong>Lines</strong> Only’.<br />
5. Click [Export] . The Save As window will open<br />
giving you a chance to name your file. Give your file<br />
a meaningful name and click [Save]. A HYPACK®<br />
Planned Line file will be generated based on the<br />
information in the <strong>DXF</strong> file.<br />
2