download assembly guidelines - Ashford Handicrafts
download assembly guidelines - Ashford Handicrafts
download assembly guidelines - Ashford Handicrafts

Create successful ePaper yourself
Turn your PDF publications into a flip-book with our unique Google optimized e-Paper software.
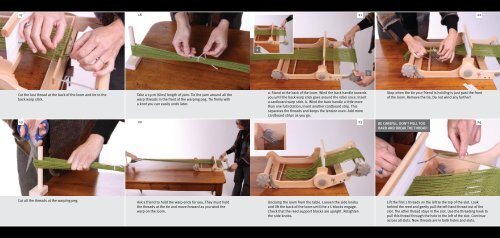
17 18 21 22<br />
a<br />
b<br />
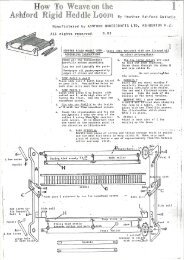
Cut the last thread at the back of the loom and tie to the<br />
back warp stick.<br />
Take a 15cm (6ins) length of yarn. Tie the yarn around all the<br />
warp threads in the front of the warping peg. Tie firmly with<br />
a knot you can easily undo later.<br />
a. Stand at the back of the loom. Wind the back handle towards<br />
you until the back warp stick goes around the roller once. Insert<br />
a cardboard warp stick. b. Wind the back handle a little more<br />
than one full rotation, insert another cardboard strip. This<br />
separates the threads and keeps the tension even. Add more<br />
cardboard strips as you go.<br />
Stop when the tie your friend is holding is just past the front<br />
of the loom. Remove the tie. Do not wind any further!<br />
19 20 23<br />
BE CAREFUL. DON'T PULL TOO<br />
24<br />
HARD AND BREAK THE THREAD!<br />
Cut all the threads at the warping peg.<br />
Ask a friend to hold the warp ends for you. They must hold<br />
the threads at the tie and move forward as you wind the<br />
warp on the loom.<br />
Unclamp the loom from the table. Loosen the side knobs<br />
and lift the back of the loom until the 2 L blocks engage.<br />
Check that the reed support blocks are upright. Retighten<br />
the side knobs.<br />
Lift the first 2 threads on the left to the top of the slot. Look<br />
behind the reed and gently pull the left hand thread out of the<br />
slot. The other thread stays in the slot. Use the threading hook to<br />
pull this thread through the hole to the left of the slot. Continue<br />
across all slots. Now threads are in both holes and slots.