
Create successful ePaper yourself
Turn your PDF publications into a flip-book with our unique Google optimized e-Paper software.
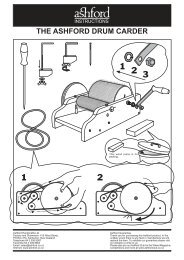
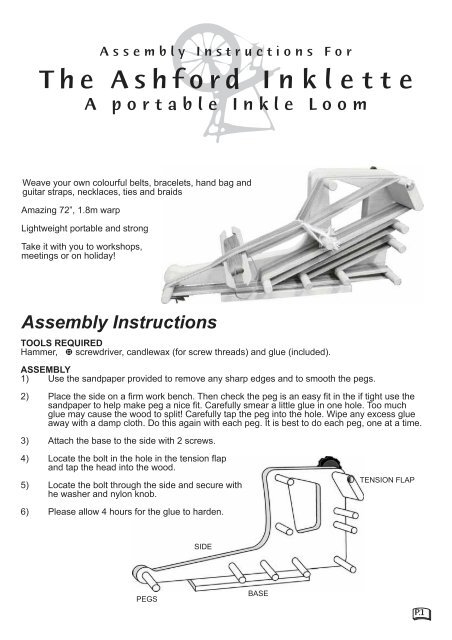
Assembly Instructions For<strong>The</strong> <strong>Ashford</strong> Inkl ett eA portable Inkle LoomWeave your own colourful belts, bracelets, hand bag andguitar straps, necklaces, ties and braidsAmazing 72”, 1.8m warpLightweight portable and strongTake it with you to workshops,meetings or on holiday!Assembly InstructionsTOOLS REQUIREDHammer, screwdriver, candlewax (for screw threads) and glue (included).ASSEMBLY1) Use the sandpaper provided to remove any sharp edges and to smooth the pegs.2) Place the side on a firm work bench. <strong>The</strong>n check the peg is an easy fit in the if tight use thesandpaper to help make peg a nice fit. Carefully smear a little glue in one hole. Too muchglue may cause the wood to split! Carefully tap the peg into the hole. Wipe any excess glueaway with a damp cloth. Do this again with each peg. It is best to do each peg, one at a time.3) Attach the base to the side with 2 screws.4) Locate the bolt in the hole in the tension flapand tap the head into the wood.5) Locate the bolt through the side and secure withhe washer and nylon knob.TENSION FLAP6) Please allow 4 hours for the glue to harden.SIDEPEGSBASEP.1
WARPING AND WEAVING INSTRUCTIONSWARP LENGTH: 1 .8m - 72” MAX WARP WIDTH: 40mm - 1 1/2”INKLE BANDS <strong>The</strong>se colourful bands are very strong and have many uses. <strong>The</strong>y make belts, ties,guitar straps, braiding for homespun’s and trims for joining pieces of weaving. <strong>The</strong>y have a dominantwarp face, ie the warp threads show. <strong>The</strong> weft thread is not visible except at the selvedge.THREADS TO USE Use strong, smooth and colourful threads. Mercerised cotton is good. Mostwool is suitable but avoid wool that is soft or hairy. (<strong>The</strong>se tend to cling to each other and make itdifficult to obtain a clean open shed). Textured and metallic threads, silk and nylon add variety. Beexperimental, but make sure all threads have about the same amount of elasticity, otherwise thesurface will be uneven.WIDTH OF WARP Because the weft thread is pulled tight, the inkle band will be reduced to abouthalf the original width of the warp. However, if you want to increase or decrease the width at anystage, this is done by the amount of tension on the weft thread.SHUTTLE A shuttle with a sharp edge for beating is included in the kit.TENSION FLAP This flap is used to keep the warp under tension when weaving. When moving theweaving around the loom, loosen the flap to release the tension. Use two hands to advance the warp.When using a full length warp take care to move the weaving little by little. Do not pull too tight, youcould break a peg!FINISHING THE FRINGE Darn in the last weft thread. Warp ends may be tied insmall overhand knots. Using both hands, twist the bundles of threads to the right,between thumb and finger, then wrap these twisted threads together in oppositedirection <strong>The</strong> inkle band fringe may also be finished by twisting or braiding.WARPING THE LOOM- Choose the length of inkle band you want, from the short warp to long warp.- Set the position of the tension flap prior to warping as illustrated.- Tie the warp thread to the front peg with a temporary knot- Colour change. Always tie the last thread to the next thread at the front peg.SHORT WARPStart and change colours hereP.2
LONG WARPROUND 1- Take the warp thread directly to the tension flap as illustratedROUND 2- Take the warp thread over the top pegand over the tension flapRound 2leashpegsRound 1Repeat Round 1 and Round 2 until the desired warp width is achieved. If you have a multicolouredwarp, add one extra Round 1. Also, tie the first thread of the new colour to the last thread maintainingthe same tension as the rest of the warp. On wider warps cut and tie when you change colours.MAKING THE LEASHESUse string or fine strong cotton. Wind the string around the two leash pegs as shown.Cut the string as shownFold each leash in half and tie a knot 1cm (3/8”) from the end.P.3
Attach a leash to all the top threads between each open(centre) thread.Keep the knot for the leash under each leash peg.MAKING THE SHED<strong>The</strong> shed is the space between the two layers of warp and is obtained by the use of leashes.A thread NOT going through a leash is called an “open” thread.Shed 1 Is made by lifting all the open threadsShed 2 Is made by pushing down all the open threadsCHANGING SHEDSTo get the best shed, push down or lift up the threads with your fingers close behind the leashes.SHED 1 SHED 2SHUTTLEWind the weft thread onto the shuttle which is usually the same colour as the edge threads.P.4
WEAVINGMake Shed 1. Pass the shuttle into the space between the threads. Pull the shuttle firmly downtowards the front peg. Pull the shuttle out of the shed - pull the weft thread tightly. <strong>The</strong> weft threadswill move together closely so you cannot see the weft at all through the warp.- Make shed 2 and repeat.TIGHTEN THE WARP BY ADJUSTING THE TENSION FLAPKEEPING THE EDGES STRAIGHT<strong>The</strong> first 2-3cm usually look poor because the tension isn’t right yet, and you may have some crossedthreads. Don’t worry! This part can be unravelled when the finished braid is cut off the loom.From now on though, it’s possible to keep the edges beautifully straight by followings simple rules:1) Keep the warp very tight. A high tensionmakes the whole braid and edges lookbetter when finished.2) Try to keep the same tension on the weftas well. Make it quite tight so that thewarp threads sit on top of each other.3) Everytime you pull the shuttle out of theshed, and before you tighten the weft,pull the previous weft thread again. Thatwill even out the little loop that occursbetween the two outer warp threads,which is essential when it comes tomaking even edges.MOVING THE WARPLoosen the nylon knob and move the tension flap down. <strong>The</strong> warp will slacken. Pull the warp forwardstowards yourself until the end of the woven piece is about 5cm, 2” from the front peg. Gradually moveall the threads around from peg to peg! TAKE CARE when you are using the longest warp length!Do not pull too tight, you could break a peg! Tighten the tension flap. PUSH the leashes back to theircorrect position.FINISHINGWhen you can’t move the warp any further and the knots in the warp are close to the leashes, simplycut each half of the warp 3cm, 1 1/2” behind the leashes and pull the threads out.Sew the weft back three or four rows to lock it. Now the warp threads cannot come undone unlessyou cut it very close to the end of the braid. So, don’t do that!Let the ends hang loose as a fringe, plait, twist, tie knots, glue and cut close to the braid so you canfold the end of it under, or tie the ends around a piece of wood to make a wall-hanging. P.5
PROJECTSNO. 1 INKLE BANDThis is a good starter project.Make your first project a short warp.Stripes of different colours and an area of alternating colours create a pattern that will teach you howwarp-faced patterns work.Use colours of high contrast to make the pattern stand out.Use 5/2 or 10/2 cotton or size 5 or 10 crochet cotton.When you have finished your first pieces, try a 20/2 or 30/2 silk for a fine band with a beautiful sheen.This pattern has 49 ends and will require 24 leashes.To help the threading there is a line dividing each colour group.X and O are different colours. You can do just 2 colours or a different colour in each group.Join the ends when changing colours as you make the warp.TOP LEASH/THREADOPEN LOWER/THREADX X O O X X O O O O O X X O O O O O X X O O X XX X O O X X X X X O O X X X O O X X X X X O O X XCENTRETHREADUse the same colour at the selvedge and for your weft. This will allow the weft to blend in.To make a heavier band use a thicker thread for the weft.NO. 2 WEAVING WITH WIRE.A BRACLETThis is a fun way to try something really different on your little <strong>Inklette</strong>.Use 26 gauge craft wire and warp around the circumference of the outer pegs.This is the short warp shown in the warping instructions.Make a warp with 17 ends. This pattern will require 8 leashes.Weave with the same wire.It will feel very stiff after weaving with cotton.Weave for approx 20cm ( 8 inches )Cut the ends using a pair of wire cutters ( non-jewellery )Use a pair of nylon jaw pliers (sometimes called "soft-jawed") to fold over the ends.Allow a good grip when folding the ends over without damaging the surface of the wire.<strong>The</strong> Bracelet will bend into place around your wrist.Acknowledgement. Our thanks to Robyn Spady a teacher and fiber artist for her enthusiasm andencouragement to develop this wonderful <strong>Inklette</strong> and for her gift of patterns.415 West Street, PO Box 474 Ashburton, New ZealandPhone: (64 3) 308-9087 Fax: (64 3) 308-8664Website: www.ashford.co.nz email: sales@ashford.co.nzP.6