download assembly guidelines - Ashford Handicrafts
download assembly guidelines - Ashford Handicrafts
download assembly guidelines - Ashford Handicrafts
- No tags were found...

Create successful ePaper yourself
Turn your PDF publications into a flip-book with our unique Google optimized e-Paper software.
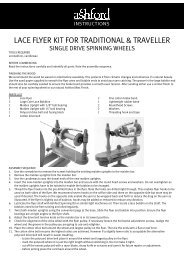
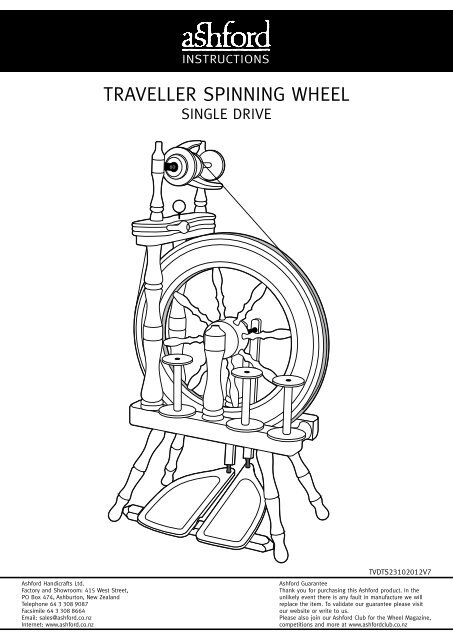
INSTRUCTIONSTRAVELLER SPINNING WHEELSINGLE DRIVE<strong>Ashford</strong> <strong>Handicrafts</strong> Ltd.Factory and Showroom: 415 West Street,PO Box 474, Ashburton, New ZealandTelephone 64 3 308 9087Facsimile 64 3 308 8664Email: sales@ashford.co.nzInternet: www.ashford.co.nzTVDTS23102012V7<strong>Ashford</strong> GuaranteeThank you for purchasing this <strong>Ashford</strong> product. In theunlikely event there is any fault in manufacture we willreplace the item. To validate our guarantee please visitour website or write to us.Please also join our <strong>Ashford</strong> Club for the Wheel Magazine,competitions and more at www.ashfordclub.co.nz
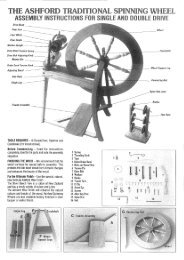
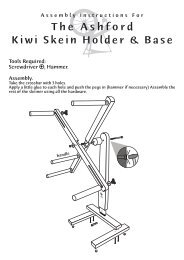
ASSEMBLY INSTRUCTIONS FOR THE ASHFORD TRAVELLER SPINNINGWHEEL -Single Drive-Tools RequiredBefore commencing, please read these instructions completely, identify the parts and note the <strong>assembly</strong> sequence.Remove any sharp corners or edges and smooth the surface of the wood with the sand paper provided. Werecommend that the wood surfaces be waxed or sealed before <strong>assembly</strong>. This protects the kiln dried wood from theclimatic changes and prevents it getting dirty or stained. The Silver Beech tree is a native of New Zealand and has alovely variety of colour and grain. For a silky smooth matt finish, use the <strong>Ashford</strong> Wax Finish to enhance the naturalcolours and character of this timber.If you are assembling your spinning wheel on a table, we recommend you protect the surface with a towel, blanketor cardboard. <strong>Ashford</strong> spinning wheels are also available factory finished in clear lacquer.Meaning of SymbolsCheck hardware againstfull size illustration.To make <strong>assembly</strong> easier use candlewax on the screws and hooks.Check the directions carefully.RightWrongWhen you use the allen key, make sureit is at 90 degrees and is at the bottomof the holeIf the hook is hard to turn use the allen key.Traveller Single Drive Spinning Wheel - Hardware Listx 2 x 2 x 4 x 4 x 2 x 1 x 13 x 1x 1 x 2x 2x 4x 2x 1x 1x 2x 1x 3
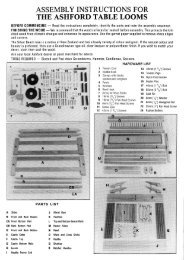
Traveller Single Drive Spinning Wheel - Parts ListFlyer Maiden Bar Maid UprightsAdjusting Knob Tension Knob Treadle AssemblyBaseLegs - 2 with holes& 2 withoutWheel SupportsConrods & Crank Wheel Maiden Bar SupportsTop Rail4 X Bobbins
Thread 12 hooks into the flyer.Secure the 2 hinges tothe maiden bar.Note the position ofthe slot in the hinge.Assemble the flyer unit.Check the shape of thenylon bearing on eachmaid upright, then insertinto the correct hole.Insert the drive beltadjusting knob into themaiden bar, turn until theend just protrudes.
Check the angle of nylon bearingsand then secure the maid uprightswith screws and washers. Do not overtighten. The maid uprights may betwisted to remove the bobbin. Thread the screw eye into the side of the maiden bar.Slide a bobbin onto the flyer and the flyerinto the bearings. Thread the screw hookinto the opposite side.Attach the brake band.Thread it through thescrew eye and then tiethe springs as illustrated.
Put the brake band over the grooved end ofthe bobbin. Do not over stretch springs.Note the holes in the base for the maiden barsupports are on the left hand side.Wax the steel rods in the treadle rail.
Locate the treadle rail into theholes in 2 legs. Check the treadlerail rotates freely. Then tap theselegs to the bottom of the holes.Tap the other legs to thebottom of the holes.Secure the 4 legs with screws.
Turn the base and legs over.Note the hole in onewheel support is rightthrough. This is therear support.Secure the front and rearwheel supports with boltsand barrel nuts. These will betightened after the next step.
Check the alignment ofthe holes for the crank.Tighten the bolts from underneath.
Insert the polyurethaneconrod joints into theend of the conrods.Place the wheel in positionand insert the crank shaft.Align the hole in the crankshaft with the groove ofthe hub. Check the wheelis parallel in the centre ofthe base and the wheelsupports are tight againstthe hub. If not, loosen thebolts, adjust the wheelsupports and retighten.
Rotate the hub pin untilit is a firm fit in the slotin the hub. Then tap thehub pin through the huband crank.Hint: Use a Lazy Katepin as a punch to avoiddamaging the hub.Slide the inner shell of the conroduniversal joint onto the crank until itclicks into the groove. Then click thefront conrod onto the universal jointon the crank.
Secure the top rail to themaiden bar supports with2 screws.Secure the flyer unit to the top rail with 2 screws. These will betightened shortly. Move the flyer unit until the wheel and middleflyer pulley are aligned. Then tighten the screws and position thedrawing pin directly beneath the drive band adjusting knob toprevent it marking the wood.X2
Tie the threadinghook to the frontmaid uprightwith tape.Ratios - You may find it easier tospin a finer yarn if your flyer rotatesfaster. To change ratio simply movethe drive belt to a smaller flyerpulley and retension the drive belt.Check the end of theadjusting knob is notprotruding beneath themaiden bar. Then placethe drive belt aroundthe wheel and largeflyer pulley.
Tie drive belt and cutoff the extra. Tap thesteel lazy kate pinsinto the base.CHECK!Oil all points on theSpinning Wheel beforeuse as illustrated.
<strong>Ashford</strong> <strong>Handicrafts</strong> Ltd.Factory and Showroom: 415 West Street,PO Box 474, Ashburton, New ZealandTelephone 64 3 308 9087Facsimile 64 3 308 8664Email: sales@ashford.co.nzInternet: www.ashford.co.nz<strong>Ashford</strong> GuaranteeThank you for purchasing this <strong>Ashford</strong> product. In theunlikely event there is any fault in manufacture we willreplace the item. To validate our guarantee please visitour website or write to us.Please also join our <strong>Ashford</strong> Club for the Wheel Magazine,competitions and more at www.ashfordclub.co.nz