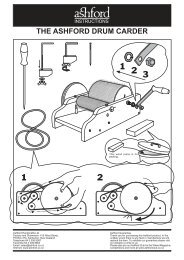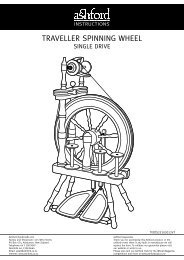
download assembly guidelines - Ashford Handicrafts
download assembly guidelines - Ashford Handicrafts
download assembly guidelines - Ashford Handicrafts
- No tags were found...

You also want an ePaper? Increase the reach of your titles
YUMPU automatically turns print PDFs into web optimized ePapers that Google loves.
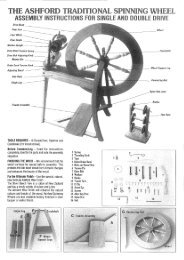
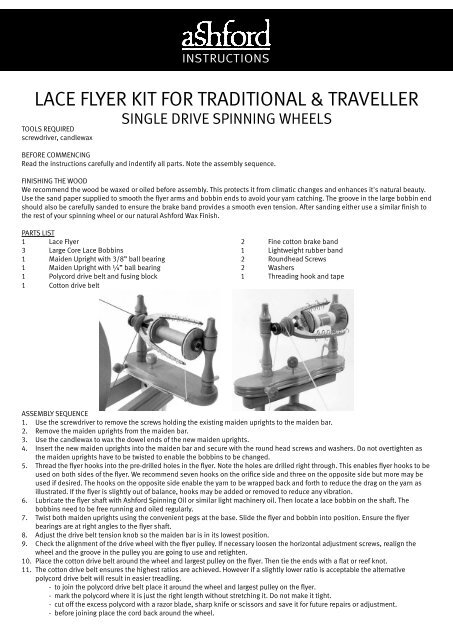
INSTRUCTIONSLACE FLYER KIT FOR TRADITIONAL & TRAVELLERSINGLE DRIVE SPINNING WHEELSTOOLS REQUIREDscrewdriver, candlewaxBEFORE COMMENCINGRead the instructions carefully and indentify all parts. Note the <strong>assembly</strong> sequence.FINISHING THE WOODWe recommend the wood be waxed or oiled before <strong>assembly</strong>. This protects it from climatic changes and enhances it's natural beauty.Use the sand paper supplied to smooth the flyer arms and bobbin ends to avoid your yarn catching. The groove in the large bobbin endshould also be carefully sanded to ensure the brake band provides a smooth even tension. After sanding either use a similar finish tothe rest of your spinning wheel or our natural <strong>Ashford</strong> Wax Finish.PARTS LIST1 Lace Flyer 2 Fine cotton brake band3 Large Core Lace Bobbins 1 Lightweight rubber band1 Maiden Upright with 3/8” ball bearing 2 Roundhead Screws1 Maiden Upright with ¼” ball bearing 2 Washers1 Polycord drive belt and fusing block 1 Threading hook and tape1 Cotton drive beltASSEMBLY SEQUENCE1. Use the screwdriver to remove the screws holding the existing maiden uprights to the maiden bar.2. Remove the maiden uprights from the maiden bar.3. Use the candlewax to wax the dowel ends of the new maiden uprights.4. Insert the new maiden uprights into the maiden bar and secure with the round head screws and washers. Do not overtighten asthe maiden uprights have to be twisted to enable the bobbins to be changed.5. Thread the flyer hooks into the pre-drilled holes in the flyer. Note the holes are drilled right through. This enables flyer hooks to beused on both sides of the flyer. We recommend seven hooks on the orifice side and three on the opposite side but more may beused if desired. The hooks on the opposite side enable the yarn to be wrapped back and forth to reduce the drag on the yarn asillustrated. If the flyer is slightly out of balance, hooks may be added or removed to reduce any vibration.6. Lubricate the flyer shaft with <strong>Ashford</strong> Spinning Oil or similar light machinery oil. Then locate a lace bobbin on the shaft. Thebobbins need to be free running and oiled regularly.7. Twist both maiden uprights using the convenient pegs at the base. Slide the flyer and bobbin into position. Ensure the flyerbearings are at right angles to the flyer shaft.8. Adjust the drive belt tension knob so the maiden bar is in its lowest position.9. Check the alignment of the drive wheel with the flyer pulley. If necessary loosen the horizontal adjustment screws, realign thewheel and the groove in the pulley you are going to use and retighten.10. Place the cotton drive belt around the wheel and largest pulley on the flyer. Then tie the ends with a flat or reef knot.11. The cotton drive belt ensures the highest ratios are achieved. However if a slightly lower ratio is acceptable the alternativepolycord drive belt will result in easier treadling.- to join the polycord drive belt place it around the wheel and largest pulley on the flyer.- mark the polycord where it is just the right length without stretching it. Do not make it tight.- cut off the excess polycord with a razor blade, sharp knife or scissors and save it for future repairs or adjustment.- before joining place the cord back around the wheel.
- hold the two ends close to the base of the flame of a candle or gas cigarette lighter until the ends start to melt. The flame atthe base iscleaner and results in a clear joint.- then quickly press the ends tightly together in the groove in the wooden fusing block. Hold firmly for about 30seconds or until the polycord has cooled.- use a razor blade or nail clippers to trim off the excess material around the joint.- adjust the tension knob so the polycord tension is as loose as possible without actually slipping.12. Remove the existing brake band from the tension knob and replace it with the new fine cotton band. Locate it over the largebobbin pulley and tie to the lightweight rubber band. Twist the tension knob to obtain the desired brake tension. Generally forbest results the rubber band should only just start to stretch.NOMINAL TRAD. RATIOSCotton Drive BeltPolycord Drive Belt40:130:1NOMINAL TRAVELLER RATIOSCotton Drive BeltPolycord Drive Belt25:130:130:125:121:124:120:118:115:116:115:114:111:112:1Lace Bobbinwith Large CoreSPECIAL FEATURES OF YOUR NEW LACE FLYERYou can spin Cotton, Angora, wool, silk and other exotic fibres into fine high twist- Large core bobbin ensures gentle take up of the yarn- Maiden uprights with ball bearings inhibit vibration and makes spinning smooth and relaxing- Choice of two drive bands - stretchy 2 mm polycord or light high-twist cottonFlyer ratios can vary between wheels and drive bandsTraditional Spinning WheelTraveller Spinning WheelPolycord Cotton Polycord Cotton30:1 40:1 25:1 30:125:1 30:1 20:1 24:118:1 20:1 15:1 16:114:1 15:1 11:1 12:1- Closer flyer hooks- Smaller flyer is lightweight, has less wind resistance and is easy to treadle faster- The grooves in the bobbin have been checked for smoothness. In the unlikely event of roughness occurring smoothgently with sandpaper provided.- Tension rubber band will make sure very light tension adjustment is possible.- Brake band - the fine mercerised cotton band will help you respond to the characteristics of the fibre you spin.- Perfect for super-light tension required for super-fine spinning.FINE SPINNING HINTSMany factors determine the correct ratio for your purpose:- the fibre you use - the yarn you require- if you want to take it easy or need to quickly finish a project - how fast you treadle- the preparation of the fibre for spinningTension - Take time to adjust the tension to suit your spinning.Ratios - Choose the ratio to suit your project. If the yarn is prepared thoroughly then a high ratio will be easy to use. When using ashorter fibre for the first time start on the slowest drive ratio. Later move to a faster ratio.PREPARATION OF FIBREPrepare the fibre according to the yarn you require. To start with a prepared combed top or carded sliver makes learning to spin a fineyarn easier. Try the long draw method when spinning shorter fibres, letting the twist gather the fibres from your hand. For longer fibrestry spinning from the fold, this will let air into the yarn.MERINO SLIVER KITWe have included some fine merino combed wool top - 22 micron in the kit. Enough to spin the yarn for a first small project. Tryknitting Margaret Stove’s beautiful Fine Lace Scarf - pattern included. The correct yarn for this pattern is in the range of 30 wraps/inch(2.5 cm).LFK17072012V3<strong>Ashford</strong> <strong>Handicrafts</strong> Ltd.Factory and Showroom: 415 West Street,PO Box 474, Ashburton, New ZealandTelephone 64 3 308 9087Facsimile 64 3 308 8664Email: sales@ashford.co.nzInternet: www.ashford.co.nz<strong>Ashford</strong> GuaranteeThank you for purchasing this <strong>Ashford</strong> product. In theunlikely event there is any fault in manufacture we willreplace the item. To validate our guarantee please visitour website or write to us.Please also join our <strong>Ashford</strong> Club for the Wheel Magazine,competitions and more at www.ashfordclub.co.nz