- Page 1 and 2: KM-3050 KM-4050 KM-5050 SERVICE MAN
- Page 3 and 4: Revision history Revision Date Repl
- Page 5 and 6: Safety precautions This booklet pro
- Page 7 and 8: 1.Installation Precautions WARNING
- Page 9 and 10: • Do not remove the ozone filter,
- Page 11 and 12: 2GN/2GP/2GR-2 CONTENTS 1-1 Specific
- Page 13 and 14: 2GN/2GP/2GR-3 2-1-4 Developing sect
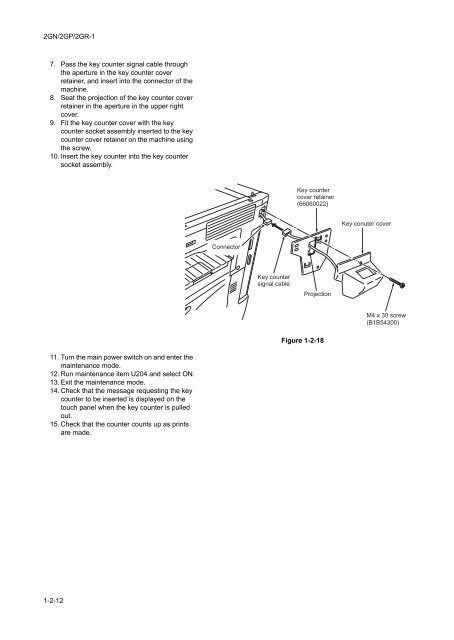
- Page 15 and 16: 2GN/2GP/2GR-1 Specifications 1-1-1
- Page 17 and 18: 2GN/2GP/2GR-3 Printer functions Pri
- Page 19 and 20: 2GN/2GP/2GR-2 (2) Operation panel 1
- Page 21 and 22: 2GN/2GP/2GR Installation 1-2-1 Inst
- Page 23 and 24: 2GN/2GP/2GR-2 Moving the machine Wh
- Page 25 and 26: 2GN/2GP/2GR-1 Remove the tapes, spa
- Page 27 and 28: 2GN/2GP/2GR 4. Align the paper flus
- Page 29 and 30: 2GN/2GP/2GR-1 Install the fixing br
- Page 31: 2GN/2GP/2GR-2 1-2-3 Installing the
- Page 35 and 36: 2GN/2GP/2GR-3 Section High voltage
- Page 37 and 38: 2GN/2GP/2GR-5 Section Item No. Cont
- Page 39 and 40: 2GN/2GP/2GR-2 Maintenance item No.
- Page 41 and 42: 2GN/2GP/2GR-2 Maintenance item No.
- Page 43 and 44: 2GN/2GP/2GR-2 Maintenance item No.
- Page 45 and 46: 2GN/2GP/2GR-2 Maintenance item No.
- Page 47 and 48: 2GN/2GP/2GR-1 Maintenance item No.
- Page 49 and 50: 2GN/2GP/2GR-2 Maintenance item No.
- Page 51 and 52: 2GN/2GP/2GR-2 Maintenance item No.
- Page 53 and 54: 2GN/2GP/2GR-5 Maintenance item No.
- Page 55 and 56: 2GN/2GP/2GR-5 Maintenance item No.
- Page 57 and 58: 2GN/2GP/2GR-1 Maintenance item No.
- Page 59 and 60: 2GN/2GP/2GR-1 Maintenance item No.
- Page 61 and 62: 2GN/2GP/2GR-1 Maintenance item No.
- Page 63 and 64: 2GN/2GP/2GR-1 Maintenance item No.
- Page 65 and 66: 2GN/2GP/2GR-1 Maintenance item No.
- Page 67 and 68: 2GN/2GP/2GR-1 Maintenance item No.
- Page 69 and 70: 2GN/2GP/2GR-1 Maintenance item No.
- Page 71 and 72: 2GN/2GP/2GR-1 Maintenance item No.
- Page 73 and 74: 2GN/2GP/2GR-3 Maintenance item No.
- Page 75 and 76: 2GN/2GP/2GR-1 Maintenance item No.
- Page 77 and 78: 2GN/2GP/2GR-1 Maintenance Descripti
- Page 79 and 80: 2GN/2GP/2GR-1 Maintenance item No.
- Page 81 and 82: 2GN/2GP/2GR-2 Maintenance item No.
- Page 83 and 84:
2GN/2GP/2GR-1 Maintenance item No.
- Page 85 and 86:
2GN/2GP/2GR-2 Maintenance item No.
- Page 87 and 88:
2GN/2GP/2GR-2 Maintenance item No.
- Page 89 and 90:
2GN/2GP/2GR-1 Maintenance item No.
- Page 91 and 92:
2GN/2GP/2GR-1 Maintenance item No.
- Page 93 and 94:
2GN/2GP/2GR-1 Maintenance item No.
- Page 95 and 96:
2GN/2GP/2GR-3 Maintenance item No.
- Page 97 and 98:
2GN/2GP/2GR-2 Maintenance item No.
- Page 99 and 100:
2GN/2GP/2GR-2 Maintenance item No.
- Page 101 and 102:
2GN/2GP/2GR-1 Maintenance item No.
- Page 103 and 104:
2GN/2GP/2GR-5 Maintenance item No.
- Page 105 and 106:
2GN/2GP/2GR-5 Maintenance item No.
- Page 107 and 108:
2GN/2GP/2GR-2 Maintenance item No.
- Page 109 and 110:
2GN/2GP/2GR-2 Maintenance item No.
- Page 111 and 112:
2GN/2GP/2GR-1 Maintenance item No.
- Page 113 and 114:
2GN/2GP/2GR-1 Maintenance item No.
- Page 115 and 116:
2GN/2GP/2GR-5 Maintenance item No.
- Page 117 and 118:
2GN/2GP/2GR-3 Maintenance item No.
- Page 119 and 120:
2GN/2GP/2GR-2 1-3-2 User management
- Page 121 and 122:
2GN/2GP/2GR-2 3. Press [OK]. 4. Pre
- Page 123 and 124:
2GN/2GP/2GR-2 Density Set the defau
- Page 125 and 126:
2GN/2GP/2GR-2 (4) Sending settings
- Page 127 and 128:
2GN/2GP/2GR-2 Resolution Select def
- Page 129 and 130:
2GN/2GP/2GR-2 (9) Adjustment/Mainte
- Page 131 and 132:
2GN/2GP/2GR-2 (11) Editing Destinat
- Page 133 and 134:
2GN/2GP/2GR-2 (14) Job accounting J
- Page 135 and 136:
2GN/2GP/2GR-1 Troubleshooting 1-4-1
- Page 137 and 138:
2GN/2GP/2GR Section Description Con
- Page 139 and 140:
2GN/2GP/2GR-5 Section Description C
- Page 141 and 142:
2GN/2GP/2GR-1 Section Description C
- Page 143 and 144:
2GN/2GP/2GR-2 Section Description C
- Page 145 and 146:
2GN/2GP/2GR (3) Paper misfeeds Prob
- Page 147 and 148:
2GN/2GP/2GR Problem Causes/check pr
- Page 149 and 150:
2GN/2GP/2GR-5 Problem Causes/check
- Page 151 and 152:
2GN/2GP/2GR-5 Problem Causes/check
- Page 153 and 154:
2GN/2GP/2GR-5 Problem Causes/check
- Page 155 and 156:
2GN/2GP/2GR-5 Problem Causes/check
- Page 157 and 158:
2GN/2GP/2GR (2) Self diagnostic cod
- Page 159 and 160:
2GN/2GP/2GR-1 Code Contents Causes
- Page 161 and 162:
2GN/2GP/2GR Code C1120 C1130 C1800
- Page 163 and 164:
2GN/2GP/2GR Code Contents Causes Re
- Page 165 and 166:
2GN/2GP/2GR-1 Code Contents Causes
- Page 167 and 168:
2GN/2GP/2GR Code C7810 C7900 C7910
- Page 169 and 170:
2GN/2GP/2GR-1 Code Contents C8140 M
- Page 171 and 172:
2GN/2GP/2GR-1 Code Contents Causes
- Page 173 and 174:
2GN/2GP/2GR Code C8300 Centerfold u
- Page 175 and 176:
2GN/2GP/2GR-2 Code C8510 C8800 C890
- Page 177 and 178:
2GN/2GP/2GR-3 Code F000 Operation p
- Page 179 and 180:
2GN/2GP/2GR (1) No image appears (e
- Page 181 and 182:
2GN/2GP/2GR (6) A black line appear
- Page 183 and 184:
2GN/2GP/2GR (14) Offset occurs. Cop
- Page 185 and 186:
2GN/2GP/2GR-2 1-4-4 Electric proble
- Page 187 and 188:
2GN/2GP/2GR Problem Causes Check pr
- Page 189 and 190:
2GN/2GP/2GR 1-4-5 Mechanical proble
- Page 191 and 192:
2GN/2GP/2GR-1 1-4-6 Send error code
- Page 193 and 194:
2GN/2GP/2GR-1 (3) Scan to E-mail er
- Page 195 and 196:
2GN/2GP/2GR Assembly and Disassembl
- Page 197 and 198:
2GN/2GP/2GR Removing the paper feed
- Page 199 and 200:
2GN/2GP/2GR-1 5. Raise the MP separ
- Page 201 and 202:
2GN/2GP/2GR-1 13. Remove the stop r
- Page 203 and 204:
2GN/2GP/2GR (3) Detaching and refit
- Page 205 and 206:
2GN/2GP/2GR 1-5-3 Optical section (
- Page 207 and 208:
2GN/2GP/2GR-2 (2) Detaching and ref
- Page 209 and 210:
2GN/2GP/2GR Fitting the scanner wir
- Page 211 and 212:
2GN/2GP/2GR 23. Remove the two scan
- Page 213 and 214:
2GN/2GP/2GR-1 Fitting the ISU 5. Ad
- Page 215 and 216:
2GN/2GP/2GR (5) Detaching and refit
- Page 217 and 218:
2GN/2GP/2GR-1 (6) Adjusting the ske
- Page 219 and 220:
2GN/2GP/2GR-1 (2) Detaching and ref
- Page 221 and 222:
2GN/2GP/2GR-1 1-5-5 Developing sect
- Page 223 and 224:
2GN/2GP/2GR-1 1-5-7 Fuser section (
- Page 225 and 226:
2GN/2GP/2GR-1 (3) Detaching and ref
- Page 227 and 228:
2GN/2GP/2GR-1 (5) Detaching and ref
- Page 229 and 230:
2GN/2GP/2GR-1 (7) Adjusting front p
- Page 231 and 232:
2GN/2GP/2GR-1 (2) Detaching and ref
- Page 233 and 234:
2GN/2GP/2GR-1 4. Remove all connect
- Page 235 and 236:
2GN/2GP/2GR-1 Requirements on PWB R
- Page 237 and 238:
2GN/2GP/2GR-1 1-6-5 Remarks on scan
- Page 239 and 240:
2GN/2GP/2GR-1 Mechanical constructi
- Page 241 and 242:
2GN/2GP/2GR EPWB RCL YC14-B6 RSW YC
- Page 243 and 244:
2GN/2GP/2GR 2-1-3 Optical section T
- Page 245 and 246:
2GN/2GP/2GR (2) Image printing The
- Page 247 and 248:
2GN/2GP/2GR The dimensions of the l
- Page 249 and 250:
2GN/2GP/2GR YC9-A5 TCS TCS YC9-B2 T
- Page 251 and 252:
2GN/2GP/2GR-1 2-1-5 Transfer and se
- Page 253 and 254:
2GN/2GP/2GR-1 2-1-7 Fuser section T
- Page 255 and 256:
2GN/2GP/2GR 2-1-9 Duplex section Th
- Page 257 and 258:
2GN/2GP/2GR-2 Electrical Parts Layo
- Page 259 and 260:
2GN/2GP/2GR 16. Feed switch 1 (FSW1
- Page 261 and 262:
2GN/2GP/2GR (4) Other electrical co
- Page 263 and 264:
2GN/2GP/2GR-1 Operation of the PWBs
- Page 265 and 266:
2GN/2GP/2GR Connector Pin No. Signa
- Page 267 and 268:
2GN/2GP/2GR 2-3-2 Engine PWB Engine
- Page 269 and 270:
2GN/2GP/2GR Connector Pin No. Signa
- Page 271 and 272:
2GN/2GP/2GR Connector Pin No. Signa
- Page 273 and 274:
2GN/2GP/2GR-1 Connector Pin No. Sig
- Page 275 and 276:
2GN/2GP/2GR-1 2-3-3 Main operation
- Page 277 and 278:
2GN/2GP/2GR-1 Connector Pin No. Sig
- Page 279 and 280:
2GN/2GP/2GR-3 2-4 Appendixes Mainte
- Page 281 and 282:
2GN/2GP/2GR-1 Periodic maintenance
- Page 283 and 284:
2GN/2GP/2GR-1 Section Main charging
- Page 285 and 286:
2GN/2GP/2GR Chart of image adjustme
- Page 287 and 288:
2GN/2GP/2GR-2 2-4-9 General wiring
- Page 289 and 290:
B D G E A C F English Supplied part
- Page 291 and 292:
B B 5 A 7 9 8 3. Secure the MFP to
- Page 293 and 294:
G 13 F 11. Turn the four adjusters
- Page 295 and 296:
16 A B 18 19 17 Adjusting the cente
- Page 297 and 298:
INSTALLATION GUIDE FOR 3000 SHEETS
- Page 299 and 300:
B B 1 4 3 3 4 2 2 A A Procedure Be
- Page 301 and 302:
C D D 7 10 8. Separate the wire (8)
- Page 303 and 304:
16 17 14 A4 15 15 LT B5 17 12 16 B5
- Page 305 and 306:
25 24 Checking the center line 1. C
- Page 307 and 308:
30 31 30 30 30 28 28 26 28 29 Adjus
- Page 309 and 310:
A B D G H K AK-71C I C E F J Englis
- Page 311 and 312:
I B H 3 2 J J J 3 1 3. Fit the fixi
- Page 313 and 314:
A 5 8.0 mm 8.0 mm C C D F D 8. Orie
- Page 315 and 316:
8 9 8 8 8 9 Slide the document fini
- Page 317 and 318:
16 14 15 16 14 15 3. Adjust the hei
- Page 319 and 320:
Operation check 1. Insert the MFP p
- Page 321 and 322:
N H I I J H 3 B J J J J J J N Modif
- Page 323 and 324:
A B I J N D K C E G F M L AK-700 O
- Page 325 and 326:
2 1 2 A Installation Procedure Inst
- Page 327 and 328:
M 7 E J 6 I D J Installing the inte
- Page 329 and 330:
4 2 2 2 4 I 3 1 O D [When installin
- Page 331 and 332:
I I 5 I G A F F When using two pape
- Page 333 and 334:
S Q S P 3 D X 1 Z S S S R S [When i
- Page 335 and 336:
Y I X 4 F W 4 Installing the base s
- Page 337 and 338:
I G Y V F W When the paper feeder o
- Page 339 and 340:
Y 11 12 Y A Y 10 Y 9 9 X Installing
- Page 341 and 342:
A N 13 13 1 2 Installing the sponge
- Page 343 and 344:
X a b Z [When using the full-color
- Page 345 and 346:
A E2 a b 5 4 3 2 1 If the copy samp
- Page 347 and 348:
NOTICE OF REVISION AVIS DE REVISION
- Page 349 and 350:
INSTALLATION GUIDE FOR CENTER-FOLDI
- Page 351 and 352:
1 3 3 1 2 4 Procedure Before instal
- Page 353 and 354:
K G K G C 9 D [To install the cente
- Page 355 and 356:
A 13 13 A A 14 14 J H E H 15 H Inst
- Page 357 and 358:
F H A B Installing the folding tray
- Page 359 and 360:
2mm 2mm a b Adjusting staple positi
- Page 361 and 362:
3mm 3mm 1 2 2 c d e Adjusting cente
- Page 363 and 364:
A B C D I J K E F G H English Suppl
- Page 365 and 366:
4 6 J 3 I 5 [Carry out steps 1 to 3
- Page 367 and 368:
A A B E E C 12 13 7 6. Secure the f
- Page 369 and 370:
11. Insert the MFP power plug to th
- Page 371 and 372:
A C E F G B D H English Supplied pa
- Page 373 and 374:
38 9 E G A A Removing the guide pla
- Page 375 and 376:
a 14/15 13 12 d 19/20 21/22 b 23/24
- Page 377 and 378:
2 X X’ 1 1 -2mm X X’ +2mm 18.Us
- Page 379 and 380:
X X’ -2mm X X’ +2mm 7. Repeat s
- Page 381 and 382:
a: 9.5 2 mm a: 5.5 2 mm 3. Perform
- Page 383 and 384:
B G* H G** I A D C E F English Supp
- Page 385 and 386:
E 3 4 5 6 8 37 C 8 A C 7 10 C 9 C R
- Page 387 and 388:
13 13 ! # 14 14 $ " % D % 11. Remov
- Page 389 and 390:
G I (a) (c) G H (b) Adhere the labe
- Page 391 and 392:
Be sure to adjust in the following
- Page 393 and 394:
F C 3 F C Adjusting the DP oblique
- Page 395 and 396:
X X’ X’ X 3 3 1 2 a f X X’ g
- Page 397 and 398:
2.5mm 2.5mm 2 1 2 a j k [Checking t
- Page 399 and 400:
2mm/3mm 2mm/3mm 1 2 2 a l m [Checki
- Page 401 and 402:
2mm/3mm 2mm/3mm 1 2 2 a l m 2. Adju
- Page 403 and 404:
5mm F 60 1mm A(60 5mm) R 128 1mm 4.
- Page 405 and 406:
A B C D E F G H I J K L M English S
- Page 407 and 408:
1 2 5 8 4 7 6 3 3. Remove the stapl
- Page 409 and 410:
A 15 14 16 17 9. Remove the blue sc
- Page 411 and 412:
24 L 20 19 25 26 L J 23 22 21 25 12
- Page 413 and 414:
D 2 L L 7 6 C 3 F E 2 L 17.Fit the
- Page 415 and 416:
Operation check 1. Insert the power
- Page 417 and 418:
P 31 Q Q P English Adding procedure
- Page 419 and 420:
English Supplied part A Job separat
- Page 421 and 422:
12 A 11 13 5. Remove the two screws
- Page 423 and 424:
18 17 A 19 21 20 C 10.Attach the jo
- Page 425 and 426:
13.Refit the staple holder that has
- Page 427 and 428:
INSTALLATION GUIDE FOR FAX System (
- Page 429 and 430:
D D D E 30 10 mm D 30 10 mm D D Ins
- Page 431 and 432:
D C 30 10 mm D A English INSTALLATI
- Page 433 and 434:
INSTALLATION GUIDE FOR Data Securit
- Page 435 and 436:
Datensicherheits-Kit (C) - Installa
- Page 437 and 438:
303KR56710 UG-30 Installation Guide