
You also want an ePaper? Increase the reach of your titles
YUMPU automatically turns print PDFs into web optimized ePapers that Google loves.
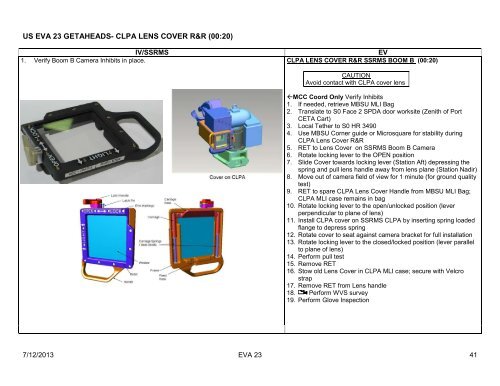
US EVA 23 GETAHEADS- CLPA LENS COVER R&R (00:20)<br />
IV/SSRMS<br />
EV<br />
1. Verify Boom B Camera Inhibits in place. CLPA LENS COVER R&R SSRMS BOOM B (00:20)<br />
CAUTION<br />
Avoid contact with CLPA cover lens<br />
MCC Coord Only Verify Inhibits<br />
1. If needed, retrieve MBSU MLI Bag<br />
2. Translate to S0 Face 2 SPDA door worksite (Zenith of Port<br />
CETA Cart)<br />
3. Local Te<strong>the</strong>r to S0 HR 3490<br />
4. Use MBSU Corner guide or Microsquare for stability during<br />
CLPA Lens Cover R&R<br />
5. RET to Lens Cover on SSRMS Boom B Camera<br />
6. Rotate locking lever to <strong>the</strong> OPEN position<br />
7. Slide Cover towards locking lever (Station Aft) depressing <strong>the</strong><br />
spring and pull lens handle away from lens plane (Station Nadir)<br />
8. Move out of camera field of view for 1 minute (for ground quality<br />
test)<br />
9. RET to spare CLPA Lens Cover Handle from MBSU MLI Bag;<br />
CLPA MLI case remains in bag<br />
10. Rotate locking lever to <strong>the</strong> open/unlocked position (lever<br />
perpendicular to plane of lens)<br />
11. Install CLPA cover on SSRMS CLPA by inserting spring loaded<br />
flange to depress spring<br />
12. Rotate cover to seat against camera bracket for full installation<br />
13. Rotate locking lever to <strong>the</strong> closed/locked position (lever parallel<br />
to plane of lens)<br />
14. Perform pull test<br />
15. Remove RET<br />
16. Stow old Lens Cover in CLPA MLI case; secure with Velcro<br />
strap<br />
17. Remove RET from Lens handle<br />
18. Perform WVS survey<br />
19. Perform Glove Inspection<br />
7/12/2013 EVA 23 41