Ocean for Petrel Plugin Creation - Ocean - Schlumberger
Ocean for Petrel Plugin Creation - Ocean - Schlumberger
Ocean for Petrel Plugin Creation - Ocean - Schlumberger

You also want an ePaper? Increase the reach of your titles
YUMPU automatically turns print PDFs into web optimized ePapers that Google loves.
<strong>Ocean</strong> 2006<br />
<strong>Petrel</strong> Product Family<br />
Module Developer’s Getting Started<br />
Guide
Copyright Notice<br />
Copyright © 2006 <strong>Schlumberger</strong>. All rights reserved.<br />
The in<strong>for</strong>mation in this document is subject to change without notice. The software<br />
described in this document is furnished under a license agreement. This software may be<br />
used or copied only in accordance with the terms of such agreement. It is against the law<br />
to copy the software on any medium except as specifically allowed in the license<br />
agreement. No part of this document may be reproduced or transmitted in any <strong>for</strong>m, or by<br />
any means, electronic or mechanical, including photocopying and recording, <strong>for</strong> any<br />
purpose without the express written permission of <strong>Schlumberger</strong>.<br />
Trademarks<br />
TM<br />
TM<br />
<strong>Petrel</strong> and <strong>Ocean</strong> are trademarks of <strong>Schlumberger</strong>.<br />
Microsoft® and Windows® are registered trademarks of Microsoft Corporation.<br />
2
Table of Contents<br />
Table of Contents ...................................................................................................... 3<br />
1. Introduction ............................................................................................................ 4<br />
1.1. Access to <strong>Petrel</strong> Data Domain...............................................................5<br />
1.2. <strong>Ocean</strong> User Interface Infrastructure ......................................................5<br />
1.3. Prerequisite............................................................................................6<br />
2. <strong>Ocean</strong> Module Wizard.......................................................................................... 7<br />
2.1. Installing the <strong>Ocean</strong> Module Wizard......................................................7<br />
2.2. Running the <strong>Ocean</strong> Module Wizard.......................................................7<br />
2.2.1. Hello World Example specification.................................................8<br />
2.2.2. Starting the Wizard.........................................................................8<br />
2.2.3. Wizard Step 1 Dialog......................................................................10<br />
2.2.4. Wizard Step 2 Dialog......................................................................12<br />
2.2.5. Wizard Step 3 Dialog......................................................................15<br />
2.2.6. Wizard Step 4 Dialog......................................................................19<br />
2.2.7. Modifying the Module Source.........................................................20<br />
2.2.7.1. Displaying “Hello World Loaded” ................................................ 21<br />
2.2.7.2. Process Code Changes ............................................................... 22<br />
2.2.7.3. Display “Hello World” in Status Bar............................................ 22<br />
2.2.7.4. Using the Input Arguments.......................................................... 24<br />
2.2.7.5. Transactions .................................................................................. 25<br />
2.2.7.6. Menu Code Changes ................................................................... 26<br />
3. Domain Examples................................................................................................. 28<br />
3.1. Creating a Well Path from a Point Set...................................................28<br />
3.1.1. Create the CreateWellFromPoints project .....................................28<br />
3.2. Upscale a Well Log................................................................................35<br />
3.2.1. Create the Upscale Well Log Example ..........................................35<br />
3.3. Running the Examples...........................................................................42<br />
4. Help Resources and Debugging Hints............................................................... 51<br />
4.1. Online Documentation ...........................................................................51<br />
4.2. Hardcopy Documentation ......................................................................53<br />
4.3. Training..................................................................................................53<br />
4.4. Debugging Hints ....................................................................................54<br />
4.4.1. Build Failed.....................................................................................54<br />
4.4.2. Process Not Appearing in Process Diagram..................................54<br />
3
1. Introduction<br />
<strong>Ocean</strong> is an application framework with the capability to work across data<br />
domains. It provides services, components, and a common graphical user<br />
interface that enables applications to better integrate. It also allows application<br />
developers to interact with other <strong>Ocean</strong> Model-Centric applications such as<br />
<strong>Petrel</strong>.<br />
<strong>Ocean</strong> Model-Centric applications are loaded dynamically as .NET assemblies.<br />
These assemblies, the building blocks of <strong>Ocean</strong>, contain Modules.<br />
<strong>Ocean</strong> is architectured in three levels: The Core, the Services and the Product<br />
Family. For Model-centric applications, the Product Family is <strong>Petrel</strong>. <strong>Ocean</strong><br />
Modules are managed by the Core layer. They interact with all levels of the<br />
framework, as shown below:<br />
<strong>Ocean</strong> Module<br />
<strong>Petrel</strong> Product Family<br />
<strong>Ocean</strong> Services<br />
<strong>Ocean</strong> Core<br />
Figure 1-1. <strong>Ocean</strong> architecture with <strong>Ocean</strong> Module.<br />
An <strong>Ocean</strong> Module is managed by the Core level. Modules are built with Visual<br />
Studio 2005 <strong>for</strong> .NET with the help of the <strong>Ocean</strong> wizard which takes care of the<br />
interaction with the Core and some low-level access to functionality provided by<br />
the Product Family.<br />
4
1.1. Access to <strong>Petrel</strong> Data Domain<br />
The access to the <strong>Petrel</strong> data domain is the responsibility of the application.<br />
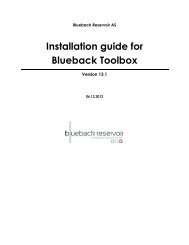
<strong>Ocean</strong> <strong>for</strong> <strong>Petrel</strong> 2006 covers a variety of data domains:<br />
• Well (<strong>for</strong> Petrophysics and Geology applications)<br />
• Seismic (<strong>for</strong> Geophysics)<br />
• Shapes (<strong>for</strong> Structural modeling)<br />
• PillarGrid (<strong>for</strong> Geomodeling)<br />
• Simulation (<strong>for</strong> Reservoir Evaluation)<br />
Figure 1-2. Surface with fault model and seismic data.<br />
1.2. <strong>Ocean</strong> User Interface Infrastructure<br />
<strong>Ocean</strong> provides the capability to extend <strong>Petrel</strong>’s user interface functionality. The<br />
<strong>Ocean</strong> Application Programming Interface (API) supports:<br />
5
1. Adding custom UI windows,<br />
2. Adding processes to the <strong>Petrel</strong> Process diagram,<br />
3. Adding processes to the Workflow editor,<br />
4. Adding custom menus to the <strong>Petrel</strong> window,<br />
5. Adding buttons to existing menus,<br />
6. Adding toolbars,<br />
7. Adding tools to existing toolbars,<br />
8. Adding objects to the <strong>Petrel</strong> Explorer window,<br />
9. Creating custom objects (domain objects),<br />
10. Extending the <strong>Petrel</strong> renderers.<br />
Programmers create modules that behave as if they are a standard part of<br />
<strong>Petrel</strong>. The modules are compiled into assemblies that are placed in the <strong>Petrel</strong><br />
installation directory and registered with the application through a configuration<br />
file. The assemblies are IL, or Intermediate Language, code that is processor<br />
independent. It provides a common layer, similar to assembly language, that all<br />
.Net languages (C#, C++, VB, etc.) compile to. At runtime it is further compiled<br />
and executed by the .Net Common Language Runtime, or CLR, engine.<br />
1.3. Prerequisite<br />
This document presents the in<strong>for</strong>mation necessary <strong>for</strong> a programmer to create<br />
and use modules in <strong>Ocean</strong> <strong>for</strong> <strong>Petrel</strong>. It assumes the following:<br />
1. Knowledge of the Microsoft .NET Framework,<br />
2. The use of Visual Studio, and the C# programming language,<br />
3. A basic understanding of using <strong>Petrel</strong> as described in the “<strong>Petrel</strong><br />
Introduction Course” manual,<br />
4. An available <strong>Ocean</strong> API development license and a base <strong>Petrel</strong> license.<br />
6
2. <strong>Ocean</strong> Module Wizard<br />
<strong>Ocean</strong> modules have many characteristics that are essentially the same from<br />
module to module. There<strong>for</strong>e, <strong>Ocean</strong> provides a wizard to simplify the creation<br />
and installation of modules. This chapter provides an overview of the <strong>Ocean</strong><br />
Module Wizard and an example of its use. The example adds a process to the<br />
Process diagram window and a menu, with a button, to the menu bar.<br />
2.1. Installing the <strong>Ocean</strong> Module Wizard<br />
The <strong>Ocean</strong> Module Wizard is not installed as part of the <strong>Ocean</strong> installation<br />
process. It must be installed separately on each instance of Visual Studio used<br />
to develop <strong>Ocean</strong> Modules. Install the wizard using the following steps:<br />
1. Locate the wizard installation file (VS<strong>Plugin</strong>Installer.msi) in the <strong>Ocean</strong><br />
2006 installation directory using Windows Explorer.<br />
2. Right click on VS<strong>Plugin</strong>Installer.msi in Explorer and select “Install”<br />
from the popup menu.<br />
3. Select “Next” in the installation window when requested to complete the<br />
installation.<br />
4. Close the last window at the end of the installation. The <strong>Ocean</strong> Module<br />
Wizard will now be available in Visual Studio.<br />
2.2. Running the <strong>Ocean</strong> Module Wizard<br />
Once installed the <strong>Ocean</strong> Module Wizard is available in Visual Studio as<br />
Templates in dialogs where new projects or items are being added. It can be<br />
used to create a new solution with a new project or extend an existing solution<br />
or project. In our example we’ll create a new solution and project. The templates<br />
<strong>for</strong> the <strong>Ocean</strong> wizard include:<br />
1. <strong>Ocean</strong> Module – Add a new module to a solution.<br />
2. <strong>Ocean</strong> Menu Extension – Extend the <strong>Petrel</strong> main menu.<br />
3. <strong>Ocean</strong> Process – Add a process to the Process diagram tree.<br />
7
4. <strong>Ocean</strong> Settings Page – Add a page to the Settings dialog <strong>for</strong> an item in<br />
the <strong>Petrel</strong> Explorer tree.<br />
5. <strong>Ocean</strong> Tree Extension – Extend the <strong>Petrel</strong> Explorer input tree.<br />
6. <strong>Ocean</strong> Window – Add a window that accepts graphics.<br />
7. <strong>Ocean</strong> Datasource – Add a class implementing the IDataSource<br />
interface.<br />
2.2.1. Hello World Example specification<br />
The example <strong>for</strong> using the wizard will be a simple Hello World module. The<br />
module specifications are as follows:<br />
1. Display “Hello World Loaded” in the <strong>Petrel</strong> message window when the<br />
module is loaded. The class <strong>Petrel</strong>Logger is used to output messages<br />
through the <strong>Ocean</strong> CoreLogger class to a window, a log file, or standard<br />
output.<br />
2. Add a Hello World process to the <strong>Petrel</strong> Process window.<br />
3. Display “Hello World” in the status bar. The status bar is part of the<br />
<strong>Petrel</strong> main window.<br />
4. Define a string as an argument to the Hello World process.<br />
5. Write “Hello World” and the contents of the string to the <strong>Petrel</strong> message<br />
window when the process is executed.<br />
6. Add a menu to the menu bar after the “Help” menu.<br />
7. Add a button to the new menu.<br />
8. Display “Hello World” in the <strong>Petrel</strong> message window when the menu bar<br />
button is selected.<br />
9. Add the module to the application configuration file (petrel.exe.config)<br />
during the wizard execution.<br />
2.2.2. Starting the Wizard<br />
The <strong>Ocean</strong> Module Wizard is started from the “New Project” dialog in Visual<br />
Studio. From the Visual Studio “File” pulldown menu select “New...” and then<br />
“Project...”. This will bring up the “New Project” dialog shown in Figure 2-1<br />
8
<strong>Ocean</strong> Wizard<br />
Project Name<br />
Figure 2-1 Visual Studio New Project dialog<br />
To start creating the HelloWorld module per<strong>for</strong>m the following tasks in the dialog<br />
as indicated in Figure 2-1:<br />
1. Select the “<strong>Ocean</strong> Module” template from the template frame,<br />
2. Change the project name that appears when the template is selected<br />
from “<strong>Ocean</strong>Module1” to “HelloWorld” in the “Name” text field. This will<br />
also modify the “Solution Name” text field with a matching name.<br />
3. Check the “Location” text field <strong>for</strong> the name of the directory where you<br />
want the solution to be created. Use the “Browse...” button to select a<br />
different directory if desired, or simply enter it in the field.<br />
4. Leaving “Create directory <strong>for</strong> solution” checked will add an additional<br />
directory that contains only the solution. Uncheck it to have the solution<br />
and project in the same directory.<br />
5. Select OK to create the HelloWorld solution and project and start the<br />
wizard.<br />
9
2.2.3. Wizard Step 1 Dialog<br />
When the <strong>Ocean</strong> Module Wizard starts the Step 1 dialog will appear as shown in<br />
Figure 2- 2. In this step you will choose the components you would like to include<br />
in your module.<br />
10<br />
Figure 2-2 Step 1 <strong>for</strong> <strong>Ocean</strong> Module creation.<br />
The Step 1 dialog appears with the module name in the top text field and a<br />
default namespace using the same name just below. Either or both text fields<br />
may be changed to suit your naming convention. The namespace field has been<br />
changed <strong>for</strong> our example as shown Figure 2- 3.<br />
The Name field defines the module name <strong>for</strong> our project. The wizard will create<br />
a class with this name that will implement the IModule interface. This class will<br />
be in a c# file of the same name. Our example will create the class “HelloWorld”<br />
in the source file HelloWorld.cs.<br />
The Namespace field defines the namespace <strong>for</strong> our projects class. It is a<br />
common practice when defining namespaces to incorporate the company name<br />
and product name into the namespace to help avoid conflict. This has been<br />
done in Figure 2- 3 with the namespace Slb.<strong>Ocean</strong>.GettingStarted. The resulting
namespace <strong>for</strong> the project will be the combination of the name space field and<br />
the project name. For the example in Figure 2- 3 the namespace in the source files<br />
will be “Slb.<strong>Ocean</strong>.GettingStarted.HelloWorld”.<br />
You now need to select the components that you would like in your module. For<br />
the HelloWorld example a process and a menu item are being demonstrated.<br />
These items are included by turning on the “New Process” and “New Menu item”<br />
check boxes. When this is done the corresponding text fields will be populated<br />
with “Process1” and “Menu1” respectively. We have changed the names in<br />
these fields as shown in Figure 2- 3. You should also note that the title of the<br />
wizard dialog will change based on the items you have selected to indicate the<br />
new number of steps that must be per<strong>for</strong>med.<br />
The name in the New Process text field is used to define the name of the class<br />
that is created <strong>for</strong> the process. This class is a subclass of Workstep, a generic<br />
class that includes the description of the Process arguments. It also implements<br />
two interfaces, IPresentation (<strong>for</strong> its appearance in the Process Diagram) and<br />
IDescriptionSource (to display in<strong>for</strong>mation in the Process dialog). The example,<br />
as shown in Figure 2- 3, will create the classes “HelloWorldProcess” and<br />
“HelloWorldProcess.Arguments”. The second class is used to publish the type of<br />
the argument package that is passed to the process by the process dialog. It is a<br />
subclass of DescribedArgumentsByReflection.<br />
The name in the New Menu text field is used to define the source file name <strong>for</strong><br />
the menu source code. The file name is derived from the menu name. In our<br />
example the menu name we’ll add is “HelloWorldMenu”. There<strong>for</strong>e the resulting<br />
source file name will be “HelloWorldMenu.cs”.<br />
The wizard allows also the user to generate workspace events, which will<br />
register delegates at session startup and shutdown.<br />
The wizard can update the application configuration file, petrel.exe.config, in the<br />
installation directory. This action is controlled by the “Add the module to the<br />
<strong>Petrel</strong> config” check box. The check box is turned on by default.<br />
To per<strong>for</strong>m the config file update the wizard must know the location of the <strong>Petrel</strong><br />
2006 installation. Check the location indicated in the text field to be sure it is<br />
correct (see Figure 2- 3).<br />
The configuration file will be updated to include the module definition <strong>for</strong> the<br />
module created by the example. It will contain “” <strong>for</strong> the example.<br />
The first part of the definition, “Slb.<strong>Ocean</strong>.GettingStarted.HelloWorld” is the full<br />
Module name, including its namespace. The second part, “HelloWorld” is the<br />
name of the assembly file (.dll) that is created when the project is compiled. The<br />
assembly file will have to be moved or copied to the installation directory be<strong>for</strong>e<br />
the module can be used. This will be explained in detail later.<br />
11
Once you have modified the fields in the Step 1 select the “Next” button to move<br />
on to the next step.<br />
Figure 2-3 Step 1 dialog <strong>for</strong> module creation modified <strong>for</strong> example.<br />
2.2.4. Wizard Step 2 Dialog<br />
The example is adding a new process to the Process manager. The wizards’<br />
second step is to gather in<strong>for</strong>mation <strong>for</strong> the process. A process can have a UI<br />
that is built from an argument list, or it may use a custom UI provided by the<br />
developer. For our example the standard UI built by <strong>Ocean</strong> will be used. The<br />
standard UI will be built from the table of argument names and fields that contain<br />
the associated value. The argument list supports basic data types (int, float,<br />
double, string, bool), or <strong>Ocean</strong> Domain Object types (Grid, Well, Property, etc.).<br />
Each argument in the argument list is identified by its name and the name will<br />
appear in the UI that is built by <strong>Ocean</strong>. The arguments also have descriptions,<br />
default values, and a role as input and/or output data. When the wizard moves<br />
to the Process details step the dialog will change to accept the in<strong>for</strong>mation<br />
defined above <strong>for</strong> the Process (see Figure 2-4).<br />
12
turn off checkbox<br />
set long and short<br />
descriptions<br />
add argument to<br />
list<br />
set argument<br />
info<br />
Figure 2-4 Step 2 defining Process parameters.<br />
The first step in Step 2 is to turn off the custom UI checkbox since there will not<br />
be a custom UI in this example. The checkbox appears at the top of the window<br />
with the text, “Generate UI”.<br />
Next you provide short and long descriptions <strong>for</strong> your process. The short<br />
description is a brief explanation of the purpose of the process. The long<br />
description provides more detail and might include some description of the type<br />
of data provided <strong>for</strong> each of the arguments.<br />
Arguments are added to the argument list by selecting the button at the top<br />
of the list. The in<strong>for</strong>mation <strong>for</strong> the argument selected in the list is filled in using<br />
the controls on the right side of the dialog. Here you define the arguments name,<br />
type, description, default value (if any), and role as input and/or output data. The<br />
name, as mentioned earlier, will appear in the UI <strong>for</strong> the process and will be<br />
associated with a field that will contain the arguments input and/or output data.<br />
The description and default value are not required, but may help the users of<br />
your process (see Figure 2- 5).<br />
You can change parameters <strong>for</strong> an argument by selecting the argument from the<br />
list and then modifying the argument in<strong>for</strong>mation.<br />
13
An argument may be deleted by selecting it in the list and then clicking the<br />
delete icon.<br />
Figure 2-5 Step 2 dialog with argument parameters filled in.<br />
When you have defined all the arguments that you require and provided their<br />
parameters you have completed the process item definition. Select Next to<br />
proceed onto the next step in the wizard process.<br />
14
2.2.5. Wizard Step 3 Dialog<br />
The example adds a pulldown menu to the menu bar and a button to the<br />
pulldown menu. The third step in the wizard defines the pulldown menu and the<br />
button (see Figure 2- 6).<br />
add new<br />
item<br />
shift item position<br />
set parameters<br />
expand menu<br />
Figure 2-6 Step 3 dialog <strong>for</strong> adding menus and buttons.<br />
The menu may only be added at the end. We’ll call the pulldown menu<br />
“HelloWorld” and name the button “Do it”. We’ll use the controls indicated in<br />
Figure 2- 6 to create, name, and provide parameters <strong>for</strong> our menu.<br />
To add the new menu to the menu bar per<strong>for</strong>m the following steps:<br />
1. Start by selecting “<strong>Petrel</strong> Main Menu” from the menu list.<br />
2. Select the “Add new item” icon to add a new item at the bottom of the<br />
menu list (see Figure 2-7).<br />
15
Figure 2-7 Menu added to menu bar<br />
3. Define the new item as a popup menu using the combo box at the right<br />
side of the dialog<br />
4. Change the name of the menu to HelloWorld by entering the new name<br />
in the Name field.<br />
16
set to<br />
Popup<br />
set name<br />
Figure 2-8 Setting parameters<br />
After the menu is added you need to add the button to it. The procedure <strong>for</strong><br />
adding the button is basically the same as that <strong>for</strong> adding the menu.<br />
1. Select the HelloWorld menu in the menu bar items list.<br />
2. Click the “+” icon to add a new item under the HelloWorld menu.<br />
3. Make the new item a button by setting the combo box to “Button”.<br />
4. Set the new button name by entering the name “Do it” in the Name text<br />
field.<br />
5. Add a click event handler to the button by turning on the “Add Click<br />
Event” button. This is requires so selecting the button can trigger the<br />
display of the message in the message window and status bar (see<br />
Figure 2- 9).<br />
17
set to<br />
Button<br />
set button<br />
name<br />
add new<br />
item<br />
event<br />
is on<br />
Figure 2-9 Step 3 adding button to new menu.<br />
After the new menu is added, its parameters set, the new button added, and its<br />
parameters set you can select the “Next” button to proceed to the final wizard<br />
step <strong>for</strong> the example.<br />
18
2.2.6. Wizard Step 4 Dialog<br />
The final step in the execution of the <strong>Ocean</strong> Module Wizard is always a review<br />
of the settings you provided to the wizard steps. You should carefully read the<br />
contents of the dialog and use the “Back” button if something is incorrect to<br />
return to the corresponding step to make repairs (see Figure 2- 10).<br />
If you are satisfied with your settings click “Finish”. The wizard will create the<br />
Visual Studio solution, project, and source files as defined by the settings you<br />
have provided.<br />
Figure 2-10 Step 4 Final review of module wizard parameters.<br />
19
2.2.7. Modifying the Module Source<br />
When the <strong>Ocean</strong> Module Wizard <strong>for</strong> the example finishes there will be a solution<br />
named HelloWorld with a project named HelloWorld in the Visual Studio Solution<br />
Explorer. The project will contain source files <strong>for</strong> the HelloWorld module that was<br />
created, the HelloWorld menu that is added to the menu bar, and the HelloWorld<br />
process that is added to the Process Manager (see Figure 2- 11).<br />
module source file<br />
menu source file<br />
process source file<br />
Figure 2-11 Example project source files in Solution Explorer<br />
The HelloWorld project in the solution is configured by the wizard to help<br />
debugging. The assembly built by the compiler is output to the <strong>Petrel</strong> installation<br />
directory. The project command line property is set up to start <strong>Petrel</strong>. So<br />
debugging is simply a matter of per<strong>for</strong>ming the build and starting the debugger.<br />
The files contain the basic code needed <strong>for</strong> the HelloWorld module. For the<br />
module per<strong>for</strong>m as defined by the specifications there is still a small amount of<br />
code that must be added manually. From the original specifications code must<br />
be added to:<br />
1. Display “Hello World Loaded” in the message window when the module<br />
is loaded.<br />
2. Display “Hello World” in the status bar when the process is started.<br />
3. Write “Hello World” and the contents of the string to the message<br />
window when the process is executed.<br />
4. Display “Hello World” in the message window when the menu bar button<br />
is selected.<br />
20
2.2.7.1. Displaying “Hello World Loaded”<br />
When <strong>Petrel</strong> is started the configuration file will be read and the modules defined<br />
in it will be loaded. The module loading process has several steps that are<br />
per<strong>for</strong>med <strong>for</strong> each module. These are defined in more detail in the <strong>Ocean</strong><br />
training materials. For the purpose of the example here it is sufficient to know<br />
that the first step per<strong>for</strong>med is the “Initialize” method of the IModule<br />
implementation. The code <strong>for</strong> our example implementation of Initialize <strong>for</strong><br />
IModule is found in HelloWorld.cs (see Figure 2- 12).<br />
public void Initialize()<br />
{<br />
// TODO: Add HelloWorld.Initialize implementation<br />
}<br />
Figure 2-12 Initialize method <strong>for</strong> IModule.<br />
To make the example display “Hello World Loaded” when the module loads we<br />
modify the Initialize method to use <strong>Petrel</strong>Logger to output an in<strong>for</strong>mation<br />
message using its Info method. The in<strong>for</strong>mation message is displayed in the<br />
message window that pops up when the message is sent. The “// TODO:”<br />
comment is replaced with the code to send the message (see Figure 2- 13).<br />
public void Initialize()<br />
{<br />
<strong>Petrel</strong>Logger.InfoOutputWindow(“Hello World Loaded.”);<br />
}<br />
Figure 2-13 Modified IModule Initialize method.<br />
Build the solution and start <strong>Petrel</strong>. When the module is loaded the CoreLogger<br />
message window will appear with the “Hello World Loaded” message (see Figure<br />
2- 14). Exit <strong>Petrel</strong>.<br />
Figure 2-14 Message window displayed during module loading.<br />
21
2.2.7.2. Process Code Changes<br />
The Process code that is constructed by the <strong>Ocean</strong> Module Wizard has a<br />
Workstep class that implements IPresentation and IDescriptionSource. It also<br />
contains an Arguments class, subclass of the Slb.<strong>Ocean</strong>.<strong>Petrel</strong>.Workflow class<br />
DescribedArgumentsByReflection. That specialized Workstep class is named<br />
HelloWorldProcess, after our process name, and it overrides the method<br />
InvokeSimpleCore, which is the entry point <strong>for</strong> process execution. Open the file<br />
HelloWorldProcess.cs. To execute your custom code, you will have to add it to<br />
the body of the InvokeSimpleCore method.<br />
The code <strong>for</strong> the InvokeSimpleCore method that is created by the wizard is<br />
shown in Figure 2-15. You can see that the arguments defined <strong>for</strong> the wizard are<br />
passed to the method. The structure is defined in the specialized class<br />
HelloWorldProcess.Arguments.<br />
protected override void InvokeSimpleCore<br />
(HelloWorldProcess.Arguments argumentPackage)<br />
{<br />
// TODO: finish the Invoke method implementation<br />
}<br />
return;<br />
Figure 2-15 Invoke method original code.<br />
2.2.7.3. Display “Hello World” in Status Bar<br />
The status bar is located at the bottom of the <strong>Petrel</strong> window. It is accessed by<br />
calling the static methods of the <strong>Petrel</strong>Logger convenience class. <strong>Petrel</strong>Logger<br />
is a layer on top of CoreLogger and is defined in the Slb.<strong>Ocean</strong>.<strong>Petrel</strong><br />
namespace. In the example the “SuccessStatus” method will be used to display<br />
the message and set the icon to the right of the status bar to indicate that the<br />
message posted marks a successful operation. Other methods (Error, Warning,<br />
Status) can also be used depending on the message target (log file, log window,<br />
modal dialog or status bar) and the type of in<strong>for</strong>mation that needs to be<br />
displayed. The message presentation will be consistent with the way the Product<br />
Family (<strong>Petrel</strong>) displays its messages.<br />
To place a message in the status bar, add the <strong>Petrel</strong>Logger call to the body of<br />
the InvokeSimpleCore method, as shown in Figure 2-16.<br />
protected override void InvokeSimpleCore<br />
(HelloWorldProcess.Arguments argumentPackage)<br />
{<br />
<strong>Petrel</strong>Logger.SuccessStatus(“Hello World Process started.”);<br />
}<br />
return;<br />
Figure 2-16 InvokeSimpleCore with status bar message.<br />
22
After modifying the Invoke method, build the solution and start <strong>Petrel</strong>. When the<br />
<strong>Petrel</strong> window is displayed go to the Process diagram window and look <strong>for</strong><br />
“HelloWorldProcess” (see Figure 2-17).<br />
Figure 2-17 HelloWorldProcess selected in Process diagram.<br />
Double click on it to start the process and display the HelloWorldProcess dialog<br />
(see Figure 2-18). You’ll see that the argument you defined in the <strong>Ocean</strong> Module<br />
Wizard is present with its default value. The long description is displayed in the<br />
top section of the dialog. If you pause the cursor over the text field the tooltip <strong>for</strong><br />
the argument will appear.<br />
23
Figure 2-18 HelloWorldProcess dialog.<br />
Select Apply in the dialog to run the process. Doing so should display a<br />
successful message in the status bar, at the bottom of the <strong>Petrel</strong> window (see<br />
Figure 2- 19 ). Exit <strong>Petrel</strong>.<br />
Figure 2-19 Message displayed in status bar.<br />
2.2.7.4. Using the Input Arguments<br />
The InvokeSimpleCore method will receive the argument list <strong>for</strong> the process as<br />
its argument. Individual arguments are named members of the specialized<br />
HelloWorldProcess.Arguments class included with the Workstep that<br />
implements IDescribedArgumentSource.<br />
The example process will per<strong>for</strong>m a very simple, and familiar, operation on the<br />
input argument. It will write its contents to the message window after “Hello<br />
World”. See Figure 2- 20.<br />
24
public static bool InvokeSimpleCore(object argumentPackage)<br />
{<br />
...<br />
string name = argumentPackage.YourName;<br />
// Write message and input argument value.<br />
<strong>Petrel</strong>Logger.InfoOutputWindow(“Hello World!”);<br />
<strong>Petrel</strong>Logger.InfoOutputWindow(“Your name is ” + name);<br />
}<br />
return true;<br />
Figure 2-20 Modified InvokeSimpleCore method code.<br />
When the method has been modified to take care of the process arguments, rebuild<br />
your project and start <strong>Petrel</strong>. You can start the HelloWorldProcess again<br />
from the Process diagram.<br />
You can now edit your process arguments and observe the result during<br />
process execution. Press the Apply button. It should display the <strong>Petrel</strong> message<br />
window with the messages previously defined in the InvokeSimpleCore method<br />
(see Figure 2- 21). Exit <strong>Petrel</strong>.<br />
Figure 2-21 HelloWorldProcess output messages.<br />
2.2.7.5. Transactions<br />
Processes that create, update, or delete domain object require transactions to<br />
control when the change is committed to the database. The general flow in the<br />
code is to<br />
1. start the transaction,<br />
2. lock the object,<br />
3. make changes to the object,<br />
4. commit the transaction, and dispose (see Figure 2- 22).<br />
25
If no transaction is used and data is updated then an Update exception will be<br />
raised. Transactions must be started and committed in the same thread. When<br />
domain object <strong>for</strong> <strong>Petrel</strong> data are used the transaction should be in the main<br />
thread.<br />
// Start the transaction in the Main thread to update a <strong>Petrel</strong> object.<br />
using (ITransaction trans = DataManager.NewTransaction())<br />
{<br />
...<br />
// Get the well log to update from somewhere.<br />
WellLog log = ...;<br />
// Lock the well log to change its description.<br />
if (trans.Lock(log))<br />
{<br />
// Modify the short desctiption of the well log.<br />
log.Description.ShortDescription = “Porosity – December 2005”;<br />
}<br />
// Commit the changes to the data store.<br />
trans.Commit();<br />
}<br />
// Dispose of the transaction<br />
...<br />
Figure 2-22 Example code <strong>for</strong> using an example.<br />
26<br />
2.2.7.6. Menu Code Changes<br />
The source code <strong>for</strong> the menu bar is contained in the file HelloWorldMenu.cs.<br />
The first part of the filename, “HelloWorldMenu”, is the name entered <strong>for</strong> the<br />
New Menu field in step 1 of the wizard. The second part of the name,<br />
“HelloWorld”, is the name given to the pulldown menu in step 3 of the wizard.<br />
The wizard will create a separate source file <strong>for</strong> each pulldown menu we add to<br />
the module.<br />
In the wizard the “Add Click Event” button was turned on <strong>for</strong> the “Do It” button<br />
that was added to the menu. This caused the wizard to create a method with<br />
“_ToolClick” appended to the button name with its white space removed. The<br />
result is a method called “DoIt_ToolClick”. By default, the method is set up by<br />
the wizard to show a message box containing a message indicating that the<br />
button has been selected.<br />
private void DoIt_ToolClick(object sender, ToolClickEventArgs e)<br />
{<br />
// Add eventhandler implementation here <strong>for</strong> the menuitem<br />
MessageBox.Show("Click event of your new Do It MenuItem.",<br />
"In<strong>for</strong>mation", MessageBoxButtons.OK,<br />
MessageBoxIcon.In<strong>for</strong>mation);<br />
}<br />
Figure 2-23 Original Doit_ToolClick method code.<br />
To output a message to the message window the method has to be changed<br />
(see Figure 2- 24).
private void DoIt_ToolClick(object sender, ToolClickEventArgs e)<br />
{<br />
// Add eventhandler implementation here <strong>for</strong> the menuitem<br />
String message = “HelloWorld menu DoIt button clicked.”;<br />
<strong>Petrel</strong>Logger.InfoOutputWindow(message);<br />
}<br />
Figure 2-24 Modified DoIt_ToolClick method code.<br />
Build the solution and start <strong>Petrel</strong>. When the <strong>Petrel</strong> window is displayed the<br />
HelloWorld menu should appear in the menu bar to the left of the Help menu<br />
(see Figure 2- 25).<br />
new menu<br />
Figure 2-25 HelloWorld pulldown menu in menu bar.<br />
Clicking the HelloWorld menu will expand it to show the “Do It” button (see Figure<br />
2- 26).<br />
new menu<br />
Figure 2-26 HelloWorld pulldown menu with Do it button.<br />
When the “Do It” button is selected from the HelloWorld pulldown menu the<br />
message window will be displayed with the message provided in the<br />
DoIt_ToolClick method (see Figure 2- 27).<br />
Figure 2-27 Output from selection of DoIt button.<br />
27
3. Domain Examples<br />
Now that you’ve learned how the <strong>Ocean</strong> Module Wizard works in the previous<br />
chapter we’ll use it to create some real world examples that access data from<br />
the <strong>Petrel</strong> data model. These examples will<br />
1. Create a well with a path defined by a point set<br />
2. Upscale a well log<br />
These examples will expose you to the <strong>Ocean</strong> domain object API <strong>for</strong> several<br />
types of data. We’ll create them in one Visual Studio solution, but use different<br />
projects <strong>for</strong> each.<br />
3.1. Creating a Well Path from a Point Set<br />
This example creates a new well in a well collection with a path defined by a set<br />
of coordinates defined by an object called a Point Set. The Point Set object may<br />
be provided in the demo project, or, if it is not present, it may be created by<br />
using the <strong>Petrel</strong> Draw Polygon utility. Draw Polygon is found in the Process<br />
diagram Utilities folder. Point Set objects in the project are found in the Input tab<br />
of the <strong>Petrel</strong> Explorer window.<br />
The Create Well Path example will be a process added to the Process diagram.<br />
Its process will have three arguments. These are:<br />
1. Input Points – the points defining the well path contained in a PointSet<br />
object.<br />
2. Result – the Borehole object that is created from the points.<br />
3. Name – a string to hold the name of the Borehole that will be created.<br />
4. Borehole Collection – an object from <strong>Petrel</strong> Explorer that contains a set<br />
of boreholes.<br />
28<br />
3.1.1. Create the CreateWellFromPoints project<br />
Create the project <strong>for</strong> creating a well from a Point Set by per<strong>for</strong>ming the<br />
following:<br />
1. Start Visual Studio and create a new project (File > New > Project...)
2. Select <strong>Ocean</strong> Module from the Templates<br />
3. Set the Name to CreateWellFromPointSet and the Solution Name to<br />
GettingStarted. Check the location where the solution will reside. Make<br />
sure the Create directory <strong>for</strong> solution button is on.<br />
4. Once the settings are verified select OK to start the <strong>Ocean</strong> Module<br />
Wizard.<br />
5. Set the project Name and Namespace to CreateWellFromPointSet<br />
6. Turn on the Process button and enter the name WellFromPoints in the<br />
text field. Make sure the “Add module to <strong>Petrel</strong> config” button is checked<br />
(See Figure 3- 1).<br />
Figure 3-1 WellFromPoints project setup in wizard.<br />
7. Select Next to proceed to the next step to set up the process<br />
descriptions and arguments.<br />
8. Choose whether you want to use the standard process dialog or to<br />
create your own, as it is done here. Creating your own dialog will give<br />
you more flexibility, but you have to handle the WinForms part. Turn the<br />
29
checkbox “Generate custom UI” only if you want to create your own<br />
dialog (seeFigure 3- 2).<br />
9. Define the arguments <strong>for</strong> the process (seeFigure 3- 2). You will need the<br />
following:<br />
a. Input Points – Input argument that is a PointSet type (a <strong>Petrel</strong><br />
domain object).<br />
b. Result – Input / Output argument that is a Borehole type.<br />
c. Name – a String Input argument to hold the name of the<br />
Borehole to be created, if needed.<br />
d. Borehole Collection – Input argument specifying where the<br />
Borehole will eventually be created.<br />
Figure 3-2 Arguments <strong>for</strong> WellFromPoints process<br />
10. Select Next to go to the next wizard step where the contents of the<br />
solution are reviewed.<br />
11. Check the solution contents that will be created by the wizard and go to<br />
last step (see Figure 3- 3).<br />
30
Figure 3-3 Review solution contents.<br />
The next step allows you to add reference settings to your project (include<br />
.dll references in Visual Studio to get more definitions). The wizard will<br />
include a number of references, like Basics, Core, Data, Geometry, <strong>Petrel</strong><br />
and <strong>Petrel</strong>.DomainObject.<br />
Step 4 will allow you to browse through the <strong>Ocean</strong> libraries and check<br />
additional services (see Figure 3- 4).<br />
31
Figure 3-4 Addition of references.<br />
12. When the wizard finishes you will have a new solution and project in<br />
your Visual Studio Solution Explorer (see Figure 3-5).<br />
Figure 3-5 Solution Explorer with GettingStarted project containing<br />
CreateWellFromPointSet module.<br />
13. If you have chosen to design a custom dialog <strong>for</strong> your process, you will<br />
have to add all the controls needed to let the user specify the arguments<br />
that you have specified <strong>for</strong> your process (see Figure 3- 6). <strong>Ocean</strong> will just<br />
32
add the “Apply”, “OK” and “Cancel” buttons that will initiate the Workstep<br />
execution.<br />
Figure 3-6 Custom dialog design.<br />
14. Implement the contents of the InvokeSimpleCore method to per<strong>for</strong>m the<br />
processing (see Figure 3- 7).<br />
33
Protected override void<br />
InvokeSimpleCore(WellFromPoints.Arguments argumentPackage)<br />
{<br />
// Set up input argument variables from argumentPackage<br />
PointSet pointset = argumentPackage.InputPoints;<br />
Borehole result = argumentPackage.Result;<br />
String boreholename = argumentPackage.Name;<br />
BoreholeCollection folder = argumentPackage.BoreholeCollection;<br />
// Start a transaction <strong>for</strong> the process<br />
using (ITransaction trans = DataManager.NewTransaction())<br />
{<br />
// If a not specified, create a new Borehole<br />
if (result == null)<br />
{<br />
if (folder == null)<br />
{<br />
Project p = <strong>Petrel</strong>Project.PrimaryProject;<br />
folder = BoreholeCollection.GetRootBoreholeCollection(p);<br />
}<br />
trans.Lock(folder);<br />
// if not supplied, set Borehole name to “wildcat”<br />
if (boreholename == null) boreholename = "wildcat";<br />
result = folder.CreateBorehole(boreholename);<br />
// New Borehole is locked implicitly.<br />
}<br />
else {<br />
// Lock the Borehole since we’ll be modifying it<br />
trans.Lock(result);<br />
}<br />
// Set the Kelly Bushing value <strong>for</strong> the well.<br />
result.KellyBushing = 100.0f;<br />
// Set the location of the well as the first point in the set<br />
<strong>for</strong>each (Point3 p in pointset.Points)<br />
{<br />
result.WellHead = new Point2(p.X, p.Y);<br />
}<br />
break;<br />
}<br />
}<br />
// Make a polyline from the points and append it to the well.<br />
// Note that this is an append, so executing the workstep twice<br />
// on the same well will loop and duplicate the trajectory.<br />
// When replacing the trajectory of an existing Borehole,<br />
// set Trajectory.Polyline, instead of calling AppendPolyline<br />
IPolyline3 polyline = new Polyline3(pointset.Points);<br />
result.Trajectory.AppendPolyline(polyline);<br />
wildCat.AppendPolylineTrajectory(polyline);<br />
// Commit the data created in the transaction to the data store.<br />
trans.Commit();<br />
// Set the output argument to the new borehole.<br />
argumentPackage.Result = result;<br />
Figure 3-7 WellsFromPoints InvokeSimpleCore method code.<br />
15. Build the solution to make sure it compiles. We’ll describe the running of<br />
the process later.<br />
34
3.2. Upscale a Well Log<br />
This example will create a simple upscale log property <strong>for</strong> a grid. The well log<br />
selected by the user is intersected with the grid selected by the user. The output<br />
is a property <strong>for</strong> the grid in which each cell intersected by the well contains an<br />
average value <strong>for</strong> the log samples falling within the cell.<br />
This example is also a process added to the Process Manager. It has three<br />
arguments. These include:<br />
1. Well Log – input argument <strong>for</strong> well log to upscale.<br />
2. Grid – input argument <strong>for</strong> grid to intersect with the well log.<br />
3. Property – output argument <strong>for</strong> the property to create.<br />
3.2.1. Create the Upscale Well Log Example<br />
The Upscale Well Log example will be added as another project in the same<br />
GettingStarted solution. Per<strong>for</strong>m the following steps to create this example:<br />
1. Make sure the GettingStarted solution from the previous example is<br />
loaded in Visual Studio.<br />
35
2. Highlight the solution in the Solution Explorer window and add a new<br />
project (see Figure 3- 8).<br />
add new project to existing<br />
solution<br />
Figure 3-8 Adding new project to GettingStarted solution.<br />
36
3. When the Add New Project dialog appears select the <strong>Ocean</strong> Module<br />
template from the Templates panel. Enter the Name UpscaleWell.<br />
Check the location and modify it, if necessary, to reference the directory<br />
<strong>for</strong> the solution. This should be GettingStarted from the previous<br />
example (seeFigure 3- 9). Select OK to start the <strong>Ocean</strong> Module wizard.<br />
select <strong>Ocean</strong> module<br />
set name<br />
set location<br />
Figure 3-9 New project definition.<br />
37
4. The wizard will now start and present its first window where the items<br />
<strong>for</strong> the project are defined. Turn on the New Process check box and<br />
enter “PropertyFromLog” in the corresponding text field (See Figure<br />
3- 10). Select the Next button to proceed to the following step.<br />
Figure 3-10 Project options <strong>for</strong> UpscaleLog.<br />
5. Turn off the custom UI implementation check box.<br />
38
6. Define the four arguments <strong>for</strong> the process in this step (see Figure 3- 11).<br />
a. Well Log – Input argument with a type of WellLog defining the<br />
log to process.<br />
b. Grid – Input argument with a type of Grid defining the grid to<br />
intersect and contain the output property.<br />
c. Cells processed – Output argument that will show the number<br />
of grid cells intersected by the log.<br />
d. Output Property – Ouput argument that will contain the property<br />
object created by the process.<br />
Figure 3-11 Argument definition <strong>for</strong> the Upscale Log process.<br />
39
7. Select Next to proceed to the next step which reviews the in<strong>for</strong>mation<br />
<strong>for</strong> the project. If the in<strong>for</strong>mation is correct, then select Finish to<br />
complete the wizard and add the project to the solution (see Figure 3- 12).<br />
Figure 3-12 Upscale Log final project settings.<br />
8. The project is added to the solution with the previous one (See Figure<br />
3- 13).<br />
Figure 3-13 Solution with UpscaleWell project added.<br />
40
9. You now have to change the project source to implement the process.<br />
The InvokeSimpleCore method will be found in PropertyFromLog.cs.<br />
Replace the “// TODO:” comment with the code in Figure 3- 14.<br />
public void InvokeSimpleCore(PropertyFromLog.Arguments argumentPackage)<br />
{<br />
WellLog log = argumentPackage.WellLog;<br />
Grid grid = argumentPackage.Grid;<br />
Property prop = argumentPackage.OutputProperty;<br />
// Create the property and return the number of cells intersected.<br />
argumentPackage.CellsProcessed = UpscaleLog(log, grid, ref prop);<br />
}<br />
// Put the created property in the output argument.<br />
argumentPackage.OutputProperty = prop;<br />
Figure 3-14 Modified Invoke method.<br />
10. There is a separate method called UpscaleLog that per<strong>for</strong>ms the<br />
processing <strong>for</strong> this Workstep. The code <strong>for</strong> this method must be added<br />
to the source file. It can be placed immediately after the code <strong>for</strong> the<br />
InvokeSimpleCore method (see Figure 3- 15). Note that the output<br />
Property variable “prop” is passed by reference to UpscaleLog.<br />
private static int UpscaleLog(WellLog log, Grid grid, ref Property prop)<br />
{<br />
// Initialize counter <strong>for</strong> cells intersected.<br />
int count = 0;<br />
// Start a transaction <strong>for</strong> this process and lock the grid<br />
ITransaction trans = DataManager.NewTransaction();<br />
using (trans)<br />
{<br />
If (prop == null)<br />
{<br />
trans.Lock(grid);<br />
// get log property version<br />
PropertyVersion logpv = log.WellLogVersion;<br />
// create the property and add it to the grid<br />
// Construct its name from the well containing the log<br />
prop = grid.CreateProperty(logpv);<br />
// new property is locked implicitly.<br />
prop. Name = "Upscale Prop " + log.Borehole.Name;<br />
grid.AddProperty(prop);<br />
}<br />
else {<br />
// lock the property so we can update it<br />
trans.Lock(prop);<br />
}<br />
// create a hash table of the log samples in measured depth<br />
Hashtable logLUT = new Hashtable();<br />
// Dump the log values and MD values in the hash table<br />
<strong>Petrel</strong>Logger.InfoOutputWindow("Log Values MD<br />
Value");<br />
<strong>for</strong>each(WellLogSample sample in log.Samples)<br />
{<br />
logLUT[sample.MD] = sample.Value;<br />
<strong>Petrel</strong>Logger.InfoOutputWindow(" " + sample.MD +<br />
" " + sample.Value);<br />
41
}<br />
// intersect the log with the grid and return cells traversed<br />
IEnumerable logInCells = log.GetLogInCells(grid);<br />
// find the average value of the log in the cell<br />
<strong>Petrel</strong>Logger.Info("******* Log in cells ********");<br />
<strong>for</strong>each(LogInCell lic in logInCells)<br />
{<br />
// get first and last log points in the cell and cell index<br />
double MDIn = lic.MD_In;<br />
double MDOut = lic.MD_Out;<br />
Index3 ind = lic.Index;<br />
// compute average of points entering and leaving cell<br />
float avg = ((float)logLUT[MDIn] + (float)logLUT[MDOut])/2;<br />
prop[ind] = avg;<br />
}<br />
// dump the result an increment the counter<br />
<strong>Petrel</strong>Logger.InfoOutputWindow(MDIn + " " + logLUT[MDIn] +<br />
" " + MDOut + " " + logLUT[MDOut] + " " +<br />
ind.I + " " + ind.J + " " + ind.K + " " + avg );<br />
count++;<br />
}<br />
// commit the transaction to save the data<br />
trans.Commit();<br />
}<br />
return count;<br />
11. Build the solution.<br />
Figure 3-15 Code <strong>for</strong> private method UpscaleLog<br />
3.3. Running the Examples<br />
When the example projects were created the petrel.exe.config file was updated<br />
by the wizard with the module name and assembly. The wizard also set up the<br />
projects in Visual Studio to start <strong>Petrel</strong> when you start debugging. Per<strong>for</strong>m the<br />
following tasks to run the examples:<br />
1. Start debugging from Visual Studio after building the solution. If you<br />
prefer not to debug you may start <strong>Petrel</strong> outside Visual Studio.<br />
2. Open a project in <strong>Petrel</strong> that has a Point set object in the <strong>Petrel</strong><br />
Explorer Input tab (see Figure 3- 16). If no Point set object is available,<br />
then use the Process diagram Utilities folder Make/Edit polygons<br />
process to create one. Use a 3D object to place your points in space.<br />
42
Figure 3-16 Point set object in <strong>Petrel</strong> Explorer.<br />
43
3. Start the WellFromPoints process by double clicking on it in the <strong>Petrel</strong><br />
Process manager. It will start and its user interface dialog will be<br />
displayed (see Figure 3-17).<br />
double-click to start<br />
Figure 3-17 WellFromPoints in Process Manager and its UI dialog.<br />
44
4. Fill in the arguments in the dialog by selecting the well collection in<br />
<strong>Petrel</strong> Explorer and dropping it into the Borehole Collection field by<br />
clicking the blue arrow next to the field. Repeat this <strong>for</strong> the Points object<br />
and Input Points field. Then enter a name <strong>for</strong> the new Borehole (see<br />
Figure 3- 18).<br />
drag<br />
drag<br />
enter<br />
name<br />
Figure 3-18 Input arguments filled in <strong>for</strong> WellFromPoints<br />
45
5. Select Apply to run the process and the well “Wildcat” will be created.<br />
You may display it in a 3D window by turning on its checkbox. Turning<br />
on the checkbox <strong>for</strong> the point set allows you to verify the borehole path<br />
corresponds to the points in the point set (see Figure 3- 19).<br />
Figure 3-19 WellFromPoints results displayed in 3D window.<br />
46
6. Close the WellFromPoints dialog and open the PropertyFromLog dialog<br />
by double clicking on it in the Process Manager window. It will start and<br />
its interface will be displayed.<br />
Figure 3-20 PropertyFromLog process startup and user interface.<br />
47
7. Select a well log from one of the wells in the <strong>Petrel</strong> Explorer Input tab<br />
and use the blue arrow drop icon to deposit it in the Well Log argument<br />
field. Use the same procedure to drop a grid from the <strong>Petrel</strong> Explorer<br />
Models tab into the Grid argument field.<br />
Figure 3-21 Well log and grid inputs to PropertyFromLog.<br />
48
8. Select Apply to run the process. It will produce output to the Message<br />
window dumping the contents of the well log and values from the cells<br />
in the output property. The Number of cells in the output property and<br />
the Output Property name are displayed in the dialog (see Figure 3- 22).<br />
Figure 3-22 Results of processing in PropertyFromLog.<br />
49
9. The property created from the well log has the name “Upscale Prop<br />
xxx” where “xxx” is the name of the borehole that contains the well log<br />
used by the process. The property can be displayed by locating it in the<br />
<strong>Petrel</strong> Explorer Models tab and turning on its check box when a 3D<br />
window is active (see Figure 3- 23).<br />
Figure 3-23 Property created in cells intersected by well log.<br />
50
4. Help Resources and Debugging Hints<br />
<strong>Ocean</strong> <strong>for</strong> <strong>Petrel</strong> provides resources to help the module developer in a variety of<br />
<strong>for</strong>ms. These range from online documentation to hardcopy books and training<br />
classes.<br />
4.1. Online Documentation<br />
The online documentation <strong>for</strong> <strong>Ocean</strong> <strong>for</strong> <strong>Petrel</strong> is available from the Help menu<br />
in the <strong>Petrel</strong> main window (see Figure 4- 1).<br />
Figure 4-1 Accessing help <strong>for</strong> <strong>Ocean</strong> <strong>for</strong> <strong>Petrel</strong>.<br />
51
Figure 4-2 Location of <strong>Ocean</strong> <strong>for</strong> <strong>Petrel</strong> online help file.<br />
<strong>Ocean</strong><strong>Petrel</strong> Help will open the <strong>Ocean</strong>.chm file that is found in the “/Help”<br />
subdirectory of the <strong>Ocean</strong> <strong>for</strong> <strong>Petrel</strong> installation directory (see Figure 4-2). You<br />
can place a shortcut to this file on your desktop so you may view its contents<br />
without having to first start <strong>Petrel</strong>.<br />
Figure 4-3 <strong>Ocean</strong> <strong>for</strong> <strong>Petrel</strong> online help shown in browser.<br />
52
When the <strong>Ocean</strong> <strong>for</strong> <strong>Petrel</strong> help is opened the contents of the compiled html<br />
(.chm) file will be displayed in a browser window (see Figure 4- 3). The left side of<br />
the window contains the hierarchy of topics in the file. There are four main topics<br />
including an introduction, <strong>Ocean</strong> Core, <strong>Ocean</strong> Services, and <strong>Ocean</strong> <strong>Petrel</strong>. The<br />
in<strong>for</strong>mation <strong>for</strong> the topic that is selected in the left side of the window will be<br />
displayed in the right side of the window.<br />
The topics <strong>Ocean</strong> Core and <strong>Ocean</strong> Services contain in<strong>for</strong>mation on the<br />
infrastructure provided by <strong>Ocean</strong> that is available to all product families. The<br />
<strong>Ocean</strong> <strong>Petrel</strong> topic contains in<strong>for</strong>mation on the <strong>Petrel</strong> domain objects and user<br />
interface components that are provided by <strong>Ocean</strong> <strong>Petrel</strong>.<br />
The left side of the window has tabs <strong>for</strong> Contents, Index, Search, and Favorites.<br />
Items listed in the Contents tab may be expanded or contracted by selecting the<br />
“+” or “-“ respectively to the left of the item.<br />
The Index tab provides an alphabetized list of major topics with subtopics where<br />
available. Double clicking on an item in the Index will display the in<strong>for</strong>mation <strong>for</strong><br />
that item.<br />
The Search tab allows the user to search <strong>Ocean</strong> <strong>for</strong> <strong>Petrel</strong> Help <strong>for</strong> topics<br />
matching the contents of the text field. You may use wildcards (*) in your search.<br />
Hitting the Enter key or the List Topics button will trigger the search <strong>for</strong> the text<br />
you’ve provided. Double clicking on a topic in the resulting list will display its<br />
contents in the right side of the window.<br />
The Favorites tab gives you the ability to save pointers to topics that you want to<br />
return to later without having to work through the hierarchy. Display the topic you<br />
want to save and select the Favorites tab. The current topic will be indicated at<br />
the bottom of the left side of the window. Select the Add button to insert it in the<br />
list of favorite topics. You can also remove topics from your Favorites list if<br />
desired by selecting the topic and clicking the Remove button.<br />
4.2. Hardcopy Documentation<br />
Hardcopy documentation <strong>for</strong> <strong>Ocean</strong> <strong>for</strong> <strong>Petrel</strong> is available in the <strong>for</strong>m of the<br />
<strong>Ocean</strong> <strong>for</strong> <strong>Petrel</strong> Application Programmers Reference Guide.<br />
4.3. Training<br />
Training <strong>for</strong> <strong>Ocean</strong> <strong>for</strong> <strong>Petrel</strong> is available through the <strong>Schlumberger</strong> In<strong>for</strong>mation<br />
Solutions <strong>Ocean</strong> Support team. The training class has as pre-requisites an<br />
53
understanding of the Microsoft .Net environment, Visual Studio 2003, and the<br />
C# language. It is also recommended that the Introduction to <strong>Petrel</strong> course be<br />
taken first to provide a basic understanding of <strong>Petrel</strong> capabilities and use.<br />
4.4. Debugging Hints<br />
Congratulations! You have run the wizard and created your module. You are<br />
adding your code and attempting to build, but the build is failing. Or, you have<br />
built successfully but your new module is not appearing in the menu or Process<br />
Diagram. Perhaps the process runs, but when you click the Apply button you<br />
always get a bad argument error. What happened? Here are a few hints to help<br />
you determine the source of your problem.<br />
4.4.1. Build Failed<br />
The build may fail <strong>for</strong> an infinite number of reasons. The most common is a<br />
missing reference. While the wizard will add required references to your project<br />
you may find it necessary to add more references based on the objects you are<br />
using in the <strong>Ocean</strong> API. Refer to the <strong>Ocean</strong><strong>Petrel</strong> Help <strong>for</strong> the object in question<br />
to determine its assembly. All <strong>Ocean</strong> assemblies start with “Slb.<strong>Ocean</strong>”. Domain<br />
objects are found under “Slb.<strong>Ocean</strong>.<strong>Petrel</strong>...”.<br />
4.4.2. Process Not Appearing in Process Diagram<br />
The wizard will add your module to the petrel.exe.config file so you shouldn’t see<br />
this problem with a module created by the wizard. However, it is common to<br />
have multiple modules in an assembly and you must make sure that each<br />
module is specified in the config file as a separate entry. If you used cut and<br />
paste to create another module in your project (another implementation of<br />
IModule), then you have to edit the config file by hand to add the module.<br />
54