MCR-FL-C-UI/UI-B-DCI-24/230 - Onlinecomponents.com
MCR-FL-C-UI/UI-B-DCI-24/230 - Onlinecomponents.com
MCR-FL-C-UI/UI-B-DCI-24/230 - Onlinecomponents.com

You also want an ePaper? Increase the reach of your titles
YUMPU automatically turns print PDFs into web optimized ePapers that Google loves.
<strong>24</strong>-<strong>230</strong><br />
POWER<br />
VAC/DCGND3<br />
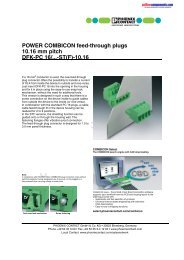
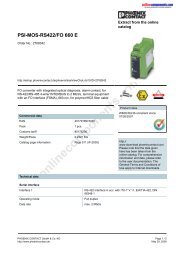
<strong>MCR</strong>-<strong>FL</strong>-C-<strong>UI</strong>/<strong>UI</strong>-B-<strong>DCI</strong>-<strong>24</strong>/<strong>230</strong><br />
Configurable 3-Way Isolating Amplifier in Bipolar<br />
Version, Standard Signal Range ±20 mA or ±10 V<br />
INTERFACE<br />
Data Sheet<br />
Description<br />
© PHOENIX CONTACT - 08/2005<br />
The 3-way isolation guarantees reliable decoupling of the sensor circuit from the processing circuit and prevents linked<br />
measurement circuits from influencing each other.<br />
This 3-way isolation amplifier is used to electrically isolate and convert the standardized current and voltage signals listed<br />
in the table on page 5.<br />
Functioning<br />
First the analog signal is modulated and then electrically decoupled using a transmitter. The isolated signal is then made<br />
available at the output, demodulated, filtered and amplified.<br />
online<strong>com</strong>ponents.<strong>com</strong><br />
3 4<br />
1 2<br />
U<br />
IN<br />
IN<br />
Ι GND1<br />
GND1<br />
SPAN<br />
ZERO<br />
<strong>MCR</strong>-<strong>FL</strong>-C-<strong>UI</strong>/<strong>UI</strong>-B-<strong>DCI</strong>-<strong>24</strong>/<strong>230</strong><br />
POWER<br />
OUT<br />
Ι GND2<br />
/U<br />
<strong>MCR</strong>-<strong>FL</strong>-C-<strong>UI</strong>/<strong>UI</strong>-B-<strong>DCI</strong>-<strong>24</strong>/<strong>230</strong><br />
Art.-Nr.: 28 64 32 5<br />
Konf. Trennverst rker / Conf. Converter<br />
≈<br />
=<br />
ERROR<br />
0…10V 0…20mA<br />
2…10V 4…20mA<br />
± 10V ± 20mA<br />
0…5V 0…10mA<br />
1…5V 2…10mA<br />
± 5V ± 10mA<br />
Range DIP S1 DIP S2<br />
default Input 1 2 3 1<br />
OFF OFF OFF CUTOFF<br />
OFF OFF ON Frequency<br />
X<br />
ON OFF OFF 8kHz OFF<br />
OFF ON OFF 30Hz ON<br />
OFF ON ON<br />
ON ON OFF<br />
Range<br />
DIP S2<br />
Output 2 3 4 5 6<br />
OFF OFF OFF ON ON<br />
OFF OFF ON ON ON<br />
X<br />
OFF ON OFF ON ON<br />
ON OFF OFF ON ON<br />
ON OFF ON ON ON<br />
ON ON OFF ON ON<br />
OFF OFF OFF OFF OFF<br />
OFF OFF ON OFF OFF<br />
OFF ON OFF OFF OFF<br />
ON OFF OFF OFF OFF<br />
ON OFF ON OFF OFF<br />
ON ON OFF OFF OFF<br />
ISOLATION<br />
POWER<br />
TEMPERATURE<br />
0…10V<br />
2…10V<br />
± 10V<br />
0…5V<br />
1…5V<br />
± 5V<br />
0…20mA<br />
4…20mA<br />
± 20mA<br />
0…10mA<br />
2…10mA<br />
± 10mA<br />
CUTOFF FREQUENCY<br />
< 0.1 %<br />
30HZ/8KHZ<br />
4 kV, 50 Hz, 1min.<br />
<strong>24</strong>…<strong>230</strong> VDC, -15%+10%, 0.9W<br />
<strong>24</strong>…<strong>230</strong> VAC, -15%+10%, 2 VA<br />
-20… + 65 °C<br />
- 4… +145 °F<br />
Dangerous voltage!<br />
These tasks must only be performed by qualified electricians who are familiar with the applicable safety<br />
measures required.<br />
Make sure that you always use the latest documentation.<br />
It can be downloaded at www.download.phoenixcontact.<strong>com</strong>.<br />
A conversion table is available on the Internet at<br />
www.download.phoenixcontact.<strong>com</strong>/general/7000_en_00.pdf<br />
This data sheet is valid for all products listed on the following page:<br />
102704_00_en PHOENIX CONTACT GmbH & Co. KG • Flachsmarktstraße 8 • 32825 Blomberg • Germany<br />
1<br />
Phone: +49-(0) 5235-3-00 • Fax: +49-(0) 5235-3-4 12 00 • www.phoenixcontact.<strong>com</strong><br />
www.phoenixcontact.<strong>com</strong>/salesnetwork
<strong>MCR</strong>-<strong>FL</strong>-C-<strong>UI</strong>/<strong>UI</strong>-B-<strong>DCI</strong>-<strong>24</strong>/<strong>230</strong><br />
Ordering Data<br />
Description Type Order No. Pcs./Pck.<br />
Configurable 3-way isolating amplifier in bipolar version,<br />
standard signal range ±20 mA or ±10 V<br />
Technical Data<br />
<strong>MCR</strong>-<strong>FL</strong>-C-<strong>UI</strong>/<strong>UI</strong>-B-<strong>DCI</strong>-<strong>24</strong>/<strong>230</strong> 28 64 32 5 1<br />
Input (Measuring Input) Current Voltage<br />
Input signals<br />
0…20 mA, 0…10 mA,<br />
4…20 mA, 2…10 mA,<br />
±20 mA, ±10 mA<br />
online<strong>com</strong>ponents.<strong>com</strong><br />
0…10 V, 0…5 V,<br />
2…10 V, 1…5 V,<br />
±10 V, ±5 V<br />
Input resistance 25 Ω, approx. 1 MΩ, approx.<br />
Max. input signal ≤ 100 mA ≤ 30 V<br />
Max. input signal (linear transmission) bipolar: -110...+110%<br />
unipolar: -2...+110%<br />
Output (Measuring Output) Current Voltage<br />
Output signals<br />
0…20 mA, 0…10 mA,<br />
4…20 mA, 2…10 mA,<br />
±20 mA, ±10 mA<br />
0…10 V, 0…5 V,<br />
2…10 V, 1…5 V,<br />
±10 V, ±5 V<br />
Max. output signal 35 mA 15 V<br />
Load ≤ 600 Ω > 10 kΩ<br />
Residual ripple<br />
< 20 mV rms<br />
General Data<br />
Supply voltage range<br />
<strong>24</strong>...<strong>230</strong> V AC/DC; 2 VA / 0,9 W<br />
Permissible range<br />
20.4...253 V AC/DC<br />
Frequency<br />
48...62 Hz<br />
Max. operation current<br />
60 mA (without load current)<br />
Transmission error<br />
< 0.1% of end value<br />
Compensation ZERO/SPAN ±15%<br />
Temperature coefficient<br />
0.01%/K<br />
Cut-off frequency (3 dB)<br />
8 kHz / 30 Hz switchable<br />
Step response (10...90%)<br />
30 µs at 8 kHz / 15 ms at 30 Hz<br />
Test voltage<br />
Input / output<br />
Input / supply<br />
Output / supply<br />
4 kV / 50 Hz / 1 min.<br />
4 kV / 50 Hz / 1 min.<br />
4 kV / 50 Hz / 1 min.<br />
Protection against dangerous body currents<br />
Acc. to DIN EN 61010-1 up to 300 V AC/DC for surge voltage category II and<br />
contamination class 2 between input, output and supply voltage<br />
Ambient temperature range<br />
-20°C to +65°C<br />
Protection type<br />
IP20<br />
Installation position<br />
As desired<br />
Assembly<br />
As desired<br />
Type of connection<br />
Pluggable screw terminal blocks COMBICON<br />
Dimensions (W x H x D)<br />
12.5 mm x 99 mm x 114.5 mm<br />
Conductor cross section 0.2...2.5 mm 2<br />
Type of housing<br />
Polyamide PA non-reinforced<br />
102704_00_en PHOENIX CONTACT 2
<strong>MCR</strong>-<strong>FL</strong>-C-<strong>UI</strong>/<strong>UI</strong>-B-<strong>DCI</strong>-<strong>24</strong>/<strong>230</strong><br />
Safety Notes<br />
Elements<br />
1<br />
When operating the isolating amplifier, certain parts of the module can carry dangerous voltage!<br />
Ignoring the warnings can lead to serious injury and/or cause damage!<br />
The <strong>MCR</strong>-<strong>FL</strong>-C-<strong>UI</strong>/<strong>UI</strong>-B-<strong>DCI</strong>-<strong>24</strong>/<strong>230</strong> modules must only be installed and put into operation by qualified<br />
staff.<br />
Qualified personnel are persons who, because of their education, experience and instruction, and their<br />
knowledge of relevant standards, regulations, accident prevention, and service conditions, have been<br />
authorized to carry out any required operations, and who are able to recognize and avoid any possible<br />
dangers.<br />
The isolating amplifier must not be put into operation if the housing is open.<br />
The adjustment with the potentiometer on the front must only be carried out with a screwdriver which<br />
is securely insulated against the input voltage!<br />
In applications with high operating voltages sufficient distance and insulation as well as shock<br />
protection must be ensured.<br />
Safe and trouble-free operation of this device can only be guaranteed if transport, storage and installation<br />
are carried out correctly and operation and maintenance are carried out with care.<br />
3 4<br />
1 2<br />
2<br />
U<br />
IN<br />
IN<br />
Ι GND1<br />
GND1<br />
SPAN<br />
ZERO<br />
<strong>MCR</strong>-<strong>FL</strong>-C-<strong>UI</strong>/<strong>UI</strong>-B-<strong>DCI</strong>-<strong>24</strong>/<strong>230</strong><br />
POWER<br />
OUT<br />
POWER<br />
<strong>24</strong>-<strong>230</strong><br />
VAC/DCGND3<br />
Ι GND2<br />
/U<br />
<strong>MCR</strong>-<strong>FL</strong>-C-<strong>UI</strong>/<strong>UI</strong>-B-<strong>DCI</strong>-<strong>24</strong>/<strong>230</strong><br />
Art.-Nr.: 28 64 32 5<br />
Konf. Trennverst rker / Conf. Converter<br />
0…10V 0…20mA<br />
2…10V 4…20mA<br />
± 10V ± 20mA<br />
0…5V 0…10mA<br />
1…5V 2…10mA<br />
± 5V ± 10mA<br />
Range DIP S1 DIP S2<br />
default Input 1 2 3 1<br />
OFF OFF OFF CUTOFF<br />
OFF OFF ON Frequency<br />
X<br />
ON OFF OFF 8kHz OFF<br />
OFF ON OFF 30Hz ON<br />
OFF ON ON<br />
ON ON OFF<br />
Range<br />
DIP S2<br />
Output 2 3 4 5 6<br />
OFF OFF OFF ON ON<br />
OFF OFF ON ON ON<br />
X<br />
OFF ON OFF ON ON<br />
ON OFF OFF ON ON<br />
ON OFF ON ON ON<br />
ON ON OFF ON ON<br />
OFF OFF OFF OFF OFF<br />
OFF OFF ON OFF OFF<br />
OFF ON OFF OFF OFF<br />
ON OFF OFF OFF OFF<br />
ON OFF ON OFF OFF<br />
ON ON OFF OFF OFF<br />
0…10V<br />
2…10V<br />
± 10V<br />
0…5V<br />
1…5V<br />
± 5V<br />
0…20mA<br />
4…20mA<br />
± 20mA<br />
0…10mA<br />
2…10mA<br />
± 10mA<br />
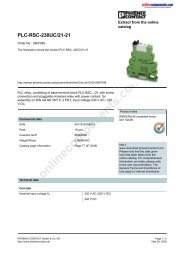
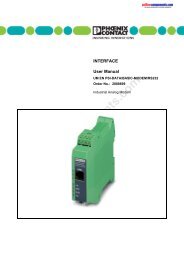
1 Signal input: pluggable screw terminal block<br />
2 ZERO potentiometer<br />
3 SPAN potentiometer<br />
4 Signal output: pluggable screw terminal block<br />
5 Supply voltage: pluggable screw terminal block<br />
6 Metal latch for fixing to the mounting rail<br />
online<strong>com</strong>ponents.<strong>com</strong><br />
≈<br />
=<br />
3<br />
ERROR<br />
CUTOFF FREQUENCY<br />
ISOLATION<br />
POWER<br />
TEMPERATURE<br />
< 0.1 %<br />
30HZ/8KHZ<br />
4 kV, 50 Hz, 1min.<br />
<strong>24</strong>…<strong>230</strong> VDC, -15%+10%, 0.9W<br />
<strong>24</strong>…<strong>230</strong> VAC, -15%+10%, 2 VA<br />
-20… + 65 °C<br />
- 4… +145 °F<br />
4<br />
5<br />
6<br />
Figure 1<br />
Elements<br />
102704_00_en PHOENIX CONTACT 3
<strong>MCR</strong>-<strong>FL</strong>-C-<strong>UI</strong>/<strong>UI</strong>-B-<strong>DCI</strong>-<strong>24</strong>/<strong>230</strong><br />
Block Diagram<br />
IN OUT<br />
IN I<br />
GND 1<br />
1<br />
2<br />
Ι<br />
/U<br />
U<br />
5<br />
6<br />
OUT I/U<br />
GND 2<br />
IN U 3<br />
GND 1 4<br />
Figure 2<br />
Configuration<br />
Block diagram<br />
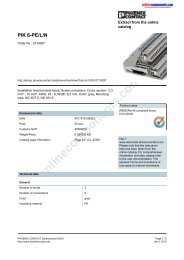
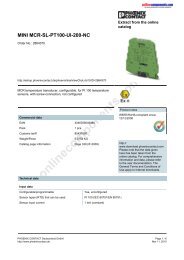
Opening the Module<br />
Figure 3<br />
Electrostatic Discharge!<br />
The module contains <strong>com</strong>ponents that can be damaged or destroyed by electrostatic discharge. When handling<br />
the module, observe the necessary safety precautions against electrostatic discharge (ESD), in accordance<br />
with EN 61340-5-1 and EN 61340-5-2, as well as IEC 61340-5-1 and IEC 61340-5-2.<br />
1<br />
3 4<br />
2<br />
1 2<br />
online<strong>com</strong>ponents.<strong>com</strong><br />
Opening the module<br />
U<br />
IN<br />
IN<br />
Ι GND1<br />
GND1<br />
SPAN<br />
ZERO<br />
<strong>MCR</strong>-<strong>FL</strong>-C-<strong>UI</strong>/<strong>UI</strong>-B-<strong>DCI</strong>-<strong>24</strong>/<strong>230</strong><br />
POWER<br />
OUT<br />
POWER<br />
<strong>24</strong>-<strong>230</strong><br />
VAC/DCGND3<br />
Ι GND2<br />
/U<br />
<strong>MCR</strong>-<strong>FL</strong>-C-<strong>UI</strong>/<strong>UI</strong>-B-<strong>DCI</strong>-<strong>24</strong>/<strong>230</strong><br />
Art.-Nr.: 28 64 32 5<br />
Konf. Trennverst rker / Conf. Converter<br />
≈<br />
=<br />
ERROR<br />
0…10V 0…20mA<br />
2…10V 4…20mA<br />
± 10V ± 20mA<br />
0…5V 0…10mA<br />
1…5V 2…10mA<br />
± 5V ± 10mA<br />
Range DIP S1 DIP S2<br />
default Input 1 2 3 1<br />
OFF OFF OFF CUTOFF<br />
OFF OFF ON Frequency<br />
X<br />
ON OFF OFF 8kHz OFF<br />
OFF ON OFF 30Hz ON<br />
OFF ON ON<br />
ON ON OFF<br />
Range<br />
DIP S2<br />
Output 2 3 4 5 6<br />
OFF OFF OFF ON ON<br />
OFF OFF ON ON ON<br />
X<br />
OFF ON OFF ON ON<br />
ON OFF OFF ON ON<br />
ON OFF ON ON ON<br />
ON ON OFF ON ON<br />
OFF OFF OFF OFF OFF<br />
OFF OFF ON OFF OFF<br />
OFF ON OFF OFF OFF<br />
ON OFF OFF OFF OFF<br />
ON OFF ON OFF OFF<br />
ON ON OFF OFF OFF<br />
0…10V<br />
2…10V<br />
± 10V<br />
0…5V<br />
1…5V<br />
± 5V<br />
0…20mA<br />
4…20mA<br />
± 20mA<br />
0…10mA<br />
2…10mA<br />
± 10mA<br />
CUTOFF FREQUENCY<br />
ISOLATION<br />
POWER<br />
TEMPERATURE<br />
< 0.1 %<br />
30HZ/8KHZ<br />
4 kV, 50 Hz, 1min.<br />
<strong>24</strong>…<strong>230</strong> VDC, -15%+10%, 0.9W<br />
<strong>24</strong>…<strong>230</strong> VAC, -15%+10%, 2 VA<br />
-20… + 65 °C<br />
- 4… +145 °F<br />
7 <strong>24</strong>…<strong>230</strong> V AC/DC<br />
8 GND 3<br />
• Using a screwdriver, release the snap fittings of the upper part of the housing on both sides 1.<br />
The upper part of the housing and the electronics can now be pulled out by approximately 3 cm 2.<br />
102704_00_en PHOENIX CONTACT 4
<strong>MCR</strong>-<strong>FL</strong>-C-<strong>UI</strong>/<strong>UI</strong>-B-<strong>DCI</strong>-<strong>24</strong>/<strong>230</strong><br />
Settings<br />
S1<br />
S2<br />
ON<br />
ON<br />
1 2 33<br />
ON ON DIP DIP<br />
1 2 3 4 5 6<br />
1 2 3 4 5 6<br />
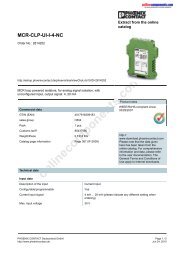
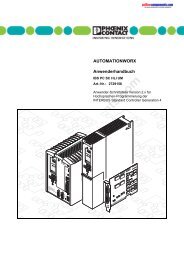
Figure 4<br />
DIP switches<br />
The desired input and output range can be set using DIP switch S1 and DIP switch S2 (see Figure 4) according to the table.<br />
The manufacturer’s module settings are: input ±10 V / output ±10 V.<br />
After each change of the DIP switch settings a ZERO/SPAN <strong>com</strong>pensation ought to be executed (see page 6<br />
and page 7).<br />
Inut Range:<br />
DIP S1<br />
DIP S2<br />
Current/Voltage Signal<br />
1 2 3 1<br />
0…10 V / 0…20 mA off off off CUTOFF<br />
2…10 V / 4…20 mA off off ON frequency<br />
±10 V / ±20 mA ON off off 8 kHz off<br />
0…5 V / 0…10 mA off ON off 30 Hz ON<br />
1…5 V / 2…10 mA off ON ON<br />
±5 V / ±10 mA ON ON off<br />
Output Signal<br />
Range<br />
DIP S2<br />
2 3 4 5 6<br />
online<strong>com</strong>ponents.<strong>com</strong><br />
0…10 V off off off ON ON<br />
2…10 V off off ON ON ON<br />
±10 V off ON off ON ON<br />
0…5 V ON off off ON ON<br />
1…5 V ON off ON ON ON<br />
±5 V ON ON off ON ON<br />
0…20 mA off off off off off<br />
4…20 mA off off ON off off<br />
±20 mA off ON off off off<br />
0…10 mA ON off off off off<br />
2…10 mA ON off ON off off<br />
±10 mA ON ON off off off<br />
102704_00_en PHOENIX CONTACT 5
<strong>MCR</strong>-<strong>FL</strong>-C-<strong>UI</strong>/<strong>UI</strong>-B-<strong>DCI</strong>-<strong>24</strong>/<strong>230</strong><br />
Compensation Instruction for Bipolar Isolation Amplifier for Bipolar Input Signals<br />
(Example: input signal range: ±10 V / output signal range: 0...5 V)<br />
1. Allow a module warm-up time of approx. 2 minutes before the adjustment.<br />
2. Set the required input range using DIP switch S1 (Example: ±10 V).<br />
3. Set the required output range using DIP switch S2 (Example: 0...5 V).<br />
4. Set the lower range value and the upper range value of the input signal, using a calibration source.<br />
(Example: -10 V at terminal point U IN (3) and GND at terminal point GND1; +10 V at terminal point U IN (3) and<br />
GND at terminal point GND1)<br />
5. Note down the output values MW1 and MW2 measured with a digital multimeter.<br />
(Example: result MW1 = 0.7 V; MW2 = 4.5 V, measured between terminal point U OUT (5) and terminal point<br />
GND2)<br />
6. Calculate the full scale <strong>com</strong>pensation point A which must be set using the SPAN potentiometer.<br />
A = (Setpoint output span + MW1 + MW2) / 2<br />
(Example: A = (5 V + 0.7 V + 4.5 V) / 2 = 5.1 V)<br />
7. Apply your required final value on the input side at the input terminal points.<br />
(Example: +10 V at terminal point U IN (3) and GND at terminal point GND1)<br />
8. Set the previously calculated full scale value A using the SPAN potentiometer.<br />
(Example: 5.1 V to be measured between terminal points U OUT (5) and GND2)<br />
9. Adjust the output to your required output final value using the ZERO potentiometer.<br />
(Example: 5.0 V to be measured between terminal points U OUT (5) and GND2)<br />
10. If necessary, repeat points 4. to 9.<br />
Graphical Presentation of the ZERO/SPAN Compensation for Bipolar Input Signals Using an Example<br />
Measured<br />
value (span)<br />
MW 1<br />
Figure 5<br />
Measured values<br />
U OUT [V]<br />
-10 -8 -6 -4 -2 2 4 6 8 10<br />
5<br />
1<br />
online<strong>com</strong>ponents.<strong>com</strong><br />
U OUT [V]<br />
5<br />
Set value<br />
Measured<br />
value (span)<br />
MW 2<br />
U IN [V]<br />
Full scale value set via SPAN<br />
Set value<br />
1<br />
-10 -8 -6 -4 -2 2 4 6 8 10<br />
U IN [V]<br />
Figure 6<br />
SPAN setting to full scale value A<br />
102704_00_en PHOENIX CONTACT 6
<strong>MCR</strong>-<strong>FL</strong>-C-<strong>UI</strong>/<strong>UI</strong>-B-<strong>DCI</strong>-<strong>24</strong>/<strong>230</strong><br />
U OUT [V]<br />
5<br />
Set final value set via ZERO<br />
1<br />
-10 -8 -6 -4 -2 2 4 6 8 10<br />
U IN [V]<br />
Figure 7<br />
ZERO <strong>com</strong>pensation to required set value<br />
Compensation Instructions for Bipolar Isolation Amplifier for Unipolar Input Signals<br />
1. Allow a module warm-up time of approx. 2 minutes before the adjustment.<br />
2. Set your required input range using DIP switch S1 (Example: 2...10 V).<br />
3. Set your required output range using DIP switch S2 (Example: 2...10 V).<br />
4. Set the lower range value of the input signal range using the calibration source.<br />
(Example: +2 V at terminal point U IN (3) and GND at terminal point GND1)<br />
5. Adjust the output to your required input value using the ZERO potentiometer.<br />
(Example: 2 V to be measured between terminal point U OUT (5) and GND2)<br />
6. Set the upper range (full scale) value of the input signal range using the calibration source.<br />
(Example: +10 V and terminal point U IN (3) and GND at terminal point GND1)<br />
7. Adjust the output to your required output final value using the SPAN potentiometer.<br />
(Example: 10 V to be measured between terminal points U OUT (5) and GND2)<br />
8. If necessary, repeat points 4. to 7.<br />
© PHOENIX CONTACT 08/2005<br />
online<strong>com</strong>ponents.<strong>com</strong><br />
102704_00_en PHOENIX CONTACT 7