TR3000 thermostat instructions - TPS Thermal Controls
TR3000 thermostat instructions - TPS Thermal Controls
TR3000 thermostat instructions - TPS Thermal Controls

Create successful ePaper yourself
Turn your PDF publications into a flip-book with our unique Google optimized e-Paper software.
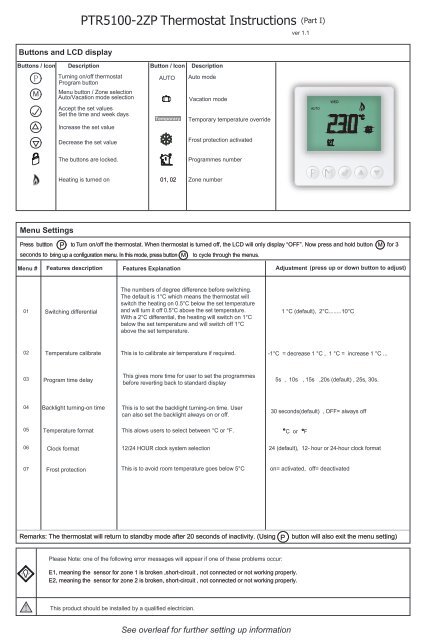
Buttons and LCD display<br />
PTR5100-2ZP Thermostat Instructions<br />
ver 1.1<br />
(Part I)<br />
Buttons / Icon<br />
Description<br />
Button / Icon<br />
Description<br />
P<br />
M<br />
Turning on/off <strong>thermostat</strong><br />
Program button<br />
Menu button / Zone selection<br />
Auto/Vacation mode selection<br />
Accept the set values<br />
Set the time and week days<br />
Increase the set value<br />
AUTO<br />
override<br />
Temporary<br />
Auto mode<br />
Vacation mode<br />
Temporary temperature override<br />
AUTO<br />
WED<br />
Decrease the set value<br />
Frost protection activated<br />
The buttons are locked.<br />
Programmes number<br />
Heating is turned on<br />
01, 02<br />
Zone number<br />
Menu Settings<br />
Press buttton P t o T urn on/o f f the <strong>thermostat</strong>. When <strong>thermostat</strong> is turn ed off, the LCD will only display “OFF”. Now press and hold button M for 3<br />
seconds to bring up a configuration menu. In this mode, press button M to cycle through the menus.<br />
Menu #<br />
Features description Features Explanation Adjustment (press up or down button to adjust)<br />
01<br />
Switching differential<br />
The numbers of degree difference before switching.<br />
The default is 1°C which means the <strong>thermostat</strong> will<br />
switch the heating on 0.5°C below the set temperature<br />
and will turn it off 0.5°C above the set temperature.<br />
With a 2°C differential, the heating will switch on 1°C<br />
below the set temperature and will switch off 1°C<br />
above the set temperature.<br />
1 °C (default), 2°C........10°C<br />
02<br />
Temperature calibrate<br />
This is to calibrate air temperature if required.<br />
-1°C = decrease 1 °C , 1 °C = increase 1 °C ...<br />
03<br />
Program time delay<br />
This gives more time for user to set the programmes<br />
before reverting back to standard display<br />
5s , 10s , 15s ,20s (default) , 25s, 30s.<br />
04<br />
Backlight turning-on time<br />
This is to set the backlight turning-on time. User<br />
can also set the backlight always on or off.<br />
30 seconds(default) , OFF= always off<br />
05<br />
Temperature format<br />
This alows users to select between °C or °F.<br />
C or<br />
F<br />
06<br />
Clock format<br />
12/24 HOUR clock system selection<br />
24 (default), 12- hour or 24-hour clock format<br />
07<br />
Frost protection<br />
This is to avoid room temperature goes below 5°C<br />
on= activated, off= deactivated<br />
Remarks: The <strong>thermostat</strong> will return to standby mode after 20 seconds of inactivity. (Using<br />
P<br />
button will also exit the menu setting)<br />
Please Note: one of the following error messages will appear if one of these problems occur:<br />
E1, meaning the sensor for zone 1 is broken ,short-circuit , not connected or not working properly.<br />
E2, meaning the sensor for zone 2 is broken, short-circuit , not connected or not working properly.<br />
This product should be installed by a qualified electrician.<br />
See overleaf for further setting up information
PTR5100-2ZP Thermostat Instructions (Part II)<br />
Ver 1.1<br />
Alternating the heating zones<br />
In order to alternate between the heating zones (heated areas) you should press and hold the button M. On LCD, there will be zone number displaying. 01 o 02<br />
Note: all settings will only be valid for currently selected zones.<br />
Auto Mode<br />
Press button M to select Auto mode. In Auto mode, the LCD will display “AUTO” on the top left corner.<br />
The <strong>thermostat</strong> executes the preprogrammed schedules in Auto mode.<br />
To adjust these schedules, follow the easy steps below,<br />
Program your <strong>thermostat</strong><br />
1<br />
2<br />
3<br />
4<br />
5<br />
6<br />
7<br />
8<br />
9<br />
10<br />
Press and hold button P for 5 seconds until you see a day flashing. Use up or down button<br />
adjust the day (hold up or down button for 5 seconds to set all days).<br />
Press button to bring up the program 1(<br />
1<br />
P<br />
).Use up or down button to set the start time<br />
(default 07:00).(Hold up or down button to change by 15 minutes each time.)<br />
Press button P again and use up or down button to set the desired temperature to be<br />
maintained for program 1.(default 22 °C)<br />
2<br />
Press button P to bring up the program 2( ). Use up or down button to set the start time<br />
(default 09:30). (Hold up or down button to change by 15 minutes each time.)<br />
Press button P again and use up or down button to set the desired temperature to be<br />
maintained for program 2.(default 16 °C)<br />
3<br />
Press button P to bring up the program 3( ). Use up or down button to set the start time<br />
(default 16:30). (Hold up or down button to change by 15 minutes each time.)<br />
Press button P again and use up or down button to set the desired temperature to be<br />
maintained for program 3.(default 22 °C)<br />
4<br />
Press button P to bring up the program 4( ). Use up or down button to set the start time<br />
(default 22:30). (Hold up or down button to change by 15 minutes each time.)<br />
Press button P again and use up or down button to set the desired temperature to be<br />
maintained for program 4.(default 16 °C)<br />
Press button to accept and exit.<br />
Note: It is faster to program the same schedule for the entire week and then to adjust the<br />
exceptional days.<br />
To erase program 2 and 3 for Saturday and Sunday,see below,<br />
In step 1, select Saturday or Sunday.<br />
In step 4, instead of using up or down button , using button M will erase the time.(--:--).<br />
In step 6, instead of using up or down button , using button M will erase the time.(--:--).<br />
Set the Time and Day<br />
This <strong>thermostat</strong> is fitted with a real time clock. It is essential that the clock time and day<br />
are set accurately if you require your programmed events to start on time. Follow the<br />
below easy steps,<br />
Step 1. Press the button once and the time will flash<br />
Step 2. Use up or down button to change the time (Hold up or down button to change<br />
by 15 minutes each time.)<br />
Step 3. Press button again, the day of the week will flash<br />
Step 4. Use up or down button to change the day of the week<br />
Step 5. Press button again to accept and exit<br />
Resetting factory defaults<br />
Your <strong>thermostat</strong> has the ability to reset all settings to the factory defaults. If you are<br />
certain you want to do this: In standby mode(when <strong>thermostat</strong> is turned off), press<br />
and hold button M and for 5 seconds until “RES” is shown for 5 seconds on LCD.<br />
Lock the buttons<br />
To lock the buttons, press and hold the up and down buttons for 3 seconds until you<br />
see a lock icon appearing, to unlock, repeat the steps above.<br />
Temporary temperature override<br />
In Auto mode, to temporary override the current set temperature,<br />
1. Press up or down button once, the set temperature starts flashing<br />
2. Press up or down button again to adjust the set temperature<br />
3. Press or wait for 5 seconds to confirm the setting with “ Temporary ” shown on LCD<br />
Now your <strong>thermostat</strong> will maintain the new set temperature until the next program.To<br />
cancel the override setting, press and hold button for 5 seconds until “Temporary”<br />
disappear.<br />
Vacation mode<br />
press button M to select vacation mode .<br />
Vacation mode will maintain a set temperature(default 10°C) all the time.<br />
Press up or down button to change the set point and press to accept and exit.<br />
Installation and Wiring<br />
Thermostat is to be mounted on the wall with free air circulation around it. Furthermore<br />
it has to be placed where it is not influenced by any other heating source(e.g.the sun),<br />
draft from doors or windows, or by the temperature of an exterior wall.<br />
Carefully separate the front half of the <strong>thermostat</strong> from the back plate by placing a small<br />
flat head terminal driver into the slots on the bottom face of the <strong>thermostat</strong>.<br />
Carefully unplug the ribbon connector which is plugged in to the front half of the <strong>thermostat</strong>.<br />
Place the <strong>thermostat</strong> front half somewhere safe. Terminate the <strong>thermostat</strong> as shown in the<br />
diagrams below.<br />
Screw the <strong>thermostat</strong> back plate on to the back box<br />
Re-connect the <strong>thermostat</strong> ribbon cable and clip the two halves together.<br />
Note: Load 1 refers to heating element or device in zone 1, and t1(sensor 1) should<br />
be installed in zone 1.<br />
Load 2 refers to heating element or device in zone 2, and t2(sensor 2) should<br />
be installed in zone 2.<br />
Load 1: 8 amp max, resistive<br />
Load 2: 8 amp max, resistive<br />
t1: sensor 1<br />
t2: sensor 2<br />
This product should be installed by<br />
a qualified electrician.