SAS803WHL-7 Thermostat for floor heating - Home :: TPS Thermal ...
SAS803WHL-7 Thermostat for floor heating - Home :: TPS Thermal ...
SAS803WHL-7 Thermostat for floor heating - Home :: TPS Thermal ...

Create successful ePaper yourself
Turn your PDF publications into a flip-book with our unique Google optimized e-Paper software.
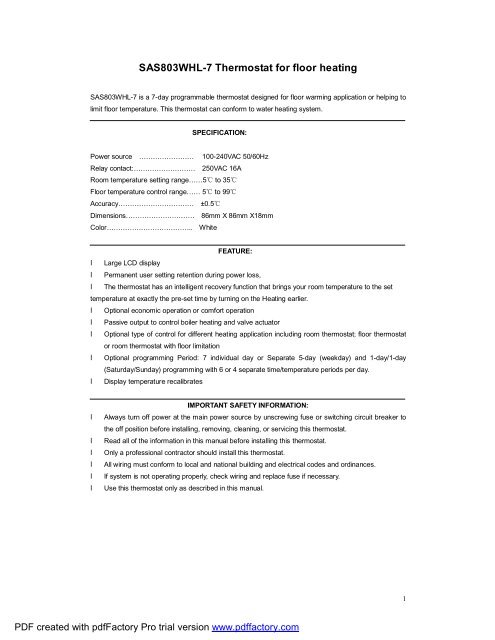
<strong>SAS803WHL</strong>-7 <strong>Thermostat</strong> <strong>for</strong> <strong>floor</strong> <strong>heating</strong><br />
<strong>SAS803WHL</strong>-7 is a 7-day programmable thermostat designed <strong>for</strong> <strong>floor</strong> warming application or helping to<br />
limit <strong>floor</strong> temperature. This thermostat can con<strong>for</strong>m to water <strong>heating</strong> system.<br />
SPECIFICATION:<br />
Power source …………………… 100-240VAC 50/60Hz<br />
Relay contact:……………………… 250VAC 16A<br />
Room temperature setting range……5℃ to 35℃<br />
Floor temperature control range…… 5℃ to 99℃<br />
Accuracy…………………………… ±0.5℃<br />
Dimensions………………………… 86mm X 86mm X18mm<br />
Color……………………………….. White<br />
FEATURE:<br />
• Large LCD display<br />
• Permanent user setting retention during power loss,<br />
• The thermostat has an intelligent recovery function that brings your room temperature to the set<br />
temperature at exactly the pre-set time by turning on the Heating earlier.<br />
• Optional economic operation or com<strong>for</strong>t operation<br />
• Passive output to control boiler <strong>heating</strong> and valve actuator<br />
• Optional type of control <strong>for</strong> different <strong>heating</strong> application including room thermostat; <strong>floor</strong> thermostat<br />
or room thermostat with <strong>floor</strong> limitation<br />
• Optional programming Period: 7 individual day or Separate 5-day (weekday) and 1-day/1-day<br />
(Saturday/Sunday) programming with 6 or 4 separate time/temperature periods per day.<br />
• Display temperature recalibrates<br />
IMPORTANT SAFETY INFORMATION:<br />
• Always turn off power at the main power source by unscrewing fuse or switching circuit breaker to<br />
the off position be<strong>for</strong>e installing, removing, cleaning, or servicing this thermostat.<br />
• Read all of the in<strong>for</strong>mation in this manual be<strong>for</strong>e installing this thermostat.<br />
• Only a professional contractor should install this thermostat.<br />
• All wiring must con<strong>for</strong>m to local and national building and electrical codes and ordinances.<br />
• If system is not operating properly, check wiring and replace fuse if necessary.<br />
• Use this thermostat only as described in this manual.<br />
1<br />
PDF created with pdfFactory Pro trial version www.pdffactory.com
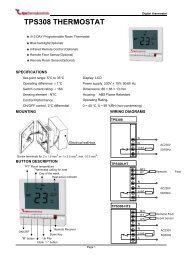
KEYBOARD, DISPLAY AND SWITCH DESCRIOPTION<br />
(6) (7) (8) (9)<br />
(10)<br />
OK<br />
(16)<br />
(15)<br />
(11)<br />
(12)<br />
(13)<br />
(14)<br />
Figure 1 Figure 2<br />
(1) SYSTEM button<br />
(2) Time Clock<br />
(3) Set button<br />
(4) OK button<br />
(5) + Raise temperature setting<br />
- Lower temperature setting<br />
(6) Shows when thermostat is in temporally override mode<br />
(7) Shows current time clock<br />
(8) Shows when thermostat is in program operation<br />
(9) MODE IN Shows when thermostat is in room temperature sensor control mode<br />
MODE OUT Shows when thermostat is configured in <strong>floor</strong> temperature sensor control mode<br />
MODE ALL Shows when thermostat is configure in dual sensor control mode<br />
(10) Shows current room temperature<br />
(11) Lock function<br />
(12) Shows when there is a call <strong>for</strong> <strong>heating</strong><br />
(13) Shows set temperature or time clock<br />
(14) Shows weekdays setting.<br />
(15) Time to get up time to go out in the morning time to go back <strong>for</strong> lunch<br />
Time to go out in the afternoon time to return in the afternoon time to sleep<br />
(16) Press SYSTEM button, Shows system in <strong>heating</strong> mode ; OFF Shows stand-by state.<br />
2<br />
PDF created with pdfFactory Pro trial version www.pdffactory.com
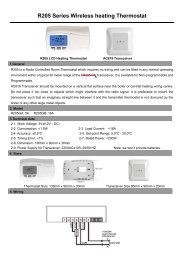
INSTALL THE THERMOSTAT<br />
ATTACH THERMOSTAT BASE TO WALL<br />
1. 2.<br />
3. 4.<br />
Figure 3<br />
1. Remove the packing material from the thermostat. Gently pull the control panel straight off the base.<br />
Forcing or prying on the thermostat will cause damage to the unit. See figure 3-2.<br />
2. The <strong>floor</strong> sensor cable must be installed to terminal block. (See figure 4 ) in <strong>heating</strong> type F or RF,<br />
3. Connect wires beneath terminal screws on power base using appropriate wiring schematic. See figure<br />
3-3.<br />
4. Push power base into conduit box. See figure 3-4.<br />
5. Using two mounting screws mount the power base to the wall. Place a level against bottom of base,<br />
adjust until level, and then tighten screws. (Leveling is <strong>for</strong> appearance only and will not affect thermostat<br />
operation.)<br />
6. Replace control panel on the power base by snapping it in place. See figure 3-4.<br />
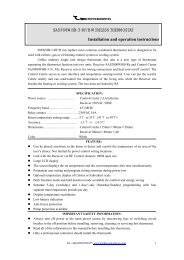
WIRING DIAGRAM<br />
Figure 4<br />
Attention :<br />
N: Neutral Wire ; L: Live Wire.<br />
Item 1-2: Connected with sensor (NTC100K). Item 3-4: Connected with <strong>heating</strong> boiler<br />
Item 5-6: Connected with power. Item 7: Connected with valve actuator.<br />
3<br />
PDF created with pdfFactory Pro trial version www.pdffactory.com
OPERATION<br />
1. Configuration Menu<br />
The configuration menu allows you to set certain thermostat operating characteristics to your system or<br />
personal requirements. When the dlisplay shows OFF stand-by state, Hold button SET <strong>for</strong> 3 seconds to enter<br />
the configuration menu. The display will show the first item in the configuration menu. Press SET button to<br />
shift to the next menu item. Use + or - to select. To exit the menu, press OK button. If no button is pressed<br />
within 20 seconds, the thermostat will exit the configuration menu.<br />
Press<br />
Item<br />
buttons<br />
1 SET<br />
3 sec.<br />
Displayed<br />
Press + or - to select Descriptions<br />
(factory default)<br />
Select temperature display adjustment higher or<br />
CL ( 0 ) -6.0 --- +6.0<br />
lower<br />
2 SET AH(35℃) 20℃—90℃ Select maximum room setting temperature<br />
3 SET AL(5℃) 5℃—20℃ Select minimum room setting temperature<br />
4 SET FH(40℃) 20℃-99℃ Select minimum <strong>floor</strong> temperature limitation<br />
5 SET FL(5℃) 5℃—20℃ Select maximum <strong>floor</strong> temperature limitation<br />
6 SET SEN(ALL); ALL/IN /OUT Temperature control mode option:<br />
ALL:Room sensor with <strong>floor</strong> limiter sensor control<br />
mode.<br />
IN:Room sensor control mode<br />
OUT:Floor sensor control mode.<br />
7 SET BL(2) 1/2/3 Select display backlight mode<br />
1. light off ; 2. light on ; 3. Keep lighting.<br />
8 SET CH(FA) FA/SL Select fast <strong>heating</strong> or slow <strong>heating</strong><br />
9 SET PS1( 7) 7/3/2/0 Programming day in one week option<br />
10 SET PS2(6) 6/4 Programming period per day option<br />
11 SET OC(24) 12/24 Selection of time scale<br />
12 SET ES(OFF) ON/OFF Intelligent Recovery Option<br />
The configuration menu chart summarizes the configuration options. An explanation of each option as<br />
follows:<br />
1) Select temperature recalibrates adjustment 6LO to 6 HI –<br />
You can adjust the room temperature display up to 6 higher or lower. Your thermostat was accurately<br />
calibrated at the factory but you have the option to change the display temperature to match your previous<br />
thermostat. The current or adjusted room temperature will be displayed on the right side of the display.<br />
2) Select maximum set point<br />
For room sensor control mode, This feature provides a maximum set point temperature <strong>for</strong> room setting.<br />
The default setting is 35℃, It can be changed between 20℃ to 90℃.<br />
3) Select minimum set point<br />
For room sensor control mode,This feature provides a mixnimum set point temperature <strong>for</strong> room setting.<br />
The default setting is 5℃, It can be changed between 5℃ to 20℃.<br />
4) Select minimum <strong>floor</strong> temperature limitation<br />
Press + or - to select you desire maximum <strong>floor</strong> temperature limitation. It can be changed between<br />
20℃-99℃,factory default setting is 40 ℃ . If <strong>floor</strong> temperature over the limitation, then stop output work.<br />
5) Select maximum <strong>floor</strong> temperature limitation<br />
4<br />
PDF created with pdfFactory Pro trial version www.pdffactory.com
Press + or - to select you desire minimum <strong>floor</strong> temperature limitation. It can be changed between<br />
5℃-20℃,factory default setting is 5℃.<br />
6) Select Type of <strong>heating</strong>.<br />
There are 3 temperature control modes: Mode ALL, Mode IN and Mode OUT.<br />
Mode ALL is room sensor with <strong>floor</strong> limiter sensor control mode.<br />
Assuming that the <strong>floor</strong> temperature is below the maximum <strong>floor</strong> temperature limit, the <strong>heating</strong> should<br />
begin to operate if the set temperature is 1℃ or 2℉ higher than the actual room temperature. If the <strong>floor</strong><br />
temperature is above the upper <strong>floor</strong> limit, the thermostat will shut off <strong>heating</strong>. High temperature warning<br />
lights is flashing,display is showing “HI”<br />
Mode IN is room sensor control mode.<br />
Press + to adjust thermostat setting above room temperature 1 ℃ or 2 ℉ . The <strong>heating</strong> should begin to<br />
operate immediately.<br />
Mode OUT is Floor sensor control mode.<br />
Press + to adjust thermostat setting above <strong>floor</strong> temperature 1 ℃ or 2 ℉ . The <strong>heating</strong> should begin to<br />
operate immediately.<br />
7) Select display backlight mode<br />
The display backlight improves display contrast in low lighting conditions. Factory default is 2.<br />
Select 1 the display will keep the light off.<br />
Select 2 the light will be on when any button of the thermostat is touched.<br />
Select 3 the display will keep the light on continuously.<br />
8) Select fast <strong>heating</strong> or slow <strong>heating</strong><br />
Select FA to start <strong>heating</strong> immediately when the set point is 1 ℃ above the room temperature.<br />
Select SL to start <strong>heating</strong> only when the set point is 3 ℃ above the room temperature.<br />
9) Programming day in one week option<br />
There are 2 options <strong>for</strong> how to program the day in one week.<br />
7: You can program in 7 individual days<br />
3: You can program in 5 weekday and 1Saturday and 1Sunday.<br />
2: You can program in 5 weekday and 1 day mode, both the same setting on Saturday and Sunday.<br />
0: Non-programmable.<br />
10) 4 or 6 period per day program option<br />
There are 2 option <strong>for</strong> how to program the period in one day<br />
P4: You can program 4 period per day<br />
P6: You can program 6 period per day<br />
11)Select displayed clock <strong>for</strong>mat<br />
Select 24h. Display will show 24-hour clock time<br />
Select 12h. Display will show 12-hour clock time<br />
(12) Intelligent Recovery Option<br />
The thermostat has an intelligent recovery function that brings your room temperature to the set<br />
temperature at exactly the pre-set time by turning on the Heating earlier.<br />
Select ON to activate the intelligent recovery function,. In configuration ES mode, the thermostat is start<br />
<strong>heating</strong> 5days in advance.<br />
Select OFF to deactivate the intelligent recovery function.<br />
Such as from Monday start <strong>heating</strong>:<br />
Heating program setting as following:<br />
5<br />
PDF created with pdfFactory Pro trial version www.pdffactory.com
Time Temp Time Temp Time Temp Time Temp Time Temp Time Temp<br />
1 6:00 27℃ 22:00 18℃<br />
2 6:00 27℃ 22:00 18℃<br />
3 6:00 27℃ 22:00 18℃<br />
4 6:00 27℃ 22:00 18℃<br />
5 6:00 27℃ 22:00 18℃<br />
6 6:00 27℃ 22:00 18℃<br />
7 6:00 27℃ 22:00 18℃<br />
Program Running:<br />
DAY Time Setting<br />
Room<br />
Schedule<br />
Schedule<br />
The first<br />
ITEM<br />
Advanced Time<br />
Temp<br />
Temp<br />
Time arrival<br />
Temp arrival<br />
<strong>heating</strong><br />
calculation<br />
when stopped<br />
1 Be<strong>for</strong>e<br />
6:00<br />
2 Be<strong>for</strong>e<br />
5:44<br />
3 Be<strong>for</strong>e<br />
5:40<br />
4 Be<strong>for</strong>e<br />
5:39<br />
5 Be<strong>for</strong>e<br />
5:46<br />
6 Be<strong>for</strong>e<br />
5:47<br />
7 Be<strong>for</strong>e<br />
5:50<br />
15℃ 25℃ 6:00 27℃ Take 40 min’ TIME 1<br />
15℃ 5:44 27℃ Take 30 min’ TIME 2 TIME 2=<br />
TIME 1×0.4<br />
15℃ 5:40 27℃ Take 18 min’ TIME 3 TIME 3=<br />
TIME 1×0.2+<br />
TIME 2×0.4<br />
15℃ 5:39 27.5℃ 0 TIME 4 TIME 4=<br />
TIME 1×0.2+<br />
TIME 2×0.2+<br />
TIME 3×0.4+<br />
15℃ 5:46 27℃ Take 5 min’ TIME 5 TIME 5=<br />
TIME1×0.1+<br />
TIME2×0.2+<br />
TIME3×0.2+<br />
TIME4×0.4<br />
15℃ 5:47 27℃ Take 10 min’ TIME 6 TIME 6=<br />
TIME1×0.1+<br />
TIME2×0.1+<br />
TIME3×0.2+<br />
TIME4×0.2+<br />
TIME5×0.4<br />
15℃ 5:50 27℃ Take 10 min’ TIME 7 TIME 7=<br />
TIME2×0.1+<br />
TIME3×0.1+<br />
TIME4×0.2+<br />
TIME5×0.2+<br />
TIME6×0.4<br />
6<br />
PDF created with pdfFactory Pro trial version www.pdffactory.com
2. Manual Operation<br />
1) Set current day and time<br />
a) Press SET button once again. The display will only show minutes flashing<br />
b) Press and hold either +、- until you reach the correct minutes<br />
c) Press SET button. The display will show the hour flashing.<br />
d) Press and hold either +、- until you reach the correct hour<br />
e) Press SET button once again. The display will show the day of the week flashing.<br />
Press +、- until you reach the correct day of the week<br />
Press button OK button once. The display will show the correct day of the week and the time.<br />
If no keys are pressed within 20 seconds, the thermostat will revert to program operation.<br />
2) Permanent hold temperature setting<br />
When thermostat is in program operation, hold OK button <strong>for</strong> 3 second to change to<br />
permanent hold temperature setting. Shows simultaneously indicate permanent<br />
hold operation. Press +、-to change set temperature. The thermostat will permanent<br />
hold the room temperature at the selected setting until you press OK button to restart the<br />
program operation. □P Shows when thermostat is in program operation.<br />
3) Temporary hold temperature<br />
When thermostat is in program operation, press +、- to check current set temperature.<br />
Blink digit means set temperature. If the set point is your desired temperature, just push<br />
OK button to revert to program operation. If the set point is not your desired temperature,<br />
press +、- to temporary change the set point.<br />
shows in temporary<br />
temperature override. The thermostat will override the current programming setting and<br />
keep the room temperature at the selected temperature until the next program period<br />
begins. Then the thermostat will automatically revert to the program operation.<br />
4) Vacation Temperature hold<br />
Continue pressing button SET over 3 seconds until display shows , when<br />
unit is active it displays a number in the top right corner, by pressing set it ranges<br />
from 01-99 . It means the thermostat is in Vacation hold mode. Display shows count<br />
back day and set point alternately. Use + or - to adjust number of the days (from 1 to<br />
99 days) when display showing count back day and adjust the setting temperature<br />
when display showing the set temperature. <strong>Thermostat</strong> will revert to program<br />
operation when count back day expires or when OK button is pressed anytime in<br />
vacation mode。<br />
5) Reset operation<br />
If the display is abnormal, Long press the OK button .When display shows “dEF” blinking several times,<br />
This will reset the thermostat to factory default setting.<br />
6) Planning your program<br />
Look at the factory preprogrammed times and temperatures shown in the sample schedule. If this<br />
program will suit your needs, simply press the SET button to begin running the factory preset program.<br />
If you want to change the preprogrammed time and temperature, follow these steps.<br />
Determine the times period and temperature <strong>for</strong> your program. You can set program <strong>for</strong> 7 individual day<br />
or 5 workday and 1 Saturday and 1 Sunday. (See configuration menu item 9)<br />
Use the table to plan your program time periods and the temperatures you want during each period. Fill<br />
in the complete table to have a record of your program.<br />
7<br />
PDF created with pdfFactory Pro trial version www.pdffactory.com
7) Lock Function<br />
Long press + & - switchs <strong>for</strong> 3 seconds simultaneously, the display will shows<br />
in it.<br />
It means locking . Anyone can’t amend the setting.<br />
Press +& - again, the display is unlocking.<br />
8) Inquiry about <strong>floor</strong> temperature<br />
This feature is only available in MODE ALL. When system mode is in OFF.<br />
Hold button <strong>for</strong> 5 seconds, the thermostat will display <strong>floor</strong> temperature. Pressing OK<br />
button to revert to program operation with room temperature shown in the display. If no key<br />
is pressed after inquiry about <strong>floor</strong> temperature <strong>for</strong> 20 seconds, the display will be changed<br />
from showing <strong>floor</strong> temperature to show room temperature.<br />
按 键 锁<br />
Samples Heating Schedule Plan <strong>for</strong> 7 individual day; 6 period per day<br />
(Factory default program setting)<br />
All 7<br />
days<br />
Time Temp Time Temp Time Temp Time Temp Time Temp Time Temp<br />
6:00 21℃ 8:00 16.5℃ 12:00 21℃ 14:00 16.5℃ 18:00 21℃ 22:00 16.5℃<br />
Heating Schedule Plan<br />
1<br />
2<br />
3<br />
4<br />
5<br />
6<br />
7<br />
Time Temp Time Temp Time Temp Time Temp Time Temp Time Temp<br />
Enter 7 days Heating Program<br />
1).Hold SET <strong>for</strong> 3 seconds. 1 flashing (indicating you are now planning Monday program) with other 2 3 4<br />
5 6 7 lighted in the display. If the display shows 1 2 3 4 5 flashing, it indicates that the 5-day program will be<br />
modified. You selected a 5+1+1 day program mode be<strong>for</strong>e. (See configuration menu item 9).<br />
2).Press +、- to change the day you about to make program.<br />
3).Press SET button again, the selected day <strong>for</strong> programming will be shown.. Also be displayed are the<br />
currently programmed start times (flashing)<strong>for</strong> the 1st <strong>heating</strong> period and the currently programmed<br />
temperature, icon indicates 1 st program period (Get up) setting。<br />
4).Press +、- until your selected time appears. The time will change in 15-minute increments.<br />
5).Press SET button, the programmed temperature will flash, press +、- until your selected<br />
temperature appears.<br />
6).Press SET button,icon indicates 2 nd program period(Go out)setting. The currently<br />
programmed start time and set point temperature <strong>for</strong> the 2nd <strong>heating</strong> program period will be shown. Repeat<br />
8<br />
PDF created with pdfFactory Pro trial version www.pdffactory.com
step 4 and 5 to select the start time and <strong>heating</strong> temperature <strong>for</strong> the 2nd <strong>heating</strong> program period.<br />
7).Press SET button. Repeat steps 4 through 6 to set the 3rd;4th;5th;6th <strong>heating</strong> program. If you have<br />
only 4-period programming per day, you might have configured 4-period per day option. (See configuration<br />
menu item 10)<br />
8).After you finish the whole day period programming, still press SET button, the day next to the just<br />
programmed day will flash with other 6 days lightening in the display. If the display shows 6 7 flashing with 1 2<br />
3 4 5 lightening in the display, you might selected the 5+1+1 day program mode be<strong>for</strong>e. (See configuration<br />
menu item 9).<br />
9). Repeat 2)~8) to complete the all days of the week programming.<br />
10).When you have completed entering your <strong>heating</strong> program, pressing OK to revert to program<br />
operation.<br />
REVERT TO FACTORY DEFAULT PROGRAM SETTING<br />
Long Press OK button 3 seconds, this will reset the thermostat to factory default setting.<br />
Error Code<br />
LO flashing in the display: Below lowest limitation temperature is detectived by <strong>floor</strong> sensor in MODE OUT or<br />
ALL. <strong>Thermostat</strong> turn on <strong>heating</strong> system until the <strong>floor</strong> temperature is over lowest limitation.<br />
HI Over high limitation temperature is detectived by <strong>floor</strong> sensor in MODE OUT or ALL. <strong>Thermostat</strong> shut<br />
down all output<br />
Err flashing in the display:<br />
MODE OUT / MODE ALL:<br />
1) Floor sensor not installed or broken in MODE OUT or ALL.<strong>Thermostat</strong> shut down all output.<br />
2) Floor sensor short cut. <strong>Thermostat</strong> shut down all output<br />
MODE IN:<br />
1) Room sensor short circuit. <strong>Thermostat</strong> shut down all output<br />
2) Room sensor broken. <strong>Thermostat</strong> shut down all output.<br />
CUSTOMER ASSISTANCE<br />
After reading this guide, if you have any question about the operation of your thermostat, please contact your<br />
installer or Energy Utility company or service provider. <strong>floor</strong> temperature to room temperature.<br />
9<br />
PDF created with pdfFactory Pro trial version www.pdffactory.com